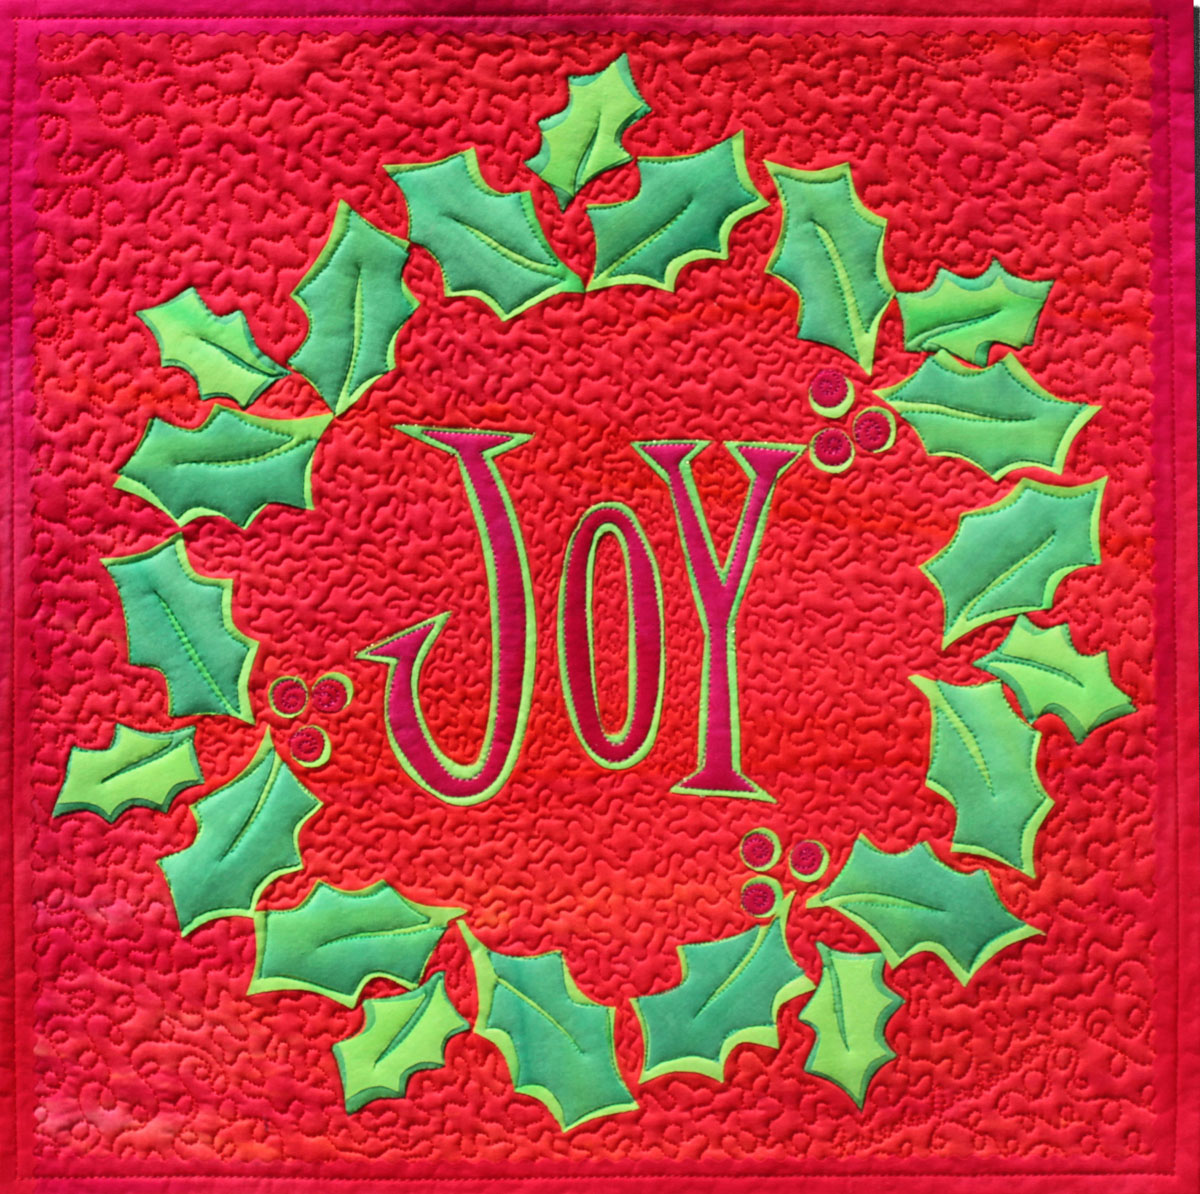
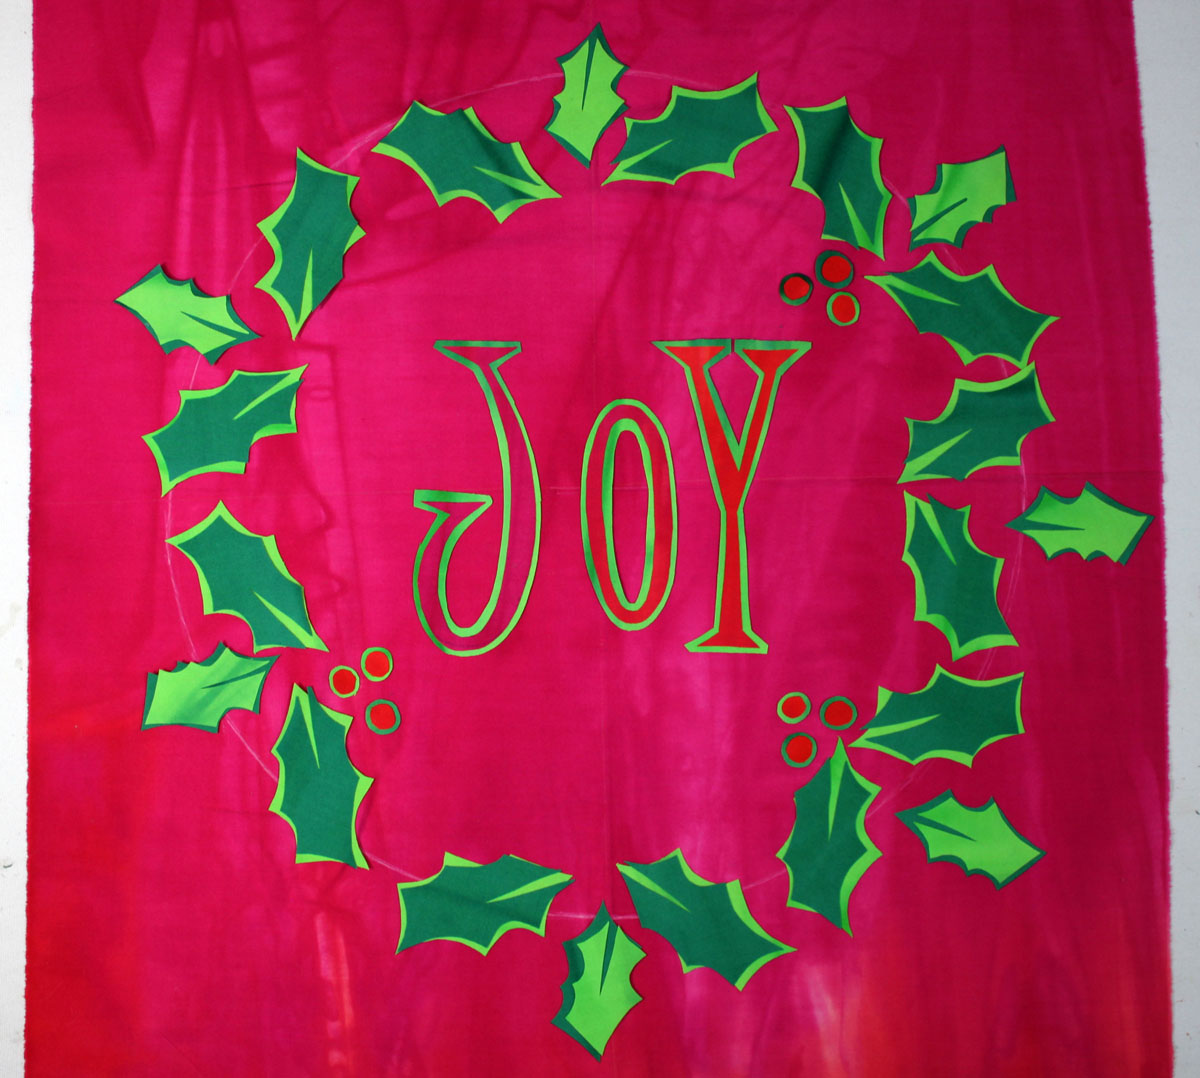
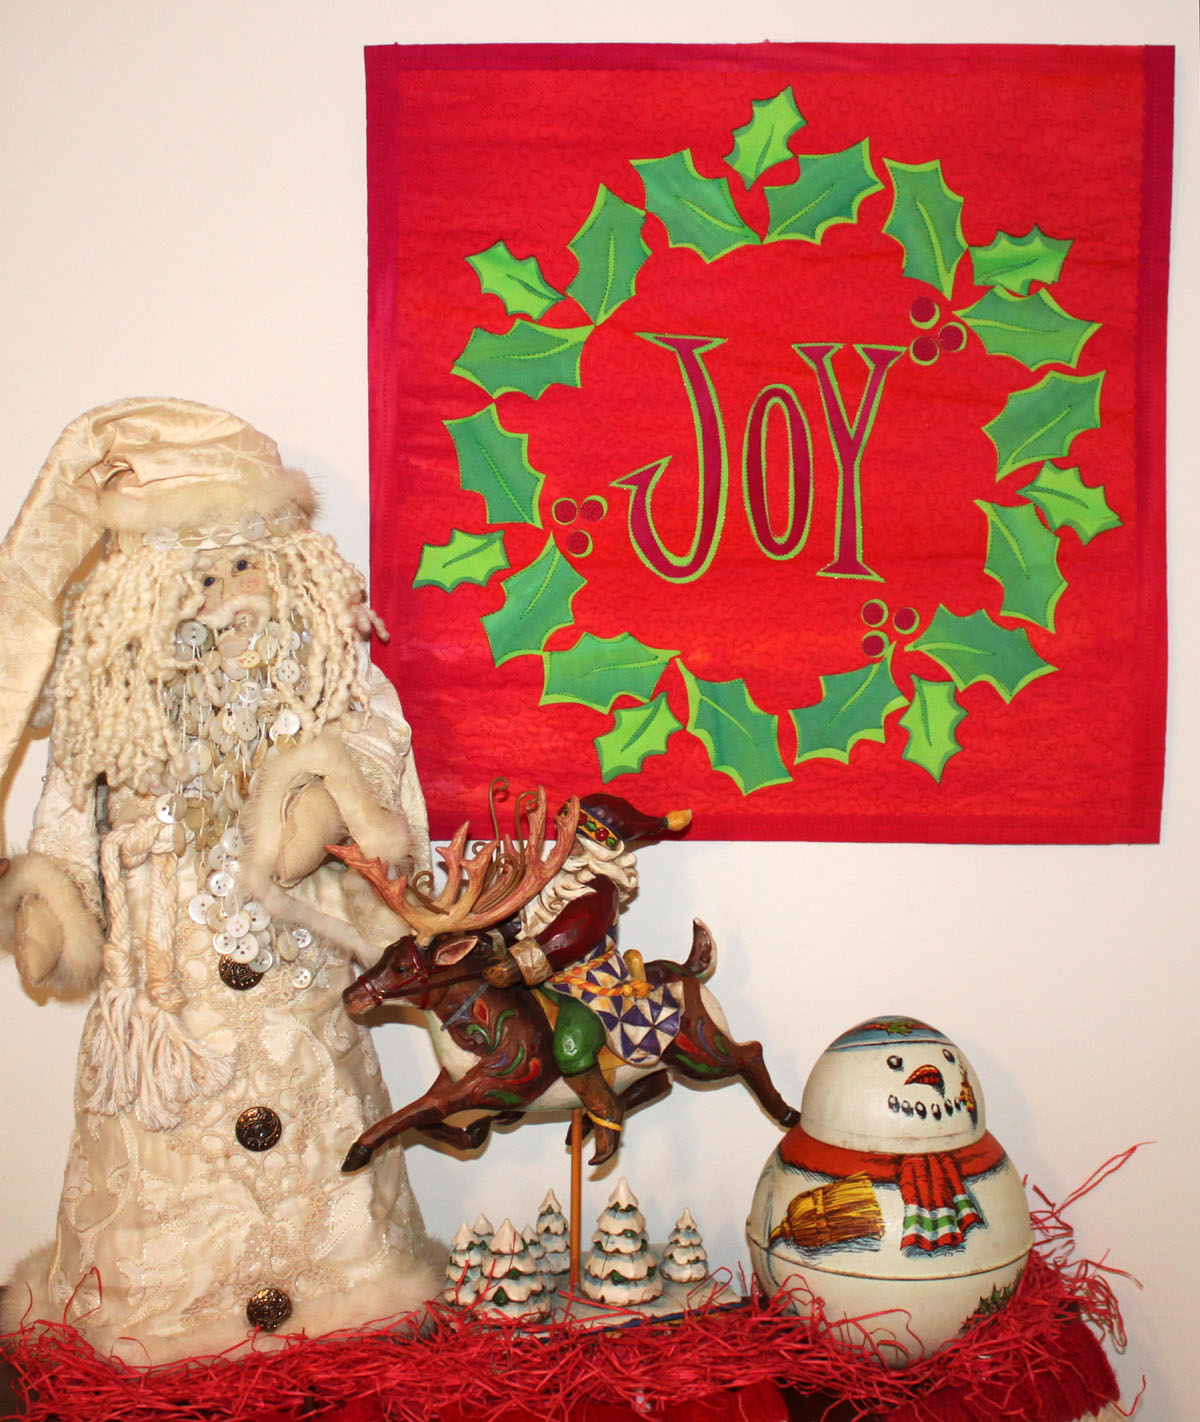
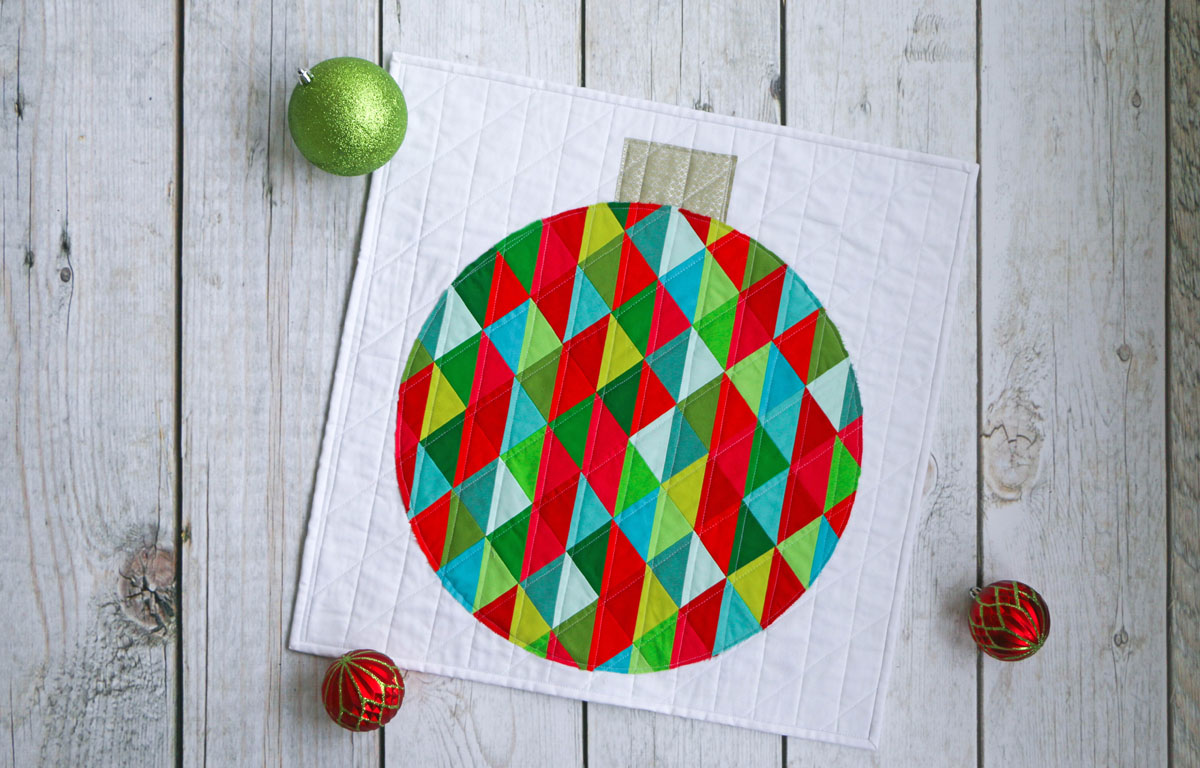
JOY Fused Art Mini Quilt
Make this fused art quilt from Frieda Anderson with bright colored fabric for the holidays. No need to satin stitch the outline of any of the pieces. This is a piece of ART and will never be washed. The following directions are for making the JOY a Holiday Moments design. The finished quilt will measure 16″ x 16″.
Materials:
- A – background for Joy, a fat quarter yard of red fabric
- B – a fat quarter each of dark green and light green fabric– accent fabrics
- C – a fat quarter of red fabric for the fused binding JOY letters and the berries
- 20″ x 20″ piece of batting
- A fat quarter yard of backing fabric for the quilt
- 2 yards of fusible web (I prefer Wonder Under it says #805 on the end of the bolt)
- Rotary cutter, mat, and ruler and a pinking decorative blade for a 45mm rotary cutter handle
- Sharp embroidery scissors
- Mechanical pencil
- Sharpie extra fine permanent marker
- Iron
- JOY Quilt Pattern
Tips for the JOY Fused Art Mini Quilt:
You will use your rotary cutter decorative blades more if they are in their own handles.
Turn your rotary mat over to the back side when using a decorative blade as the blade can scar your mat.
Always cut out fused shapes without release paper on them to get clean crisp edges.
Basic Fusing: Please read this first.
- Prewash all of your fabrics and then iron the fabric with steam to remove the wrinkles.
- Apply fusible web to the back of your fabrics with a hot dry iron.
- Let the fusible web cool and then remove the release paper as you work with each piece of fabric.
- Keep the release paper intact so that you can reuse it to transfer designs from the pattern to the back of the fused fabric. You will also rebuild some design elements on top of release paper and then put them on the quilt top as a whole unit.
- If you tear or lose your release paper, you can always use parchment paper to transfer your designs.
- To transfer designs from the pattern to the back of the fused fabric, place the release paper over the pattern and trace the shape of the design using either a mechanical pencil or black sharpie marker. Place the marker or pencil side of the drawing against the fused side of the fabric and either a) rub the pencil tracing with your fingernail or b) heat with a hot dry iron the pencil/marker line. The markings should transfer to the fused fabric. Remove the release paper and cut out the design right on or just inside the transferred line with a sharp rotary cutter or a pair of sharp scissors.
- I use a pencil when I am working with light colored fabrics so that the pencil line will not show through the fabric. But with dark colored fabrics, you have to use a sharpie marker to be able to see the line. Be sure and cover any exposed fused fabric with an extra piece of release paper when you are using a hot iron so that the fusible does not attach to the iron and your iron stays clean.
- Tack fusing is lightly ironing fabric together just enough to heat them to stay together. Don’t press too hard or you will over fuse the fabric.
Fusing your fabrics:
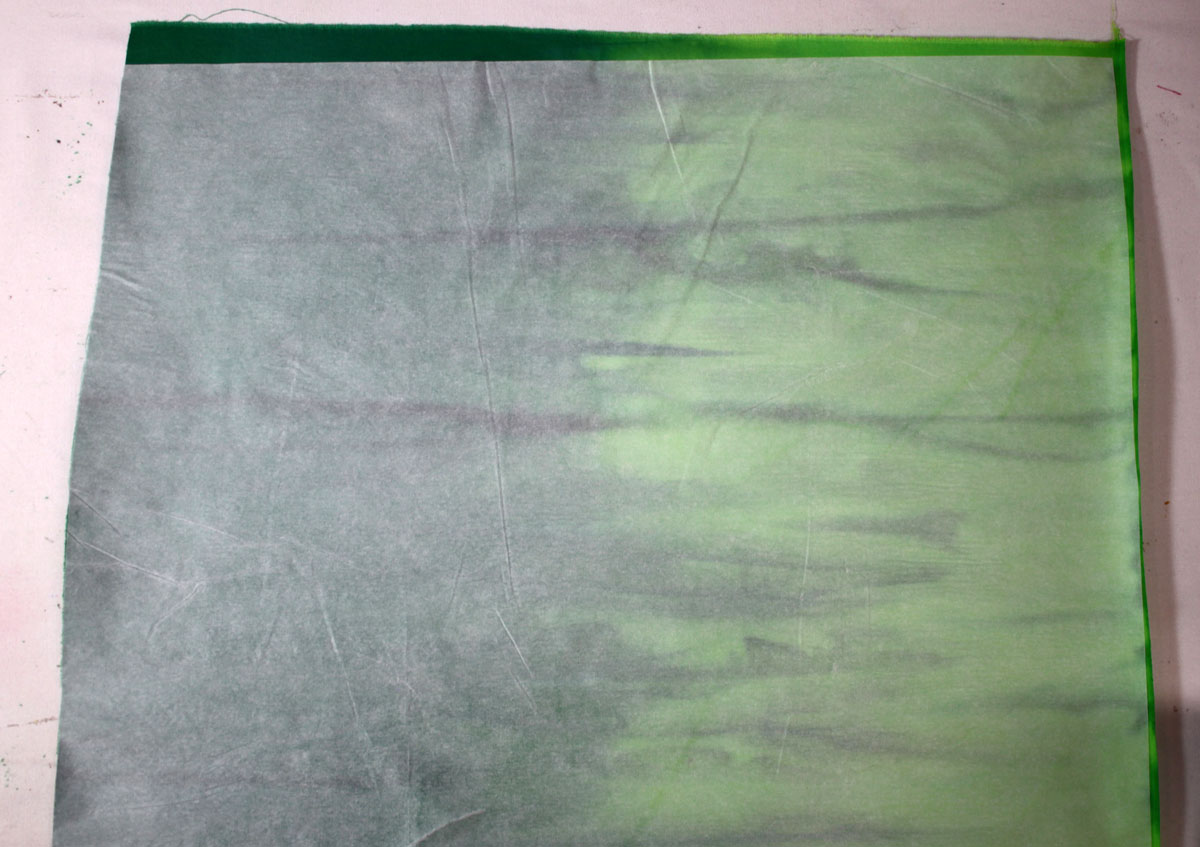
1. Before you begin, steam press all of your fabrics and batting to remove any wrinkles or creases. Then turn off the steam and use a hot dry iron to apply the fusible web to the green fabrics.
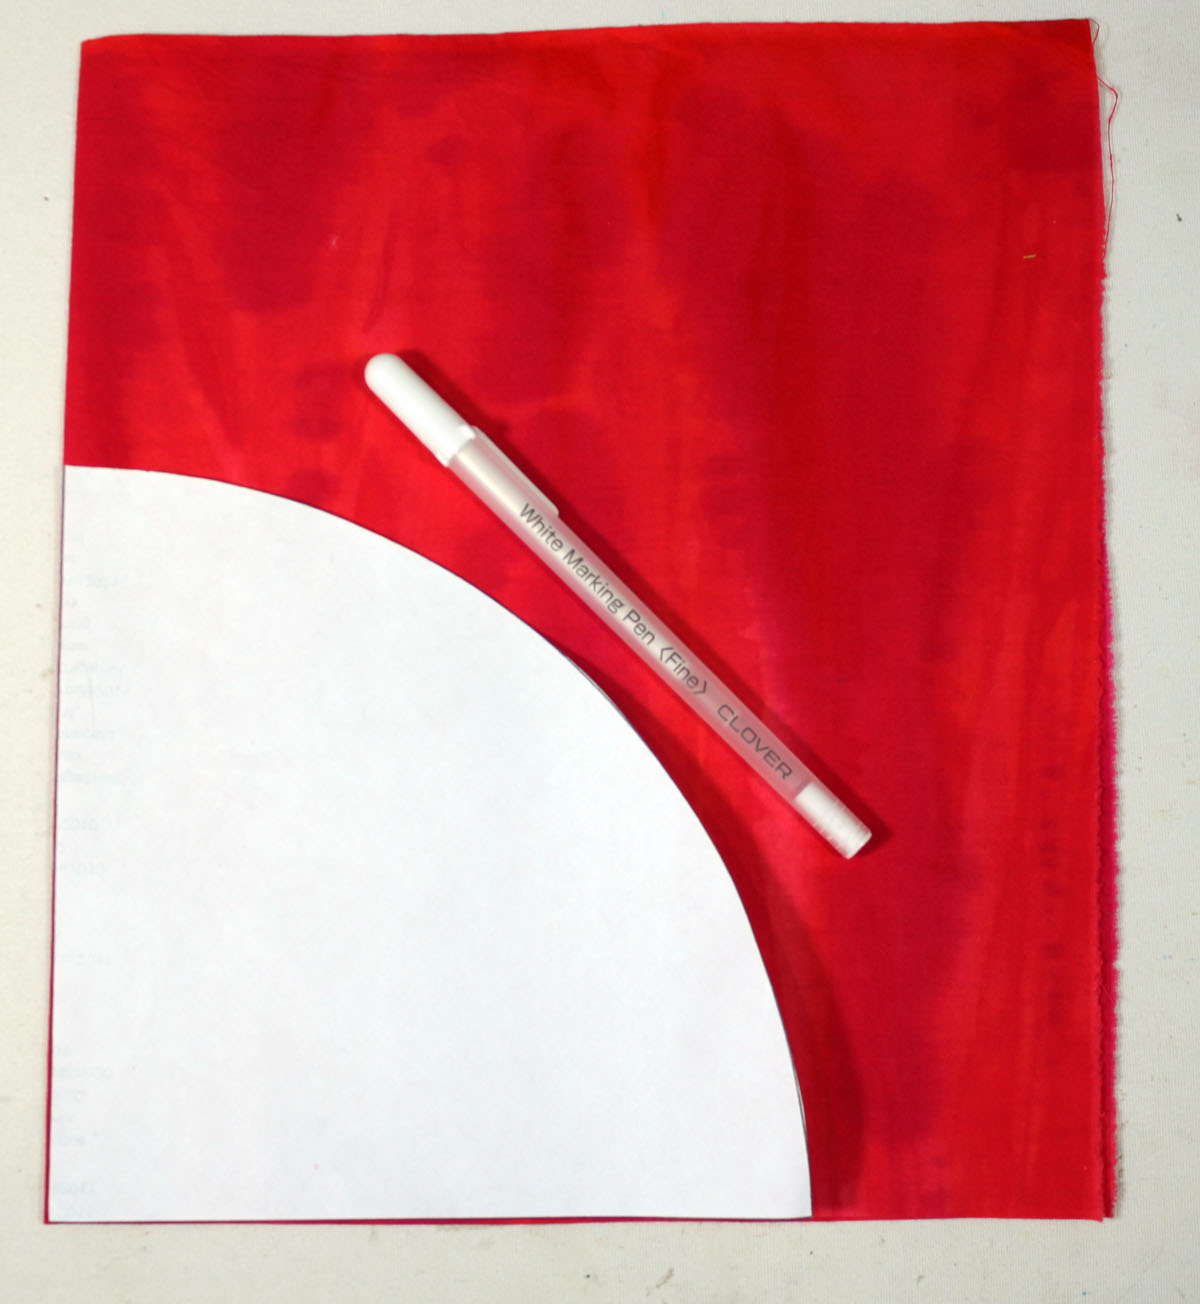
2. Cut your red background fabric 17″ x 17″. You do not need to add fusible web to this fabric. Cut out the ¼ circle shape from the paper pattern. Fold your background fabric in half once and then fold in half again to find the center. Crease with a hot dry iron. Place the ¼ circle shape in the center of this creased X and mark the outside curve with a chalk pencil. Mark it four times to create a complete circle in the center of your background fabric. You will use this as a guide to place your design elements on the background fabric.
3. Apply fusible web to the back side of your accent fabrics – red for the berries, letters and binding, and two shades of green for the leaves and shadow behind the JOY and berries.
To apply the fusible web, use a hot dry iron with the tacky side of the fusible web against the back side of the fabric.
Let the fabric and fusible web cool, then peel away the release paper (release paper is the paper that the wonder under fusible web sits on). Whenever cutting out a shape, be sure and remove the paper first before cutting.
3. Keep this release paper intact because you will be using it throughout the process of creating your JOY piece. (If the release paper rips you can always use parchment paper in place of the release paper.)
4. Layer the whole batting unit with backing fabric, pressing it together to get a nice smooth sandwich. Set this aside.
Making the leaf design shapes on the center of JOY:
1. Place a piece of release paper (or parchment paper) from the fused accent fabric over your design elements on the paper pattern and trace with a pencil or sharpie marker the design you will be cutting out.
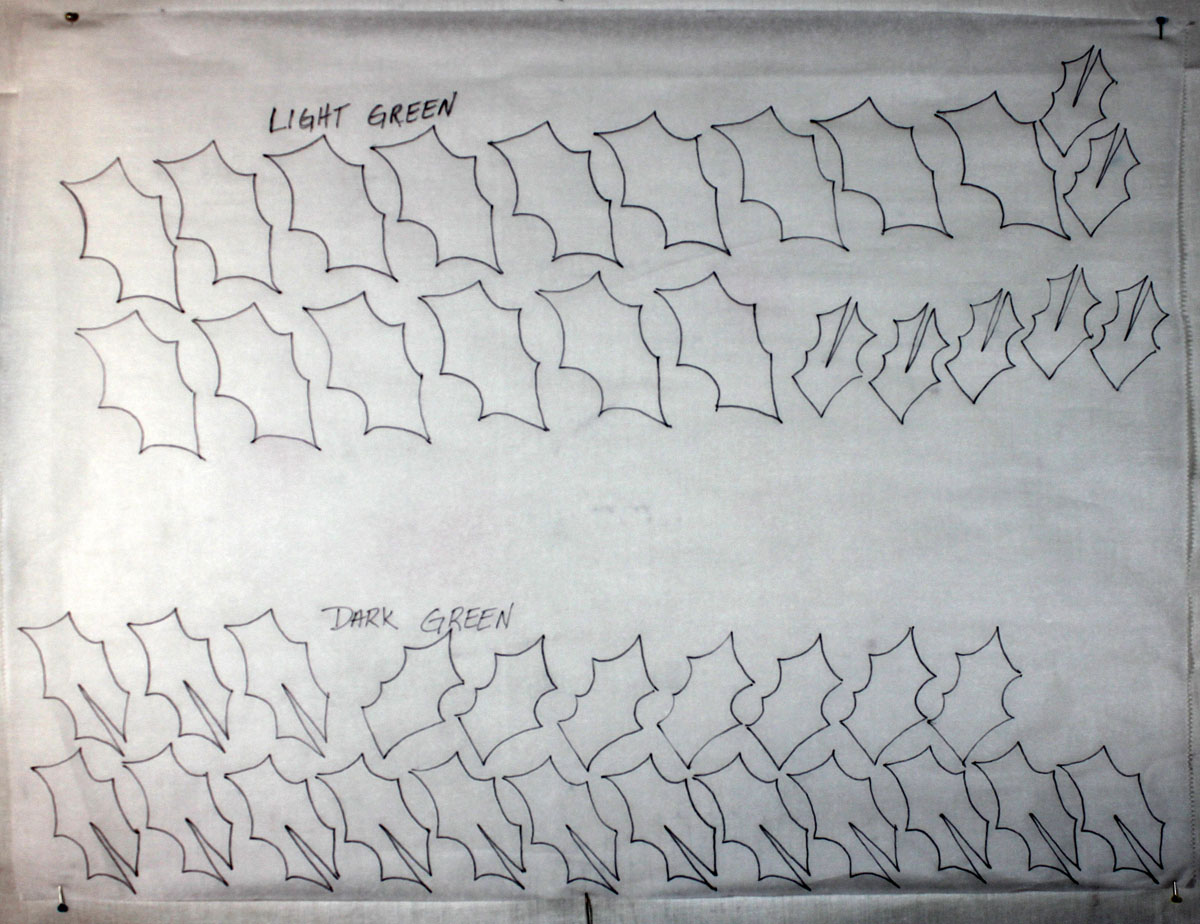
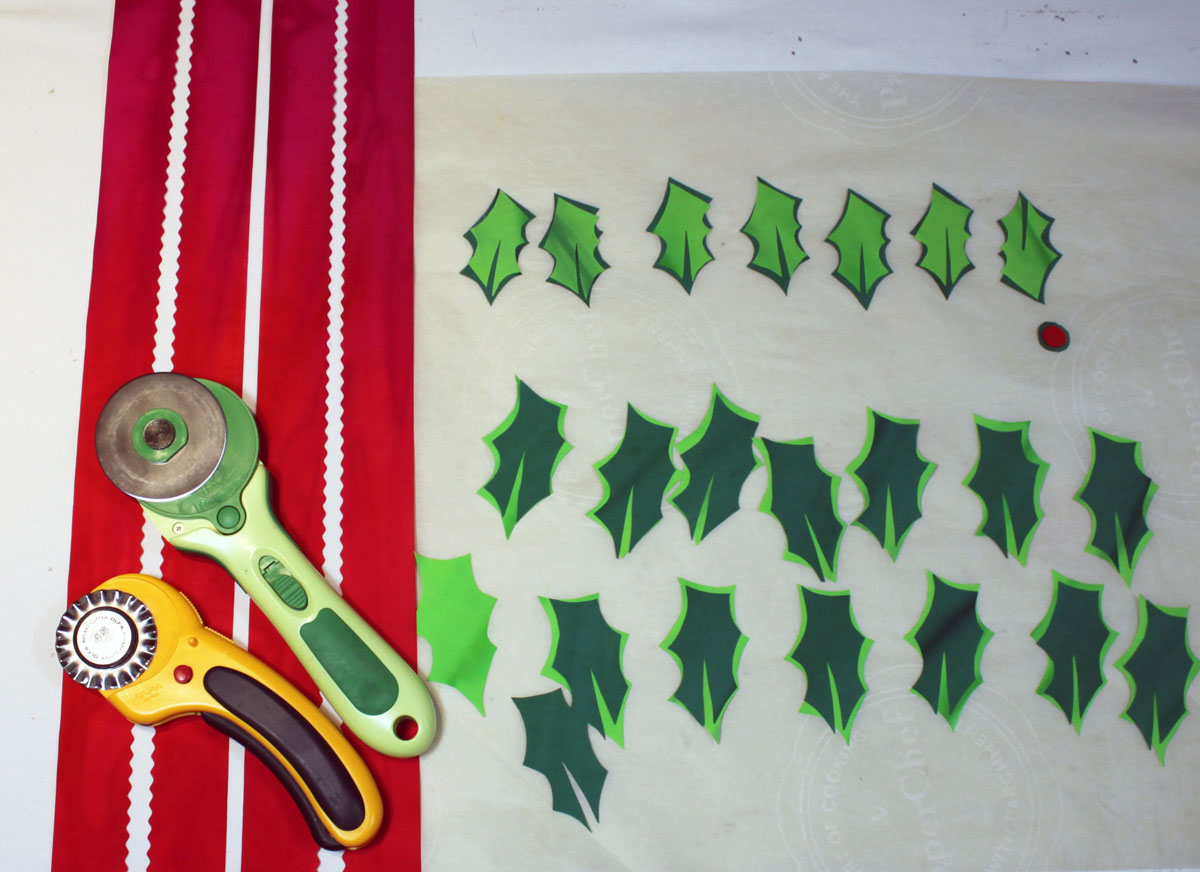
2. For JOY trace the tiny 1, tiny 2, little, and big leaf shapes on separate pieces of release paper. You will trace 14 big leaf shapes out of light green fabric, 14 little leaf shapes out of darker green fabric, and 7 each tiny leaf shapes out of light and dark green fabric.
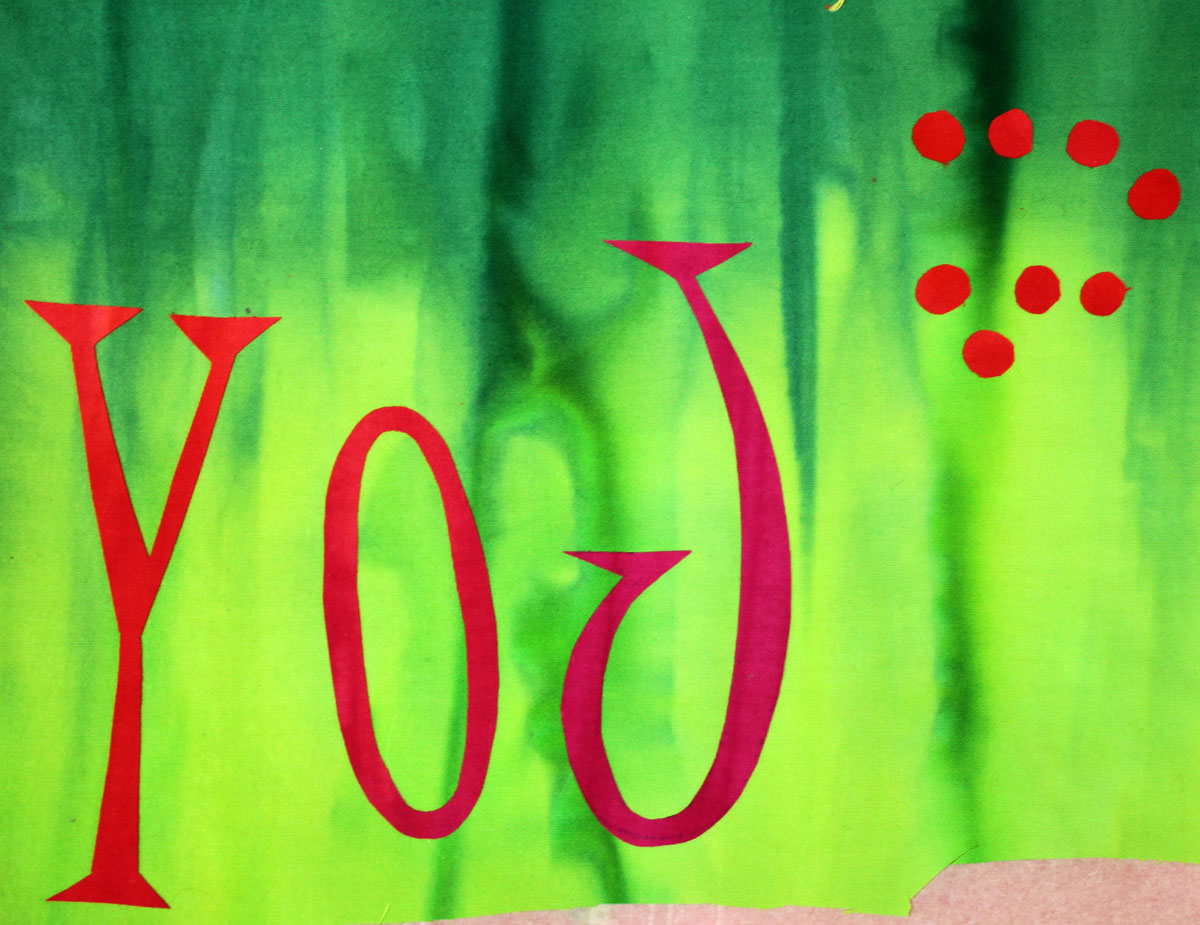
3. Place the release paper tracing side down against the fused side of your accent fabric and press with a hot dry iron to transfer the traced shapes to the fused fabric. Do the same for the letters for JOY and transfer to red fabric. Be careful not to let the iron touch uncovered fused fabric. The tracing should transfer to the back of the fused fabric.


4. Use very sharp small scissors to cut out your shapes.
5. Place the light large leaf shapes back on a piece of release paper and tack fuse them down to the paper. Place the light small leaf shapes on the release paper and tack fuse these in place. (Tack fusing is lightly fusing with a hot dry iron.) Note: If you are unsure how long to press, practice first on a test piece. You do not want to over-heat at this point as the fusible can get fused up!

6. Place the corresponding darker colored leaf shapes on top of the larger dark leaf shapes and fuse them together on the release paper. You will end up with 14 larger leaf shapes and 8 smaller leaf shapes. These should all have a shadow effect when you are finished. Refer to the finished picture.
7. For Red Berries cut free form 9 small ¼” red circles from fused red scraps of fabric. You can also trace the circle shapes from the pattern.
8. Using the circle marked on your background fabric, place the design elements around the circle shape. Refer to the picture for placement. On JOY the leaves are centered over the chalk circle line. Do not fuse down yet.
9. Fuse these red circles on top of fused green fabric that still has the release paper on it. Then cut out circles from the green fabric that are slightly larger than the red circles. These circles will be placed after we make the letters. Make sure you remove the release paper from the green fabric before you cut it out.
Marking and cutting the letters for quilt center:
1. Place the pattern sheet with the letters in your scanner/copier.

2. Cut a piece of release paper for each set of letters that is 8.5 x 11 inches. Place the letter size release paper in your paper bin and copy the letters onto the release paper. Do not touch the ink when it comes out of your printer. If you don’t want to try this, you can trace each letter onto a piece of release paper with a black extra fine sharpie marker.
3. Place the piece of release paper with the letters either printed or traced on it ink side against the fused side of the color of fabric you will cut your letters from. Press with a hot dry iron. Let the paper cool and remove the release paper. The ink should transfer to the back of the fused fabric.
4. Use very sharp scissors to cut out each letter.
5. Place each cut out fused letter on top of another color of fused fabric that still has the release paper on it. Press in place on the right side of the fabric leaving enough room around each letter to cut out the letter again, leaving about an 1/8″ of an inch shadow in the new color. Be sure to remove the release paper from the second color of fabric before you cut out the letters.
6. Place JOY in the center of the wreath shape you made. Once you have all of the shapes arranged the way you like them, fuse them to your background fabric.

8. Place a clean piece of white fabric over the top of the entire quilt and steam set the whole design.
Machine quilting your pieces:
1. Place the quilt top on top of your pre-pressed batting and backing fabric and press together well. I like to use 505© temporary spray adhesive to hold the layers together. You can also place straight pins in each corner.
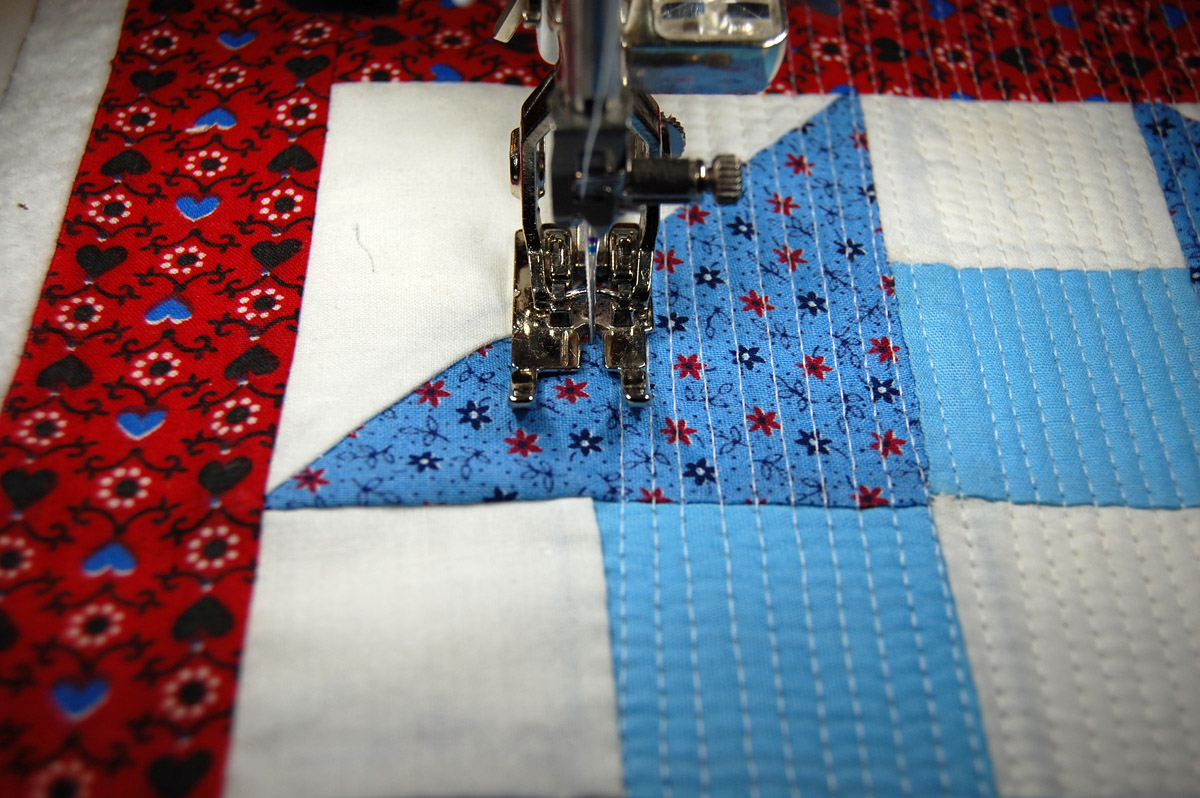
2. Using matching or variegated thread, outline stitch along the sides of all the straight edged design elements. Outline stitching is like stitching in the ditch, right next to and not on top of the design element. Do this in free motion mode on your sewing machine; or, simply stitch to your own liking.
3. Free motion quilt the background to your liking. I have used a stipple stitch done in a light weight thread on the inside of the wreath shape. For the border area, I switch to a heavier weight thread and quilt a loop and twirl design. I also like to machine quilt my name in the background using a matching thread. If you have never tried this before, use a pencil to write your name and then free motion quilt over the pencil marks.
4. Press the whole quilt top well with a hot iron. Use a rotary cutter to square up and trim the edges of the quilt to 16″ x 16″ square. Add a hanging sleeve and a fused or sewn binding of your choice. Be sure to add a label to your quilt.
Finally, we need to bind the quilt to finish it.
Materials needed for binding:
- Decorative rotary blade, such as pinking, wave or scallop. Any blade will work.
- 45 mm rotary cutter handle that fits decorative blades
- Regular rotary cutter with plain blade
- Rotary mat
Directions for binding:
Fuse web onto the back of the fabric to be used for binding and allow to cool. Peel off the backing paper and set aside.
With a regular blade in your rotary cutter, cut 4 lengths of fabric about 1.5 to 2 inches longer than needed for the edge of the quilt.
With a deckle blade in your rotary cutter (I keep a separate cutter with the deckle blades on them), and using a ruler as an edge, cut binding at least 1.25 inches wide or wider depending on your preference. Remember, it will be folded in half.
Fold the binding in half along the long edge, then use a creasing tool to press it down. DO NOT USE an IRON at this point.
Position the binding against one edge of the quilt, butting it into the crease. Using a hot dry iron, press into place.
Do two edges like this. Press on both sides of the quilt and trim at the ends even with the quilt edge.
With the remaining two edges, position the binding and press it lightly in place just on the top. Place a piece of release paper under the back edge of the binding.
On the back side at the ends, fold over the extra ½” of binding so it is flush with the side of the quilt. Place a small piece of fusible on the top of the fold.
Fold the rest of the binding to the back and press in place. Finish off with top stitching using decorative threads on the front of the binding.
Our December 23 Gift For You
Today’s gift is a BERNINA Beauty Set including a pocket mirror, BERNINA red lipstick and BERNINA red nail polish to one awesome WeAllSew fan.
All you have to do is post a comment below answering the following question:
For whom would your create this JOY quilt?
A winner will be chosen at random on December 26, 2015 and announced the following week!
Good luck!
Congratulations to our WeAllSew reader “msved”, the winner of the December 23 gift. Enjoy!
Used Products


What you might also like


36 comments on “JOY Fused Art Mini Quilt”
-
-
i would like to have horses in the wall hanging thank you
-
This is really cute. I think I would make mine for my sister-in-law. I might add a snowman, since she collects them!
-
I would make one for each of my daughters and daughter-in-law. It is such a cheerful and fun project. Thanks for the inspiration.
-
I would make one for my neighbor. They are always so helpful. This is a great idea.
-
I would make this for my daughter who spreads JOY to everyone she knows! This is a great project…thank you!
-
Great project!
A good gift for a special friend -
For my granddaughter….Joy is in her name.
-
Great wall hanging,
I would make this for my friends.
Can’t wait to get started on this great project for next year.
Thanks for all the great projects and prizes.
I looked forward to doing this again next year, keep up the good work.
Happy Holiday’s -
Every year I make something for a dear friend for Christmas, this will be part of next year’s gifts !
-
I would use it as background for a small Christmas Scene!
-
I think I would 😉
-
I would make this for my Granddaughter. She is just starting out on her own.
-
My mom doesn’t do much decorating any more, so this would add a little Christmas cheer to her home.
-
I would make my Joy quilt for a friend who’s brother has cancer. I would add a dachshund since my friend has three of the darlings.
-
Using a copper colored background it would look perfect on my living room wall. However, I have two daughters and one granddaughter who would also appreciate having one. Then of course, one for school and one for church and one for the……….
-
I would make it for my daughter-in-law.
-
One of my quilting friends.
-
I would make the Joy quilt for my sister’s new home.
-
My younger sister
-
This is my favorite project yet. I would keep it for myself!
-
I would like to make one for us and another for my sister in law. This is a great project and appears to be simple enough to be able to get two going at the same time.
-
I think my daughters might enjoy this plus I wouldn’t mind having one of these myself ; ) thanks for the great tutorial!
-
I have a niece whose name is Joy. This would be perfect for her.
-
I would make the Joy Quilt for my mom. Actually I think I’ll make it for next year. She will love it.
-
I would make it for my daughter.
-
I would make one for my daughter. lisajcowell(at)cs(dot)com
-
My sister-in-law has been so thoughtful, I think she deserves this really pretty design.
-
My son and daughter in law. They are newlyweds and have very little Christmas decorations they would love it for years to come
-
I would make one for my parents.
-
My daughter would love to have this for her wall.
-
-
For myself. I love the simplicity of this.
-
I would make this for myself, but also make one for my daughter!
-
I would create it for a friend who lost her father this year. Of course I am not very good at sewing, so after looking at it she may pass it back to me, LOL!!
I <3 everything you guys have shown us. Thank you for the inspiration.
-
I would love to create this wall
hanging for my daughter-in-law as she has just been diagnosed with cancer. She would need a little cheering up.
-
-
My daughter and her family could use a little joy!
Leave a Reply
You must be logged in to post a comment.

For a friend who just had surgery.