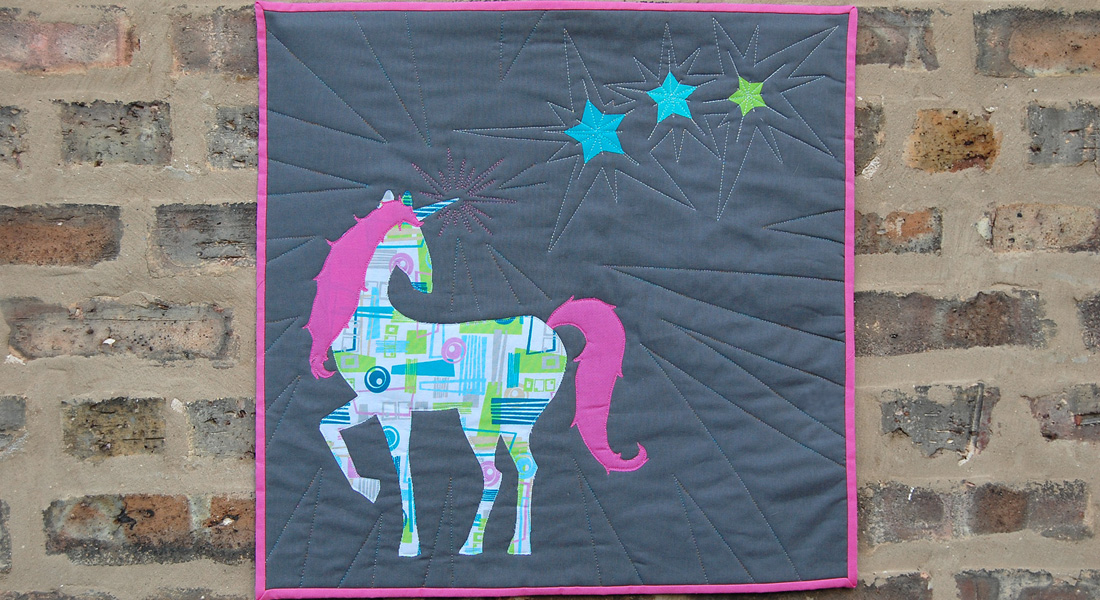
Reverse Appliqué Unicorn Quilt Tutorial
The feeling you feel when a new addition to the family is on the way is such a precious time. Preparing the nursery and all of baby’s things is so exciting! Loved ones will purchase items you need and the makers in your life will get busy sewing for the little one. Baby quilts are so special to make and that’s why we wanted to create the sweetest baby quilt tutorial. Since unicorns are still very much on-trend we decided to create this magical reserve appliqué unicorn quilt with shooting stars! We created this quilt with Maureen Cracknell’s fabric collection called Mystical Land which we thought worked perfectly with all it’s dreamy purples and blues.
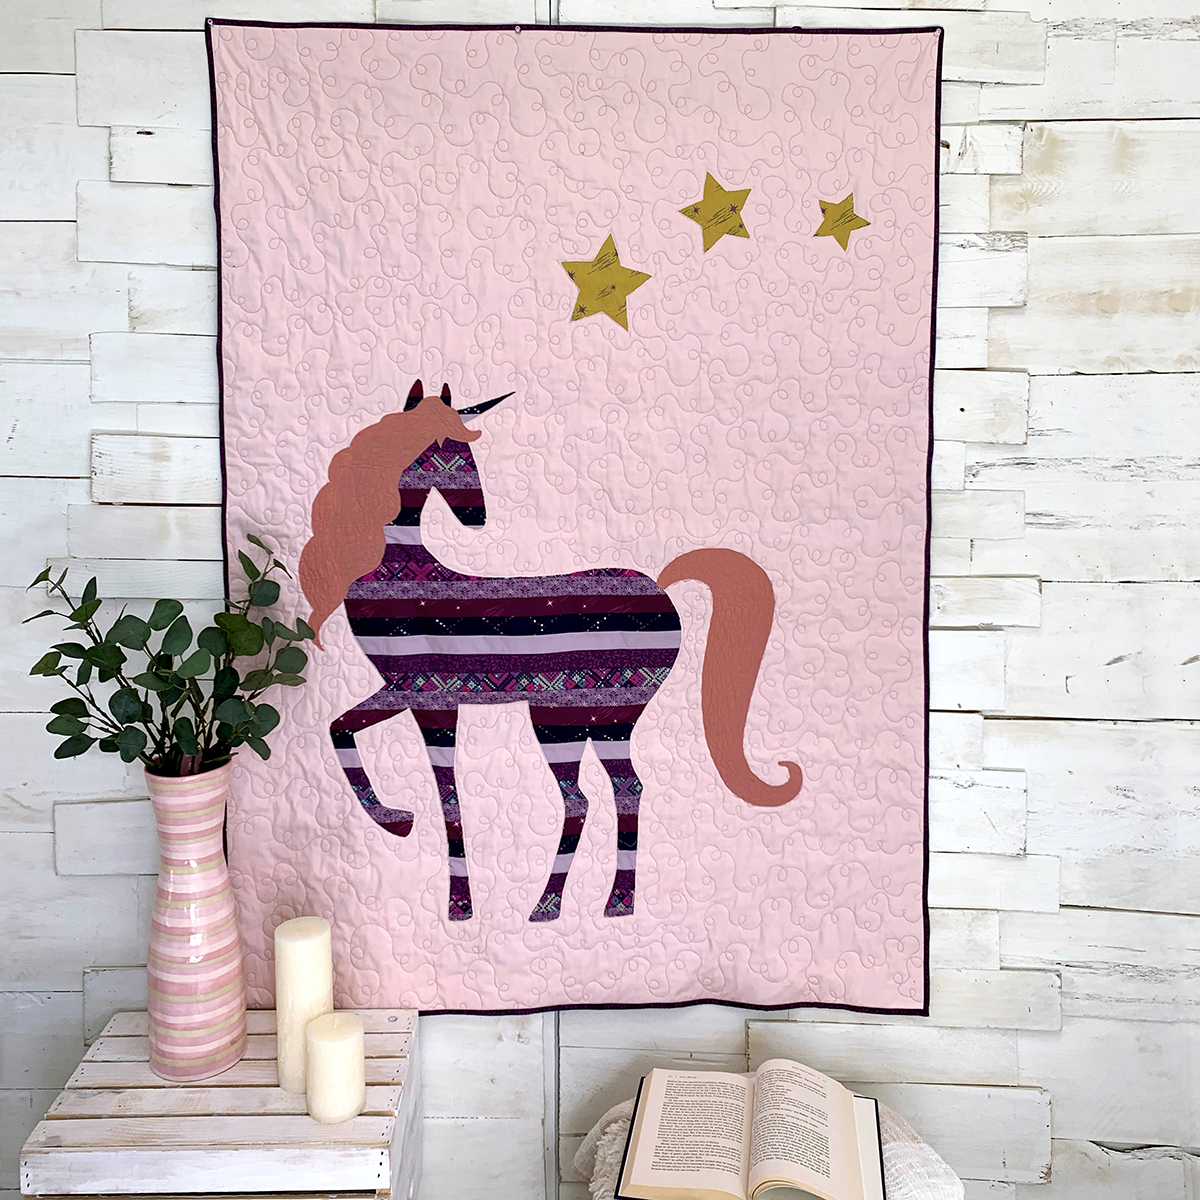
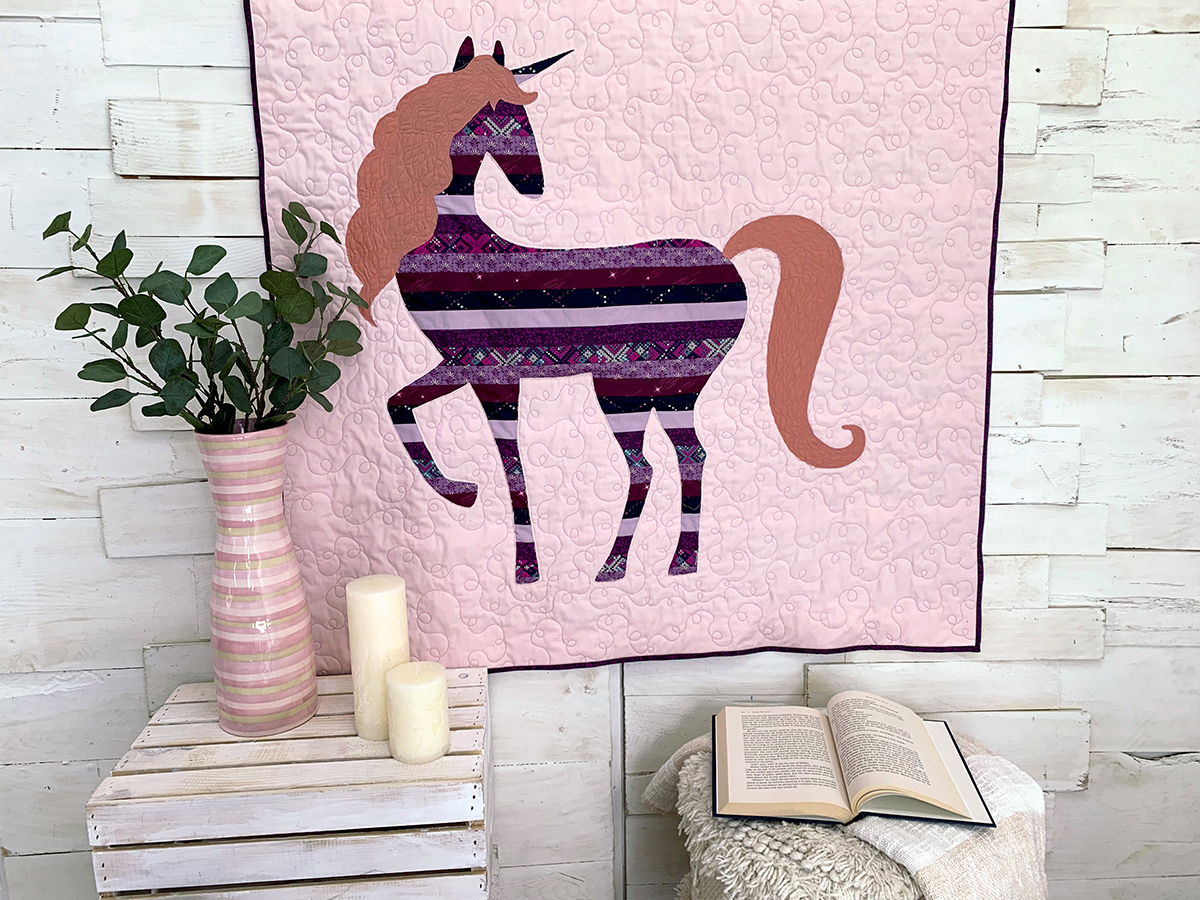
Enjoy the tutorial below and let us know in the comments if you plan on putting this quilt on your to-sew list! 🙂 Finished Unicorn Quilt measures approximately 41″ x 55″
Materials to Make a Unicorn Quilt:
- Download the Appliqué Unicorn Quilt Templates here!
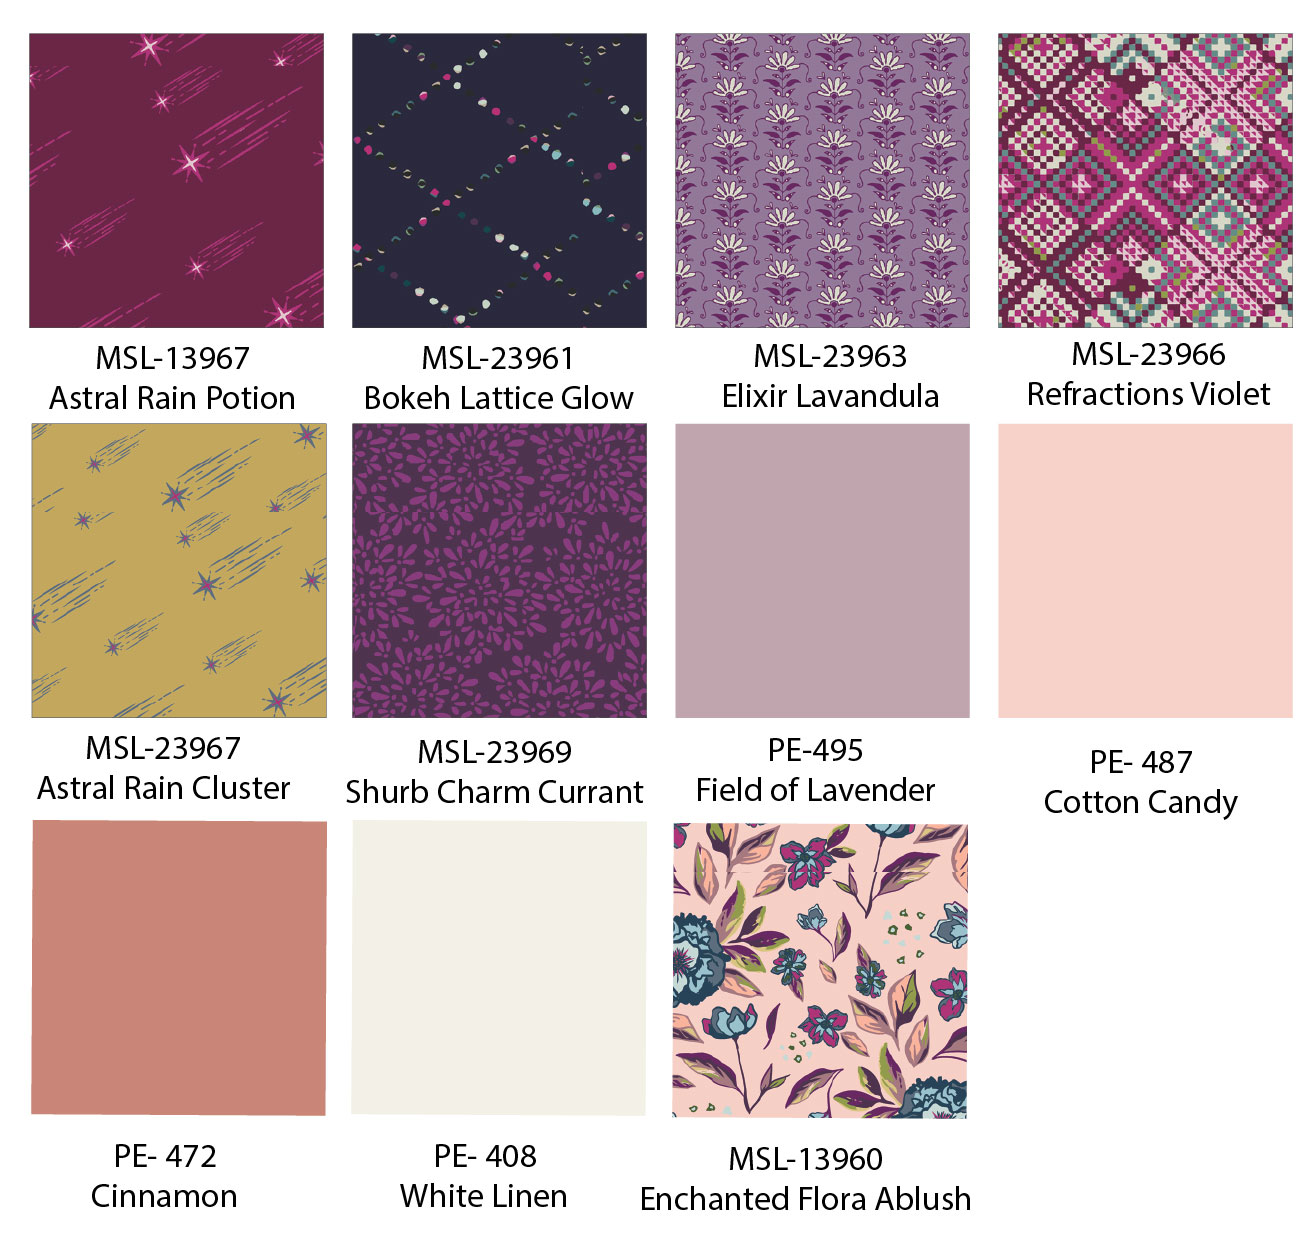
Fabric Used:
- Fabric A- MSL-13967- Astral Rain Potion – ⅓ yd.
- Fabric B- MSL-23961- Bokeh Lattice Glow – ⅓ yd.
- Fabric C- MSL-23963- Elixir Lavandula – ⅓ yd.
- Fabric D- MSL-23966- Refractions Violet – ⅓ yd.
- Fabric E- MSL-23967- Astral Rain Cluster – ⅝ yd.
- Fabric F- MSL-23969- Shrub Charm Currant – ⅓ yd.
- Fabric G- PE-495- Field of Lavender- ⅜ yd.
- Fabric H- PE-487- Cotton Candy- 1 ¾ yds.
- Fabric I -PE-472- Cinnamon – ⅜ yd.
- Fabric J- PE-408- White Linen -1 ¾ yds.
- Binding- (Fabric F)- 2 ½” x 202″ Long (5 Strips) – ⅜ yd.
- Backing – MSL-13960- Enchanted Flora Ablush – 3 3/4
Cutting Directions:
- Cut (5) Five 1 ½” x WOF strips from Fabric D, F, and G
- Cut (6) Six 1 ½” x WOF strips from Fabric A,B,C
- Cut (1) One 3 ½” x WOF strip from Fabric G
- Cut (1) One 20 ½” x WOF rectangle from Fabric E
- Cut (2) Two 12 ½” x 20″ rectangles from Fabric I
- Cut (1) One (1) 62″ x WOF pieces from Fabric H and J (background fabrics)
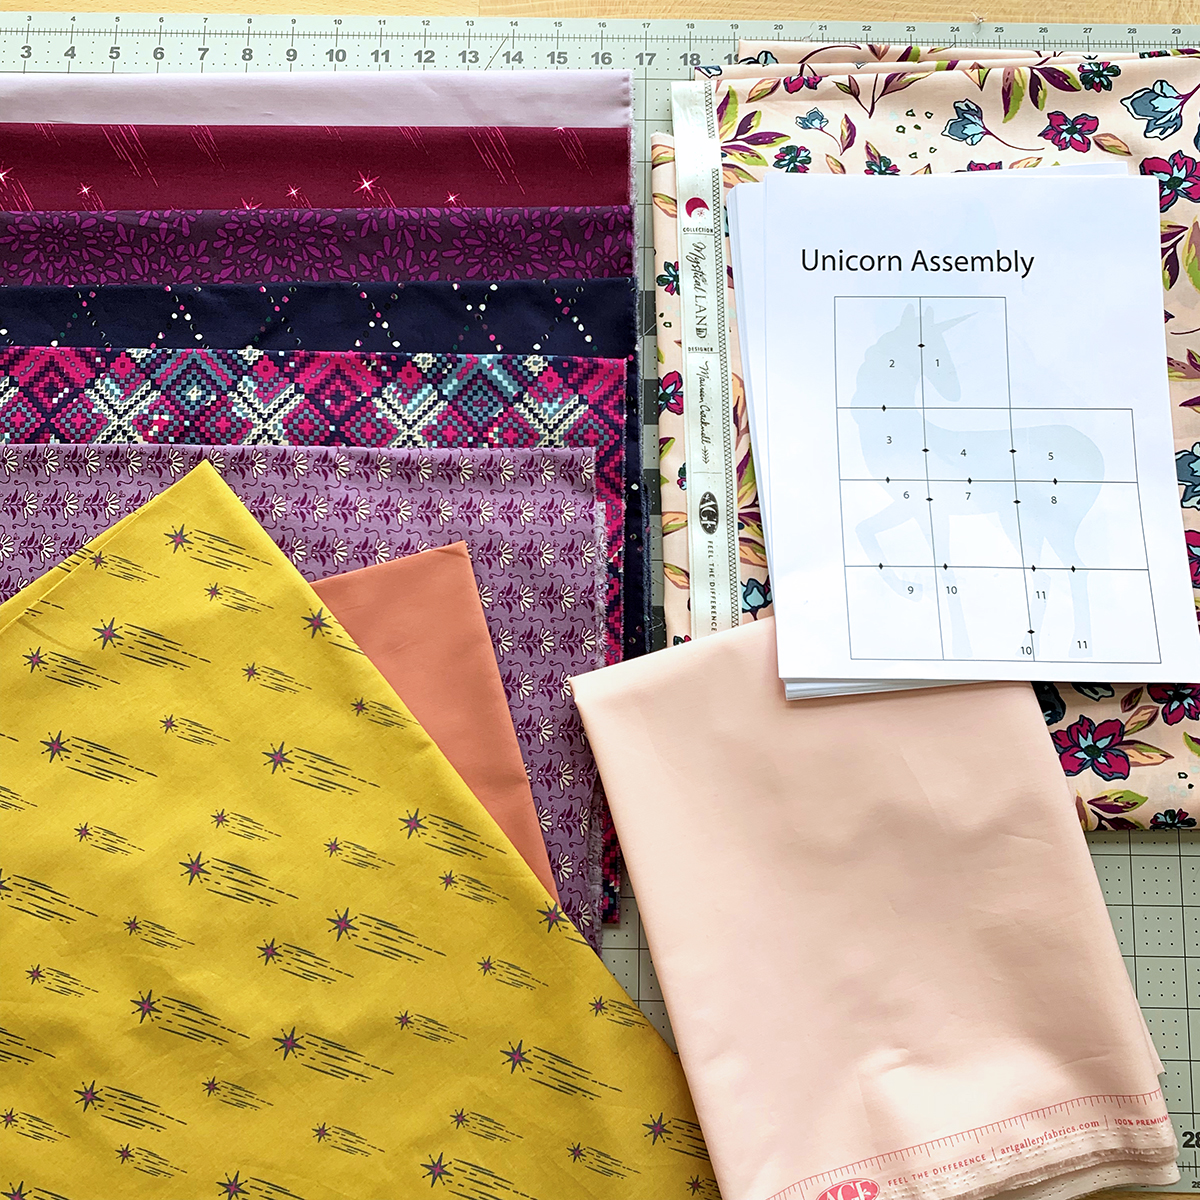
Additional Materials:
- Steam-A-Seam
- Batting
- Small sharp Applique scissors
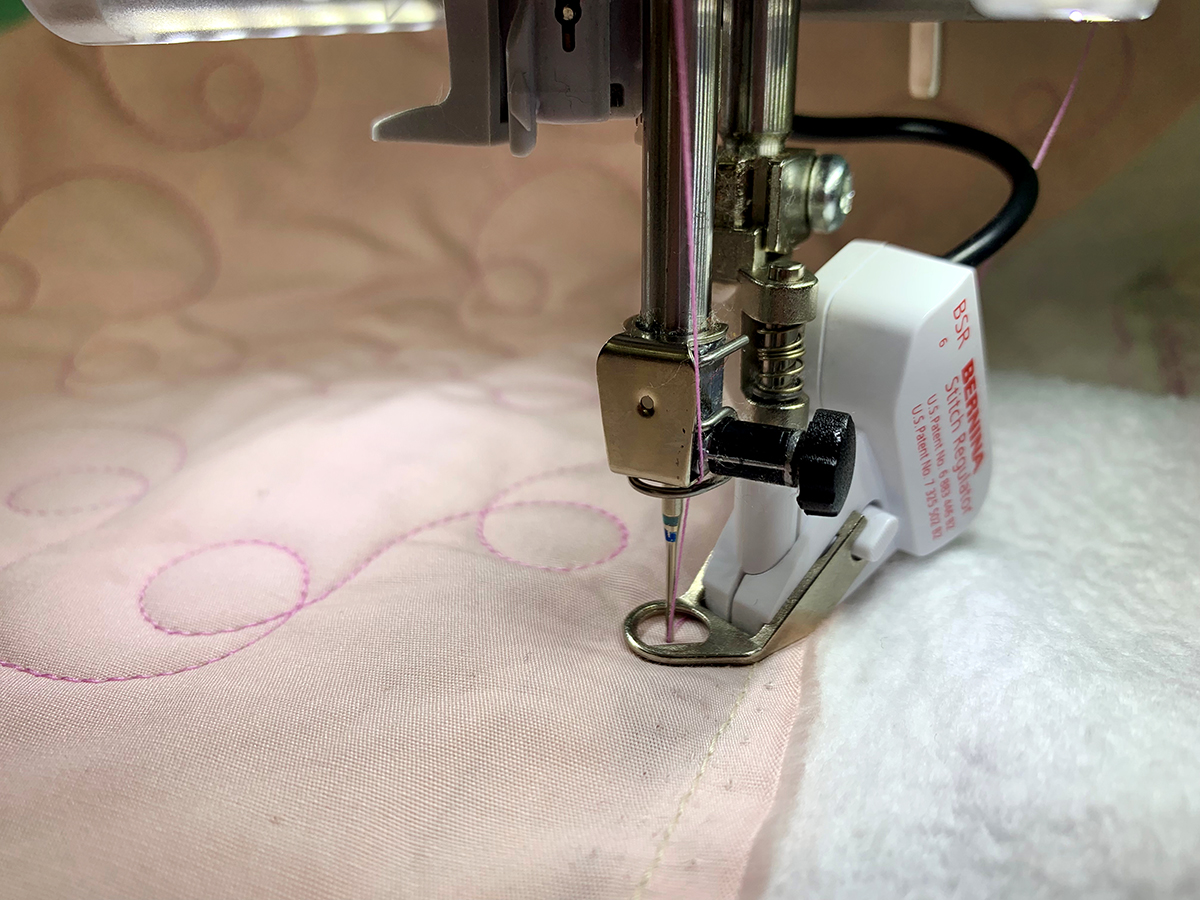
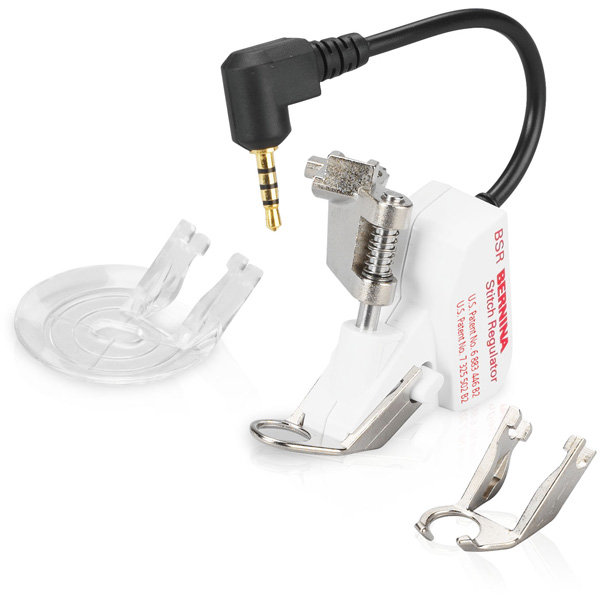
- BERNINA Stitch Regulator (BSR)
- Walking Foot #50
Step One- Sewing Strips
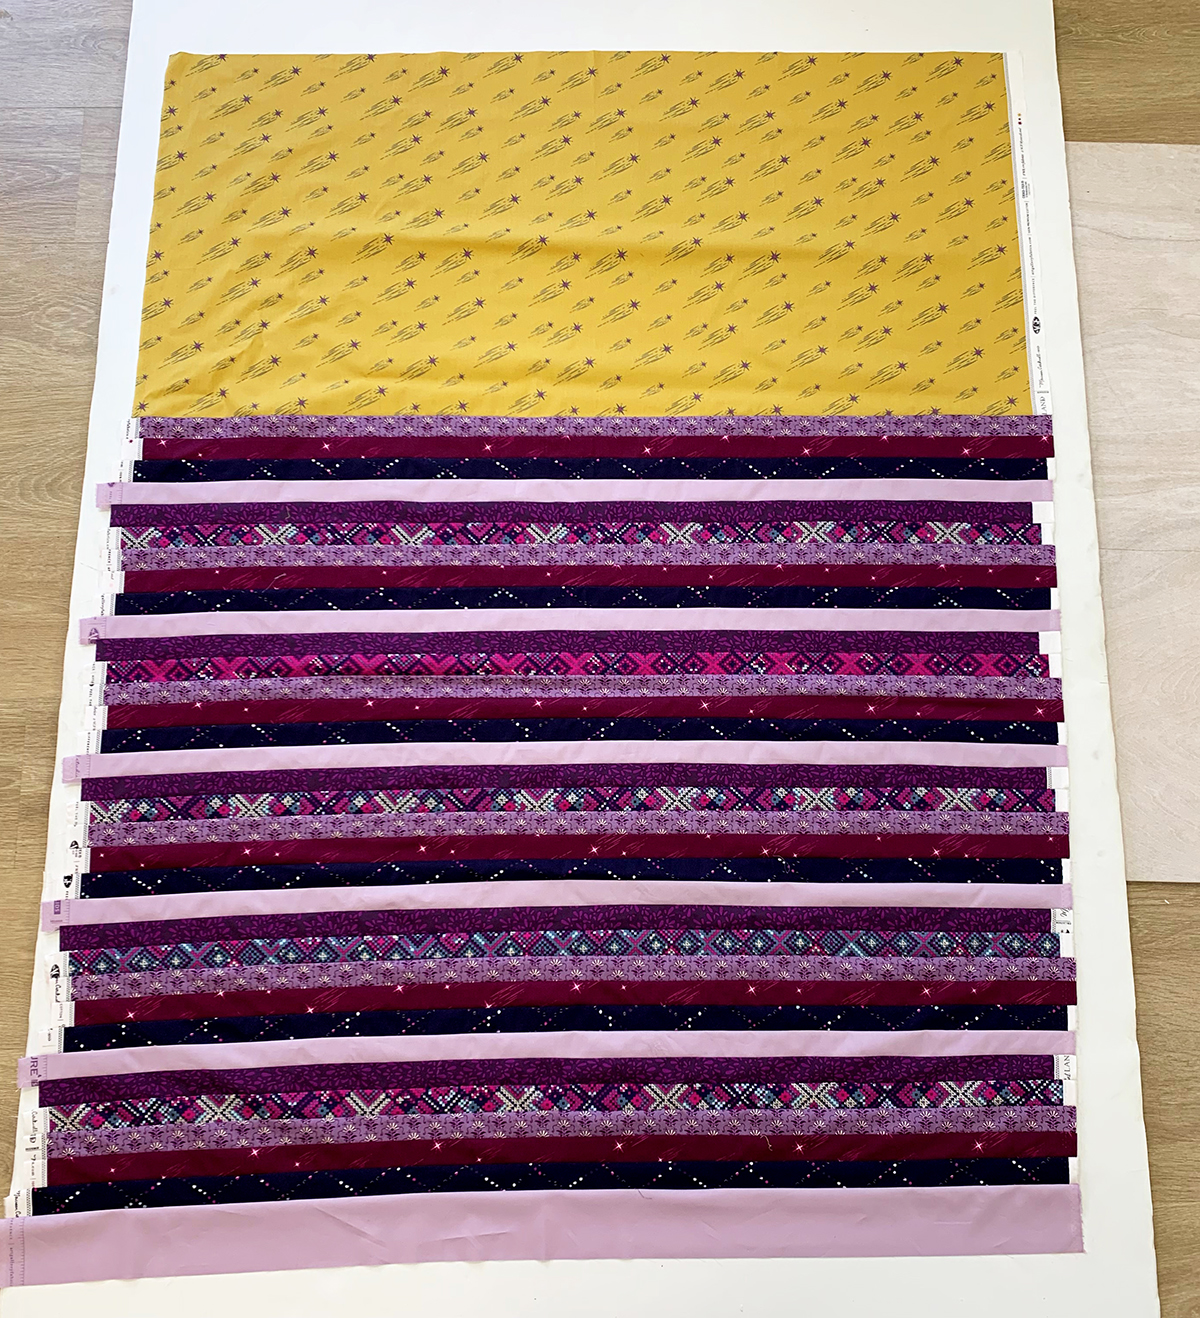
Place your 1 ½” strips in order and sew strips into easy to handle segments. Press your seams to one direction making sure to not to distort the long straight seams.
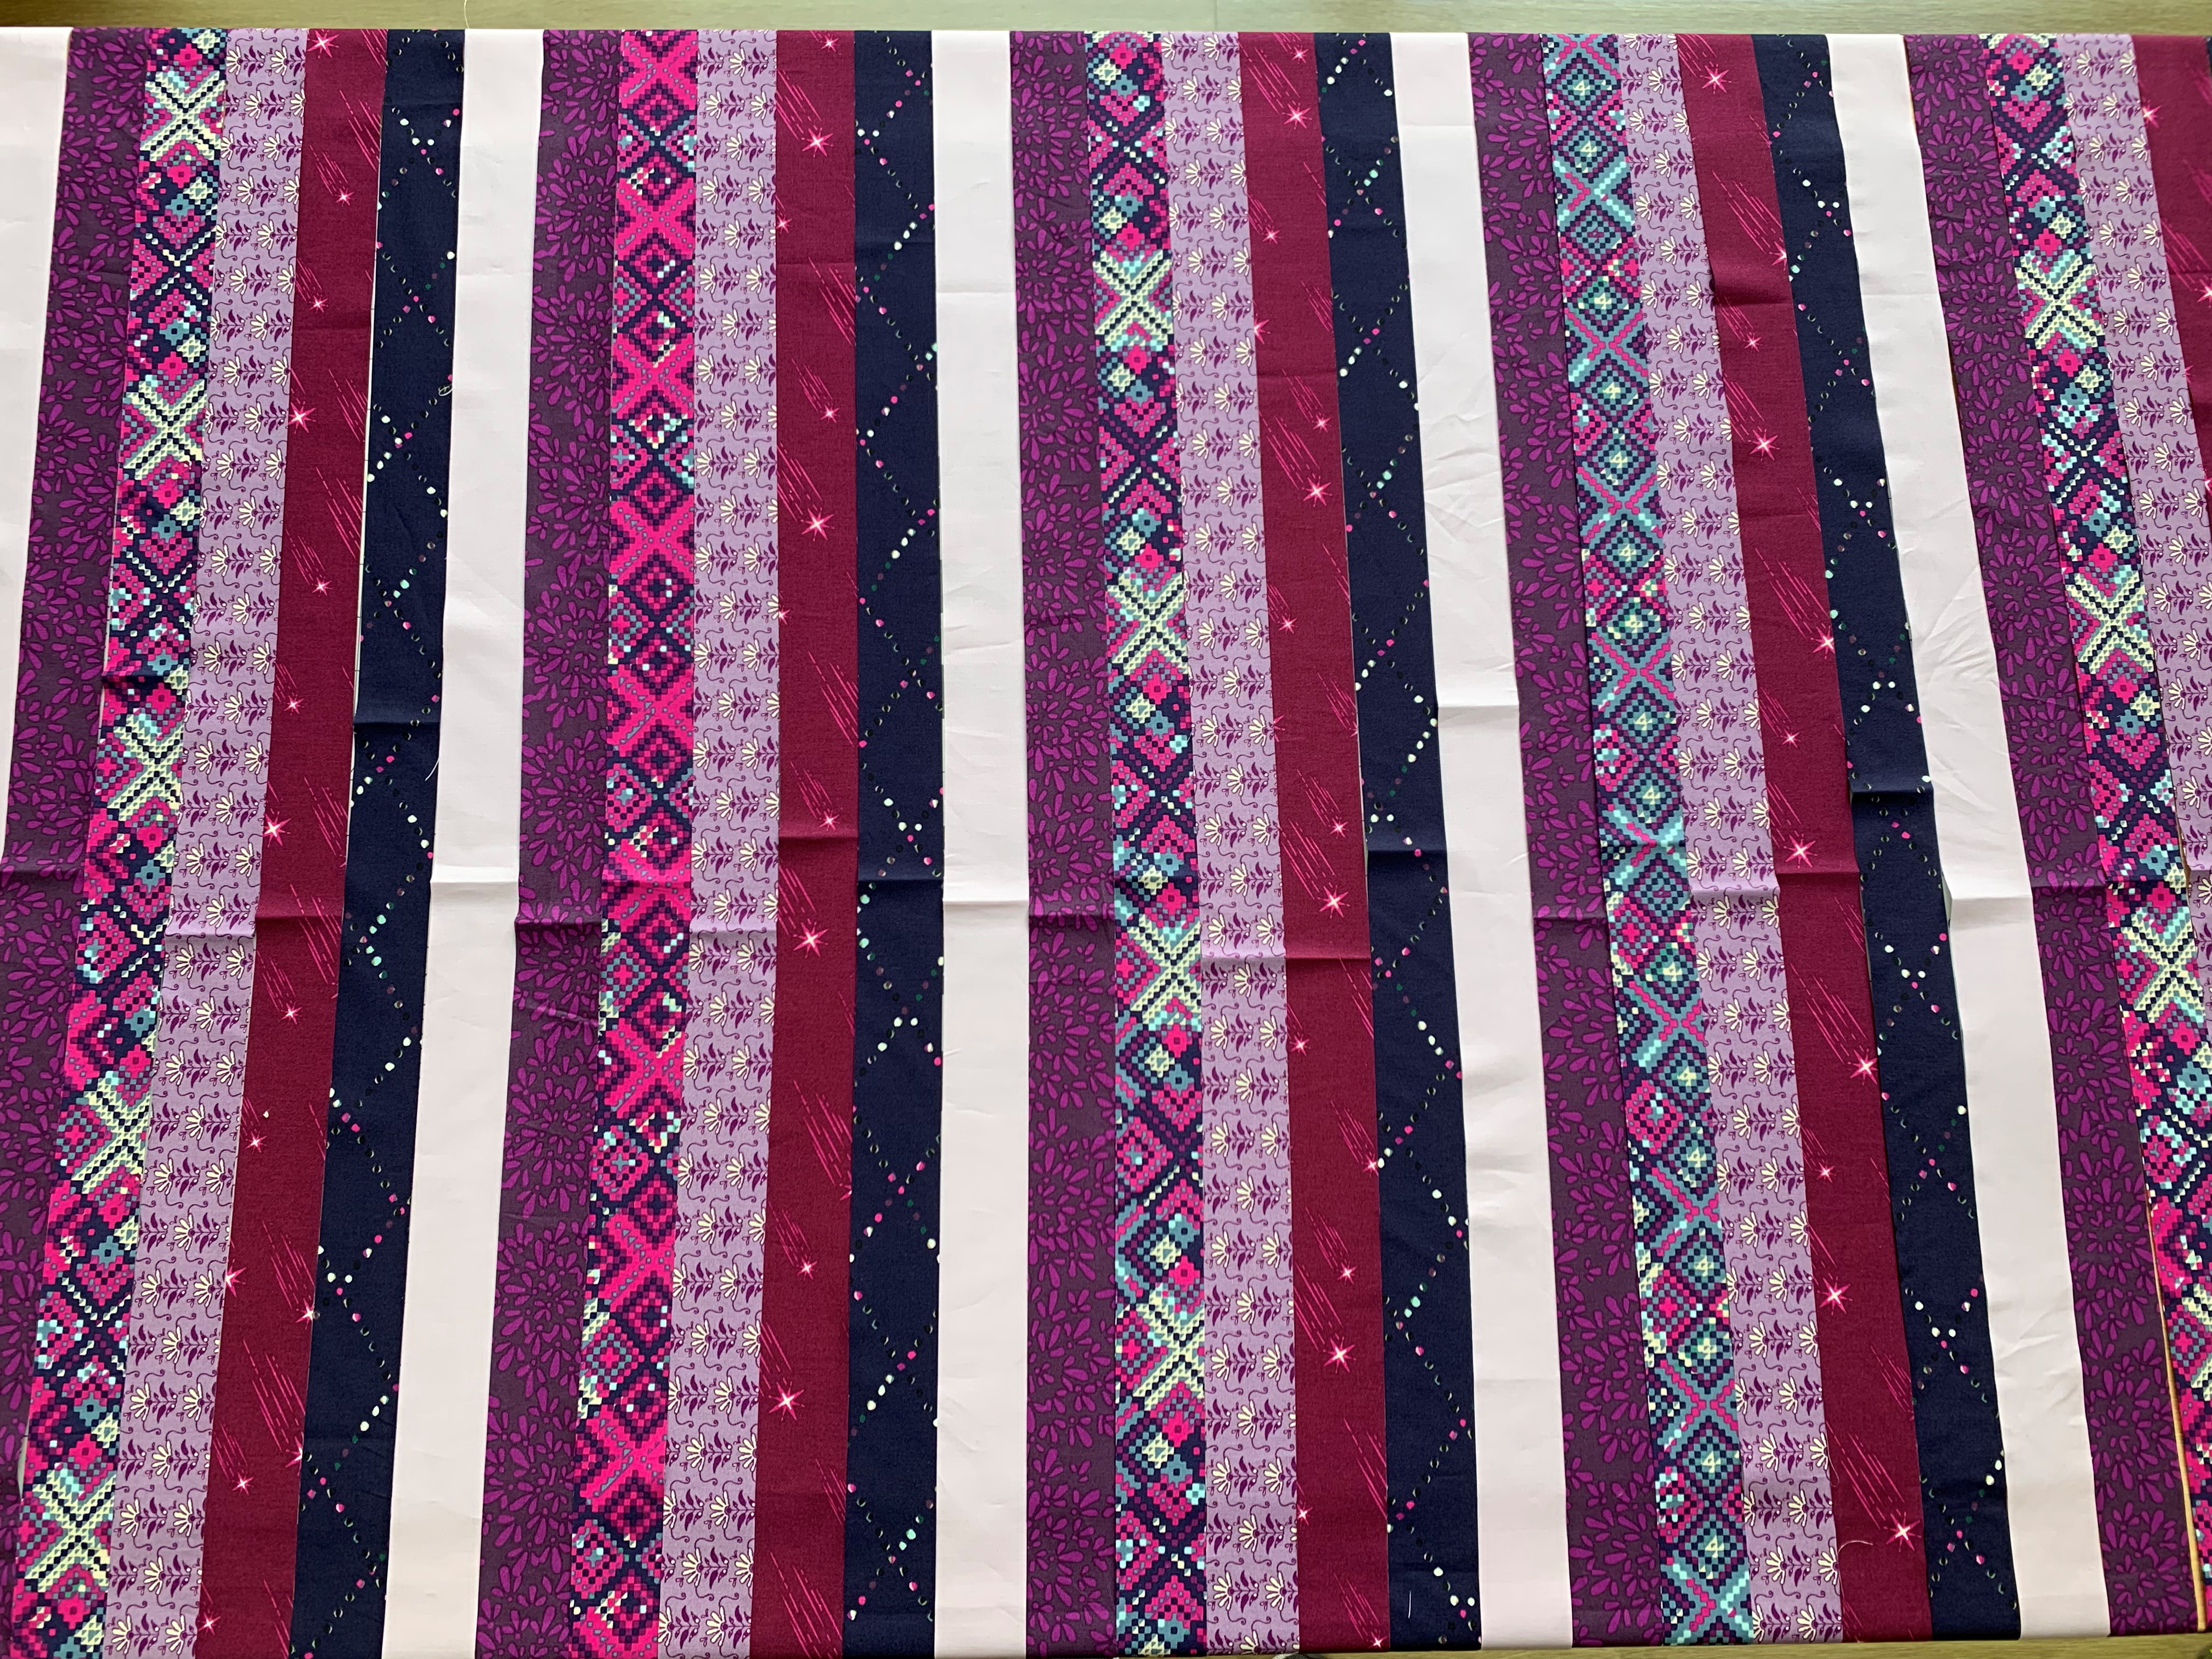

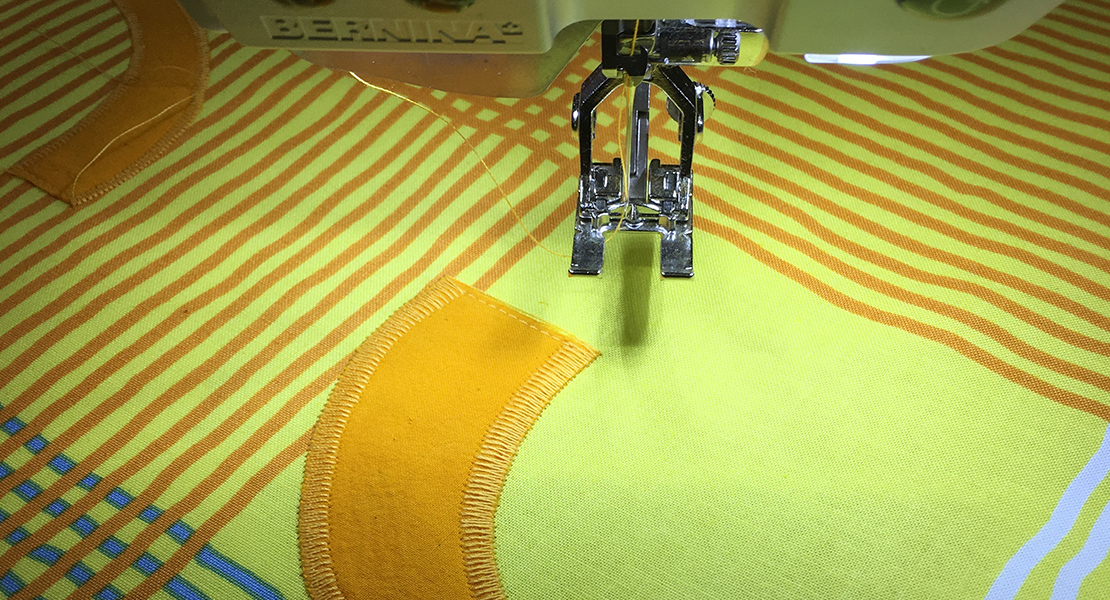
Feel free to use your patchwork foot for a perfect ¼” seam allowance. You can also use your universal presser foot. Make sure the needle is adjusted 4 spaces to the right for a perfect scant ¼”.
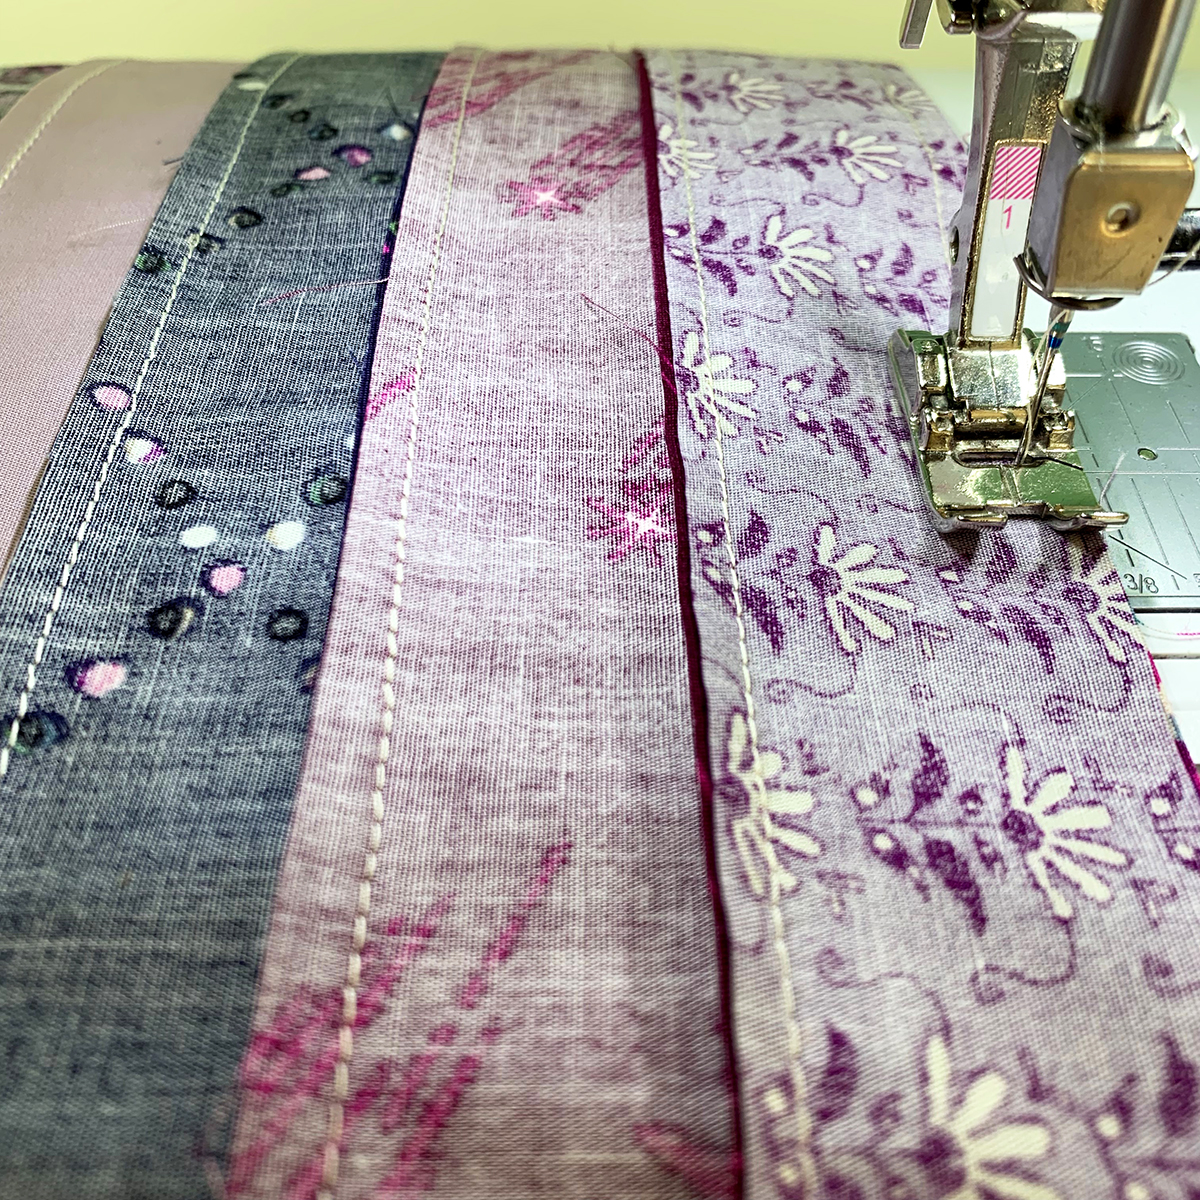
Once you have all your 1 ½” strips together sew a 3 ½” strip from Fabric G to the bottom of your strip unit and to the top sew a 20 ½” x WOF (width of fabric) strip.
Step Two – Assembling the Unicorn Template
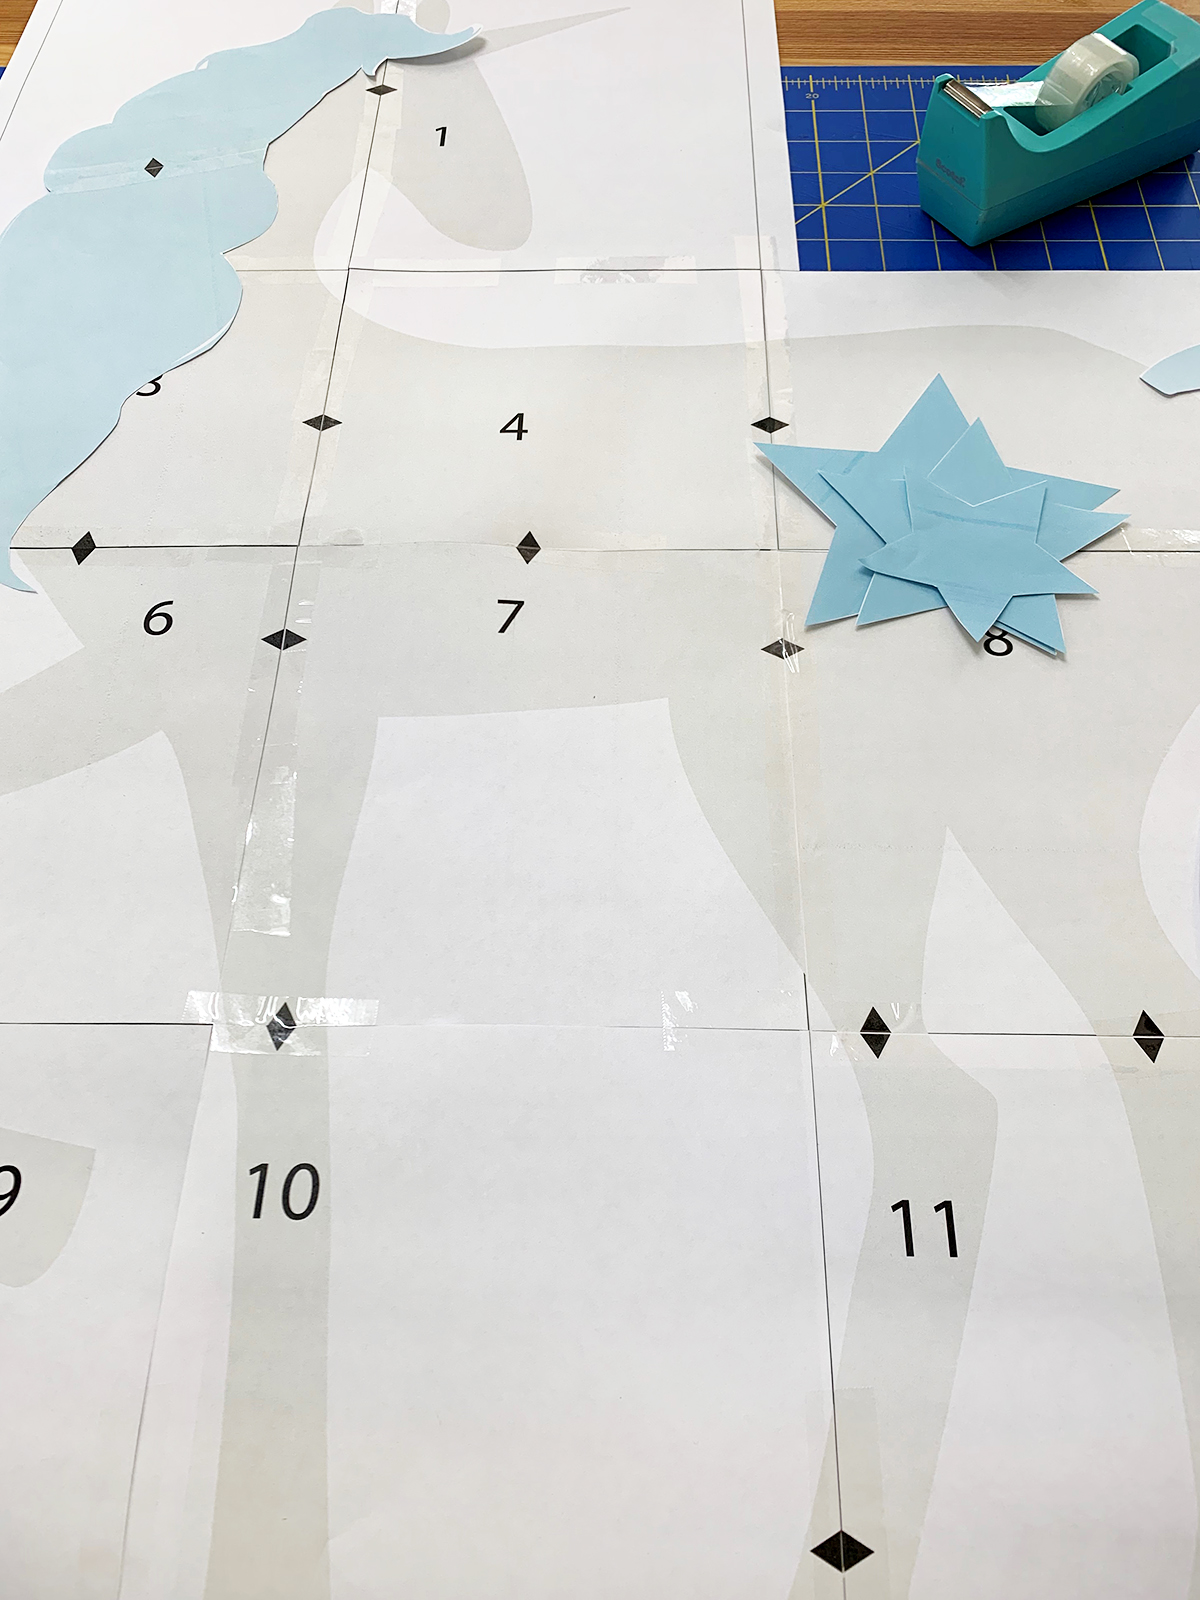
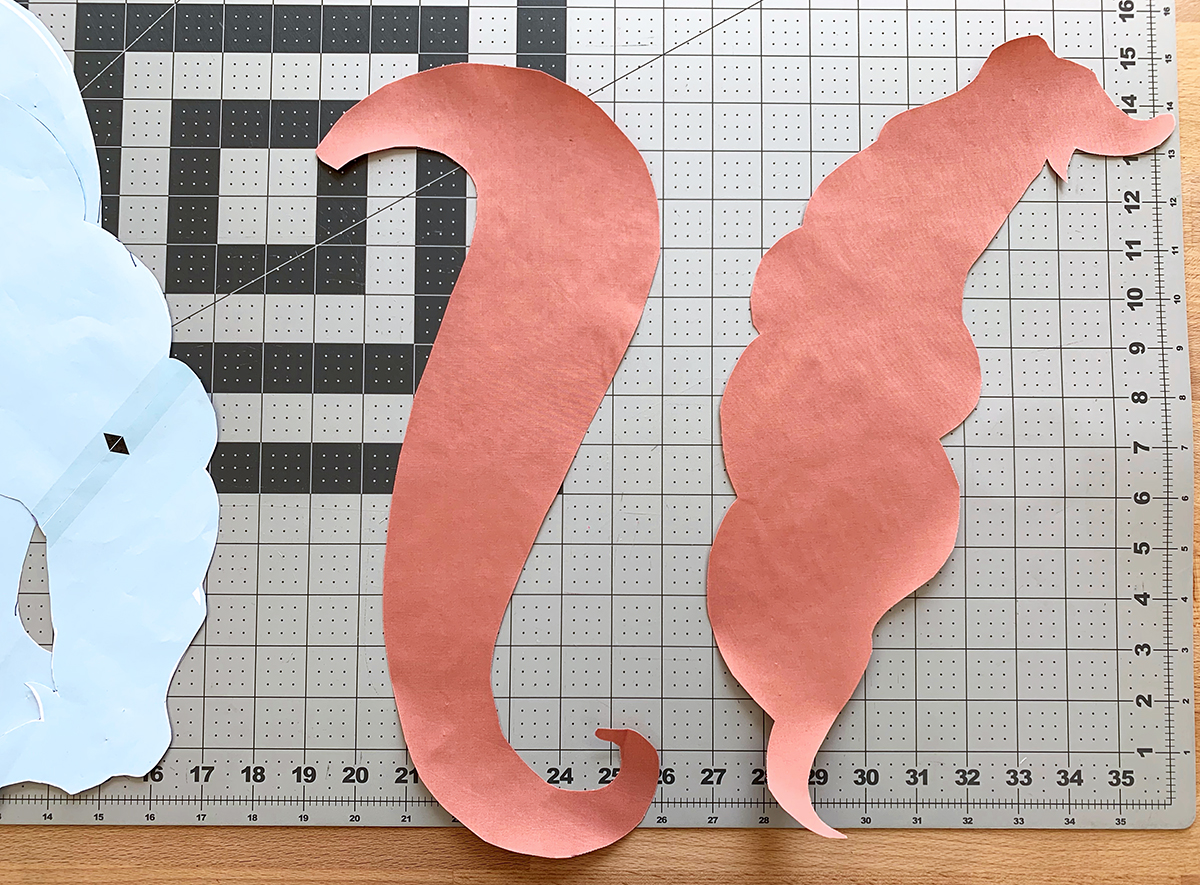
Cut out all your pieces on the black rectangle line. Line up all your notches to the corresponding pattern piece and tape together. Follow the Unicorn Assembly diagram on the printable PDF.
Step Three – Creating Your Quilt Sandwich
You can skip this step if you are using a darker fabric for the backing of your quilt, but because we chose a very light color for our background and our strips are dark, you can see your strips through the background fabrics. In order to fix this problem, we layered another fabric behind it. (Fabric J)
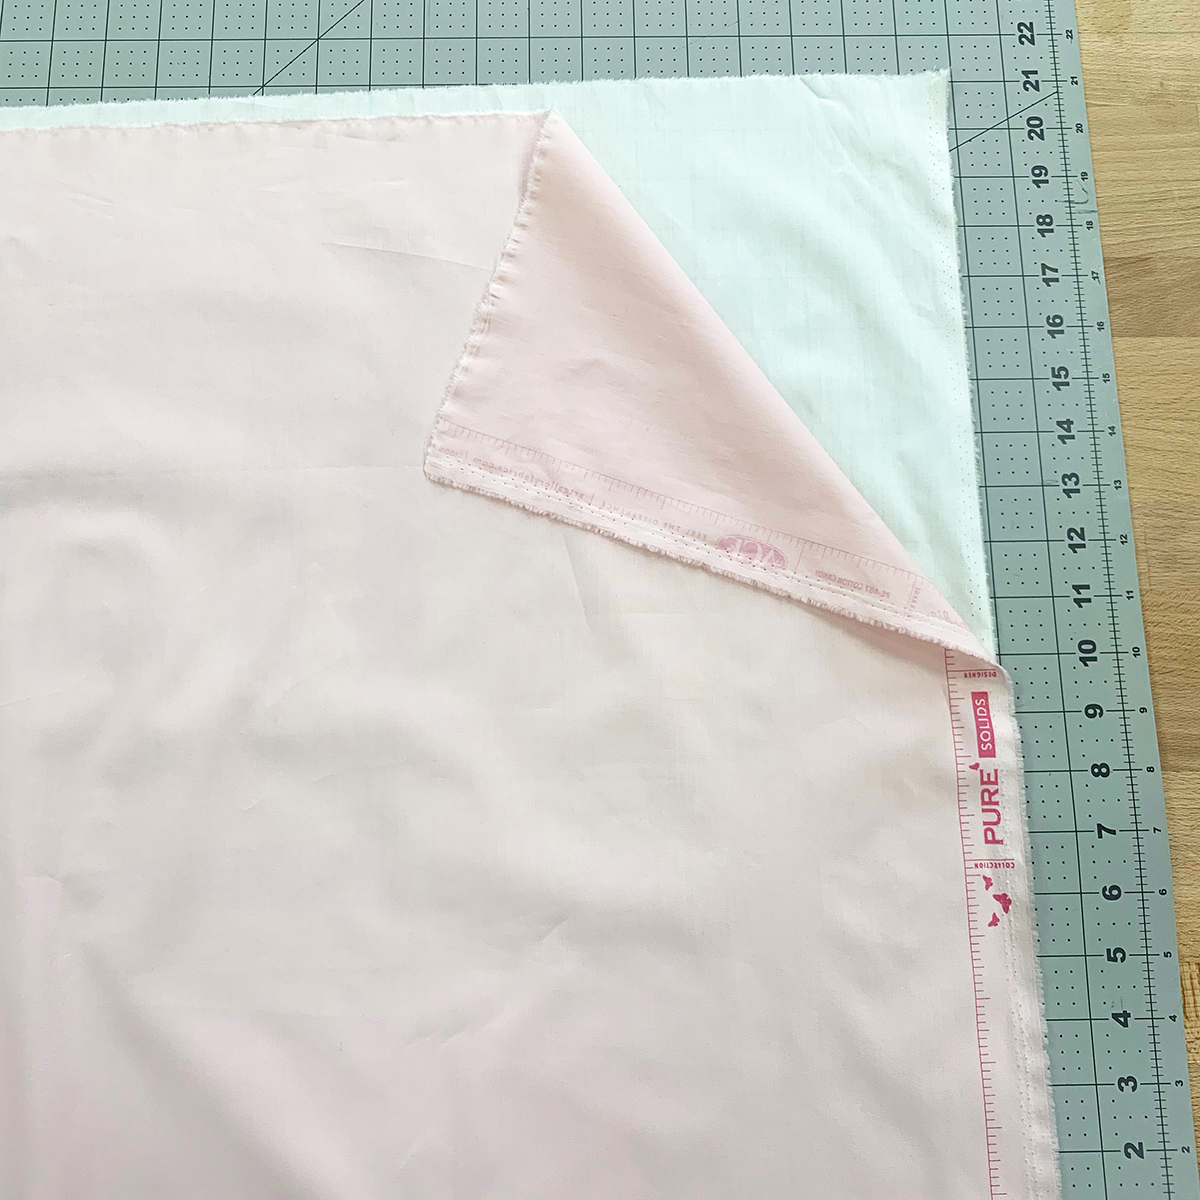
Layer your backing fabrics and baste together. Place them onto your striped quilt top and then place this on top of your batting and backing pieces. Pin layers together.

Place your unicorn template at the bottom left side of your quilt. Trace with a fabric marking pen.
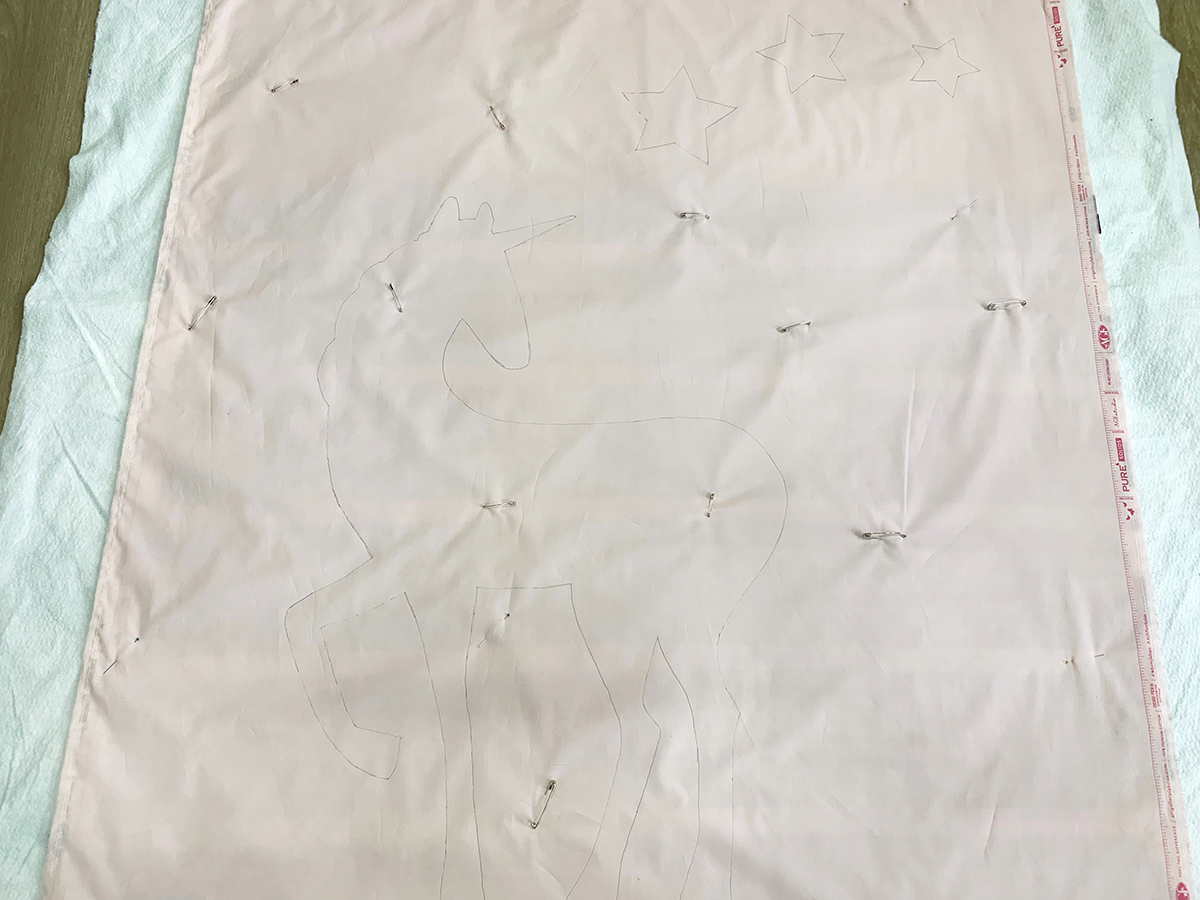
Repeat this same process and trace your stars on the top right of your quilt.
Step Four – Reverse Applique
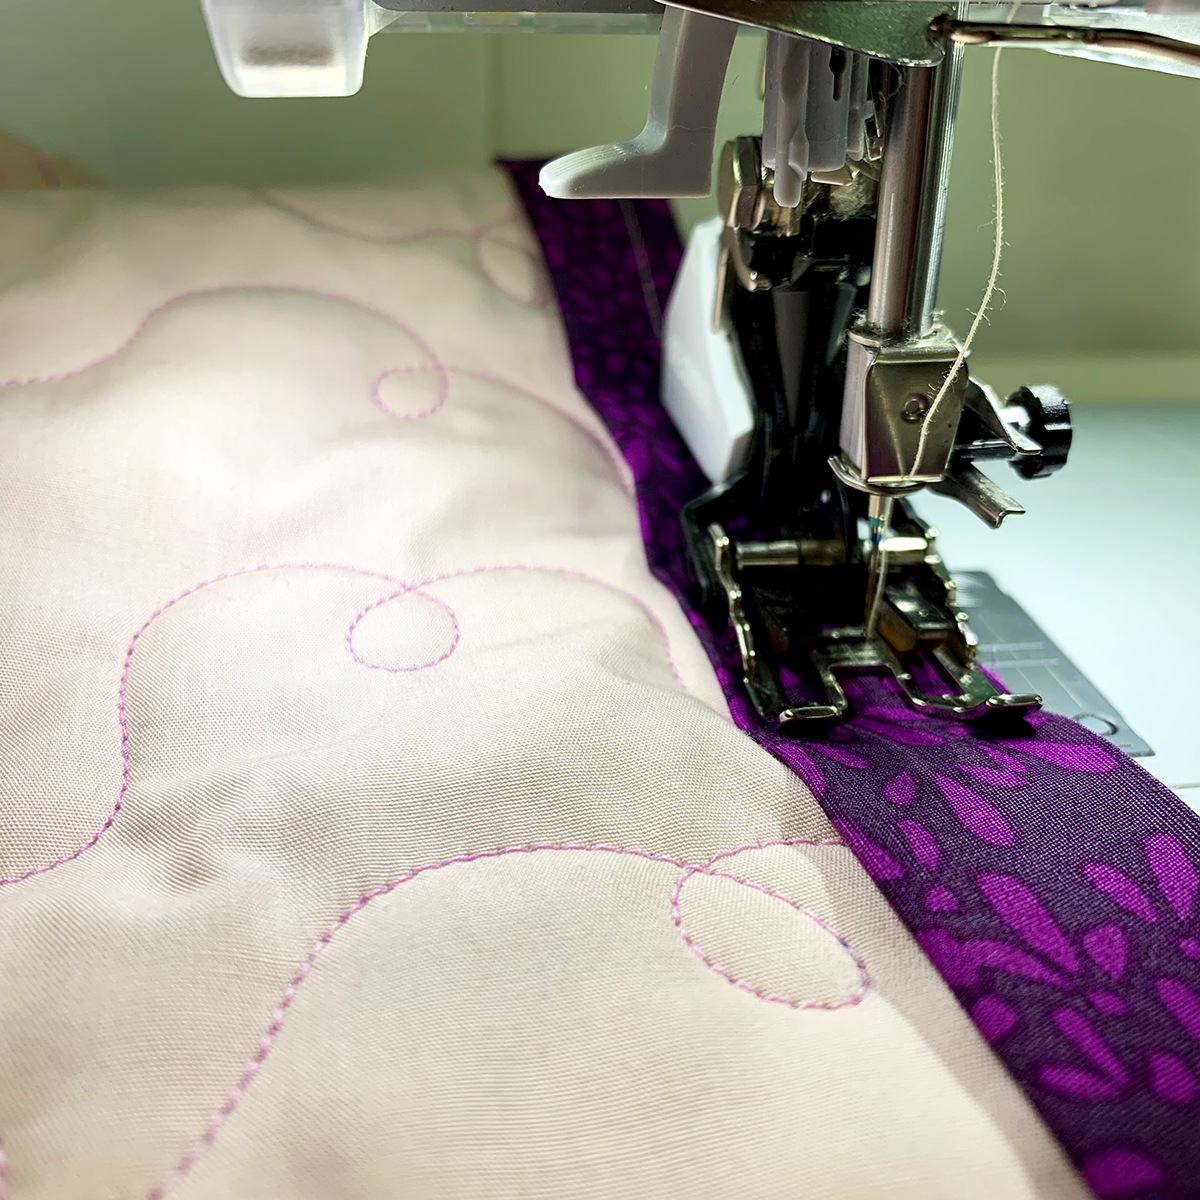
Sew on the lines you drew with a small stitch length.
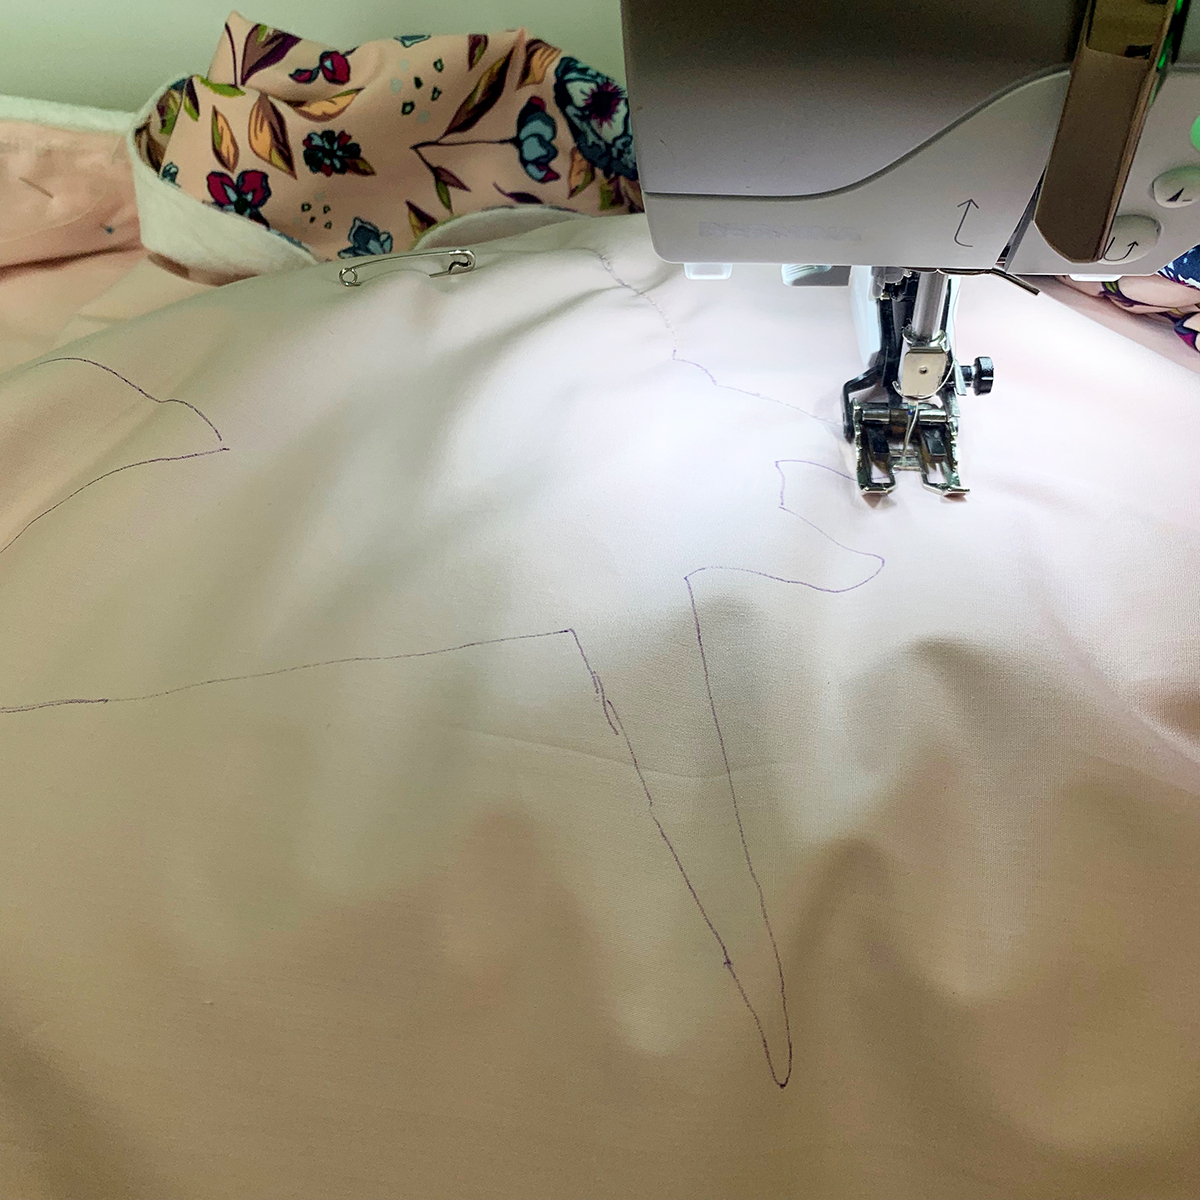
Take your small sharp scissors and poke a slit through the top two layers of fabric making sure not to poke into the pieced section of your quilt.
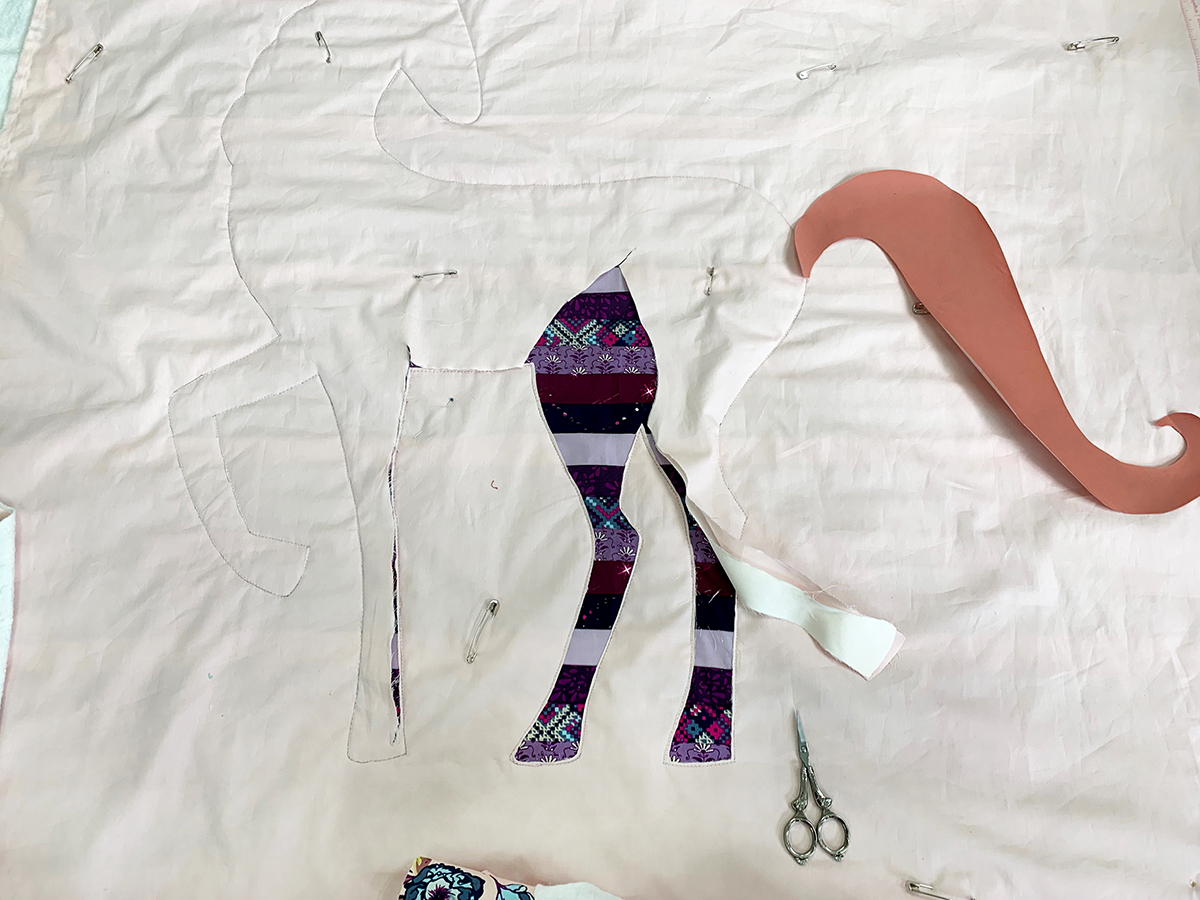
Once you got a small hole started, make your way to the edge of your unicorn leaving ⅛” around the edge of your unicorn. Repeat this same process to cut your stars.
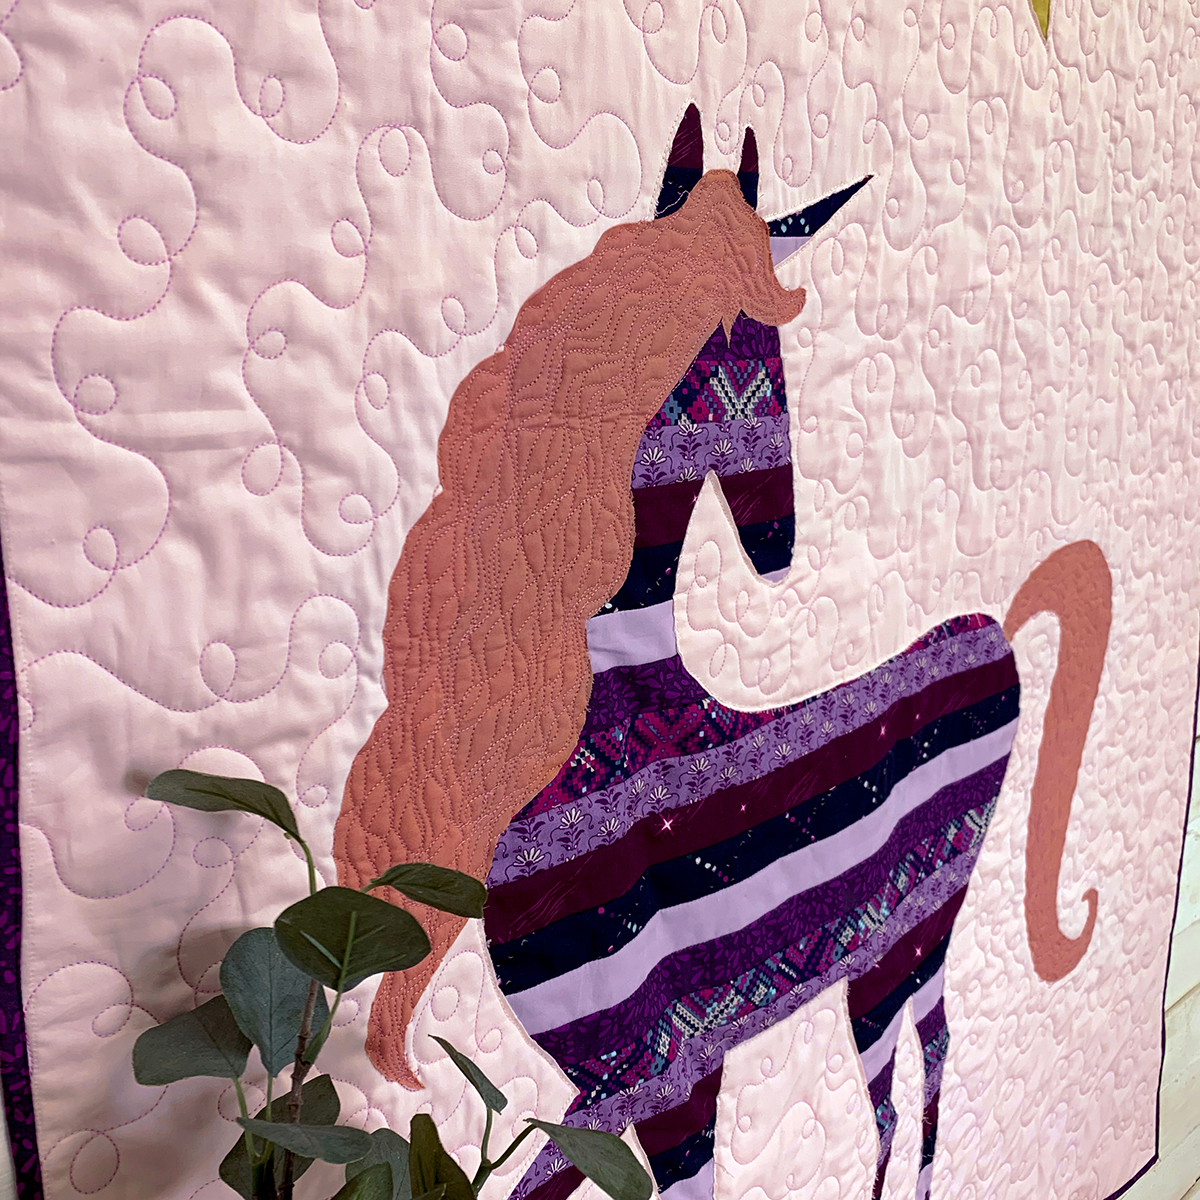
For the mane and tail pieces, take your 12″ x 20″ rectangles and apply Steam-A-Seam. Trace out your templates and cut out pieces.
Place your mane and tail as you desire and press into place.

Step Five- Quilting
Attach your BSR and quilt as desired! We used meandering swirls in a soft pink color to complement our background fabric. To learn more about the BERNINA Stitch Regulator take a look at this video! 🙂 For the mane and tail, we did a lot of heavy quilting to create hair-like texture.
Step Six- Final Touches
Trim your quilt to desired length and width. We trimmed ours to 41″ x 55″.
To bind our quilt we used our walking foot which helps to move all your layers of fabric smoothly while creating perfect stitches. Click here to find a great tutorial for making your own double-fold quilt binding and attaching it to your quilt.
And your Unicorn quilt is complete and is ready to be gifted!
Hang your quilt on the wall, place on the edge of a crib, or put on the floor for the baby to sprawl out and play.
Happy Sewing,
The AGF Crew


What you might also like


10 comments on “Reverse Appliqué Unicorn Quilt Tutorial”
-
-
Our WeAllSew blog content is posted in an open format. It sounds like you are interested in printing out the tutorial to save for later. If you wish to print the post, you can easily print your tutorials from the WeAllSew blog. If you attempt to print directly from the screen a pdf will be generated for your convenience. You can always save the PDF to your computer for later reference, please give it a try.
-
-
I am teaching a group of teen girls how to sew, and this is a PERFECT project for them. Lots of straight seams, and then some not so straight seams, and sew adorable! Thank you.
-
Totally love this design!
-
I also realize I could expand this print on 11 x 17 paper and make a much bigger quilt, more like a lap quilt than a baby quilt. That idea I like quite a bit.
-
Thank you for the project. My grand daughter just drew a unicorn for me so I know she would love this. Do you think I could shrink the print out to make a small wall hanging?
-
I just found the mini version of the quilt which was printed at 35%. Both are lovely.
-
-
I am cutting out the strips. Why am I cutting only 5 of two of the fabrics?
-
Ok. As I look closer I see fabric F as 11 total strips. Now I am totally confused!
-
We apologize for the confusion. You need to cut only 5 strips for Fabric F.
We will modify the blog post soon.
-
-
Leave a Reply
You must be logged in to post a comment.

This is such a cute idea! I think it would be a great addition to my twin grand-daughters’ bedroom.
Would it be possible to make the tutorials in a format that can be printed out, using a “Print Friendly” app to generate a pdf)? I downloaded the templates, but the large photos make it very lengthy to print out. I did manage to save it, but it’s 11 pages!