Tips for Tiny Patchwork Piecing
Patchwork piecing calls for precision—precise cuts, seams, and placement are necessary to come together as designed or planned. Small-scale patchwork (anything smaller than 2” finished size) is the next level. There is no room for error if your patchwork is only 1” big!
![MTC_Tiny_Patchwork_01_Covr_Shot_BERNINA_WeAllSew_Blog_1080x1080px[1]](https://weallsew.com/wp-content/uploads/sites/4/2022/08/MTC_Tiny_Patchwork_01_Covr_Shot_BERNINA_WeAllSew_Blog_1080x1080px1.jpg)
Whether you’re attempting tiny patchwork for the first time or just looking for a new perspective, I’m here to share some insight on small stitching with success. Below are some of my favorite tips to make your process easier and your results even better!
Pressing Matters
When setting out to sew any sort of patchwork with precision, taking the extra time to prepare your fabric is crucial. Knowing how to press your fabric has more nuance than you’d think!
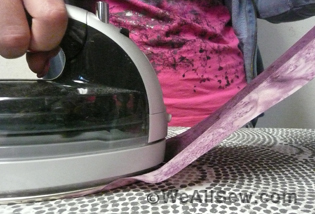
First, yardage should be well pressed and wrinkle-free. Use a good, hot iron (like my LAURASTAR Lift PLUS) to press. Don’t be afraid to use a bit of steam to press, but avoid ironing motions with steam. This movement, with added moisture from steam, is what causes the fabric to warp and shift. Simply press down, burst steam, hold the iron until the moisture is evaporated, and lift away. I use steam sparingly when pressing patchwork but it really is the best way to smooth out stubborn creases in your fabric.
![MTC_Tiny_Patchwork_02_Press_BERNINA_WeAllSew_Blog_1080x1080px[1]](https://weallsew.com/wp-content/uploads/sites/4/2022/08/MTC_Tiny_Patchwork_02_Press_BERNINA_WeAllSew_Blog_1080x1080px1.jpg)
Next, consider starch. I prefer a starch-alternative spray—Flatter is my favorite but Best Press is a popular choice. These sprays will add a bit of stiffness and body to your fabric without leaving a residue on your fabric or iron. Traditional spray starch can be used as well, and it will add more structure to your fabric than an alternative, but it also may flake or make your fabric easier to scorch. Proceed with caution!

Finally, use a clapper. Originally designed as a tailor’s tool for pressing crisp seams, a clapper is a block of wood that is pressed on top of a hot, freshly pressed seam or piece of fabric. When the wood is placed on the hot fabric, it helps absorb the residual heat (and moisture, if any) allowing the fabric to cool quickly. Combined with a bit of pressure, the result is a particularly flat and crisp seam. When working with small patchwork, you have more seams and seam allowances coming together in a small space.
![MTC_Tiny_Patchwork_04_Clapper_BERNINA_WeAllSew_Blog_1080x1080px[1]](https://weallsew.com/wp-content/uploads/sites/4/2022/08/MTC_Tiny_Patchwork_04_Clapper_BERNINA_WeAllSew_Blog_1080x1080px1.jpg)
Presser Foot
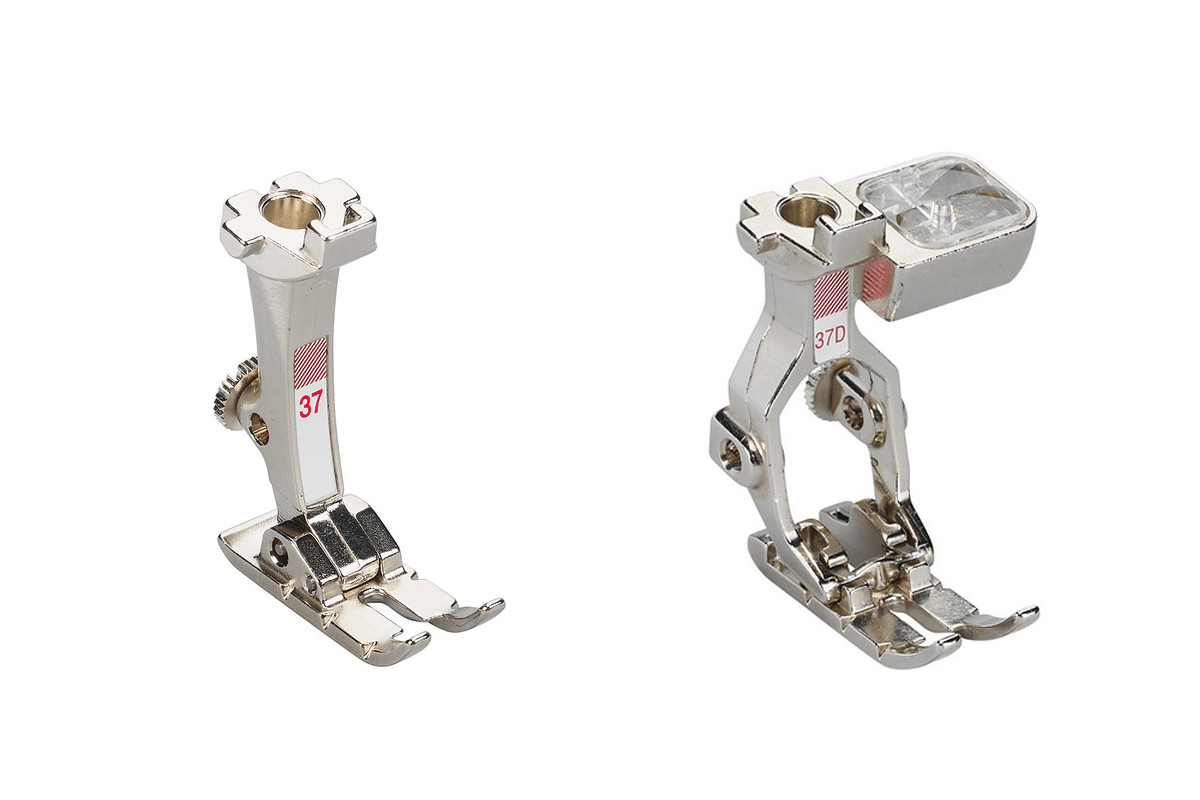
There are multiple patchwork presser feet to choose from for your BERNINA—the #37/37D, #57/57D, and #97/97D. How do you know which to choose?
![MTC_Tiny_Patchwork_05_Quarter_Inch_Feet_BERNINA_WeAllSew_Blog_1080x1080px[1]](https://weallsew.com/wp-content/uploads/sites/4/2022/08/MTC_Tiny_Patchwork_05_Quarter_Inch_Feet_BERNINA_WeAllSew_Blog_1080x1080px1.jpg)
Patchwork Foot #37 is a classic 1/4″ piecing foot designed for 5.5 mm machines. There is also a version of this foot that can be used with Dual Feed, the #37D.
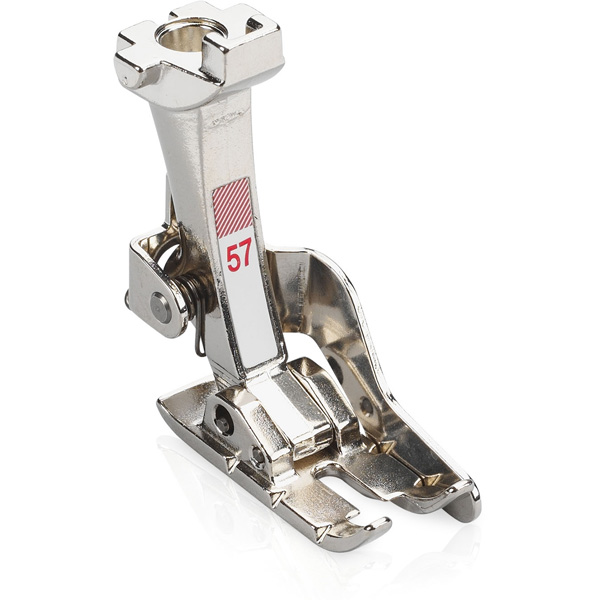
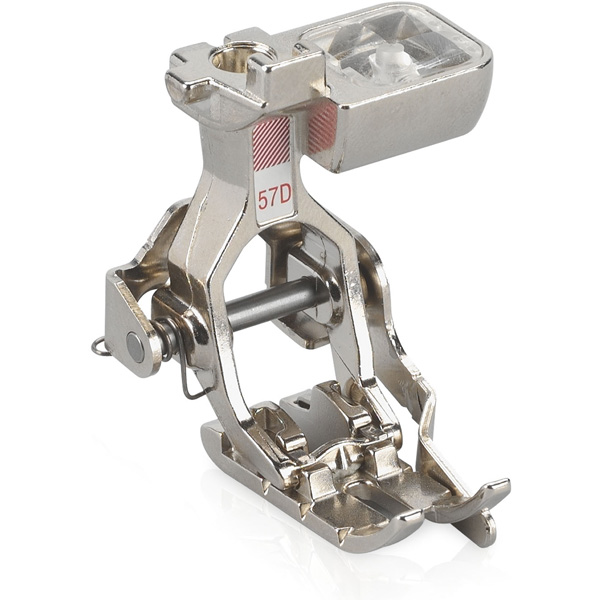
Patchwork Foot #57 is a 1/4″ piecing foot with an additional small guide on the right side of the foot and it is also designed for 5.5 mm machines. There is a Dual Feed version of this foot as well, the #57D.
![MTC_Tiny_Patchwork_07_[1]](https://weallsew.com/wp-content/uploads/sites/4/2022/08/MTC_Tiny_Patchwork_07_1.jpg)
Patchwork Foot #97 is a little bit different. This is a 1/4″ piecing foot designed for 9 mm machines. Which means that the right toe of the presser foot measures 1/4″ wide, but the left toe, as well as the area of the presser foot behind the needle, is a bit wider to maximize contact with the wide feed dog on this machine. And you guessed it—there is a Dual Feed version of this one too, the #97D.
![MTC_Tiny_Patchwork_08_[1]](https://weallsew.com/wp-content/uploads/sites/4/2022/08/MTC_Tiny_Patchwork_08_1.jpg)
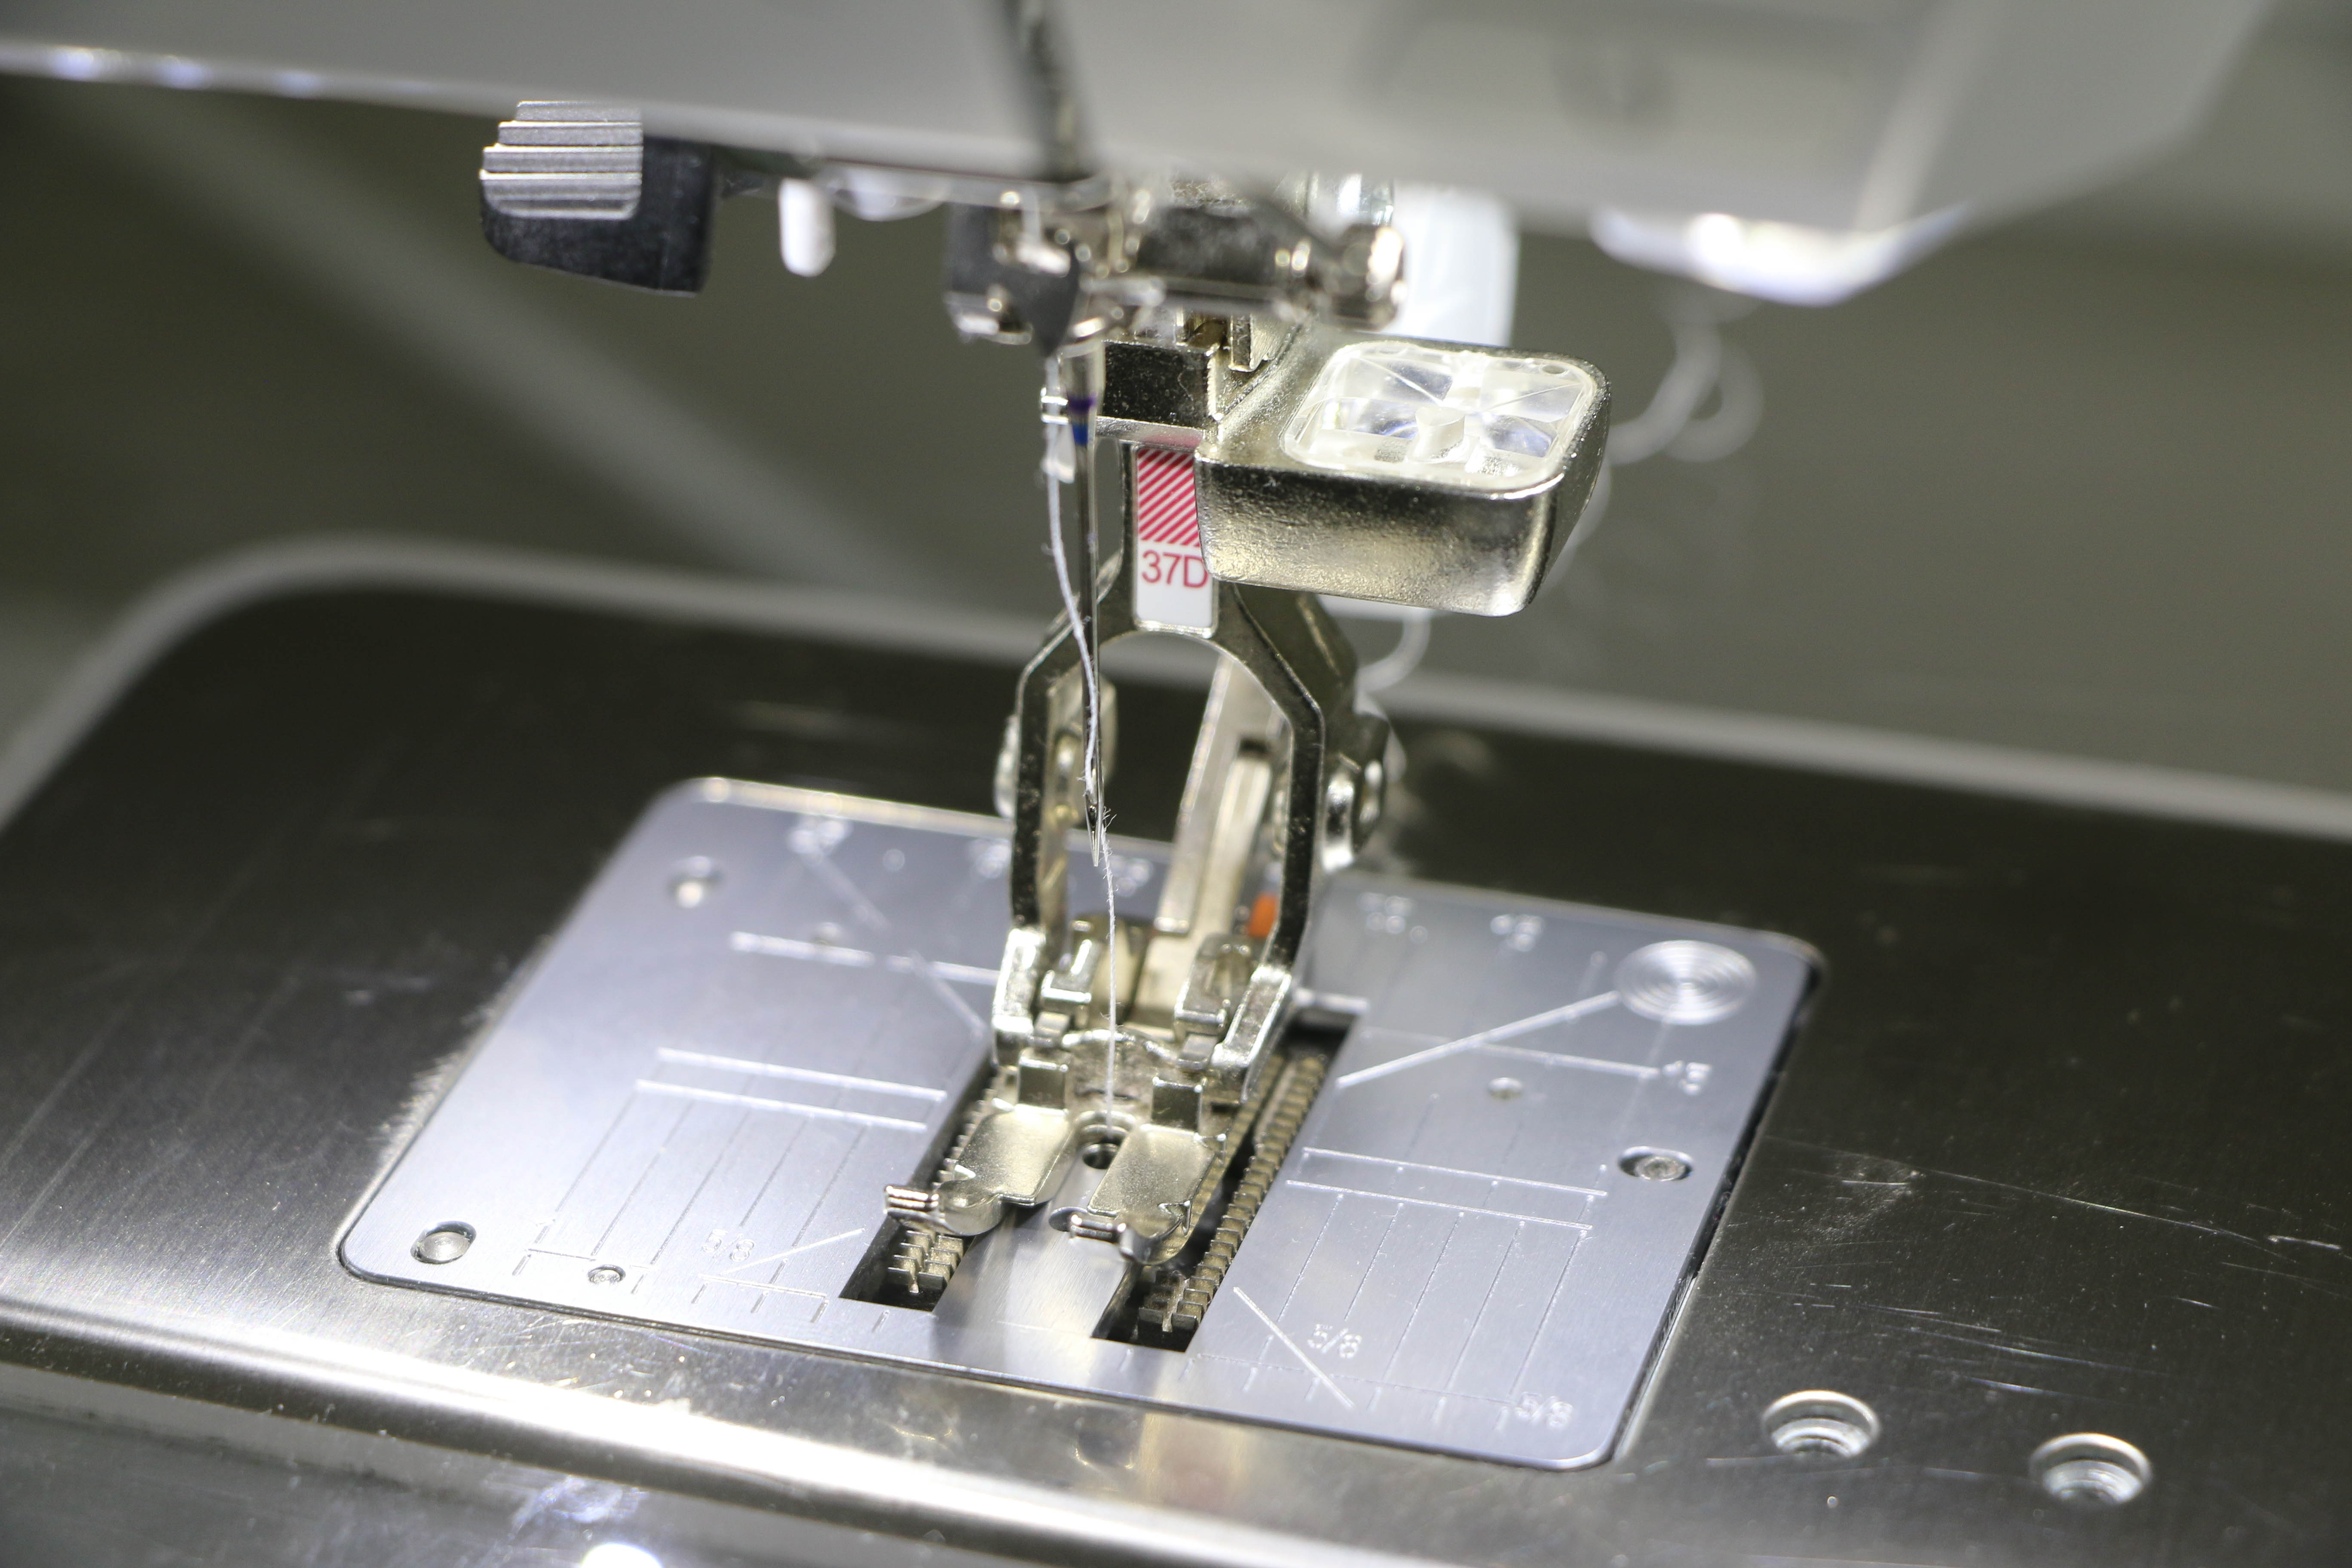
Ultimately the decision on which presser foot to use really boils down to personal preference. No matter what feels comfortable to you, there is an option! There are a few features about all of these presser feet that make them the best tool for piecing tiny patchwork: the needle opening, the “toes” of the foot, and the base of the foot.
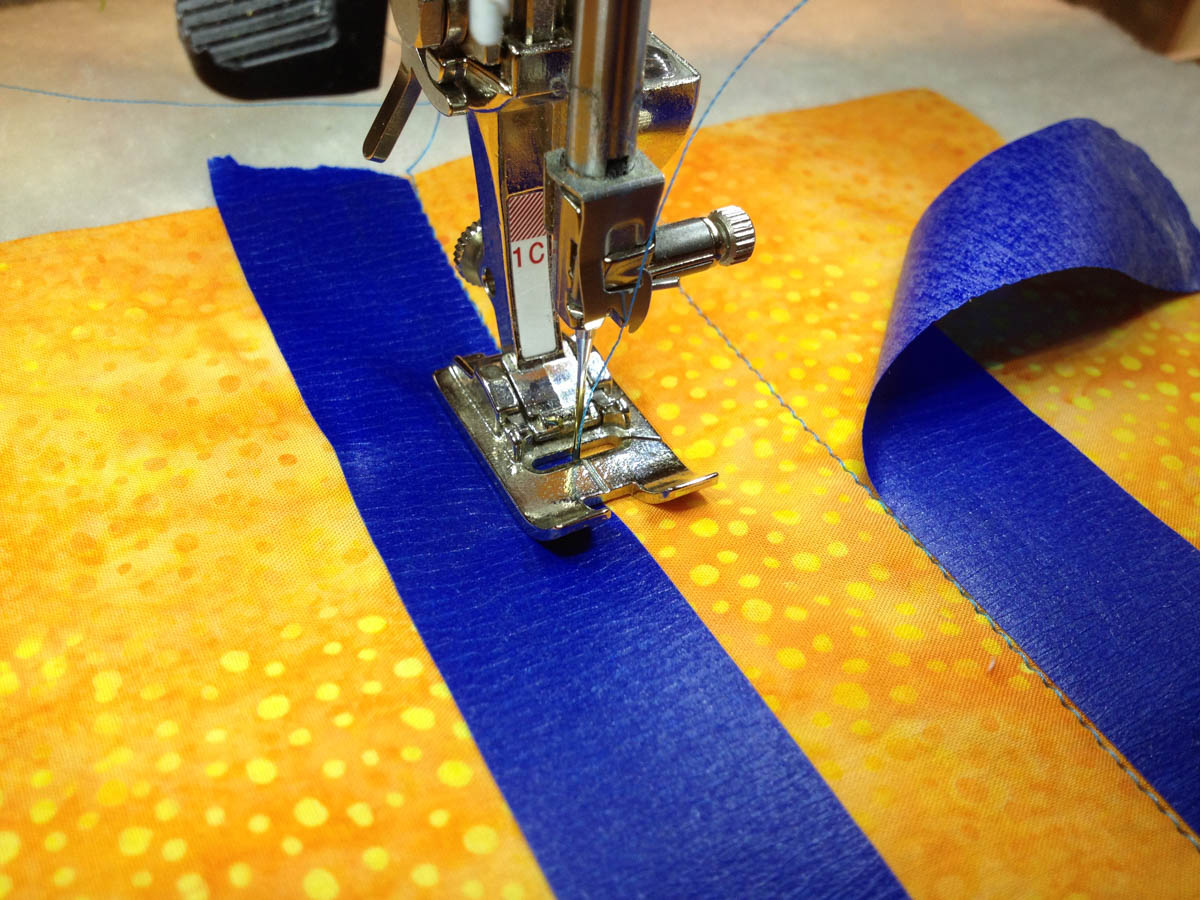
The needle opening on all of these presser feet is incredibly narrow, as they are designed for a straight stitch. Having the presser foot so close around the needle (without interfering, of course) gives better support to your fabric as it is being stitched through. That gives you a more precise stitch.
![MTC_Tiny_Patchwork_09_Needle_Opening_BERNINA_WeAllSew_Blog_1080x1080px[1]](https://weallsew.com/wp-content/uploads/sites/4/2022/08/MTC_Tiny_Patchwork_09_Needle_Opening_BERNINA_WeAllSew_Blog_1080x1080px1.jpg)
Of course, we know that these feet are engineered to be 1/4″ wide so that when you guide your fabric under the foot, and the raw edge is aligned with the presser foot, you will have a precise 1/4″ seam. But the “toes” on your presser foot have a few other helpful markings that you may not have noticed before!
There are small notches in the presser foot (on both the left and right sides) that align with a few helpful points: one directly in line with your needle, one 1/4″ in front of the needle, and one 1/4″ behind the needle. These markers make it so easy to gauge where you’re at, especially because that narrow opening for the needle can limit your visibility. If you’re pivoting around corners or stitching Y-seams, these markers are a lifesaver!
![MTC_Tiny_Patchwork_10_Marks_on_Foot_BERNINA_WeAllSew_Blog_1080x1080px[1]](https://weallsew.com/wp-content/uploads/sites/4/2022/08/MTC_Tiny_Patchwork_10_Marks_on_Foot_BERNINA_WeAllSew_Blog_1080x1080px1.jpg)
If you’re working with really tiny pieces, sometimes a 1/4″ seam allowance is too big and bulky in which case you may want to try a 1/8” seam allowance. Our patchwork presser feet have guides for that too! You will find a small notch on the inside of each toe that indicates your 1/8” line.
![MTC_Tiny_Patchwork_11_Guides_BERNINA_WeAllSew_Blog_1080x1080px[1]](https://weallsew.com/wp-content/uploads/sites/4/2022/08/MTC_Tiny_Patchwork_11_Guides_BERNINA_WeAllSew_Blog_1080x1080px1.jpg)
Straight Stitch Plate
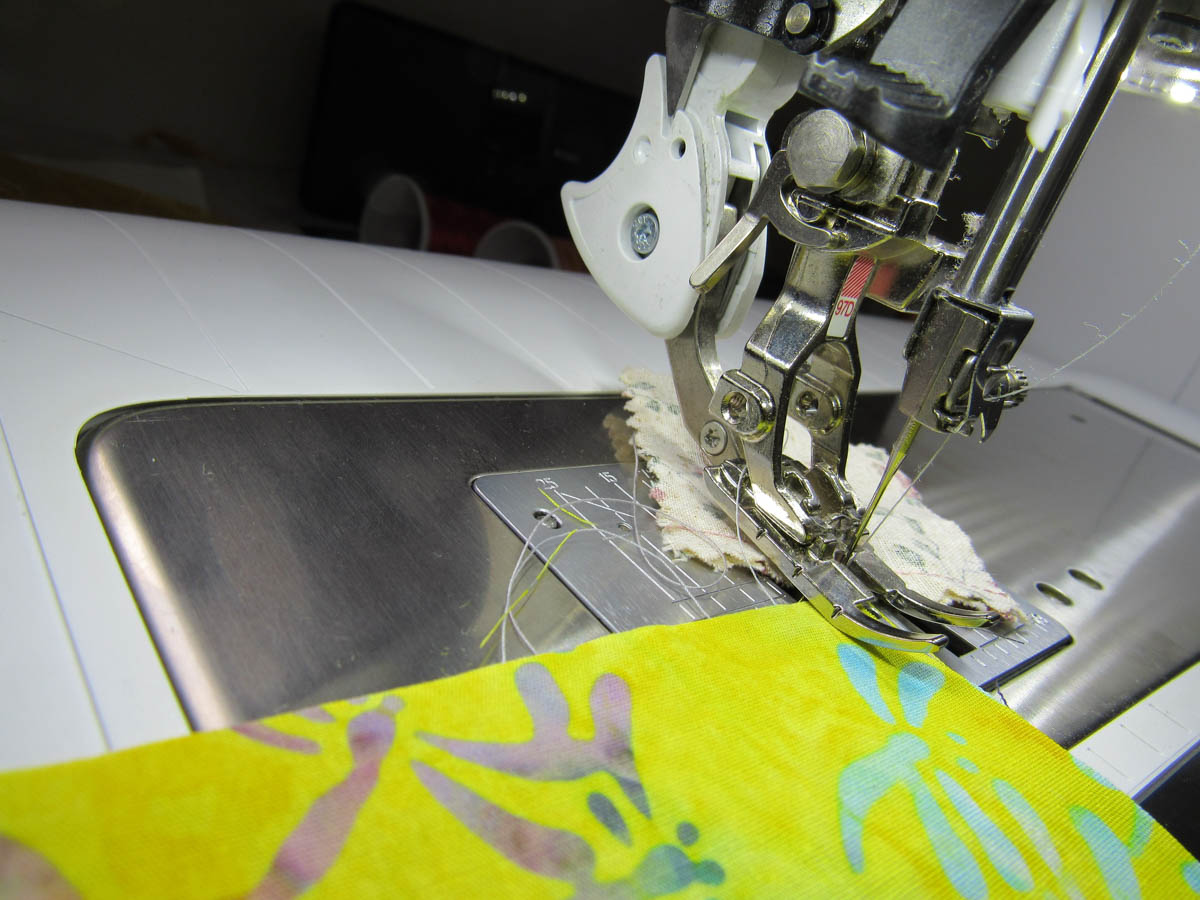
When working with small pieces or fine fabrics, occasionally when you take the first stitch at the beginning of the seam, you might experience the needle pushing the corner of the fabric down into the stitch plate. If you’re using a standard stitch plate, there’s a lot of space there for your fabric to get pulled into! One easy way to prevent that is using a straight stitch plate.
![MTC_Tiny_Patchwork_12_Straight_Stitch_Needle_Plate_BERNINA_WeAllSew_Blog_1080x1080px[1]](https://weallsew.com/wp-content/uploads/sites/4/2022/08/MTC_Tiny_Patchwork_12_Straight_Stitch_Needle_Plate_BERNINA_WeAllSew_Blog_1080x1080px1.jpg)
Similar to how a straight-stitch presser foot gives your fabric better support for stitching, the Straight Stitch Needle plate adds so much stability to your sewing, but from the underside. The combination of these two tools sets you up to sew as precisely as possible with small pieces or small seam allowances.
Needle & Thread
Of course, your needle and thread choices impact your piecing! The finer your thread, the better for tiny patchwork. Thread may not seem like it takes up space, but when you have many seam allowances intersecting in a small area, that extra bulk can surprise you!
I recommend using a high quality very fine, but strong, thread for this. What weight will vary depending on the fiber and manufacturer of your choice—unfortunately, there is not a standardized scale for measuring thread weight among brands. Traditionalists often stick to exclusively natural fibers (cotton, generally) for their quilts and patchwork, but polyester has become more commonly accepted. If you are working with vintage or antique fabrics though, I advise sticking with cotton because these fabrics are more delicate.
For cotton threads, look for 50 – 60wt threads and for polyester, go for 60 – 80wt. Some of my personal favorites are Mettler Silk Finish Cotton 60wt or Aurifil 50 wt for cotton and for polyester, I love Mettler Seralon, Seralene, or Seracycle. Seracycle is a new, 100% recycled poly made from 100% post-consumer recycled PET bottles. Hooray for greener choices!
![MTC_Tiny_Patchwork_13_Threads_BERNINA_WeAllSew_Blog_1080x1080px[1]](https://weallsew.com/wp-content/uploads/sites/4/2022/08/MTC_Tiny_Patchwork_13_Threads_BERNINA_WeAllSew_Blog_1080x1080px1.jpg)
Your needle size is always dictated by your thread choice. Thicker thread calls for a larger needle and finer thread needs a smaller needle! Remember that with thread weight, larger numbers mean finer thread but needles are the opposite. A smaller needle size will have a lower number. For small piecing, I recommend using a needle no larger than 80/12. If you’re using a particularly fine thread (like a 60wt cotton or 80wt poly) you’ll probably want a 75/11, 70/10, or even 60/8.
Regardless of size, you will want a very sharp needle like a microtex. Specialty finishes on needles, such as chrome or titanium, will also help them stay sharper for longer.
If you really want to dive into the distinctions of needles and threads, I highly recommend this post written by our friend Lori Kennedy.
Efficient Piecing
Starts and stops with small patchwork can be tricky. If you’re working with lots of small seams, chain piecing will be your best friend! You can work through many pieces pretty quickly if you don’t have to stop and cut your threads each time.
![MTC_Tiny_Patchwork_14_Chain_Piecing_BERNINA_WeAllSew_Blog_1080x1080px[1]](https://weallsew.com/wp-content/uploads/sites/4/2022/08/MTC_Tiny_Patchwork_14_Chain_Piecing_BERNINA_WeAllSew_Blog_1080x1080px1.jpg)
When you reach the end of one seam, stop, raise your presser foot, slide the next piece in, and keep stitching! If you use your Free Hand System to raise the foot, you’ll be able to cruise through even faster.
But lining up tiny pieces underneath a presser foot can be tricky. Try using a stiletto to guide your fabric where you need it, especially close to the presser foot. The fine point on this tool can get much closer to the presser foot and needle area than your hands can!
![MTC_Tiny_Patchwork_15_Stiletto_BERNINA_WeAllSew_Blog_1080x1080px[1]](https://weallsew.com/wp-content/uploads/sites/4/2022/08/MTC_Tiny_Patchwork_15_Stiletto_BERNINA_WeAllSew_Blog_1080x1080px1.jpg)
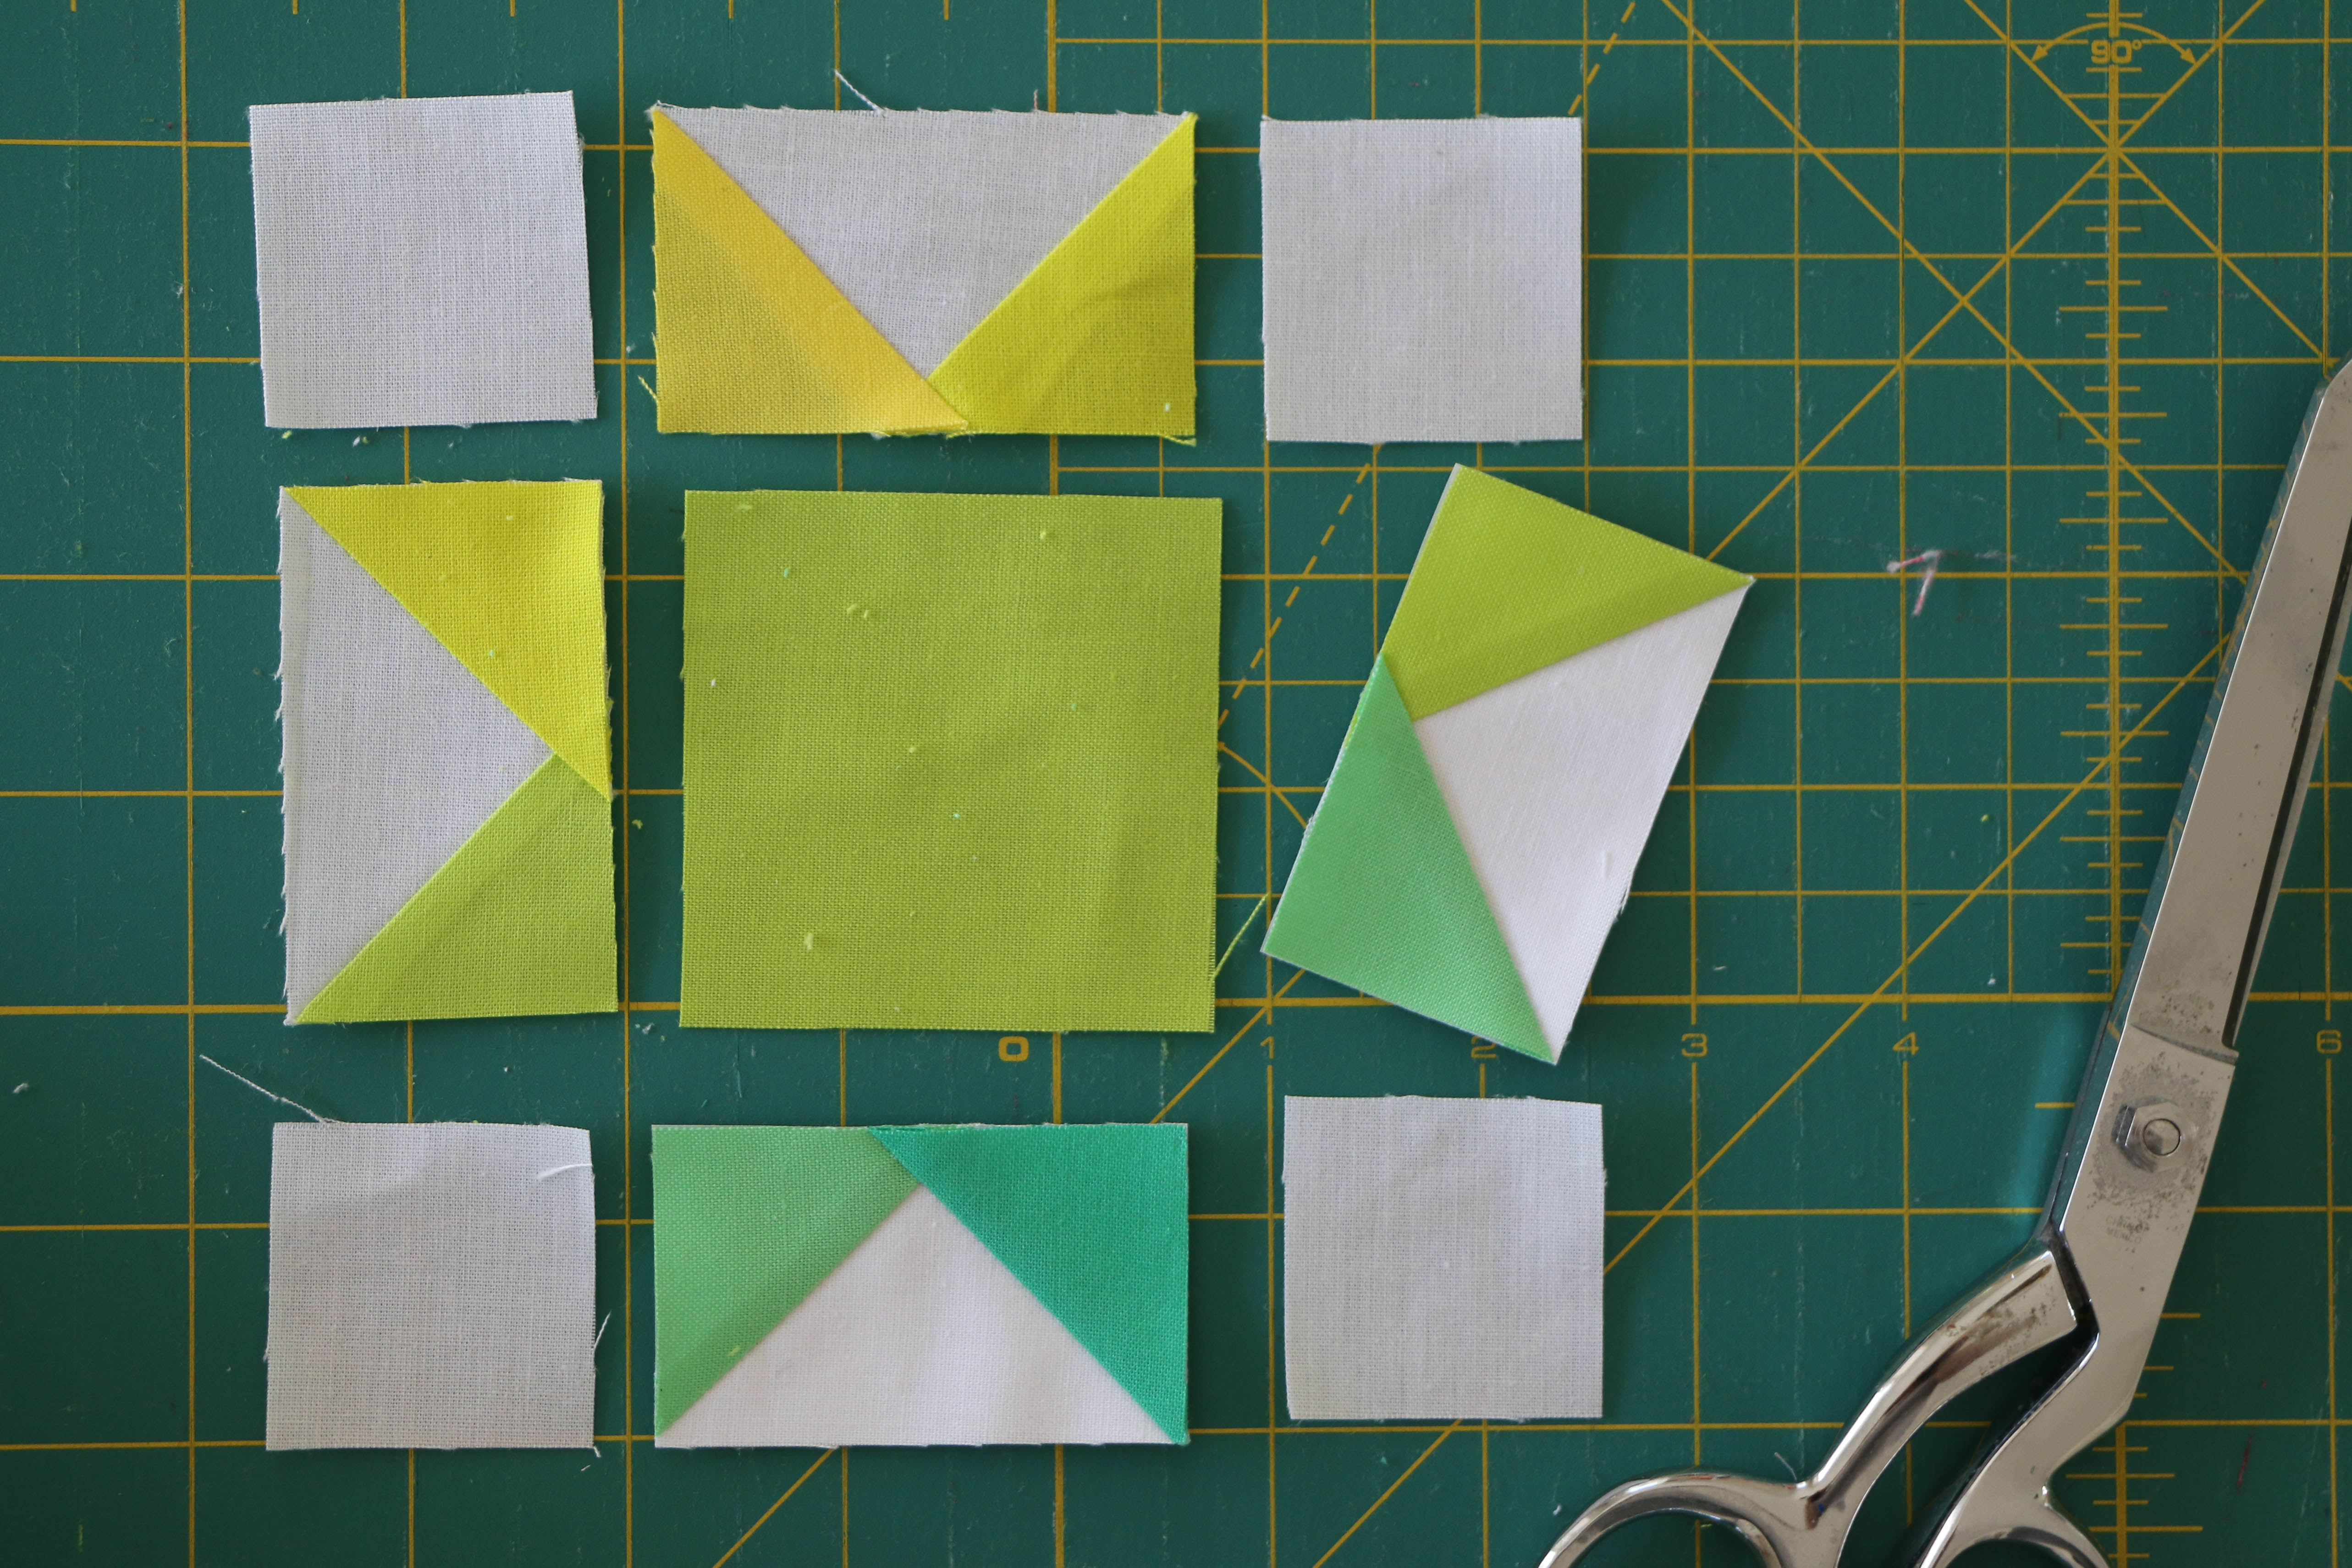
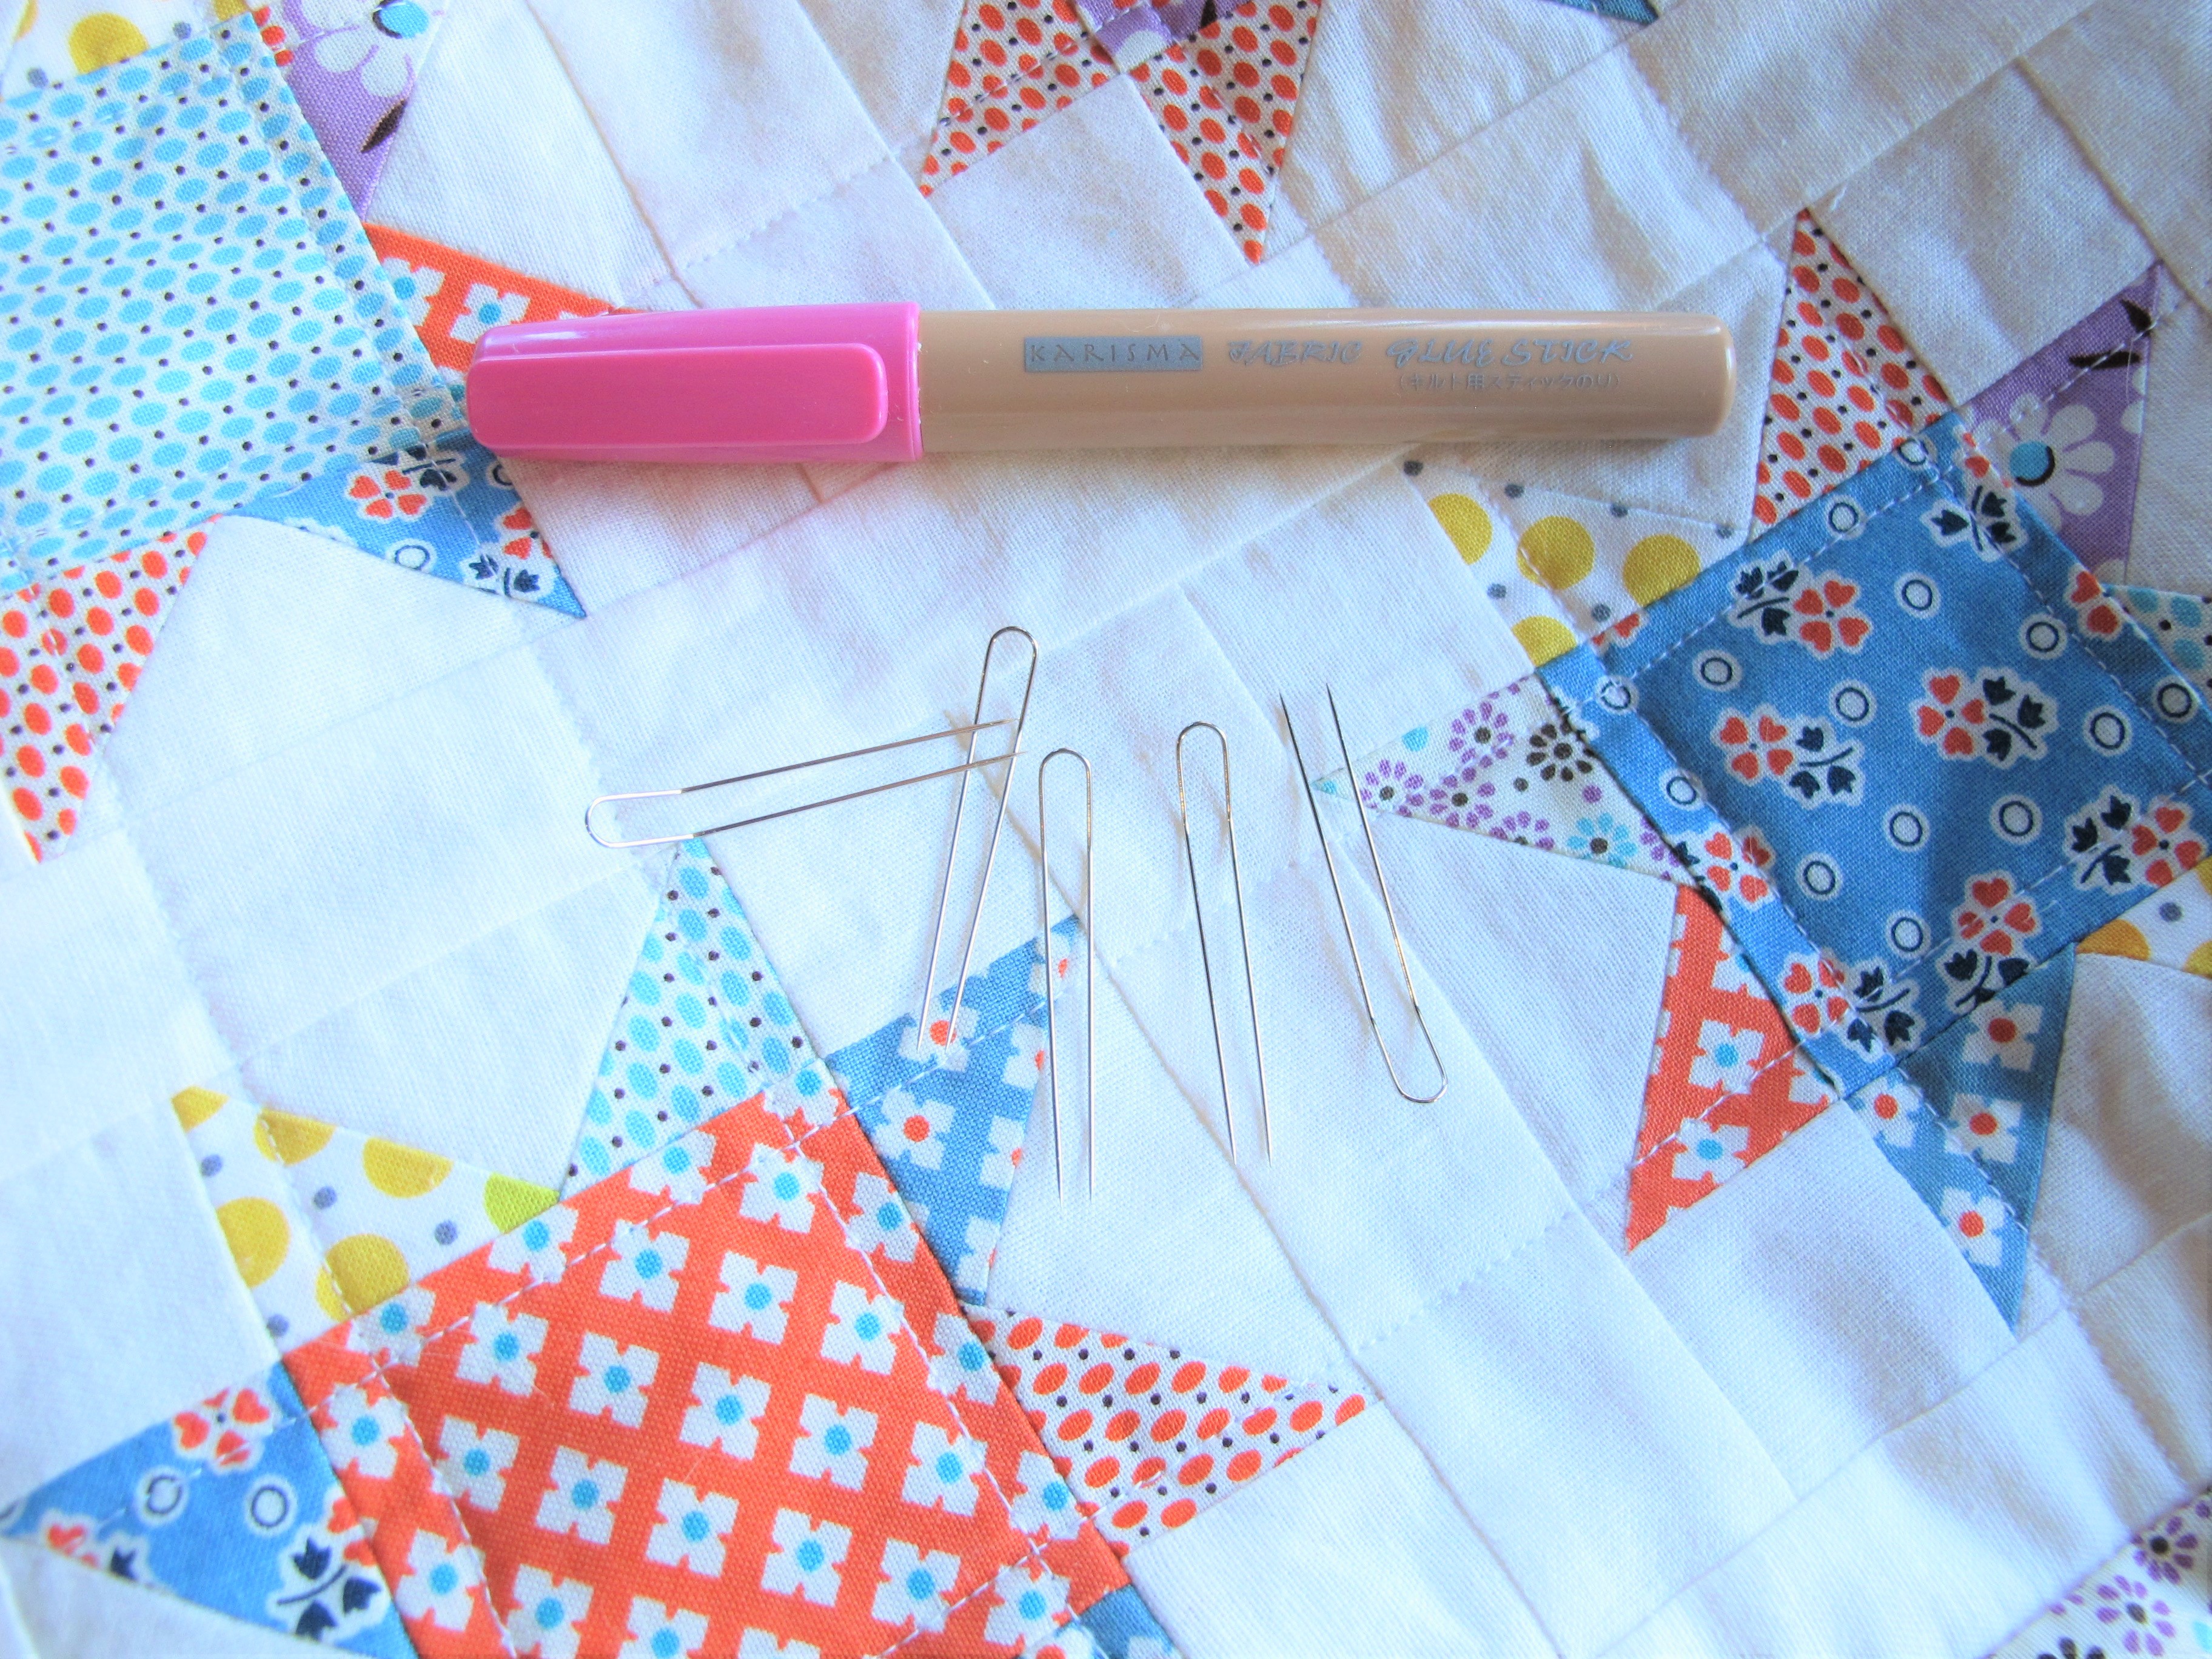
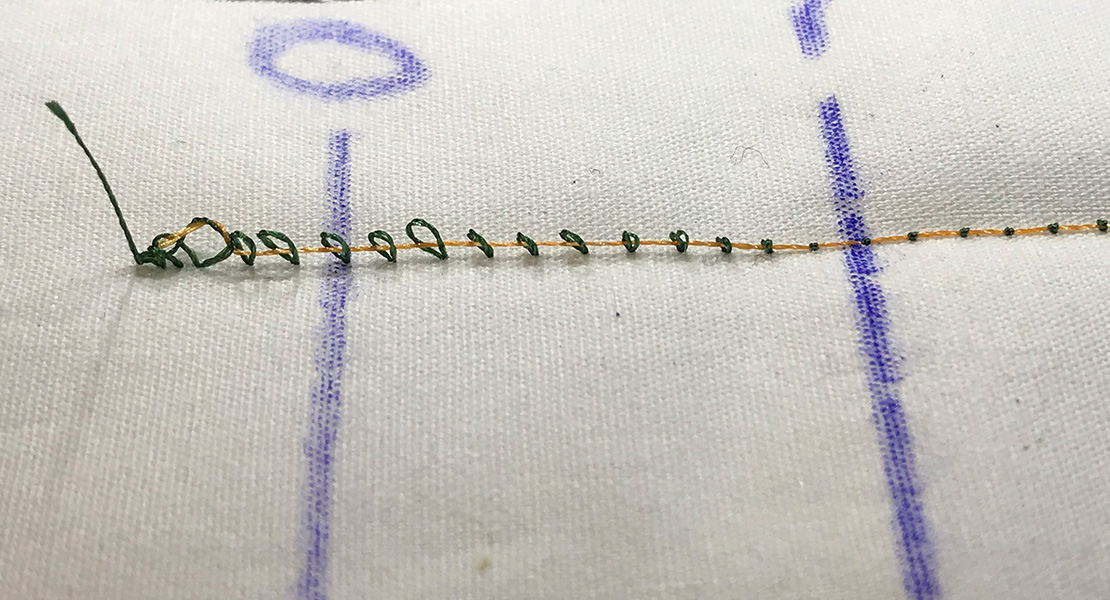
A shorter stitch length can also be beneficial for small seams. Our standard stitch length is 2.5 mm, which is about 1/10”. The smallest half-square triangles in my pin cushion finish at just 1” which means I only have about 10 stitches securing each side. A shorter stitch length means that my seams (and there are many of them in this project) will hold much more securely. I recommend 1.5 to 1.8 mm.
![MTC_Tiny_Patchwork_16_Stitch_Length_BERNINA_WeAllSew_Blog_985x585px[1]](https://weallsew.com/wp-content/uploads/sites/4/2022/08/MTC_Tiny_Patchwork_16_Stitch_Length_BERNINA_WeAllSew_Blog_985x585px1.jpg)
Hopefully, these tips help you on your journey through tiny patchwork! What’s the smallest quilt block you’ve made? Let me know in the comments below!
![MTC_Tiny_Patchwork_17_Pin_Cushion_BERNINA_WeAllSew_Blog_1080x1080px[1]](https://weallsew.com/wp-content/uploads/sites/4/2022/08/MTC_Tiny_Patchwork_17_Pin_Cushion_BERNINA_WeAllSew_Blog_1080x1080px1.jpg)
Used Products


What you might also like


1,287 comments on “Tips for Tiny Patchwork Piecing”
-
I just use my regular sewing foot. I don’t have a patchwork foot.
-
Love my 37D foot.
-
I like my 1/4 inch with guide. Makes things easy to see.
-
Just learning, I’m a newbie! Using the 37 foot.
-
-
I use my 57 or 97D foot for patchwork.
-
My go-to-patchwork foot is #97D!!!!
-
I used my 97D as well!
-
I use the 97D foot almost always for piecing.
-
-
Love my 1/4 in plastic foot
-
I used my 97D as well!
-
-
I absolutely love the 97D, pleasure to use
-
Go to patchwork foot is#37
-
I love the 57D foot. It is so easy to use and I usually have great success with it.
-
I use my #97 foot w/ stitch guide…
Absolutely love my Bernina 770QE -
I have both. 57 and 37. I use 37 regularly, but I am glad to have both.
-
I use my D97.
-
I always use a 1/4″ foot with the guide. Makes things so much easier.
-
I love my 37D. Foot for patchwork
-
My #37 foot for piecing on my 153 and my 37D or 97D when piecing on my 880 plus!
-
-
57 is my go to Bernina Foor!
-
I use #37
-
Patchwork-Foot-97 is what I like to use.
-
I use my 37 —almost every day!
-
Fav foot is 97D
-
97D is my go to for piecing of any type.Absolutly love the 1/8 in on inside of foot.
-
I use 37 patchwork foot, and 57 D, quarter inch foot with the guide bar. My Bernina Machines are used for everything quilting. A 155, 180 and 1260. I only do quilting projects now that I am retired. Sometimes I have 2 machines at the ready simultaneously. One straight stitch throat plate, one with zigzag.
-
My favorite patchwork foot is 97D. The article was so interesting with great tips- really enjoyed it-
-
I use my 37 D foot The 1/4” foot. I love my 770QEE
-
It depends on what kinds of pieceing I’m doing. I have lots of feet. The clear foot comes in handy if the fabric is finer and I need to see better. Like for a crazy quilt! I’m always having fun
-
I use my 37D and single hole plate for most things and sew comfortably with them.
-
I love working with my 97D patchwork foot.
-
I use the # 37 foot. It came with my machine and I have gotten accustomed to using it; it feels comfortable for me and therefore, makes me confident.
-
I can’t live without my 97d. It keeps my 1/4″ straight and true.
-
You gotta go with the 97D!
-
I use the 97D foot for piecing. This is a must for me to ensure accuracy.
-
My favorite foot is 57D
-
I use the #57 foot for all my sewing that calls for quarter in. (1/4) seam allowance. Thanks for the chance to enter!
-
Classi???
-
I use foot 57. Works great.
-
It really depends on what I am sewing but my favorite 1/4 inch foot is the 57D or the 37D.
-
I use my 97D foot on my 790 and the 37 on my 475QE. I use a starch pen to apply Best Press to my seams before pressing.
-
I use my 97 foot
-
I use my 37D and , yes, straight stitch footplate!
-
I love my 97D foot and will use the new tips i got from this post. I have just been introduced to pocket prayer quilts an am anxious to get started!
-
I use the #37 Patchwork foot, usually with the seam guide that I also happen to have.
-
I use my 97D with my 5 series and 57 with my older machine
Makes a world of difference in stitch accuracy -
I use my 57D for almost everything.
-
I am very fond of the 37d foot for all 1/4” seams thanks to the training of Dianna Marshall at Gloversville Sewing Center,
-
My fav is the 57D. I use this foot all the time for piecing
-
I also use my regular sewing foot, and move the needle over 1 notch.
-
My favorite patchwork foot is my 97D!
-
I use my 97D on my 780!
Love it… -
My 97D for piecing quilt projects! Love it!
-
I too use my regular foot for doing almost everything on my B570QE, which I love. It’s my favorite sewing machine. It’s an amazing machine.
-
My go-to patchwork foot is #97D!
-
I use patchwork foot 37 and the straight stitch plate. Perfect results every time!
-
I use my regular foot 1D
-
I use the #37 a LOT.
-
97D
-
I use a #57 Patchwork foot with a guide when piecing and a #37 Patchwork foot when English paper piecing! I love my BERNINAs !!
-
My go to sewing foot is the 97D
-
I use 1970’s BERNINA to piece a lot it still runs perfectly. I have 1/4” marked!
-
I like my 97D foot fo patchwork
-
I use either the 97 or 97D, depending on which machine is not already in use for other projects.
-
I use either the 97 or 97D, depending on which machine is not already in use for other projects. I have also used the 57. It’s nice to have a full tool box
-
I use my 97 patchwork foot.
-
my 97 foot
-
I love my 97D foot!
-
My 97D! Works best for me! :o)
-
-
Depends on what I’m piecing.
-
I love my #57 but will use #37 sometimes
-
-
I use #37.
-
My go-to piecing foot is #37 with a straight stitch throat plate. Never fails me.
🙂 Linda
-
My favorite patchwork foot is the 37D. I feel more confident each time I use it. Practice, practice, etc.
-
97D is my go to foot for piecing.
-
My go to is my 37 patchwork foot!
-
-
I use patchwork foot #37 all the time.
-
I love my #37!
-
I have been using my #37 foot for years and absolutely love it. I recently purchased a Bernina 790 and am wondering if the 37D would be a good purchase? I would love to win the backpack prize! I am a Bernina lover for over 45 years.
-
I don’t own a patchwork foot so I use #1!
-
Depends on which machine I’m using. On my 770 it’s the 97/D and my 475 likes the 37. Also straight stitch plate for both.
-
I love #97D, and use it for more than just patchwork.
-
Hmm. . . Can’t seem to comment other than replying, but oh well. I never win anything anyway. I LOVE the 97D and use it for just about everything, but especially patchwork.
-
-
I love my 37D foot for piecing.
-
97 is my go to foot for patchwork on my 480.
-
57 has been my go to!
-
-
I love my 57D foot!
-
Love my 37D! ?
-
I use patchwork foot 37 and a straight stitch throat plate.
-
I love my 97D !!
-
My absolute favorite is 97D.
-
37 or 97D depending upon which machine I am using.
-
#37
-
My go-to patchwork foot is 57D!
-
I use my 57D foot everyday for patchwork! Love it!!!
-
I sew on a 630–a 5.5 mm machine. I love the #37 foot. I can use either side of the foot as a quarter inch guide and I also use the inside toe for one-eighth inch seam allowance.
Because it does not have a guide attached, I can also use it for stitching in the middle of the fabric for foundation piecing. I also have the option of using it with the patchwork seam guide. -
37D, hands down! It’s my go-to foot when I need an accurate 1/4″ seam allowance.
-
All are great, and this article was so informative! I usually have my 97d on while piecing.
-
I finally bought the #37 foot a month ago. I didn’t really think it would make that much of a difference, but it does! The right tool for the right job.
Thanks for all the “tiny tips”! -
I’d like to do more Patchwork with my #37 and Bernina 790. Love the blog post about creating a great sewing station in a tight space. Maybe once I follow that advice I’ll do more patchwork
-
I love my 37D foot and use it when I piece or quilt. It helps keep all layers together when sewing a 1/4 seam.
-
I always use my regular sewing foot or number 37 . I love piecing
-
I love the #97D foot. I like the marking for 1/4″ away from the needle.
-
-
I almost exclusively use my 97D foot with guide for quilting. Accurate!!
-
I use my regular zig zag foot but maybe I need to change that!
-
Definitely my 57D foot, makes a world of difference!!
-
I was taught to use the #37!
-
97D is my go to foot
-
I use a 37 but I really want a 97D!
-
37 has been my go-to. I didn’t know the red marks were 1/4″ guides! That willbe great to know going forward!
-
-
I think my favorite is 97D!
-
Definitely #37! Gets the job done.
-
I use a #37.
-
I gotta go with 57d foot. I love having the bar built into the foot because I tend to be a speed demon when piecing and the little bar just helps me keep more consistent
-
I think I need to utilize this foot. Anything to help my accuracy
-
-
I love using my 97D foot for piecing. Also have a 97 that came with my 570QE.
-
It varies a bit, but my usual go to is 57D.
-
Love my 37 foot for patchwork piecing
-
I am new to piecing and find the 57 quite handy.
-
-
Love my 97D
-
I use 97d and the little guide piece that screws down. I don’t know it’s name but I love it!
-
I use 57D!
-
Favorite patchwork foot is #97.
-
I usually use the 97D with the seam guide
-
97D for me!
I am looking forward to some piecing tonight. -
Pretty simple, I like a standard 1/4 inch foot with high visibility. 🙂
-
97D is my go to foot with a straight stitch plate!
-
I am still working up to patchwork, but to start out, I would use my standard 1C foot. But the patchwork feet are certainly tempting!
-
You will love piecing once you get started. Just remember there are no mistakes only learning opportunities and creative license.
-
-
I’ve been using the #37, but just picked up the #97 for my 9mm machine.
-
I use my 97d but I think I want to try the 57d. The little bar might be just what I need when sewing fast.
-
-
#37 is my go to. Nice giveaway… thanks for the chance to win it!
-
97D is my all time favorite!
-
#37
-
My go to is the 97D , 1/4 “ foot . But will have to check out 37 for piecing patchwork. But my 97D and I do great! Love my B790+
Thank you Bernina
-
-
Because I’m an avid quilter, my 97D foot is invaluable to me!! It’s on my machine 90% of the time!
-
I use the 97D foot. It’s perfect for a 1/4” seam for me.
-
Well, my go to foot on my 1260 Bernina is the 37, and on my 590 is the 97 with a straight stitch plate…..but I love the 34 too my 590…sew many choices
-
Well, my go to foot on my 1260 Bernina is the 37, and on my 590 is the 97 with a straight stitch plate…..but I love the 34 too on my 590…sew many choices
-
97D is my go to but it appears as though I should give the 37 a whirl!
-
I use my regular 1/4” foot- love it but seems i may need to add to my ‘feet collection’
-
I bounce back and forth using 97D and 37D. Sewing on a Bernina helps too!
-
#37 for sure!
-
I typically use the 1/4 inch foot for piecing quilts. Great giveaway. Love my three Berninas!
-
97d all the time!!
-
I’m a 57D fan!
-
97D is my go to.
-
I generally use the 37D, if I need to do something else I don’t absolutely have to change my foot.
-
#37 is always my go-to foot for patchwork piecing.
-
I tend to use my #1 foot but also use my three-sole walking foot quite a bit.
-
I love my 97D! ❤️
-
37D is my bff! Honestly, I love all the different feet at different times, but I keep coming back to the 37D.
-
I love my #57; it has made my piecing so much more accurate.
-
I really appreciate using foot#37 on my Aurora 440.
-
I really haven’t done much patchwork. I don’t have a specific patchwork foot, though.
-
I use my #97D with the straight stitch plate.
-
My favorite foot for piecing is the 37D. It makes perfect 1/4″ seams every time! I love how easy Bernina has made it to change feet too!
-
My go to foot is 57 on my Bernina 350 & 97D on my B880.
-
I use #57D. I love my Bernina!
-
#37D with a straight stitch plate and a stiletto. Slow speed helps too (but sometimes I get inpatient!)
-
I use a 37. Would like more info on quilting with my new Q20 please?
-
I love my 37D foot. Great give-away. Love the backpack!
-
I use my Bernina walking foot most of the time on my 430 when I am piecing a quilt block.
-
-
The 97D of course!
-
#37 cannot wait to get sewing again. We just moved and our HHG arrive next month.
-
I use foot #1 but clearly I need to expand my knowledge based on all the above comments and not a single comment I saw said they use this foot.
-
I used to use my #1 until I learned about 97 and 97D. I have both of those now. The 97 for my 730 and the 97D for my 880. Once you use that you’ll never go back!
-
-
I use presser foot #1
-
I use my 97D. It has helped me make cleaner lines for sure!
-
My favorite patchwork foot is #37. Love BERNINA ❤️❤️❤️
-
It can depend on what I’m piecing but most often I use 97D. I Love sewing on my 770 QE and all my feet
-
I love the 57D.
-
Thanks for the chance to win this awesome stuff!! Wow! I literally just bought my first Bernina today so I was browsing the website and found this great post. From reading the comments I think I need to check out the #37!
-
In the past I have used both #37 and #57. Now I know that I should be using #97. I guess it’s time to go shopping!
-
I just use #1. I will read this blog and maybe change my mind??♀️
-
57d is hands down my favourite!
-
#37 is my patchwork foot
-
#37 foot. Always.
-
#37 foot. Always. I love it!
-
My go to patchwork foot is 97D for 880 & 830; 97 for 480 and 37 for 560. Love my BERNINAS!
-
My favorite patchwork foot is #97D. Love my Bernina ❤️
-
I’m a 97D fan for patchwork.
-
97D is my favorite so far! Still learning all about my new baby.
-
For my Activa 140 a #37. Then my new 570 QEE the 97D
-
I use the 57 with guide for most everything since I need that 1/4″ for projects. When I’m doing my version of applique I use the 34! Thank you for the opportunity to win all this lovely swag – just wish Bernina would offer it’s followers the chance to purchase.
-
I don’t have a patchwork foot, so I use the #1 foot.
-
I use #37 or #97 depending on which machine I’m using. I love my Berninas.
-
I love my 97D foot!! So versatile yet precise!!
-
My favorite foot is my 1/4 inch with the guide on the side.
-
I love the 97D. Best 1/4 inch on all of my piecing.
-
I just got my #37 foot and I already love it!
-
#37 came with my 350PE for a reason. 🙂
-
37D is always the favorite.
-
My 97D with the seam guide really improved my precision.
-
Number 1 .
-
I love the 97D foot for piecing.
-
I’m just starting out in quilting, but I love my walking foot!
-
I love my #37 foot but I would absolutely love to branch out and try some new feet!
-
#97D is my go to piecing foot
-
I like using 1D because I can control the fabric better with it. Although, like a lot of others have commented, I also utilize 97D sometimes and it absolutely depends what I’m constructing.
-
#37
-
#97d! This was a most helpful tutorial.
-
I love my 97D foot with and without the guide! Great for both 1/4” and 1/8”.
Love to win this fantastic giveaway ??
-
97D is my favorite
-
I use foot 37 at my bernina 790 plus. Nice giveaway
-
I use 97D foot and straight stitch plate.
-
I use the #57 foot. I have both old and new Berninas and each machine has one so I don’t have to go look for one!
-
Love my #37! May need another one for a second machine…
-
I prefer 37 most days. Sometimes I grab 57 instead.
-
Love my 39c. And my 880 plus
-
Hi I use a 37 on my machine to piece everything! Lovely giveaway!
-
I love my #37!
-
I use my 97D exclusively-sooo accurate!
-
#37 is my favorite foot to use for patchwork. One thing good that came out of the pandemic is I learned how to quilt!
-
37
-
My favorite piecing foot is 97D. Precision at its best. Love we all sew. Thank you for doing this giveaway
-
My go to foot is my old number 37 patchwork foot! I’ve had it for over 20 years.
-
97D and a single stitch plate. Nice giveaway. Thanks.
-
I generally use foot 97d.
-
Most of the time I use my 1D for patchwork but if there are curves in the pattern I will switch to the 97D which works great for those.
-
97d! Hoping to win!!!
-
#57 on my 1001 machine is my go to. The guide helps me stay on task ?. On my 750 I use the #97D so I can utilize my dual feed!
-
I love my 57D. It’s the perfect addition to my 570QEE, which has always been my favorite piecing machine.
-
When piecing, I use the 97D foot.
-
I use the #37D.
-
My 1/4″ foot is my fav for quilting.
-
I do not have a piecing foot yet. This is a just learning project for me. I am currently using my 1C foot.
-
I’d use my #37!!!
-
I love my 770QE , I love the 37D foot with the dual feed while piecing!
The walking foot is also great when FM quilting! -
My 1/4 inch foot. Thanks for the tips. I feel brave enough to try tiny piecing now.
-
97D all the way for me, baby! But all these 37’s in the comments has me curious.
-
I use the #37 foot on my B535. It gives me perfect ¼” seams.
-
I’m wearing out my #37D foot–it’s on my machine most of the time (until I’m ready to do the quilting)!
Ruth in VA -
I like #37..thank you for the great giveaway
-
My fav is 50. Oh wait and 97D!
-
I love the 97D always accurate
-
I love the 97D
-
I absolutely love the patchwork foot. I started sewing on a Bernina930 40 years ago. A year ago I bought a new Bernina. The new patchwork foot is a game changer. It is fabulous!!!
-
#57 works great
-
My go to is #37.
-
I normally use the 97D.
-
I love using the #97D foot for piecing.
-
I have always used the #37! I am curious to try a new one now.
-
#37 – my favorite foot! Love all the useful markings!
-
I love the 57 foot for long strips. It’s also helpful when my niece is sewing. I also use the 97 foot quite a bit.
I still default to my B350, my first machine, for piecing. There I almost exclusively use a walking foot .
-
97D… with the presser foot pressure lowered to about 30
-
97D with attachment is my go to foot and the straight stitch foot plate. ?
-
I love the 57d for piecing. ❤️
-
57D
-
Wouldn’t be without the 97D!!
-
I use my 97D…love it and love the giveaway!!
Thank you 🙂
-
It depends on which machine I am sewing on: for the 550qe I like using #37 with quilt piecing and on the B480 I use 97D. For general sewing, I always use the #1 foot on either machine.
-
Without a doubt my go to foot is the #37!
-
97D works for me!
-
37D is my go to piecing foot! I love my Bernina 790+! I would love to win!
-
My go to foot is my 97d. It has really improved my piecing game.
-
Thanks for the helpful information. I use a quarter inch piecing foot.
-
#57D is my favorite. The dual feet and guide of the side make piecing a piece of cake! LOL!
-
I use the 37 foot with the single needle throat plate. Works swell.
-
I use #37.
-
I love the 37D for my 770 QE! I occasionally use my 97D
-
The #37 foot is by far my favorite! It’s very versatile
-
I use 1D and move my needle.
-
97D is my go to foot for piecing. Thanks so much for having such a nice giveaway! I love the backpack!
-
57D is my fav – thanks for a great giveaway
❤️❤️my Bernina’s -
I use the 97D foot for piecing.
-
I have used all of the 1/4” presser feet.
By far, 97D with guide is my favorite.
I also use it without the guide for regular sewing.
This give away is great! -
For most of my patch work I use my 57D, or my 37 foot. They both do such an amazing job. I do a lot of quilting and are always looking for a seam that us going to match up nicely.
-
I love my 97D foot!
-
I love my 37D foot for piecing, it is so actuate. Along with being able to cut thread with my foot pedal it makes quilt piecing so enjoyable.
-
I’d love to get all three! 37D is what I use right now.
-
My go to is #57 for patchwork, #37 is for paper piecing, which is my favorite way to go for tiny piecing!
-
I love #57
-
I love my 97D !!
-
Being a longtime quilter, I love my #37 foot and use it all the time! As a proud owner of a Bernina for almost a year, am still learning about all the various feet 🙂
-
I use a teflon foot #52 on my old Bernina 800!
-
My go to foot 37d
I love my Bernina and could really use the backpack for out of home calls for help! -
I have only used #1 – as a beginner, it’s worked alright, but I am looking forward to extending my collection to make my works looks more professional!
The gold plated #1 is absolutely lovely!
-
scant 1/4 #37
-
#37D the dual feed keeps the fabric from slipping about.
-
My favorite is #57 or #57D depending upon the machine.
-
97D for perfect piecing! Paired with knee lift there’s no stopping me!
-
I don’t get enough time to do a lot of quilting but when I do I use my tried and true foot 37.
-
Love and use my #97D
It helps move my fabric piecing with ease. -
I like the 57 or 57D for my 1/4” seams!
-
1/4 inch foot for piecing!
-
I am looking forward to using my new 37D pressor foot next Wednesday when I purchase my new B 570 QE. My old Berna was a true workhorse for me and I’ve loved it the nearly 30 years, countless wedding gowns and dozens of quilts I’ve made with it. But I’m afraid it has met with a fatal failure.
-
I use 97D on my 770 QE.
-
37D with helper down
-
57 D!! It gives an extra help with that side guide!! ?
-
I use 97D for patchwork.
-
I use the 97D foot. Love it for other sewing projects too.
-
I use the 37 foot on my 1230 and a 97D on my 590. The single hold plate is a game changer.
-
I like using my 37D foot, helps me with my seams always being the same.
-
I normally use the 97D foot, works great for me, or when I am at the small machine just the 37. For sure I will try to do the little pincushion, the instructions are so great.
-
#97D is my go to foot. Thank you for the giveaway!
-
37D! Thanks for giveaway.
-
My favorite patchwork foot is 57D
-
I always use the 97 D foot.
-
I love my 37D foot for piecing!❤️
-
The foot most often on my Bernina is #57– I make a lot of charity quilts and throws and this foot allows me to keep going and going and going!
-
37D is my favorite for piecing!
-
It depends on what I’m piecing, but either my 37D or 97D are both wonderful! ❤️
-
The 37 usually works for most projects. Would love to update.
-
I use #97D when working at home and #37 when on retreats with my older Bernina 430 Aurora.
-
I use the 97D on most bug have used 37 also I’d love to win this !!!!Please select me !!
-
My go to piecing and patchwork foot is always the 97D with the seam guide!!
-
I use the#37 foot as it is 1/4” on both sides
-
My 325 gets me thru all the projects; I still use the old standard #37.
-
97D. Sometimes with the guide and sometimes without.
-
I use #57 all the time. Love it!!!!!
-
97D. The possibilities are endless
-
I use my standard sewing foot. I had no idea there was a patchwork foot
-
I use #37 all of the time. Perfect seams every time!
-
#57. It’s what I use most of the time and love it!
-
I have been using 57D. Absolutely love the Tiny Tips!
-
37 on my 1230, 37D on the 770QE+ are my feet of choice for piecing.
-
I love my 97D foot for patchwork, piecing and lots of other sewing work too!!
-
My favorite is the 57D – almost can’t go wrong with it. Would love to win this package!
-
My go to is 97D for patchwork.
-
37D. Love the dual feed that came on my first Bernina Tula 770. Never had a Bernina and loving it!
-
I use #37D, even though I have the 97D, and like paper piecing for tiny pieces projects.
-
I use #37 for most patchwork projects.
-
37D is my Ho to foot on my big girls (830LE, 880SE). 37 on my smaller girls. For bigger piecing, I might use 1D.
-
I’ve just started with Bernina and have been using the 1C. However, I recently picked up a 37 and am excited to try it out on my next project.
-
I have my Bernina on order, but I am very excited to try the 97D foot!
-
My favorite foot is the 97D with the guide. I’ve had the 97D foot before but for some reason forgot about the guide. Purchased the 770QE Plus last fall and discovered the guide! It’s helps me get that quarter inch that was a little elusive previously. Seemed to be one of those hit and miss things! LOL Now I’m more confident sewing a nice quarter inch. Side note: I love my new sewing machine!
-
97!
-
I mostly use #37. Although I have several others.
-
37 is my favorite foot for patchwork and other projects.
-
97D is my go to for piecing. ?
-
#37D is my go-to. Would love to win!
-
I use my “regular” sewing foot.
-
My #1. I use it for everything! I need to branch out and use all my feet!!
-
My go to foot on my 880 Plus is the 97d. On my 1530 it is the 37. I have used the 37 so mich the shine is worn of the bottom.
-
37 foot and l like all
Bernina items -
#97D is my favorite because it ensures that I get a 1/4″ seam even when i”m too tired to watch a certain spot when I sew.
-
#37 need to go check out other feet.
-
My go to foot is my 97D. I use it far more than any other foot in my collection.
-
My favorite foot for piecing is 97D
-
My go to and always on my machine is the 37D and the single whole stitch plate!
-
I love my #37 foot for patchwork.
-
#37, Wow would love a golden foot!
-
Sometimes it’s my 57D and sometimes my 97D! Just depends.
-
I love my 37 foot. It helps make patchwork sewing a piece of cake.
What amazing prizes! Best of luck to everyone and thank you Bernina! -
Helpful tips! The smallest block I have made is a 4.5″ pineapple block. My go-to foot is 97d.
-
I like to use my 34C foot that’s clear so I can see what I am sewing! I use it for all patchwork!
-
I use my 97D foot!
-
97D is my go to foot
-
Always with the 97D. Works like a charm.
-
97D is one of my favorites
-
What’s your go-to patchwork foot?”
My favorite is the 97D with the little screw in 1/4” plate. Perfect for all quilt piecing.
-
My go to foot for piecing is the 97D, for my recently upgraded 790. I used the 37 for years with my Artista 200 machine.
-
97D because I have the 790, but I really like the bar that is attached to the 57D. Wish the 97D was set up the same way as the 57D.
-
57D is my go to. Love to win!
-
I use my foot #37 fir my piecing. It’s my go to foot.
-
I use 37D
-
I have a 153qe and use my 57 foot for piecing.
-
My favorite quilting foot is the 97D.
-
Love the 97D foot for all 1/4 ” seams. All my projects come out looking neat and never wonky. It’s also perfect for accuracy on bindings.
-
I use my 97D on my 770.
-
97D on my 740 and 37 on my 440
-
My favorite presser foot is my 57D. I use it for piecing all my quilt tops.
-
My 57D for patchwork sewing
-
#37 foot. The straight switch plate is a game changer. My precision increased so after using this while piecing. I sometimes use my larger machine to piece and the I use my #57D foot.
-
I use my #37. Love it for turning corners!
-
I use #37. Very informative article!
-
My current most used foot is the 1/4 inch foot. It makes life easier.
-
I use either my 57D or 97.
-
I love to use my walking foot.
-
Lately I’ve been using the 37D … perfect for my ByAnnie bag construction. Patchwork I use 97D
-
I love my 97D for piecing because of the extra guide piece. Thanks for a great giveaway.
-
I use 97D for all my piecing.
-
I use my #37 foot. Fingers crossed!
-
I typically use the #37 and sometimes use the #57
-
My go to foot is 97D for my 590 with a straight stitch plate. My 475 I use 37 with straight stitch plate.
-
I have a 790+ and love the 37D
-
My go to patchwork foot is my 97 foot. I love it’s accuracy!
-
97D on my Tula Pink 770 – love this foot
-
I love the 97D foot on my 740, and the 57D if I’m using my older 430.
-
I have a B770 QE E and I absolutely love my 97D for piecing! Works like a dream ?
-
Trusty #37 for me!!
-
I believe I have all of the Bernina patchwork feet but I used a 97D most often. ?
-
I like my number 37 patchwork foot for piecing.
-
As a new quilter, 97D is my favorite!
-
Love my 97D for my 790 and the 37 foot for my 570QEE
-
97d is my go to piecing foot
-
Love my ‘D’ feet – gives me lots of control. I sometimes use a clear foot if it’s hard to see. Thanks for the opportunity…..
-
I use my 97D foot, that’s my go to foot for piecing.
-
Exciting giveaway! I love the 97D foot! Makes keeping a consistent 1/4” or scant 1/4” so much easier!
-
The Question: “What’s your go-to patchwork foot?”
My Answer: the 97D Pressure foot lives on my machine as I do alot of piecing. But the #50/walking foot lives close by.
Thank you for a nice Back to School giveaway. -
57. I usually sew straight seams. I love my Bernina 750qe!!
-
I use the 37 foot as my straight stitch foot for my 790. It’s the most narrow (and more narrow than the #8).
-
34D?
-
Hands down I use 97D. But I am looking for ways to use different feet to help me improve my seams and quilting.
-
Will just be beginning so will probably start with #1 and go from there.
-
37D, but after reading this article, I’m anxious to get a 97D
(I also have the 57, but find it not as convenient to use)
I have been wanting to try miniature piecing for some time now, and realize the suggestion to use the straight stitch plate could be a game changer!) -
Love my 97D for patchwork! The extra control from the wider left side gives a lot more control. If its slippery fabric, I’ll use the screw on guide piece, but don’t need it very often. Love this give away bundle – great combo of practical items!
-
I love my 97D for patchwork!
-
My favorite foot for patchwork is the 37D foot. It pieces perfectly!!
-
97D is my favorite piecing foot!
-
I use my 97D
-
My 37D or 97D. Just depending what I am working on.
-
I gave up trying to piece on my Tula, and now use either my 700 or 500 embroidery machines with the 26 foot and piece in-the-hoop. Perfect blocks every time.
-
My patchwork foot is the number 97 for my Bernina 770.
Thank you for always inspiring us with projects to make! -
I like to use the 97d on my Bernina 770q almost all the time when piecing, occasionally the 57d.
Thank you -
hi, my go to foot is always the 57D. for me a very accurate foot.
-
#37 is my all time favorite foot for patchwork! In fact I use it most of the time. (I recently got a Teflon foot and coming to love that, especially since I also discovered cork!)
-
I am trying to learn to use my 97D foot. It is getting easier
-
I use the #37 foot and stitch regulator but do need to get a straight stitch plate. Love the items in the give away! Thank you for the opportunity
-
Mine is the 97D
-
I have not done enough patchwork to have a favorite foot yet. I currently use my 97D. Nice package to give away.
-
#37, 1/4 inch. Love my Berninas
-
The #97 is my go to foot with the straight stitch plate on my bernina 480 ?
-
Generally I use the #37 D foot. Love the giveaway!
-
I use the open toe foot or a quarter inch foot with a flange.
-
I use my 37D. It is great for narrow seams and top stitching.
-
Always use my 37D along with a stiletto so I end up with perfect 1/4 inch seams for quilts!
-
I love my 37D with my dual feed. Helps me keep my seams straight and my points line up!
And I love my Bernina!♡ -
I always have the 97D door on and the straight stitch plate.
Love my Bernina! -
My go to foot is 97D. I use it so much
-
I’m just getting started in the Bernina and patchwork world, so I don’t have a patchwork foot – yet! Looking forward to experimenting at my dealer’s shop so I know what will work best for me. Would love a chance to win a foot!
-
97d
-
I use the 37. Would love to win this ?
-
I used to use my 97 foot but purchased a 57 foot to use for patchwork.
-
Love the 37 and 97d!! The smallest I have done is 1/2 inch.
-
Love the 97D foot for piecing!
-
I have all three patchwork feet, but prefer to use 97D. In fact I misplaced it the other day and panicked when I couldn’t find it. I looked in my foot storage container three times before I actually found it right where it should be, in the storage box.
-
I always use the 97 foot on my Bernina 480SE (plus single hole plate)… I think it was a game changer for me with the 9mm machine!
-
#37!!!!!!! I love Bernina every thing!!
-
#97d with and without fence.
-
My go to is the 57D…works perfect for me every time!
-
I love the 97D for patchwork piecing.
-
My favorite patchwork foot is 97D. Love how my 790+ with the dual feed engaged and this foot gives me the perfect scant quarter.
-
My Bernina walking foot.
-
I use my #37 or 37D most of the time.
-
Recently have switched to 34D with needle position adjusted. It holds the fabric on the feed dogs more evenly than 97D and I get a much better stitch line.
-
I am waiting for my brand new Bernina to arrive, but the 37D foot is on my wishlist. I love time piecing and this type of foot is a lifesaver
-
97D – perfect quarter inch seams every time.
-
I have a 97 foot which I love. It gives such an accurate seam.
-
I use my #97 foot on my second hand Artista 180.
-
Love my 97D, favorite foot
-
#37 is my favorite. Thanks for the giveaway.
-
I use #97 for piecing.
-
The 57D is my go to piecing foot, love my Bernina!
-
I love my quart inch and my #97D…love the fancy gold foot..thanks for the chance to win
-
I didn’t buy a dual-feed machine but my dealer gave me #57D when I bought it and it works fine. But lately I’ve been using my walking foot. And I always use the straight stitch needle plate!
-
My favorite piecing foot is the 97d.
-
#97D is my most used foot. Crossing my fingers to win…
-
My go to piecing foot is the #37D or #97D. Love both of them because of the great markings so I can easily tell when to pivot at 1/4” and 1/8” on either side of the foot all while having the aid of the dual feed function!
-
57D is my favorite although I will also use 97D. Thank you for the opportunity to win. Hope I do win!
-
Foot #57. I can’t keep a consistent 1/4” seam without the guide on the side.
-
Love my 97D!! Game changer for perfect 1/4”.
-
I love #57D because of the dual feed and guide combo – very powerful!
-
#37D for my B570
-
Hi
Prize looks awesome! My go to foot for patchwork is #37! -
My go to patchwork foot is 97D!
Brenda Moore -
57d with the guide. Crisp results!
-
I use foot 57D. But I want to get a 97 D in the near future.
-
I still love my #37 foot!
Thanks for this opportunity -
I love my 57 foot!
-
My go to patchwork foot is 97D and a single hole throat plate!
-
I use #37 foot for piecing regular size, if I want to get that perfect 1/4″ seam
I use the open toe #20 for tiny piece foundation paper piecing.
THANK YOU..Kate -
97D is my favorite piecing foot with a straight stich plate
-
#37 foot is my favorite ❤️
-
I use #37 because that is what I have, but I think #57 would be very useful with that guide.
-
#37 is my favorite.
-
My go to foot is the 97d patchwork foot. Seems like I can’t live without it.
-
37
-
I love my 57 & 57D feet!
-
I love the Patchwork Foot #57 with the side guide to get my quarter inch seams. Works every time!
-
I’m a 97D on my 880+ or a 37 on my 530.
-
97d for me!
-
My go to foot for patchwork is 97D. Unless I have just a little to do then I just use whatever is on my machine. Which doesn’t always work to my benefit! Sometimes I need to be reminded the time it takes to put on the right foot is time well spent!
-
#37 foot is great for piecing. Would love to win!
-
57D is my favorite. I love the dual feed.
-
I love the 97D foot but also the 37 foot for piecing.
-
I love my walking foot (#50)!
-
My go to presser foot right now is my 97D. I am new to the dual feed (upgraded from a Virtuosa 153 QE to a 770 QE) and love it for piecing. So far so good! Can’t wait to try the BSR.
-
I use #97 foot with zero mm foot plate.
But if you really want terrific piecing, starch first with Best Press. What a difference it makes in piecing accuracy it makes to stiffen the fabric prior to cutting. -
Love my 97d when using my 780 and 37 when using my 180.
-
Love the 57D foot, but also use 97D too!
-
97D is my go to foot
-
My go to is the 97D on my 830. Love the dual feed – it’s smooth as butter ?
-
I love my 97D foot, it is my go to for piecing!!
-
97D is my favorite!
-
Very nice giveaway. I use foot 97.
-
Always use #37 , love it
-
I use the 97d
-
I adore my #37 foot. And #97 is sweet too. I love my Bernina. I’m one lucky girl. And would love to win this bag. It’s adorable
Glad I finally figured out how to register. Lol.-
I use my 37D. It with the straight stitch plate make stitching much smoother.
-
-
I love the 97d! It’s so versatile!
-
I use my #1 foot!
-
I use my 57 foot most of the time. I love my Bernina 440
-
I just started taking the beginners quilting class at Bernina. I’m new to sewing so I don’t have a foot preference yet. 🙂
-
Foot 57D always for patchwork.
-
I love the 97D foot on my 880 – super precise seaming.
-
I still sew on my 1020 and use foot #0 for all my patchwork. I can’t wait for retirement (2 years) to buy new 720, but I will never get rid of my steady-eddy 1020.
-
For me, it depends on what exactly I’m piecing.
Love my 57D foot for patchwork piecing with ¼ inch seams. Will also use 97D sometimes. If I’m working on other patchwork piecing like hst and others, I like to use my 34D foot. 34D also is my go to for foundation paper piecing. -
I use either the 57D or 97D foot.
-
I love my quarter inch foot! It almost never comes off my machine unless I am making a bag, and then I need bigger seam allowances, the zipper foot, and the edge stitch foot.
-
It has to be the 57D or a 97D on my 9mm.
-
My favorite go to foot is #37
-
97D is mygo to patchwork foot on both my Bernina 570 and 790!
-
Foot # 57 is my favorite
-
Generally I use the #57 foot. Love the giveaway!
-
I use my #37 all the time!
-
I love the 59D foot for piecing. Love the duel feed feature
-
I use 57; thanks for the chance to win.
Jane -
I just use the regular sewing foot
-
I love my 97D foot but I still use my 37 foot.
-
97D is my favorite.
-
I love my #97D foot!
-
97D is my favorite foot for patchwork. Love it!
-
57D is my main go to for patchwork. I feel confident using it.
-
I use my 97D foot on my 880 and my 37 foot on my 350.
-
I always use my Bernina foot #37 for accurate 1/4” seams.
-
I use a 1/4″ foot
-
My favorite patchwork foot is the 97D! It works great with my 790 plus! My piecing is never complete until I press with my Laurastar Smart U system! What a wonderful prize you are giving away! My heart went “barump” when I saw it!!! Thank you for the opportunity to enter!!❤️
-
I haven’t done a lot but I’m ready to learn.
Thanks for the opportunity. -
#97d I love ❤️ it. Percent scant quarter inch every time
-
I use the #57 foot.
-
#97 D. Looks like a fun giveaway!
-
#37 for me!
-
57D is my go to foot for piecing.
-
I always use 57 with the guide foot with dual feed! I recently purchased a clapper and don’t know what I even did without it! ?
-
I like using a 1/4″ foot without a guide
-
I change a lot between the 57d and 97d depending if piecing straight lines or triangles
-
My go to is 97D for quilts. And for bags I use 57D, as the guide helps going around curves of layers. The info above was very helpful!
-
Good afternoon, I use my 97D for piecing all the time. It’s so accurate. Thanks for the chance to win.
-
I use foot #57
-
I always use my 37D foot. I find it works quite well!
-
57 is my go to!
-
I use my #37 for sewing and piecing.
-
I use my 97D foot!
-
#97D – seems to work like a charm.
-
I use my 97D or my 57
-
On my 5mm machine I love the 57 foot! On my 9mm machine I use the 97D.
-
#37 everytime!
-
I love the 57 foot!
-
#37 is my go to. I can always use improvements to keep seam consistency
-
I am still working in the quarter inch seAm-#37 is my go to. I can always use improvements to keep seam consistency
-
I like the quarter inch foot #37. helps with being consistent.
-
I use my regular presser foot and just follow the edge.
-
I love the 97D for piecing!
-
My favorite foot is the 97D for piecing.
-
I’m just now learning to do patchwork so I use my #37 foot.
-
Nice giveaway! I use my 97D or my #8 foot. You can move the needle over one position on the #8 foot. It may not be a true ¼ inch but if I’m consistent it works.
-
I love using the 37 foot on my Aurora 430 which was my first Bernina machine, but I just recently purchased a 97 foot for her. On my 790 my go to foot for piecing is the 97D. And depending on what I’m piecing the 57 foot is a fave!!!
-
I like to use the #37D foot for piecing
-
37D and a single hole stitch plate are my favorite combination!
-
#97D is my go to foot for piecing, I love that foot!11
-
I absolutely love the quarter inch foot.
-
I’m new to Bernina. I believe the one I have is #37, but I’m not positive. My Bernina was recently inherited from an aunt and I haven’t had time to do much experimenting.
-
#37 – I rarely take it off my machine unless I’m sewing a garment…most of my sewing is quilt related these days.
-
97D without the guide?
-
I use 97D when sewing with 740 and 37 when using my 830 Record.
-
I love my #37 foot. It works on my older machines and can be used on the newer ones.
-
I love doing tiny patchwork. I use up my scraps from the big quilts. I use the 97D foot a lot.
-
I use my 37 foot the majority of the time. However there are times when I will use my 57D
-
I really use my 97D foot most often. I recommend it highly since the fabric is held in place over the feed dogs and the dual feed helps keep the seam straight.
-
Love using my 97D. Thanks for the awesome giveaway!!
-
I use my 57 foot on my 350 and my 97D on my 880
-
My #57!
-
I use the 37D – d for delightful! Lol. Nice gifts! Hope I win!
-
97D is my favorite. Sometimes I use the 37D on certain piecing projects! I love my Bernina ❤️
-
37D
-
I love the #97D foot! Works for me on my 790 + and 590. I get very accurate results!
-
I have two Berninas. My go to 1/4” foot is #37.
-
Foot #37 is my favorite
-
#97D is my favorite patchwork foot of choice!
-
I love my 57 D foot I need that little extra flange!
-
I use my 97D foot for patchwork. I love it!
-
My go to is #97D
-
Straight stitch plate and #37. Great article.
-
Hi. I love the 97 D. Still a novice at piecing.
-
I use the 97 foot, but hoping to get one of the dual feed feet to go with my new machine!
-
I love my 97D foot!
-
I use foot #37 for piecing most of the time. I would love to win this prize. Thanks! Cindy
-
I love the 57D! It’s definitely my go to!
-
My go-to foot is 97d. It’s a perfect 1/4” for quilt piecing. My second go-to is the 20d, great for wide stitches.
-
34d is my favorite and 37 is my second favorite
-
I usually use #37 or 37D depending on which Bernina I use. I LOVE that Bernina has all these different feet just right for specific projects!
-
I use a #1 as that is all I have
-
The number 37 is my foot to use. I love making mini quilts, need to have a foot that makes accurate seams. I really hope I win!
-
My favorite foot is #37.
-
#34 with needle poisition 4
-
#37D, but now I’ll have to try the others!
-
Currently, I’m using the 97D for my piecing. But, I’m intrigued in trying the 57. I’ll get it next time it’s on sale!
-
I love 97D or sometimes 57D. Makes it so easy.
-
I’m in love with my #57D. My piecing has never looked so good!
-
97D is my preferred foot for piecing.
-
I like to just use my 34d foot.
-
I don’t have one of these feet yet as I am just now starting to try quilting. This was the best explanation on each of the different feet and I see the benefits. I am thinking I might need to start “foot fund” jar!
-
I use my 97D when piecing. This is my most used foot!
-
I love my 97 foot!
-
“What’s your go-to patchwork foot?” 57 on the 480, 97D on 790
-
I have never used a patching foot but would try it!
-
#97 is my go to foot for piecing. I like how easy the feet are to change.
-
On my 790, I use the 97D foot, but I use the 37 foot on my other machines.
-
My favorite is the 97D – I like how it moves the fabric keeping my ends even.
-
I cannot live without my 97D. It’s my go to foot for the majority of my sewing.
-
97D every time
-
Always #37. Whether geneeal sewing, piecing a quilt or sewing byAnnie projects. It’s my go to presser foot on all my Bernina machines.
-
I’m a newbie, so I’ve only used one foot… thanks for the chance at this awesome giveaway!
-
97D is my go to patchwork foot. It’s easy to get the perfect 1/4 in. Seam. Fun giveaway!
-
97D most of the time!
-
97 is my favorite
-
I usually use 97D.
-
I use #97. It’s rarely off the machine! I also use 37 on my 1130.
-
I use #37 and love it.
-
I do not have a patchwork foot so I use my standard sewing foot to piece my quiilts.
-
97D is my go to foot for piecing without the edge piece.
-
I don’t have a patchwork foot so I just use my regular sewing foot.
-
I use the 97D foot
-
I use my 37 foot for all my patchwork!! Thanks for the chance to win.
-
I like to use foot #57. I like the edge to keep fabric straight, while sewing a 1/4” Seam❣️?
-
I use the 97D for my piecing. Love it❤️
-
57 foot
-
#37 and a straight stitch plate 🙂
-
I use the #97D on my 770QE machine.
-
I use my 37D for almost all of my piecing. Good luck to all that enter. Thank you for a wonderful giveaway.
-
#37 is my go to
-
I always use my #1 foot; I just line the edge of the fabric up to the edge of the presser foot and it always works out great! I’d love to try out some of the other feet one day, but for now, the #1 foot fits the bill just fine 🙂
-
I use my regular foot, my machine is a 570QE and I love it. I’m planning on getting a 37D soon.
-
Presser foot #37 makes piecing easy peesy. Thanks for the chance for a giveaway!!
-
My regular clear foot.
-
I don’t have a specific patchwork pressure foot but would sure love to have one. Thanks for the great giveaway.
-
I like 37… but my all time favorite foot is the BSR!
-
37D is my favorite
-
I use the #1.
-
I love my machine. Learning to use my #97. What a fabulous give away. Best of luck to all who enter.
-
97D, it’s my go to foot.
It helps with seam widths. -
My favorite foot to use with my 770 is the 97D. It has really helped me improve my accuracy in stitching 1/4″ seams.
-
I use the 97D – the dual feed is awesome!
-
My favorite foot to use with my 770 is the #97D. It has really helped me improve my accuracy in stitching 1/4″ seams.
-
I have appeared been a BERNINA girl and my favorite go to foot would be the 37 and depending what I’m doing, I’ll use the straight stitch plate. Love this foot. Thanks
-
Sometimes 37 and sometimes 57d.
-
My favorite foot for piecing is my 97.
-
I love my #37 for piecing.
-
love my 37. it’s a reliable workhorse for sure!
-
# 57 because it helps me sew perfect 1/4″ seams
-
I use my 57 foot 99% of the time!
-
My favorite foot is 97D for patchwork. So excited for this drawing!! Thank you for doing this!
-
Always the #37 foot for piecing quilts.
-
I’m fairly new to Bernina after having a Pfaff for 30 years. It’s a HUGE learning curve and I’m experimenting with the feet. 97D has been my favourite so far for patchwork but I brought a 34D last week and I’m really liking the clear view the foot gives me.
The giveaway looks awesome. Fingers crossed. ???
-
#97D is one of my favorites. Nice giveaway!!! Thanks for allowing me to enter.
-
I use a 97D to do my piece work. I bought a 770QE+ and received it in March of this year (2022) with money left by my dear Mom.
I am becoming more confident with my new machine. My 1st Bernina was an autographed 550QE and I love it also. -
I use the 1/4″ foot routinely
-
I love the 97D foot. It keeps me getting straight seams. Love my Bernina’s
-
“What’s your go-to patchwork foot?” I love all my feet but 1D is my absolute favorite!
-
My favorite patchwork foot is 97D!
-
I use a quarter inch foot with an added guide on my base.
-
I use my 97D.
-
I love using 37D for my stitching.
-
Currently I do not have any of these feet so I use my regular foot. I enjoyed this tutorial, as I do all of them. I so need this! Thank you for a wonderful give away.
-
I prefer the 97 foot for piecing. I like the seam guide that comes with it.
-
97D
-
I like the 97d foot
-
I use the 97D foot with my 750QE and the 37 foot with my 440QE for achieving the 1/4” seam. Great tips! I love small scale piecing and quilting.
-
My go to is #57
-
I use a 1/4” foot.
-
97D is my go to patchwork foot!
-
Most of the time I use 37D as I like to see the edge of my patchwork as it flows past the needle, but I also have the 97D and use that on larger pieces of patchwork. The 37D works great on my 9 mm machines
-
Before getting my 790+, I used the #37 foot and loved it. Now, though, the 97D is my go-to — it gives me a perfect seam allowance every time!
-
I love my #37 and #57 foot for piecing.
-
My go to is 97D!
-
I love your article. Very informative. My favorite foot is the 97D.
-
Always 97D!
-
I like using the 97D foot!
-
#57 – whenever I stray from it, my accuracy suffers!
-
My 97d with the guide and straight stitch guide, is my go to on my 790. What has also greatly improved my piecing skills is pre shrinking my fabric with water followed by Best Press. My dealer has been saying it for years and only recently has it sunk in! My accuracy is amazing now!!
-
I use #37 for piecing. Thanks
-
I don’t have one so I just use #1 for now.
-
I use a variety of feet depending on what I’m doing. Mostly use the standard foot.
-
Love My 97D!!!
-
97D for most piecing, with and without the guide.
Love my Berninas. -
I love my walking foot for piecing.
-
37d foot is my favorite for piecing along with the single hole stitch plate.
-
Foot 37 is my favorite.
-
I use my 97D for piecing and anytime I need a quarter inch, but I just learned in this post that the inside of the foot also measures 1/8″.
-
Well I have just recently started to learn quilting. I am mainly a garment maker. I had a Bernina 1130 which died, so I got. B590 and now I just love the 97D foot! I use it all the time. When I do 1/4 inch seems I use the gauge. I use to use the 37 foot on my 1130 but you just can’t beat the 97D with the dual feet function. My sewing looks so much better!
-
I use my #37 mostly. I have the best results with that one but I do practice with additional feet such as #57 to improve my results.
-
97D great give away, hope I win.
-
Hi, thanks for the giveaway! I use my foot #37.
-
97d is my go to piecing foot!
-
I usually use the 97D for patchwork piecing.
-
Love the 97d foot
-
My go to is 97D. Thanks
-
My go to foot is a 37d. I also have a 57d.
-
I use my 97D foot almost every day. I have the 37D as well, but this is my go to foot for just about everything!
There are several reasons I like this foot so much:
1) Open, so I can see. Yet it still holds fabric in place
2) Dual Feed is awesome!
3) I like the various markings! I also have made up one of my own. I use the edge before the 1/8” marking (near U shape of foot) for my topstitching on bags. It works great on making the handles too.
4) I use it for bag making, piecing quilts, quilting, paper piecing, etc….This foot is not just for patchwork!
-
I love the 37 foot so much I have 3 of them.
-
I use my 57 foot. I love the way it works. Thanks for doing a give away! 🙂
-
#97D is my go to foot! Thanks for the article and all of the information.
-
My go to foot is always the 97D!! Love it!❤️❤️❤️
-
I like the 97, but think I may try some that are posted here. I’m always learning new things and enjoy that with my Berninas.
-
#97D is my favorite for piecing.
-
Mine is the #37. Honestly couldn’t sew without it!
-
I use the 97D foot!!?
-
I use #37 – it is my go to! Fun giveaway!!
I’m feeling lucky. -
The 37D is my favorite patchwork foot!
-
Hands down the 97d foot although when I first got my 770 I didn’t like using the attachments but have since learned and now like how smooth and easy the foot is.
-
I love my 97!
-
Love my #37 foot
-
Right now I like 57D but I love that there’s so many options
-
Love the 97 foot!!
-
I use a #37 for piecing. Love my Bernina!
-
I’m still a quilt rookie…. I’d like to try piecing but worry that I need a tutor in the chair next to me. Tackled one for the first grand: big pieces. (Saw some Mennonite ladies sitting outside under a tree hand quilting!) I should tackle a small project like the one above and start with my #37.
-
Love the 37 foot
-
I’m just learning and doing an in the hoop piecing project right now so only using the 26 foot, but its working!
-
37D Love it.
-
I love my 97D on my 790,
But I also have an old 930 record and quarter in foot for that worked great for the 40 years I used the machine -
I love my 97D on my 790,
But I also have an old 930 record and quarter in foot for that worked great for the 40 years I used the machine. Lovin my new machine though -
I love my 97d. I just have to remember to put my straight stitch plate on.
-
I use the 97D. The smallest piecing I have done is on the 365 Ultimate Sampler Challenge. It had 1/2 inch half square triangles and 3/8 X 3/4 inch flying geese. And yes it was definitely a challenge.
-
Depending on which of my machines I am using! On my B350 I have the #37, and on my B790 I use a regular #97! However I prefer dual feed so #97D my store was sold out and on back order for what felt like months, I couldn’t wait that long so I had to make do!
-
37
-
97D here!
-
For my Bernina I use my 1/4 inch foot.
-
I love my 97D patchwork foot! The accuracy of my piecing has improved incredibly!
-
I am glad to own a #37 foot for my essential Bernina. The giveaway is awesome!
-
1/4 foot!
-
I like my #57
-
37D!
-
I do all my piecing using the #97D foot.
-
I use foot 37 with guide, perfect 1/4 inches seams!
-
97D. It seems to be a good choice for this lefty
-
I learned to use the #37! Love to try the others.
-
I use foot 97D, with the screw in guide and my straight stitch plate for great results!
-
When I am piecing on my Bernina I use the 1/4 inch foot, or the foot with the guide. Either a #37 or #57.
-
97D and I are good friends!
-
My favorite is #37.
-
57D is my new favorite! Worth every penny. I wish there was a clear foot with 1/4-inch marks!! Maybe soon?!?
-
My go-to foot is the 97D.
-
# 37 is my favorite and the most used foot I have.
-
I love to use my 57D foot!!
-
In use the 97d and guide for my piecing.
-
Use 37 foot. Need to get the coded foot though. I’m a begysocmay change my mind! 🙂
-
#37 is usually on one of my machines for piecing. Yesterday I got to see them making feet at the Bernina Switzerland Factory!
-
I love my 37 presser foot but will look into the 97D. Thanks for the awesome and informative article.
-
I use #37 but am now considering trying out the #97.
-
It is hard to change old habits – #37
-
I use #37 all the time!!
-
I use my 000 on my 830 record!
-
I use foot #37 but I may check out the others. Great article
-
Love my 57D. I have a 57 for each of my 4 machines!
-
97D is my FAVE?
-
I have always used 57D but now that I see other options , I am going to try those feet. Thanks!
-
definitely the 37 foot for my 930 and the 97 for my 640—-cant go wrong with these feet!!!!
-
I use my 97D for almost all of my sewing. great article! Thanks for the tips!
-
It depends on what I’m piecing. #57 if I’m piecing long strips together. Otherwise a #37. Bernina makes it “sew” easy to sew, quilt, play with threads, etc. with all of the accessories available…even on my very simple 530!! Thank you, Bernina!!
-
I use 37 foot to piece. I am on my third Bernina!
-
I use the 97D… but learned a lot from this post. Thank you.
-
My favorite patchwork is #97. Always exact 1/4 in seam.
-
Love my 97D!
-
Love my 97D!!
-
#97 usually but depends on project
I live in Uk so am not eligible for this prize ?. Do you do a similar comp over here?
-
I use my 1D. I am in the process of getting new feet for my machine when there is a sale on presser feet. ?
-
I use my regular foot it’s very trusting
-
Open toe 20 D love to be able to see the appliqué edges and use the side of the foot as a guide.
-
Believe it or not, I use my 1D and move the needle to position 4 on the right. I have all of the feet mentioned but I feel I get the best contact with the feed dogs with this foot.
-
97D although I like the other patchwork feet as well!
-
I use my 1/4 inch seam foot.
-
Nice giveaway products! Foot 37
-
My Bernina patchwork #57 is my go to foot. What a nice give-away. I’d love to win!
Good luck ? everyone!
Patti -
Depends on which Bernina I’m using. 97 or 97D are my go to.
-
I use my #37. I have a straight stitch throat plate on my wishlist!
-
I usually use my 1/4 inch foot for patchwork. I have both a Bernina 440 and a Bernette for quilting classes / retreats.
-
#37 is my usual choice
-
I use 97D most of the time.
-
I use 97D when quilting at home. I love the even feed. But if traveling, it’s 57 on my smaller machine. I get excellent results with both.
-
I use my 97D on my 740. Works great for me! Love the dual feed!
-
I use the 97 foot.
-
I use the #37 foot.
-
97!
-
Wow such a great giveaway! My favorite foot for piecework is 97D?
-
Love my 37D patchwork foot ♥️?♥️
-
I’m still struggling to find my sweet spot. I really like the fence on the 57d foot, and wonder why they didn’t make the 97 with it. The seam guide is a good idea, but it has to be removed for frequent oiling of the shuttle race, so it really isn’t a time saver.
-
The 97D is my “go to” piecing foot. The wider base holds the fabric more secure. With the 0 mm stitch plate and the screw on guide, my 1/4” seams are more consistent.
-
I just started using the #57D. I really like the bar on the side as a guide! For me…… I find that my piecing is more uniform if I sew slightly less than 1/4 inch. Still learning!!
-
97d
-
57D The dual feed helps sew over the seams without shifting them.
-
I use 1C.
-
Love my 37D
-
Mine is 97D
-
I love my 97D for piecing on my 570 QE.
-
I love the 37 foot for most piecing. Occasionally, I will use 20 and move the needle to where I need it to make the correct size blocks.
-
I usually just use my 1/4 inch foot with a guide (but I use it for everything). It’s my favorite ?
-
I love love love my 97d foot for piecing. I always use my dual feed option and my Bernina B790+ and that foot makes a perfect 1/4” seam!!!
-
I love my 10d. It lets me know that I am in the right place
-
I use my 97D for patchwork.
-
I use my regular foot. I do not have a special piecing foot, yet!
-
On my B215 I use a 57D
-
I use 57D on my B350
97D for B770QE -
I use 57D on my B350,
97D for B770QE -
I have a 790+ and I am a 97D girl. I always use the straight stitch plate and I also use leaders all of the time. Nothing worse than trying to sew a 1/4″ on a small piece and have it hang up at the beginning. Leaders work wonders. My machine is new and I am still “exploring” and next up is to learn the knee lift. I think it would help on the chain piecing. I actually had one on my first Bernina 830 Record. I used it all of the time so it should be an easy transition. LOVE MY BERNINA! and the 97D foot. I highly recommend it.
-
97D and 57D
-
I generally have alot of issues staying on target with a 1/4″ seam, so I got a 97D to help me. It works like a dream and I have no issues now. I don’t really piece many small pieces though, but I just might try it after seeing this video. Thanks so much!
-
The 97D is the foot I normally use. Very helpful information in the article! I never win anything but I can try!
-
I use my 37 foot.
-
my #20 on my aurora 440QE, its still a gem! just found a Joanne precut blocks from 1998 and 1999 so this has been more patchwork then this machine has seen in its lifetime! LoL
thanks for the joy of sewing and community -
I like a straight stitch foot for every day sewing and small pieces.
-
Definitely the 97D!
-
97D
-
#57 is my foot of choice.
-
97D is my choice every time.
-
I use foot Number 97! Love that foot! Thanks for the chance to win!! Been sewing with Berninas for over 34 years!
-
I use patchwork foot #37, and sometimes my walking foot #50!
-
I love all my patchwork feet!!! My favorite is the 97D.
Over the years, I seem to collected about all of the Bernina feet. It’s wonderful to have the perfect foot for the task at hand. The perfect tool (aka foot) makes projects so easy to complete! -
It depends on which Bernina machine I am using … on my older 153, I like to use the #37. I use the #57D and #97D when doing patchwork with the 9mm footplate on my 770QEE.
-
57 is my go to foot – I use it on my vintage 930, my 830, and my 910
-
I use #37
-
Love my new 1/4” foot for patchwork.
-
It’s got to be the 97D!
-
I like to use 37D. ❤️❤️
-
#57 is my go to with a straight stitch plate ???
-
I use the 37D. Perfect for my needs.
-
I love using me 57C for piecing. It keeps my seems even and at a perfect 1/4”.
-
I prefer my 97D or my walking foot for patchwork
-
#97D for sure!!! I love that foot and it gives a perfect 1/4” seam.
-
I use my straight stitch plate and my patchwork foot all the time. They made a huge difference in sewing together my pieces!!
-
Love 37D!! So pick me
-
I love 97D on my 790 and use 37 on my 215!
-
I like to use the foot with the 1/4 inch for any piecing that I do. I mostly sew clothing, so I would like to learn more about quilting.
-
I use #37.
-
I use #57 with the guide. It’s the best to get an accurate 1/4″ seam.
-
My favorite piecing foot is 97 Ali g with the straight stitch plate.
-
I always use my #97 foot with guide plate when piecing. Thanks for a chance to win a great package of Bernina products!
-
My go to is the 97D , 1/4 “ foot . But will have to check out 37 for piecing patchwork. But my 97D and I do great! Love my B790+
Thank you Bernina -
Love foot #57D. My go to patchwork foot.
-
I use Patchwork foot #37 most of the time. Occasionally I use #57 with the guide.
-
I use the 97D with the straight stitch plate, Works perfect for me!
-
I use my #37 foot.
Awesome giveaway. Thanks! -
I can’t live without my #37 and #97!
-
I use the 97 foot. It has become my favorite
-
I love 37!
-
I’m still learning about the different feet so I really only use the same one all the time.
-
I use 37 foot but really rely on the little 1/4” tick mark on the throat plate as well. The single hole throat plate makes a huge difference.
-
I learned to sew as a very young girl on a Bernina in the early 1960’s. Still have my machine. I have always just used the original foot that came with my machine.
-
My favorite is the 97D, and the 57 on my travel machine
-
#37 LOVE this foot!
-
I love the 57D!
-
Definitely the 97D for me with needle clicked once to the right for a scant 1/4 inch!
-
#97D is my go to! I love the differential feed when I am piecing.
-
I love the 97D foot the best!
-
Hi!
I use the 97D foot for all my piecing. Love it! -
Love the 57D on my 790+. My piecing has improved so much using this foot. Thanks for the explanation of the 3 piecing feet.
-
Great Giveaway!! Thank you so much. I use the 37D for my piecing!!!
-
My fingers are crossed, hoping to be the lucky winner! Love the video on tiny patch pin cushion.
-
I use a 0 or my 1 on my 1230 or my 1030 machines!!
-
Is it bad that I almost never change my feet
-
I seem to bounce between them all, depending on project, material, and mood.
-
I love my 97D foot!
-
I’m on my 2nd Bernina in 30 years and my favorite foot is 37D. It’s so versatile for widths and always is my “go to”!
-
I love my #37 foot with the straight stitch throatplate
-
#37D on my 790+ and I use #37 foot on my little 475
-
Hello! I mostly my 37D but will also use my 57D depending on my mood I suppose.?
Thanks for the chance to win such a great treat! -
97D us my go to.
-
Always can use another foot, and the other swag looks good also. We love the 7 Berninas in our immediate family including a longarm.
-
I would have used my regular #1 foot, but I learned a lot from this post. I need to get a new foot and the straight stitch plate!
-
I use my 97D. I love this foot!
-
I have an 830 and my favorites are the 37 and 57D.
Thanks for the give away and the chance to win -
Love my 97D! I’ve used my 37 and 57D in the past but with my new machine, the 97D works great.
-
Love the 97D for my 880.
If I am going to a class I always pack my 97, 57 and 37 for my 730 Artista just in case. -
#37 and definitely with a straight stitch plate!
-
I use #37 with straight stitch plate
-
I use a #37
I have some feed dog wear marks on my foot. Does it need to be replaced or can it be fixed??
-
97D is my fave!
-
I am a BRAND NEW Bernina B79 owner!! I would choose the 97D foot!! And I have not yet made a legit quilting square!
-
I use #37 on my Bernina 1130 and the 97D with my 790 Plus. I love Bernina. – Cathleen
-
I’m not too clever – I mostly use the open zigzag foot for most of my stitching so I can see what I’m doing.
-
#37 is my go to and it rarely gets taken off. It works for so many projects!
-
I love using my #57D patchwork foot on my B740 Bernina machine! It’s dual feed really helps with sewing a proper seam. I love all the Bernina products and try to learn as much as I can about using my machine.
-
I love my quarter inch foot for patchwork.
-
Love my 57D!
-
97D is the only foot I use to get the 1/4 inch seam.
-
I use my 97, but I want to try the 57D
-
Foot #37 !
-
I have a 5.5mm and 9 mm machine, but I use the 37 foot or the 1 foot to piece.
-
I love the 97 D foot and the straight stitch plate…perfection!!
-
I love using the 1/4″ foot!
-
My favorite foot is the #37. It is my go to foot especially when piecing. However when quilting my favorite is the BSR as I really enjoy free motion quilting.
-
I always use my 97D – love it.
-
#37 with the single stitch plate. Just bought a 590 and am considering the #97.
-
My favorite foot for tiny patchwork is the straight stitch foot with the non stick sole #53. The small footprint allows me to sew curves easily.
-
I almost always have the 1/4” foot with guide on my 830. Unless I am Topstitching
, than I use the stitch regulator or free motion feet.
Would have named a daughter ( if I had one) bernina ?❤️? -
I don’t have any special feet for quilting; I just use my standard presser foot.
-
#37 is my go to foot.?
-
My go to foot is the patchwork foot #37. It’s the perfect piecing foot. Thanks for this chance to win the marvelous giveaway.
-
I use my 97D for piecing!! I just love it!!
-
When piecing a quilt I use the 37D. It’s a very accurate foot.
-
Definitely the love of the 37. Thanks for the info on the markings on the feet … I had no idea!
-
Mine is just the #1 foot!
-
97D – I love it.
-
My 97D foot is a game changer, along with the straight stitch plate.
-
My favorite and go-to foot is 97D with my B765 SE.
-
I love my 97D pressure foot for piecing. Make sewing 1/4” and 1/8” seams a dream!
-
I use my 1D or 97.
-
The 97D foot is my go-to foot for piecing.
-
I usually start off with the 1/4″ piecing foot with the guide, but before long I’ll change to my regular 1/4″ piecing foot without the guide. Your giveaway looks wonderful. I think I would change my favorite foot to “Sewing With the Gold” if by chance my prayer is answered. Thanks for the chance to win such a lovely Prize!
-
Mine is a 37D. I love it!!!
-
#20…Thanks for the great giveaway!
-
I use foot #37. ?
-
I always use #37 … love this foot!
-
37D is my go to foot. I love the 1/4 inch seam it makes and being able to see what I am sewing.
-
#37 remains on my machine most of the time, it’s my favorite.
-
I love the 97D foot for most of the piecing I do. This article is a very helpful reminder for tiny piecing. I also like Flatter for my stabilizing spray.
-
I tend to use my #57 foot the most but after reading this post I really want to try the #97 foot.
-
37D is my winning foot!
-
I used my 97 with my Artista 730. But since I upgraded to my Bernina 790 I purchased the 97D foot. My favorite for accuracy❤️
-
I love ALL my Bernina feet, but the 37, 57 or 97 are my go to for piecing.
I find that I use # 20 foot an awful lot for many tasks. It allows good vision of area to be sewn and I can easily manipulate fabric or seam placement.
Jane Antlfinger
[email protected] -
My go to foot for piecing is the 97D foot. After watching the tutorial, I am now inspired to make a tiny patchwork piece.
-
Thank you! These are excellent tips.
I feel like sewing some tiny things, like pin cushions, doll patchwork blankets, and perhaps a needle book. Something fancy!!
Thank you for this give away opportunity. -
Oh, oops forgot to add my tiny patchwork sewing foot.
That would be my standard foot. I have a quarter inch guide on my machine
as you display on your 10th photo! -
I usually use my 57D foot on my 570, but do like the other quarter inch feet. I also use the plate you discussed. I love the stability of the Bernina feet. I previously had others brand of machine and all the guides on the quarter inch feet were wobbly.
-
I use #37 with a straight stitch plate
-
A #37 for me. I still sew on my trusty old Artista 180. My local quilt shop often asks me if I want to trade up. Arty as I call her was my first love and I just can’t seem to let go of her. I’m sure I will some day ?
-
#97 is a sure firm foot to use with its guide but when I have a snag it is a pain to unscrew the guide and remove it to get things cleared up underneath the plate. So I find that more and more I simply use #37.
-
#97D is my standard for piecing!!!
-
My 57 is the favorite.
-
My go to foot for piecing is #97D with my 790+. So glad my dealer suggested trying this foot, as it made a huge difference. Happy Sewing!
-
#37 and #97 use them both ☺️
-
I love my walking foot!
-
I use a 37 foot for most piecework. The markings on the 37 really help me.
-
I piece with #57 unless I use a lot of pins, then I use #37. But my favorite is my walking foot with the needle moved to the right for sewing on the binding. Using the walking foot makes my binding smooth without wrinkles!
-
#37
#37D is on my wish list, though!-
I use my 37D but would like to try the 57D.
-
-
#37 of course!!
-
I love my # 57 foot for making accurate 1/4” seams.
-
I love my # 57 foot for making accurate 1/4” seams. My points match up so easily when I am putting my blocks together.
-
I own the 97D but prefer my 34D. Go figure! Both are excellent feet.
-
I like to use my 97D on my 770 qe and 57 on my 215 machine
-
My favorite patchwork foot is definitely 37D. Love it!
-
I use my 97D on my 880.
-
I use the 37D and find it always accurate. Thank you.
-
My favorite quarter inch foot is the 37D – hands down.
-
My go to Patchwork foot is #57, I love the guide.
-
On my 880+, my go to picking foot is 97D. On my 530, it is the 57 foot.
-
The #37 1/4” foot for my old, 1080QE is my favorite for piecing. Even after a purchase of a newer (different brand) machine, I piece everything on my Bernina with this foot. It’s the most accurate and very versatile. I can even piece with a scant 1/4” with this foot. Perfect every time! Just what this Virgo needs! ?
-
I use my 37d foot but only because I sew a lot of 1/4 inch seams.
-
I use my 37 foot for all of my patchwork! I love all my Bernina machines and love to quilt
-
It’s #37 all the way , and the straight stitch plate.
-
I have all three patchwork feet. I almost always use #97. It works the best for me
-
Usually #37
-
Number 37 ❤️
-
97D is wonderful!
-
97D is the best, as it has a guide for material
-
My go to foot is 37, I love it!
-
My Goto patchwork foot is the 57D. I love it in combination with the dual feed system. ??
-
I don’t think I have a favorite. I mostly sew garments.
-
I use the 37D most of the time but most of the “D” feet make me happy. Depends on the work and how small the pieces!
-
Definitely my 97D foot!
-
I always use my 97D foot and straight stitch plate to piece. Together with my 790+AE, they make piecing easy. ♥️
-
I have both the 97d and 57 d foot . I use the 57d foot the most.
-
-
Most of my sewing is on a Featherweight and depending on what I’m doing, I’ll choose the appropriate foot. But my mostly go-to is the basic/vintage which gives a nice 1/8 seam if that’s what I need.
-
#37. Great article!
-
I don’t know yet! I’d love to find out. 🙂
-
100% I go with my #37! My 1/4” couldn’t be as good and perfect as it is if I didn’t have that foot! I piece on a 5.5mm and do Everything else on my beloved 880! There is no stitch like a Bernina stitch, the quality speaks for itself! Thanks for the great content! I can always find an amazing project on WeAllSew!
-
I love my #97D patchwork foot but I really am wanting to try #37!
-
97D— want to try the 57d someday
-
I love my #57! ❤️❤️❤️❤️
-
So far it is the DA foot. I ❤ my Bernette b79. So many projects, so little time!
-
I prefer to always use the waking foot (#50) because I enjoy the layers staying together neatly as I sew.
-
My favorite foot is 37D
-
97D is my go-to piecing foot
-
I use 97D primarily. Thanks for your great products!
-
I use my #37 foot for piecing. I find it gives me just the right seam allowance.
-
The 97D is my go to foot for my 880
I couldn’t live with out it
Jeanne -
97D! Really didn’t love the 37 with the 9mm width.
-
My new favorite is the 97D on my new 770 QE PLUS!
-
I use #57 foot.
-
I love my 57 – this is a great article and really gave some great tips for tiny patchwork. Thank you!
-
97D is my go to piecing foot.
-
I use my 97D foot and straight stitch plate to piece.
-
My #37 is almost always on my machine! Love love love it.
-
My favorite foot is my 1/4 inch foot followed by my boat rudder foot
-
#37 for me.
-
I think I own all of the 1/4″ feet but, I use my 37D the most for piecing my quilts.
-
I use a regular or straight foot. It would be a great improvement using a quilting foot.
-
I use my 37 patchwork foot my go to always ?
-
I LOVE THE 57D piecing foot but am trying to transition to using the 97D for it’s added exactness! Not quite there yet but keep trying— fun for this old dog to learn new tricks; thank you
-
97D is my go to patchwork foot.
-
i will be finding out very soon!
-
Love 97d foot
-
My go-to patchwork foot is the #37 foot!
-
I use my 37D. It with the straight stitch plate make stitching much smoother.
-
On my Bernina I use #57.
-
I love my 97D and guide. Perfect 1/4 inch every time. I taught both granddaughters how to piece and this foot and guide kept them on track.
-
I love both my 57 and 97 feet! They help me/my sewing to be more consistent! Especially with anything requiring triangles…ugh?
-
My foot that is always on my machine is 97D with dual feed engaged with straight stitch plate.
-
I just bought the #57 and am excited to use it. I think this will be my go-to.
-
I use the #37 patchwork foot.
-
My favorite is the 97D foot!
-
-
When piecing the 97D foot with the hover feature on the machine are great tools for piecing. Pin Pals Book by Carrie Nelson is a great book of tiny pin cushions to practice your precise piecing.
-
57D is my favorite unless I am working in a tight space where the the foot gets in the way. If that’s the case, I’ll grab my 37 foot. It’s great to have options.
-
I always use the 97D foot, my favorite.
-
My go to is the 57D. I get better results with the side bar.
-
My go to is my #37D ?
-
Couldn’t live without my 97D. And I use the stitch plate with a single hole in it as that helps hold the fabric better.
-
97D terrific little helper!
-
I love the 97 foot for patchwork.
-
My 97D which came with my Bernina 770 sewing machine.
-
I use my 37D and the straight stitch guide.
-
I use my #37 foot.
-
I’ve always just my 1/4” quilting foot.
-
I use my 37 or walking foot for piecing!
-
#37D
-
57D/57 is my go to foot!
-
I use the 97D and a straight stitch plate.
The give away would be great to win!
-
I use Patchwork Foot 37.
-
I just completed Elizabeth Hartman’s Pretty Birds quilt pattern. Without my 97D foot, I’d still be trying to piece those tiny little squares.
-
97D is my go to for patchwork!
-
I just use my regular #1 foot because I don’t have any of the specialty feet yet.
-
Though I’ve sewn for most of my life, I am new to quilting and use the #97 foot, which was recommended. It has done the trick so far! Loving my 570QE!!
-
I love my #37 patchwork foot, but use my invisible zipper foot to do cording. In my opinion it works better than the cording foot and sews exactly 1/4” away from the edge. It is my secret trick for corded bindings.
-
I use the 97D on my 770 and the 37 on my 335.
-
I love my 97d. It’s my go to. I found this article helpful. Thanks
SBooth -
37D is what I generally use.
-
I typically use my 97D on my 790, but sometimes I will use the standard 37 once I start assembling the piecework together. Yay Bernina ?
-
Depends on the machine I am using. Either my 97D foot for my 880 or my 37 foot for my 440.
-
I love using my 97D!
-
go to foot is 97D!
-
I rarely change my foot and use 1D for most things.
-
The 37 foot is on my machine all the time.
-
I use a walking foot with my Bernina 1530. I works great!
-
I have 4 of these 6 feet. 57D is my favorite, second favorite is 97D.
-
I use my regular 1C foot for garment sewing when a 1/4″ seam is required.. But for patchwork I use the 97D for quilting projects because it’s accurate. Very accurate.
-
I use the 1C for piecing and 97D for the quilting part.
-
It was a learning curve to get comfortable doing a 1/4″ seam on 9mm feed dogs. I have finally succeeded with the 97D foot, along with the screw-in seam guide and straight stitch plate.
-
I always use my Foot #37.
-
I love my 37D foot. I can use either side to get my qtr inch seam.
-
97d is my favorite
-
I use my regular c1 foot.
-
I love my 97D foot. I get accurate 1/4″ seams ?
-
I use the 97D. It stays on my machine 95% of the time!
-
My favorite patchwork foot is 97D. It’s the best!
-
I love my 37D patchwork foot. Don’t know what I would do without it!!
-
#37 is my go to foot for piecing, as well as several other things!!!
-
I’m a 97D user. I love that foot!
-
I love my 37 foot. Also known as my quilting foot! It has never done me wrong. ?
-
I have 2 favorites, 57 and 97D feet.
-
97D
-
I use the 97D.
-
I love my #37 foot. Also known as my quilting foot! It has never done me wrong. ?
-
I use the #97D patchwork foot most of the time, but if using my old Bernina (at a class or when traveling) I use the #37 foot.
-
For years, it was the 37, but now that I have my 97D, it is just the best!
-
I use #37, old faithful, for most piecing. Occasionally #1 for stitching in the ditch.
-
Love my 37 for almost everything ?
-
I like using my 97D foot for patchwork.
-
I use #37 for most piecing. Occasionally #1 for stitching in the ditch.
-
I love my 97D! It is the best!
-
I use the 97D on my 790+ .
-
i use the 97 foot
-
I use my 97D on my 880.
-
Definitely the #57 foot.
-
I use both #37 and #57 feet for my patchwork projects. The bar on #57 is a great addition to keep seams to a quarter inch.
-
I use a 37.
-
I use #37 foot. I need all the help I can get to have good 1/4″ seams.
-
97D is the perfect one for me!
-
I use a 97d for everything! I may have to try the 37 just for fun! I love how easy it is to use different feet on a Bernina and how much changing them truly helps.
-
My go to foot is the 37D and I sometimes use the guide with it.
-
97D for me.
-
I love my 97D foot Lately I do 99% quilting
-
My absolute go-to foot is the 97D… I love how it holds more fabric using both feed dogs!
-
I use my 97D foot. This gives me very accurate 1/4 inch seams with a single whole plate and the needle 5 ticks to the right ! Perfection
-
I use my 97 foot. This gives me very accurate 1/4 inch seams with a single whole plate and the needle 5 ticks to the right ! Perfection
-
I use my #37
-
I use my 97 D foot. This gives me very accurate 1/4 inch seams with a single whole plate and the needle 5 ticks to the right ! Perfection
-
Sometimes I use my 34D with the clear sole just so I can see more clearly and hold the fabric down over the entirety of the feed dog .
I use my 97 D foot. This gives me very accurate 1/4 inch seams with a single whole plate and the needle 5 ticks to the right ! Perfection -
Sometimes I use my 34D with the clear sole just so I can see more clearly and hold the fabric down over the entirety of the feed dog .
-
My #57D foot gets quite a workout! And I LOVE it!!
-
I do not have a patchwork foot. On my old Bernina I use 000, on my B560 I use a 1 C.
From all the comments, it looks like I need to get a patchwork foot! -
I use the 97D.
-
I Iove several feet, depending on what I’m piecing…
Open toe.
Quarter inch. -
#57 is my go-to patchwork foot
-
#37
-
My #37 is my best friend! Also a light bulb might have just come on! (LOL). Are all Bernina feet with a D mean that it’s a Dual Feed foot?
-
Great giveaway! I use my 97D for most all of my sewing. Thanks!
-
37D – for patchwork!
-
I love the 97d. Very accurate 1/4″.
-
Favorite #57D
-
New quilter, long-time sewist, so I enjoy seeing tips and different feet to use with my Bernina 570QEE. I mostly use the 97D, but I might check on the 37D after reading this blog. Thanks!
-
well, I used the number 20 foot, i just upgraded to a new B570QE and it has a patchwork foot in the package, can’t wait to try it out, i mean the machine is only 1 day old so can’t wait to figure things out
-
Great giveaway! I always use my 97 foot.
-
I love my 92D foot. It makes Piercing so much easier.
-
I use my Quarter Inch foot for most of my piecing.
-
Using the 97D foot. Cant wait for this giveaway!
-
I have the 37, 37D, 57, 57D, 97 and 97D.
My favorite go-to is always the 57 for both my 9mm and 5mm machines. Occasionally I use one of the others, depending on what kind of blocks I am joining. -
I use my walking foot for all my quilting steps. I really need to look into all of the different feet to see what I am missing.
-
I use my 97D when piecing ?
-
I use the 37 or the 97D depending on which of my machines I am using. Love them both.
-
I love the 97D foot for piecing on my 770. I have the 37, 37D, and the 57D as well. Much easier with the 97D.
I had been working on a quilt and one 6” block had 108 pieces! Made it much easier to match points. -
I mostly use my 97D for patchwork.
-
The foot #57 is the answer for me. To have that guide on the right makes all the difference. This time I am going to go for 1/8″ seams and I know it will be critical.
I really appreciate the reminder about the 1/8″ marker. That precision has been eluding me, but this time I am determined to get it right! -
I use my #37. I love that I can gauge 1/4 & 1/8 inch seams.
Cathy -
Number 37 – and the guide
-
I use my #37 or #57…or my #1 foot. It completely depends on which Bernina I’m using, what mood I’m in and what type of fabric I’m using.
-
I like #37
-
I prefer the patchwork 97 foot.
-
I use the #57D for patchwork. Love my Bernina!
-
My 97D is indispensable for an accurate 1/4” seam for patchwork.
-
I use the 57 foot on my Activa 210 and the 57D on my B740 . Love them both!
-
Use a standard #1. Do not have one of the specialty feet.
-
I really like the 97D. I love the way the foot is designed to allow you to sew the different seam allowances. I also have the 57D, but my “go-to” is the 97D.
-
I use my regular foot and move my needle over to 6.0 for 1/4-in seaming.
-
I like the 97D foot, and for many other uses as well!
-
I use my regular foot!
-
I use 97 D on my Bernina! Waited forever to be able to buy my Bernina, but I love it! Worth the wait. Hope to upgrade someday! Embroidery has become my new go to.
-
I have a Bernina 440QE, I use my walking foot for all my piecing.
-
With my 790+ I use my 97D. With my 435 I use my 37. I love the perfect 1/4″ seam I achieve with these two feet. My favorites, for sure!
-
I use my 97D foot and love it!
-
I use my 97 a lot. I also use my walking foot in some situations it offers more control.
-
I use the #37 patchwork foot all the time when piecing. It is wonderful!!!
-
My 97D on my 770. Still learning to use this machine.
On my 930, I tend to use the all purpose foot, 000. It is the one I am the most comfortable with. -
I use my 57D – a perfect 1/4 inch seam!
-
I use my 97D patchwork foot and shorter stitches. It gives me the ability to see exactly where I’m stitching!
-
My piecing is so much better now that I use the 97D foot. I will have to try the 57 foot on my next project.
-
I like the #37 foot the best. Thanks for the article with helpful tips!
-
I use my #37 and 57 for piecing. Love both of them!
-
I love 97D. It’s a perfect guide, especially for smaller pieces. I see on a 570QE and it’s absolutely wonderful. I also stick with Bernina needles a they work best for the machine.
-
I love my 97D!
-
I use #37 for my 350SE or #97D for my 830.
-
I use my 97D for piecing and found the perfect stitch!
-
Love my 97D for 1/4” piecing on my 790 plus
-
Love using either the 37 or 57 foot for patchwork. I am intrigued to complete such a small patchwork. Really have to be precise!
-
I love my 97D foot and use it for my small pieces. I must admit I think I’ve been using a needle larger than I should. I will have to change that.
-
I have several different Bernina machines & love each of them. I use my #57D whenever sewin quilt blocks. I also have the 97D I use it also. I love the guide, it helps me a lot. So thankful for these feet to help me
-
My go-to for patchwork foot is 57.
-
97D. I have all three of the patchwork feet, but this one has become my go-to foot for quality accurate stitching.
-
I use #37 or #97D
-
#97 is my favorite, but I might have to try something different after reading all these comments!
-
I use #37 foot.
-
My favorite foot is my 1/4 inch foot.
-
It’s a tie between the 57D and 97D
-
I use 97D and the straight stitch plate for my piecing
-
I love my 97D foot for piecing.
-
Use 37 foot which came with my Bernina (wedding present) from my parents in July 1999:
SLH -
My go-to foot for patchwork is the #97.
-
I use my regular foot. I did recently buy the plate for straight stitching only. Looking forward to using that!
-
I love my 57D, but with your diagrams of the feet (above), I may be using my 97D more now! Thank you for this article!
-
My 37D foot with the single hole stitch plate gives me the most accurate quarter inch seam for patchwork!
-
I use b
My Bernina walking foot on my 430 most of the time. -
97D
-
97D is my favorite foot to use, but I also use my 37D & 57D feet when I’m too lazy to change the foot out! Thank you for such an awesome giveaway!
-
My go to patchwork foot is the #37 foot for accurate 1/4″ seams.
-
My standard is the 1/4″ foot.
-
I like using foot 37D to do my patchwork. I love quilting.
-
I use the 97D. The markins are so helpful.
-
My go to is the 57D foot and the patchwork stitch. Never fails me!!! I love my Berninas!
-
I generally use the 97D to 57 for a nice 1/4” seam❤️
-
I have a 590 and an 830. I usually use a 57d. Nothing sews like a Bernina!
-
I have all three but my go to foot is the 57D. I like the guide on the side of the foot.
-
Didn’t realize the difference, but I use 57D. Might investigate the 97D.
-
I love to use my 97D patchwork foot. I use it for almost all of my sewing.
-
I get my most accurate seams with my 97D foot and the seam guide.
-
I use my regular foot
-
The 97D foot is my favorite foot for patchwork piecing. Precision and ease of use every time!
-
I love my 97D foot for patchwork.
-
I normally use my #37, although I find it gives me a hair too generous an allowance and I have to be careful. Maybe I’ll treat myself to the #57 D when it’s next on sale!
-
I would love a patchwork foot! I just upgraded to a B770 yesterday!
-
I use my 97D for most everything that I sew, but after seeing some of these comments, I will most definitely be checking out the 37. Thank you for the chance to win such an awesome prize.
-
I just use my 1/4 th inch foot or my regular foot
-
97D foot fits my needs well!
-
I like my 37 foot for piecing.
-
I would be lost without #37 when it comes to piecing!
-
I use the #37 foot for piecing.
-
I learned something new about my 97D foot. I have never been really sure which edge was exactly 1/4 inch. Good to know about the other measurements too. Thanks.
-
#57 all day baby!!
-
I don’t have a patchwork foot yet, but based on the information here, I will want the 97D 🙂
-
I most often use the #37 foot.
Sometimes I prefer the #57. -
Foot #57 sometimes need help with that 1/4 inch
-
Would love to win this! My go to foot is #37
-
Ever since it came out I have loved the 97d foot!
-
Hands down the 97D is to the best foot of course with the dual feed! ??❤️
-
I’m so brand new To my Bernina that I don’t know the number but it’s the foot with the guide so I’m getting my scant 1/4” seams.
-
Presser foot 57 is my favorite.
It was the first foot I used and has been giving me perfect quarter inch seams ever since. It is my go to when it comes to patchwork! Next would be wither presser foot 37 or 97. -
I really love the Patchwork Foot with the guide (#57). Really speeds things up.
-
My go-to patchwork foot is #57. I really like the guide. I also use it or other sewing when I need a 1/4″ seam.
-
I love my 37D
-
I usually use my 57D, I love havi g the attached fence to keep me going perfectly straight. If I’m doing curved piecing, I use the 97D, so the fence doesn’t get in the way of me seeing exactly wherw my fabric is.
-
Definitely, it’s the 97D foot. The additional guide that comes with the foot has been a lifesaver for me! I also use the guide with other feet.
-
My trusty & super efficient 97D makes piecing a joy! My 770QE never leaves home without it!
-
love the 97D foot?
-
I love the 97D patchwork foot and add the stitch plate for best accuracy.
-
My 57 foot helps me sew much!
-
My smallest pieced block has been a 1” square! It sure is tiny and yes, used the 97D patchwork foot for accuracy.
-
Almost Always! The #57D for patchwork, but I use the #37 on occasion as well.
-
My favorite foot is the 97D. I find it accurate and easy to line up the fabric. It makes chain piecing a breeze.
Cheryl Goodwin -
97D is the perfect foot to use….love it.
-
97d is my go to favorite
-
I like to use the 57!
-
I use my 1/4 foot for everything.
-
I love to use the 97D foot for all of my piecing needs!
-
I love using the 57D foot!
-
I am not a quilter but I find #37 wonderful for adding the fine topstitching on other sewing articles I complete.
-
I use my 97D for most patchwork and general sewing. loved this article, pointed out other options.
-
My piecing foot for patchwork is #97. My Bernina and that foot allow for precision creating!!
-
I use the 97D foot.
-
I may have to try some patchwork! I haven’t done it in years – so I would try all the suggested feet! 🙂
-
97D
-
My go to patchwork foot is #37.
-
My favorite patchwork foot is #37.
-
I use foot # 97D for patchwork.
-
I love my 37D. With dual feed, it’s a breeze to sew accurate seams!
-
For standard patchwork, I just use my 1C or 1D foot. However, if I need to have smaller seams, the 37D is my choice.
-
97D and the single hole plate were a game changer for me!
-
Without a doubt, the 97D foot is my go-to foot for precision piecing. The 1/4″ and 1/8″ marks make it easy, and they are perfectly placed for piecing/binding/corners…
-
I love my 37 and 57 !!!
-
-
Definitely the 97D foot on my 770 and the 37 foot on my 440 machine!
-
The 37 is the go to foot!
-
I’m pretty new. I haven’t ventured past #37 yet.
-
The 37 is the go to foot…. Can’t seem to leave a post here!?!
-
Can’t seem to leave a post here!?! Says it’s a duplicate… can’t be…
The 37 is my preferred foot! -
My favorite foot for piecing is the 57.
-
I use the 97 but am hoping to get either the 37D or 97D; have not decided. I bought the 570QE in April 2022 and am still learning. Whichever foot I pick it will be the dual feed as that feature is very nice to have. The piecing tips were great as the smallest onces I have done is 3″ by 3″ for hot pads and quilted appliance covers. The foot is also great for my garment sewing because sometimes pattern instructions have you sew a 1/4″ stitch so I always stop and change to a 97. I agree with the straight stitch plate and hope to get it soon. Wish I had an endless sewing budget but no luck so I just save up until I can get my next sewing tool.
-
I use the 97D foot. Love my 770QE
-
I use my regular sewing foot. But I pick up my new 590e in a few hours!
-
97D is the best.
-
I use my 57 foot so much, it’s rarely off of my machine. I add on Bernina’s magnifier attachment when I really need precision. I can see a thread’s difference with the magnifier!
-
57!
-
I use my #37D foot.
-
97D for my 570.
-
#37 is my go to foot.
-
Favorite foot is the 97D. Love all the dual feed feet and my Berninia.
-
Definitely the 97D and single hole plate. I just finished a 110″ square quilt top that had 1″ square pieces. Thank you for the article!
-
My go to foot is the 97D. It is fabulous!
-
I use my 57D foot for most of my piecing. Love it and the 97D as well.
-
My 97D is my favorite!!!
-
My go to patch work foot is #37. Having said that, I have been known to use whatever is still on my machine. Guess you could say I’m not very picky as all my Bernina feet do an amazing job!!!
-
I love my 97D foot!
-
97D is the foot I use for precise piecing on my 770 but I prefer using a 5mm foot for small pieces.
-
The 97D is he best
-
I am pretty new to Bernina. I use the 97D, These feet are taking some getting used to…means I need more time “practicing” right?
-
I use the 97D foot for piecing. I need to remember to use the 0mm plate and hold the threads to the back of the machine for perfect seams every time!
-
I own the 97d, 37d and 57d. My go to is 97d. I like them all. Thanks
-
I love my Teflon foot the most so I use it for just about everything.
-
97D is my go to for all my piecing!
-
I use the 37 for my 430 and love the 37D with my 750, but now I want a 97D after reading this blog post!
-
I use my #37 foot.
-
I use my walking foot on my 930 Record Bernina!
-
I use the 97D! Loved learning about the other marks on it!!
-
37 and 37D.on my 580 and 770 respectively. Love both !!
-
I love the 97D
-
I love my 97D with the quilt guide for my 590. And I make sure my single hole stitch plate is attached. For my 230 it’s the 57 foot. Of course, the 37 foot is perfect for stitching diagonal lines. It’s so nice to have many choices in presser feet to improve my stitching capabilities.
-
I have an older machine, the marvelous 1230, so I use the #37’patchwork foot
-
I love the97 foot. New to piecing but love it so far!
-
I use foot #97.
-
I love my 57D: it’s my favorite foot. I especially like it when I’m teaching my grandchildren to quilt. 🙂
-
I really like the 97 foot on my Bernina 730 and the 97D on my 880.
-
My go-to piecing foot is either 97 or 97D because I have a 9mm machine (B570 QE).
-
I love the 97D foot. Thanks for chance for giveaway and great tips!
-
I have used all of the feet featured here, but for simple piecing I swear by my #34D clear foot for use with my Artista or B770 9mm machines. It covers both feed dogs for consistent feeding, and I use the 1/4″ guide line inscribed on the stitch plate.
-
Most amazing patchwork foot ever 97D. It allows you to adjust precisely to the seam width you want or the pattern needs. Add to that the control of the dual feed foot you have an amazing quilting patchwork foot that other companies cannot compare. I love my Bernina 97D!
-
My favorite quilting foot is the 37D. I love the simplicity of the guides.
-
I use a 1/4″ foot for my piecing on my old machine. I am dreaming of a Bernina!
-
97D is my go to foot!!
-
I love using my #37 1/4 foot for my quilting. But reading the posts I might need to try one of the others. Happy quilting!
-
I use the 97d, it seems to work the best for me with the straight stitch plate. I love my Bernina 790plus!
-
I love my 97D foot, for piecing and all straight stitching.
-
My regular sewing foot
-
I use my 37 qtr inch foot and a stiletto
-
Since I have an ancient Bernina (810), I use #37. When it first came out, it was like the most revolutionary foot. I didn’t have to use masking tape anymore.
-
I use my 97 on my Bernina 480 SE
-
I love both the 37D and the 97D – sometimes the 3/8″ seam you can get from the 97D is so useful and sometimes I’m switching back and forth and I don’t have to switch feet. If it’s just a 1/4″ seam the 37D is great. Both feet are brilliant!!!
-
I use my 97D. I like that I can adjust for different width if needed.
-
I use my regular foot, but move my needle position to ensure a scant 1/4”.
-
I really like 97D, using dual feed with my 880. When traveling, I take along my 440 and get a lot of piecing stitched with the 37 foot. I love how smooth they stitch. And, yes, 50 years ago, learning to tailor, I first experienced the beauty of using a clapper with a good steam, for beautiful seams.
-
I piece with foot #37 and quilt with #50. Love both!
-
The 97D presser foot is my absolute favorite! I am a quilter and I found that when using this foot with the straight stitch plate, the accuracy of my 1/4 seam allowance greatly improved!
-
I use the 97D pressure foot. Love it!
-
My favorite is the #97D, as it covers the full 9mm feed dogs. I don’t usually use the included guide, but I am glad I have the option. Love both my BERNINAs, my 10 year old 750QEE and my year old 790+!
-
I use both the #37 and #57. I use them more than my regular sewing foot. The single hole plate is an absolute must!!
-
97D for me!
-
I love my 37D that’s my go to goot
Leave a Reply
You must be logged in to post a comment.

2022 WeAllSew Back-to-school Giveaway
This giveaway is now closed. Thank you to all of our WeAllSew fans who entered!
Congratulations to our winner(s):
Keep an eye out for the next WeAllSew giveaway!