How to Sew Tiny Holiday Cookies
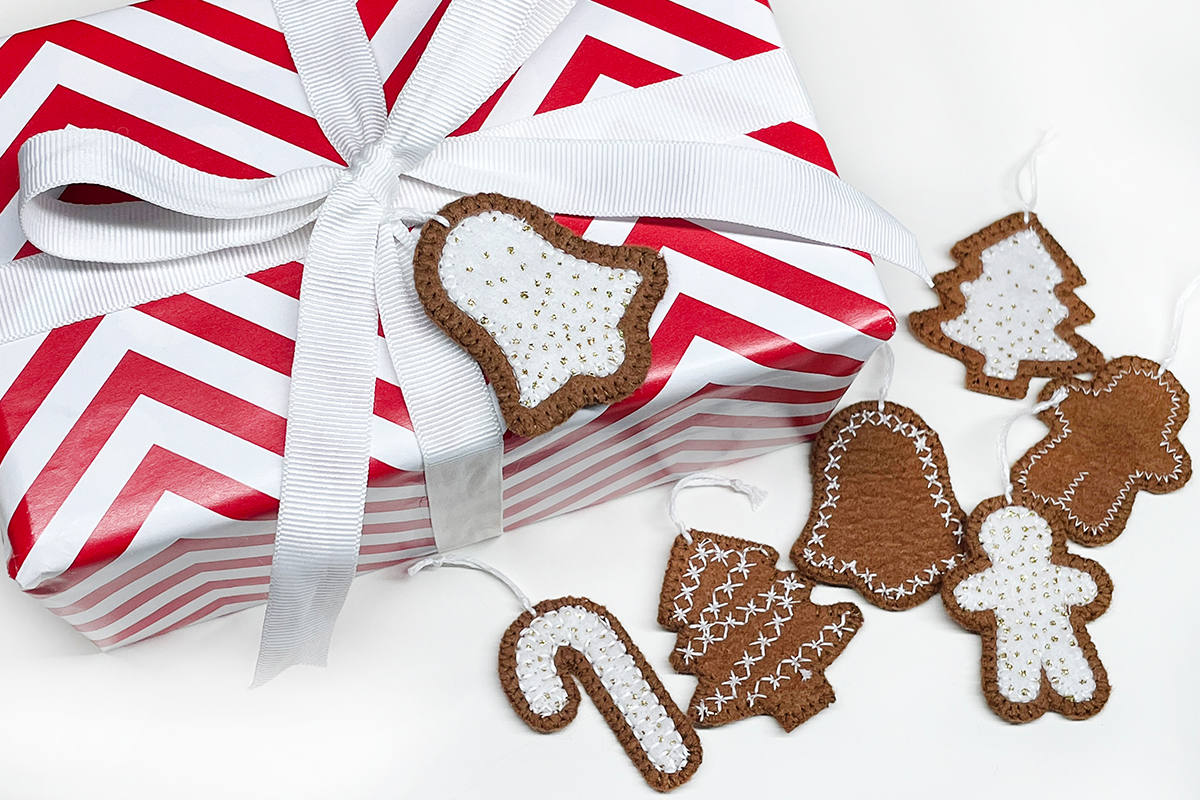
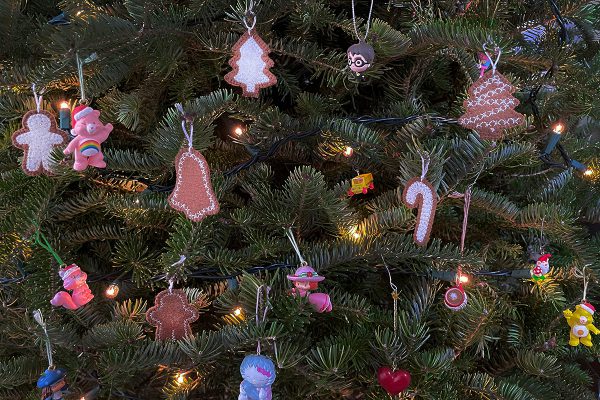
Do you love making and eating cute tiny holiday cookies like I do? Hello everyone this is Kerry Goulder from Kid Giddy and hope you’ll join me in making a batch or two of tiny cookies that you can make into sweet ornaments and gift tags. These holiday cookies are so simple you will undoubtedly, find more reasons to make them and other ways to use them. Why not make two and turn them into festive earrings? Add beads, crystals and other things to “decorate” your holiday cookies and see all the possibilities.
Materials to Sew Tiny Holiday Cookies
- Tiny Holiday Cookies Ornament and Gift Tags pattern
- 2 pieces of 2” x 3” Xotic Felt in Coconut Shell (for each double-sided embroidered cookie – 1 piece for the iced cookie)
- 1 piece of 2” x 3” Glitzy Felt in White (for each iced cookie)
- 6″ piece of white Aurifil Floss for hanging
- 50 Wt Threads to match
- Mini iron
- Washable glue for basting or double-sided fusible appliqué
- 8 1/2” x 11” Freezer Paper
- Tear Away Stabilizer
- Sewing machine
- Thread snips
- Earring hooks, if desired

Printing and Cutting Instructions
Print the cookie patterns onto the dull side of the Freezer Paper. Patterns are provided as 2″ and 3″ sizes that can also be printed larger as desired.
Cut the outside line for the double-sided embroidered cookies and cut the inside line for the icing tops.
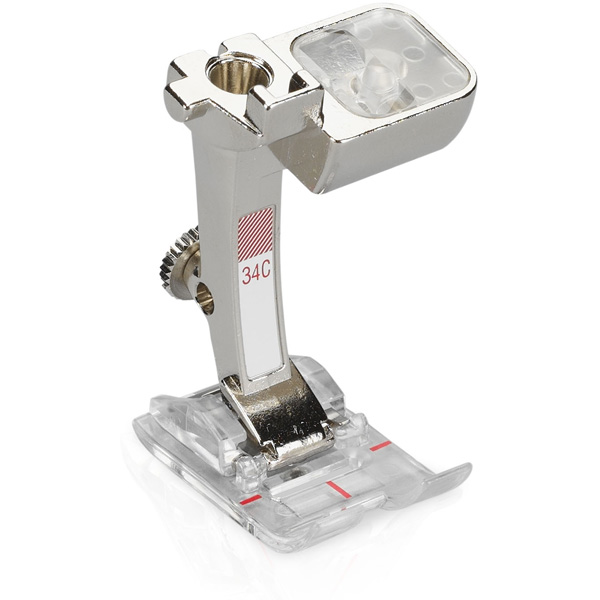
Presser Feet and Accessories
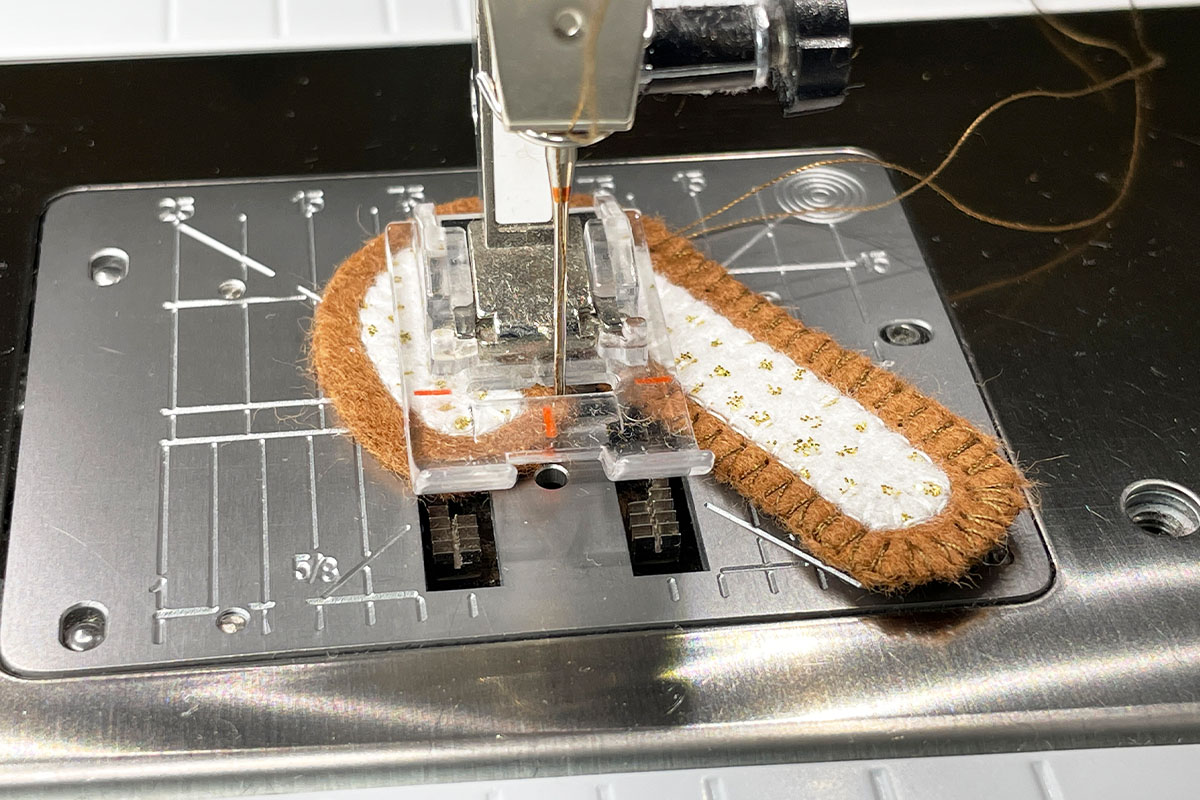
Reverse Pattern Foot with Clear Sole #34C
Let’s Start “Baking” Our Holiday Cookies
After printing and cutting all cookie pattern pieces, press the freezer paper pattern pieces (shiny side down) onto the fabric using a mini iron. Using freezer paper will allow you to cut out the cookie pieces without pins poking and without the paper shifting around while cutting.
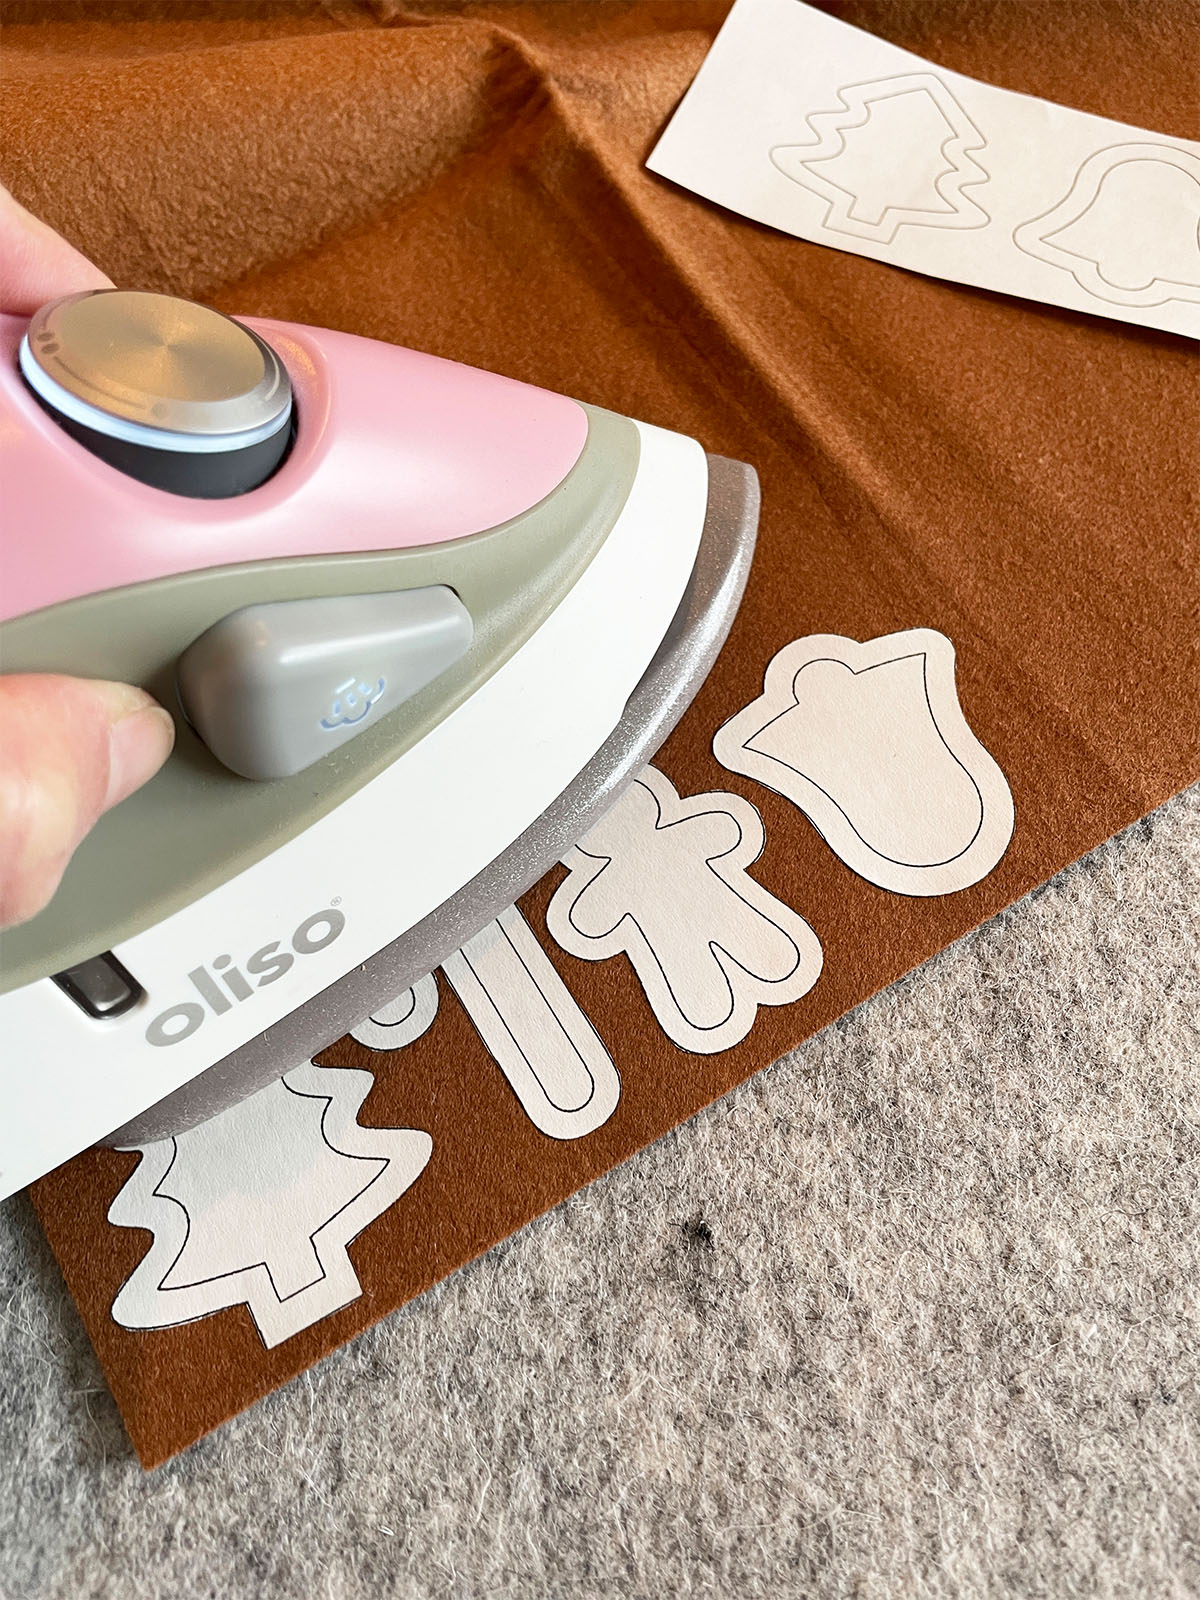
Carefully cut out the fabric cookie pieces (fronts, backs and icing) and gently remove the freezer papers. Do not discard the freezer papers as they can be reused many times over by pressing them onto fabric again.

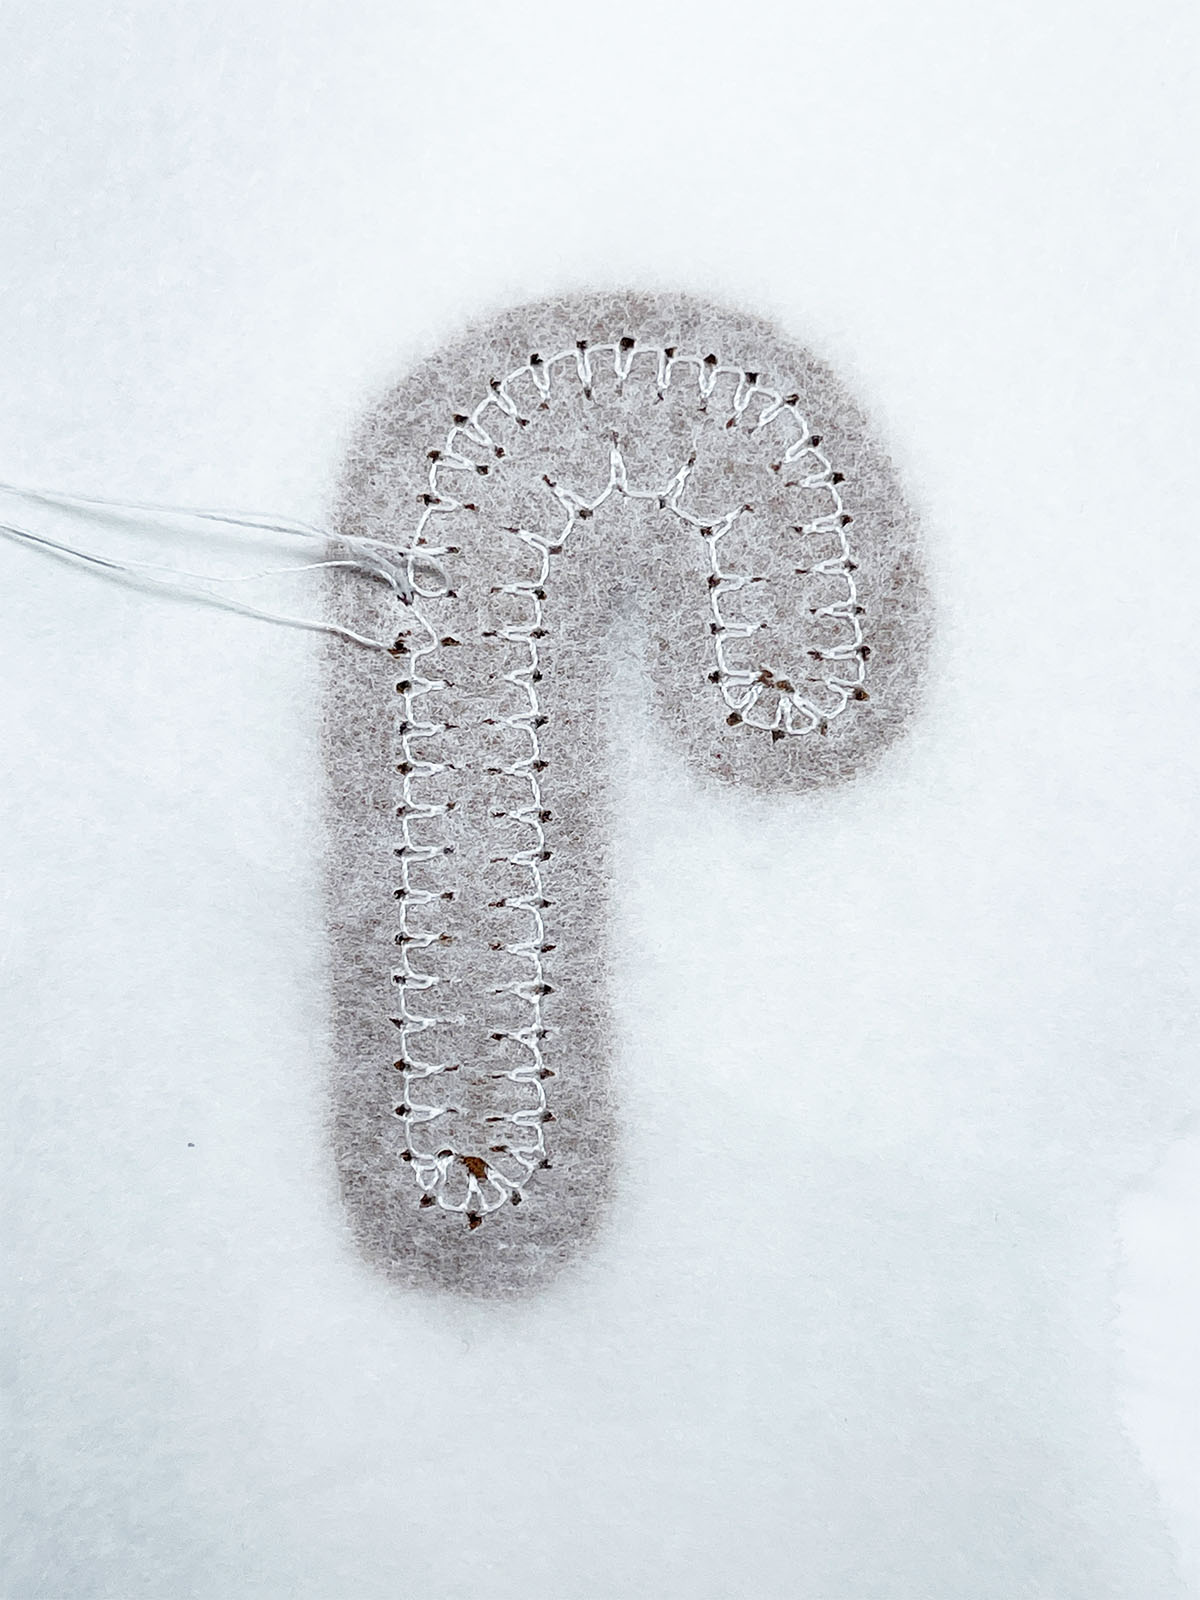
Iced Holiday Cookies
Glue baste the icing piece onto the front piece of a cookie piece.
On the BERNINA 590E interface display, select the search button and type 1309 to get the Single Blanket Stitch . 1310 is the Double Blanket Stitch which is thicker and could look nice on larger cookies but may be harder to stitch on smaller cookies.
Decorative Stitch numbers are different in each series. Be sure to look up the correct stitch number for your machine before stitching.
Place the Iced Cookie top on the tear-away stabilizer. Stitch all the way around the edge with the needle in the down position. As you work around a curve, lift the presser foot occasionally to pivot, in order to keep the stitches neat and on track.
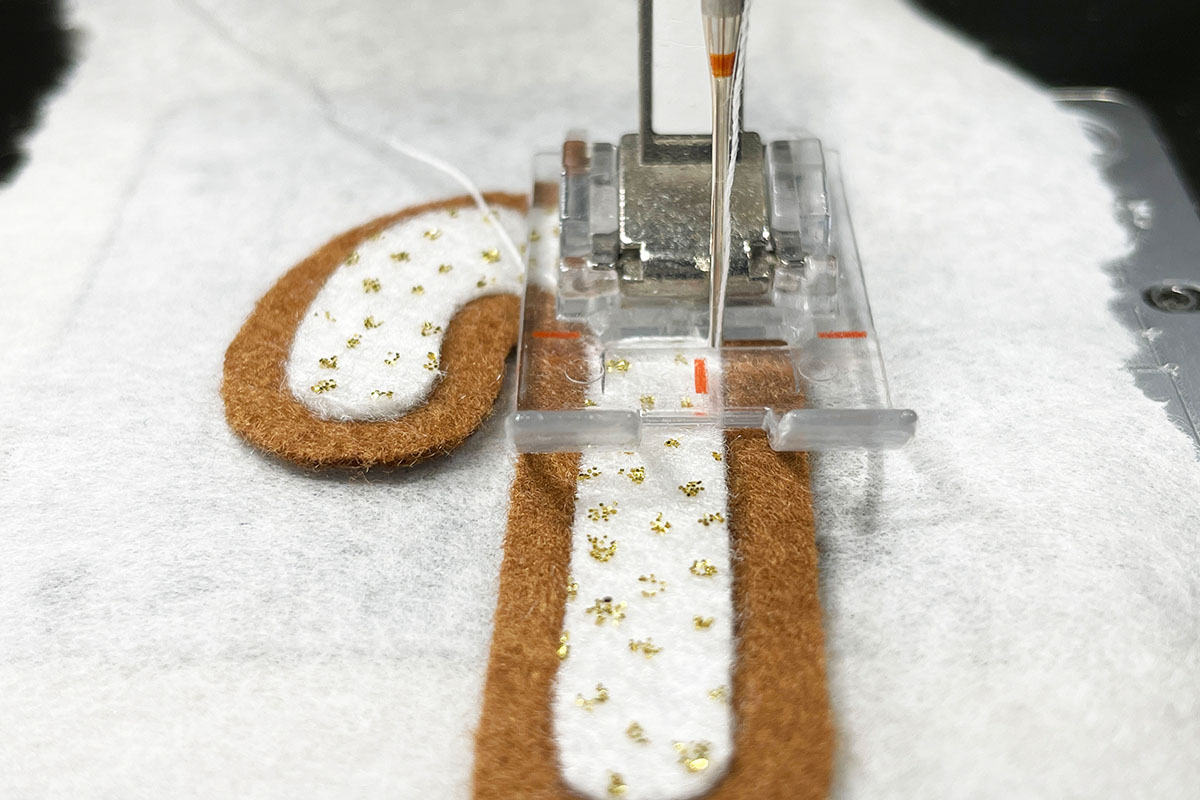
When you come to a corner, be sure the needle is in the down position and at the tip of the corner. Pivot the fabric before the next stitch in order for the needle to go in diagonally from the corner. Pivot once more before advancing, so the next stitch is perpendicular to the icing.
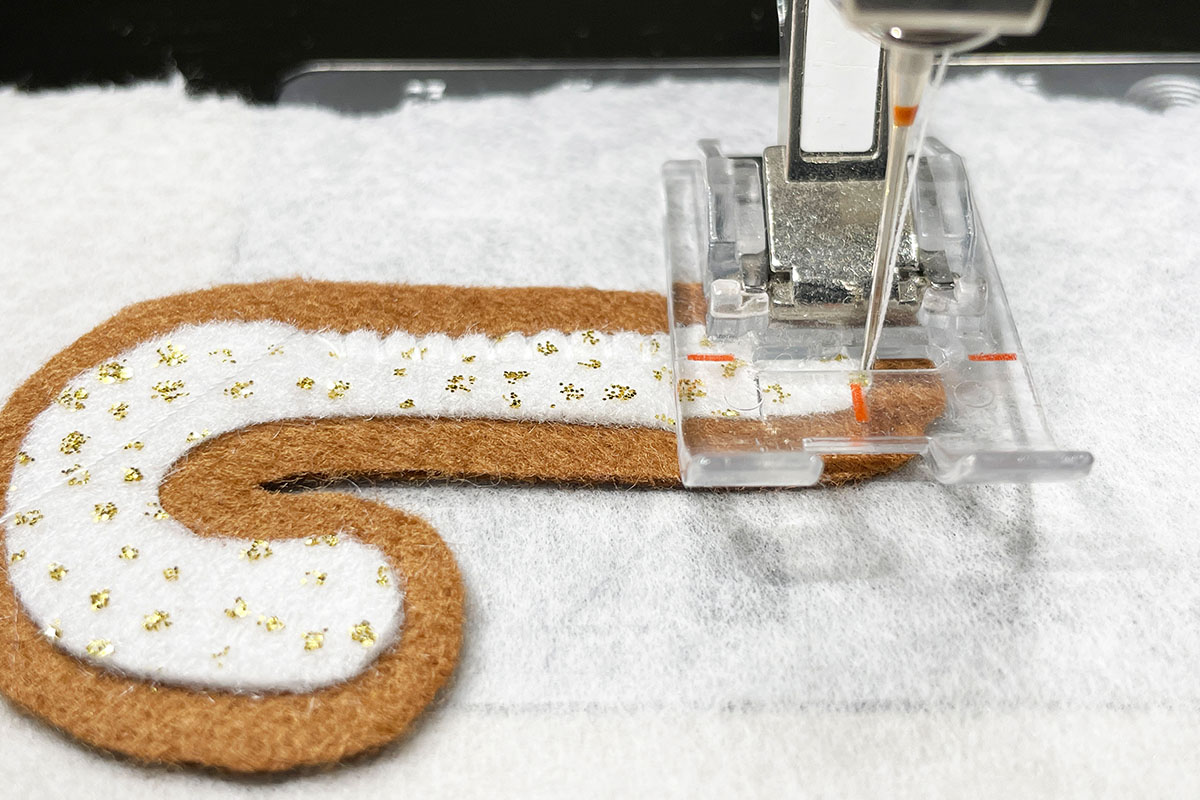
Once sewn all the way around, pull all threads to the backside of the cookie and stabilizer.
Carefully remove the tear-away stabilizer. Remove the outer piece first and carefully use a seam ripper to tear away the pieces on the inside of the stitching.
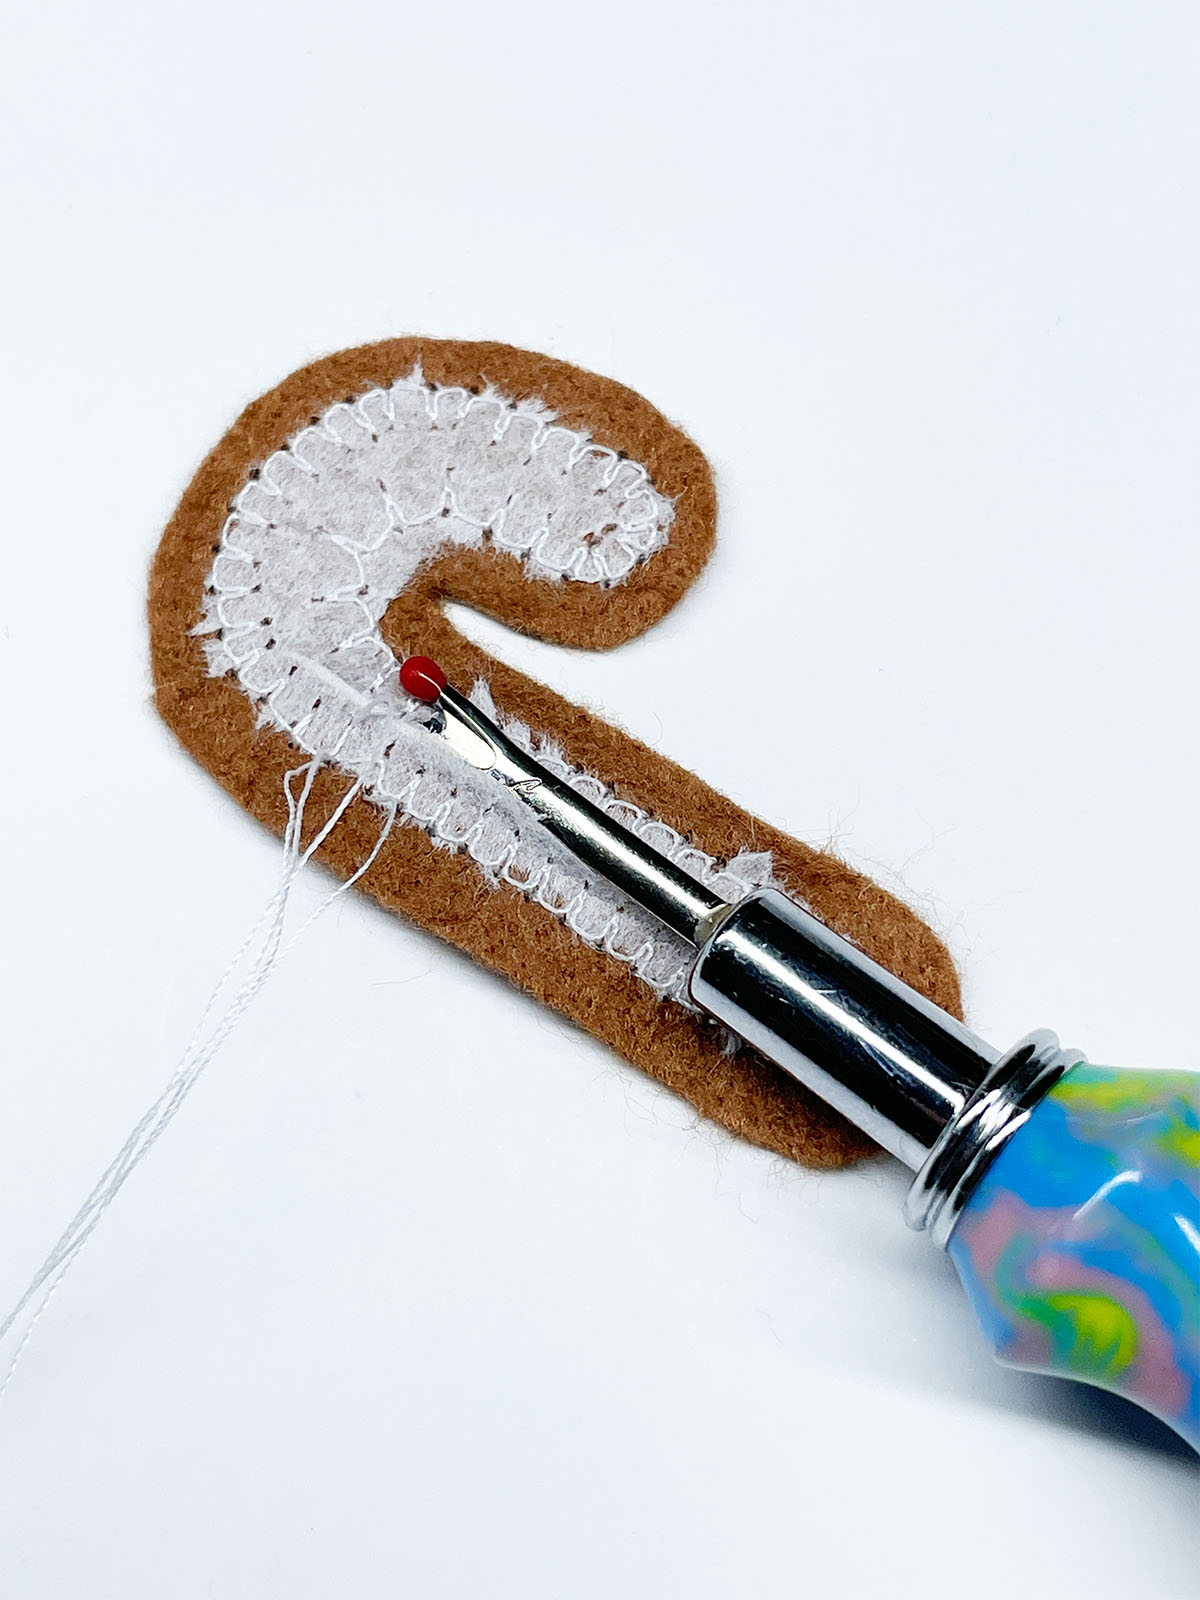
If you don’t want to remove this inside piece, or can’t remove all of the tiny pieces, it’s ok as it will be covered up.
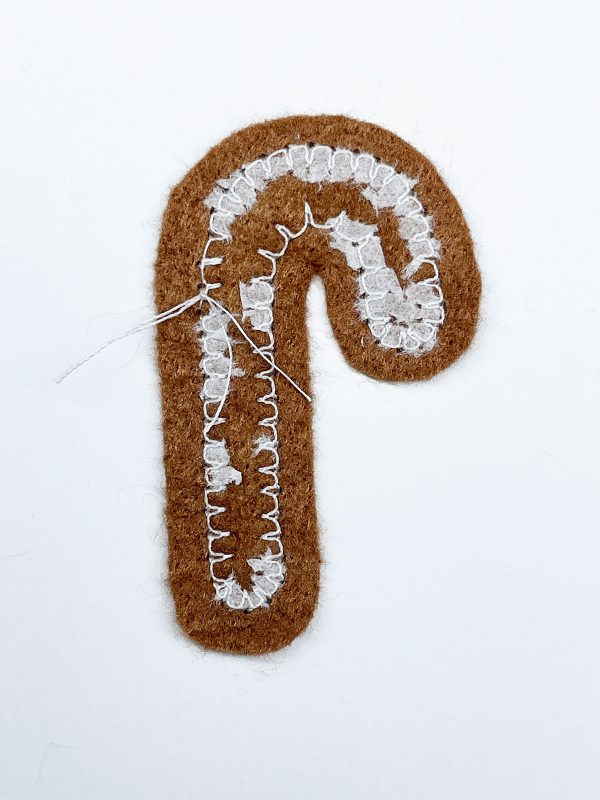 Add the Backing

Place the cookie top onto the cookie back. Glue baste the front and back cookie pieces together or use the double-sided fusible appliqué to adhere them to avoid shifting.
Stitch the outer edge of the cookie using a blanket stitch again.
Be sure to pivot as needed, keeping the needle in the down position so your cookie doesn’t shift out of position.
Tear away stabilizer isn’t recommended in this step as it will be difficult to remove all the tiny pieces. If you have difficulties without the stabilizer in this step, try using a water dissolving stabilizer instead. Remove what you can with scissors and dissolve the rest with dabs of water.
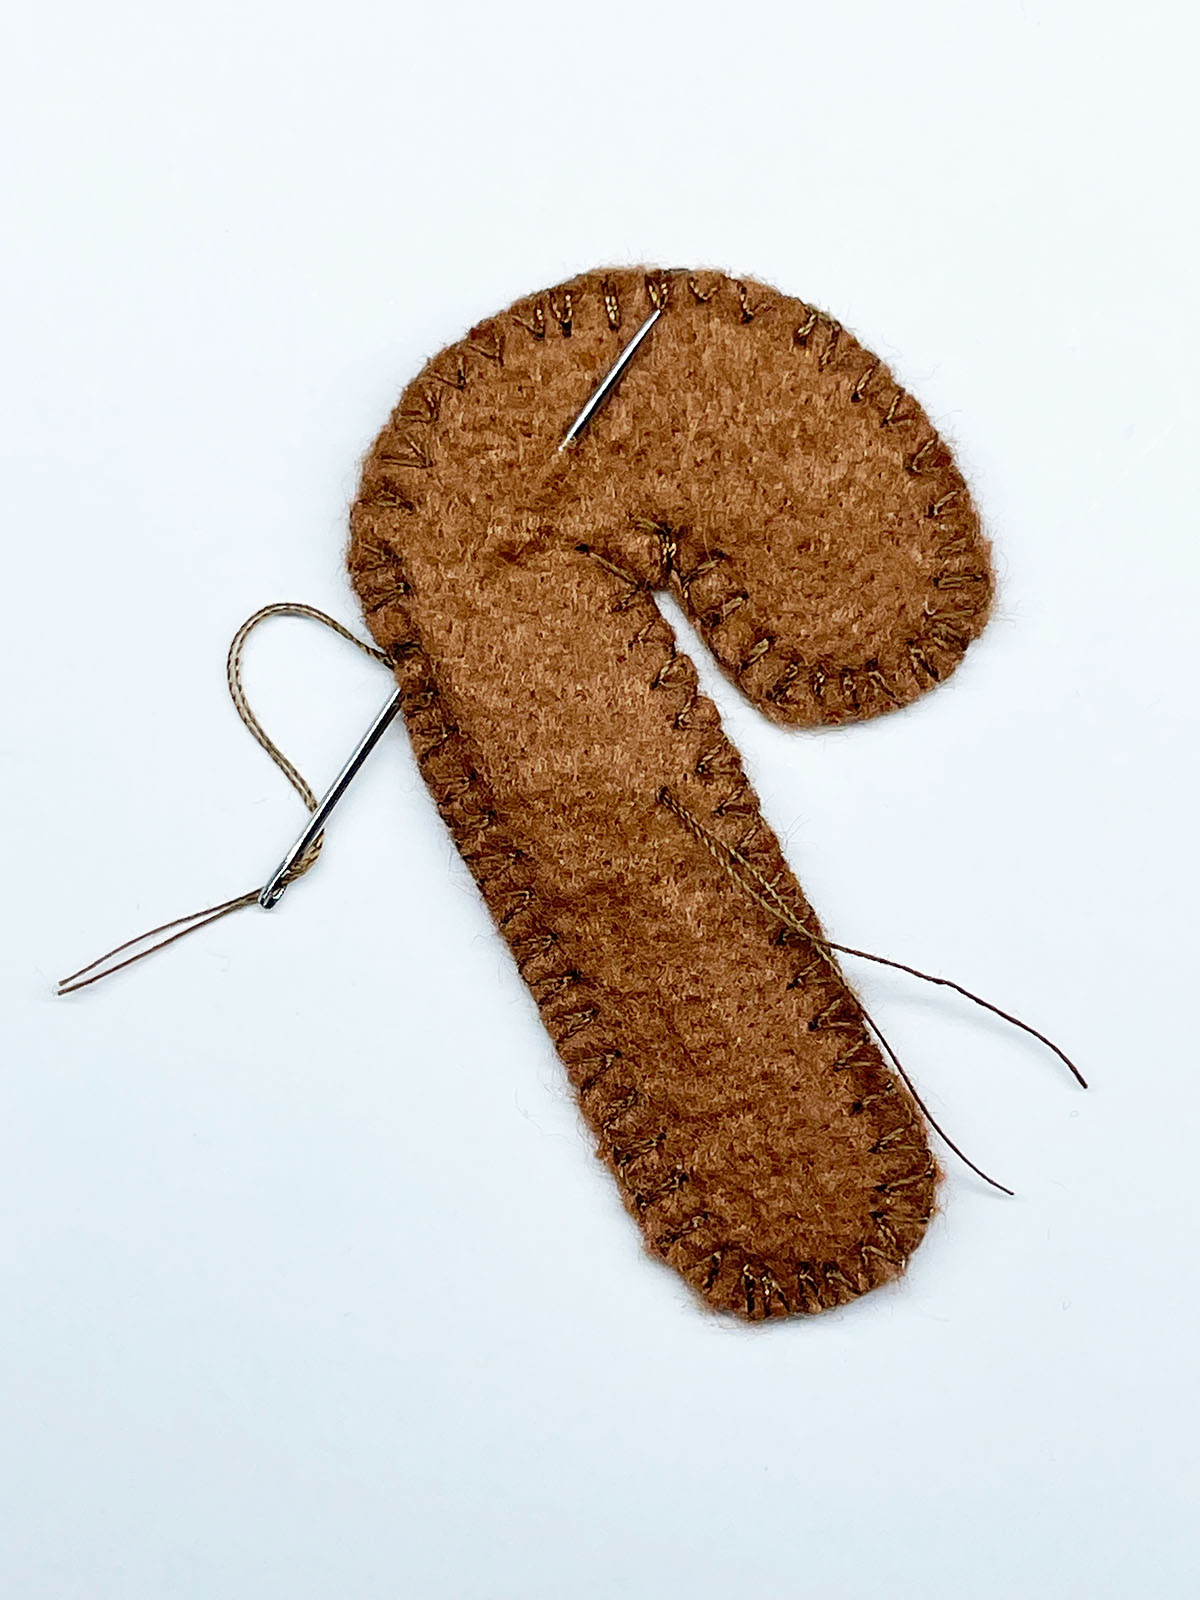
Knot the end stitches and leave the threads long to bury inside and between the layers.
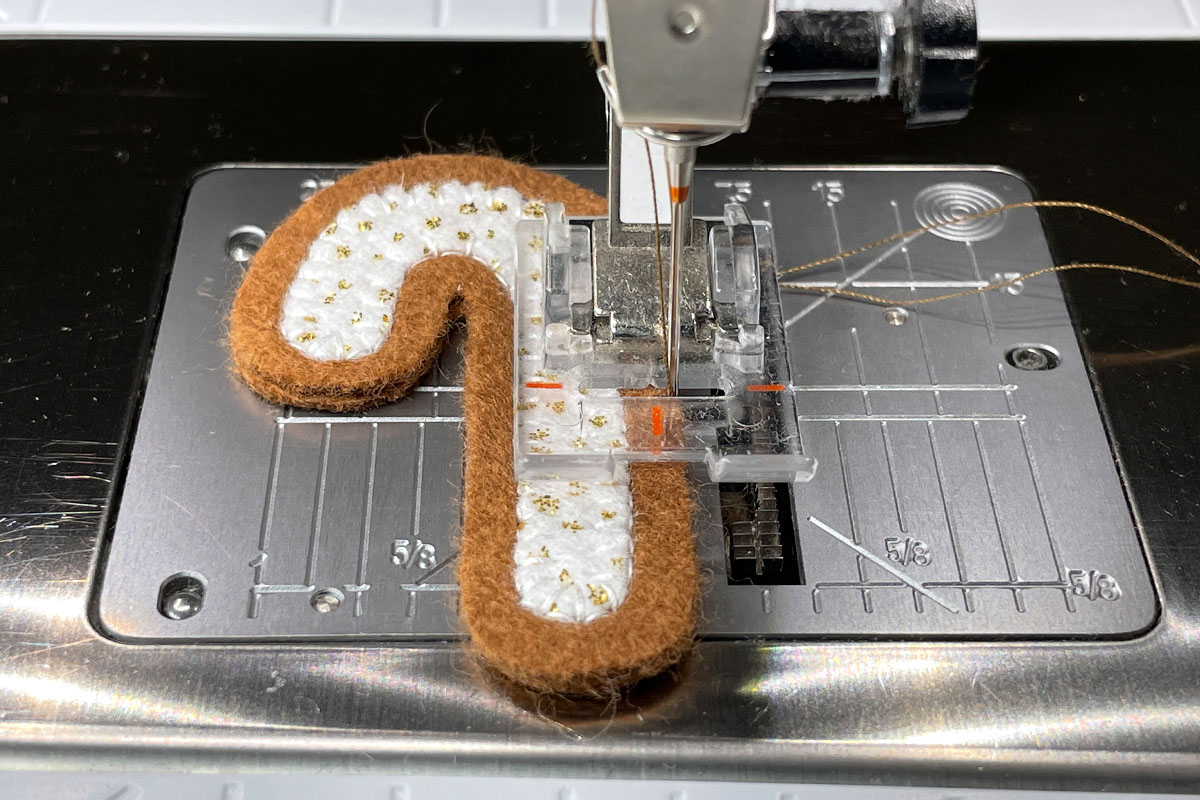
Embroidered Holiday Cookies
Find a fun decorative stitch to use by clicking the decorative stitch tab on the interface. Click through the files to get to know some of the different options at your fingertips and select a favorite. In order for your stitches to fit properly onto your cookie, be sure to adjust and test the different stitch size/length and width options.
Place the plain cookie piece onto the tear-away stabilizer and stitch the pattern as an outline, stripes, zig zag, name/word or any other option you’d like.
Repeating Steps from the Iced Cookies
As we did with the Iced Cookies, carefully remove the tear-away stabilizer and place the cookie top onto the cookie back. Glue baste the front and back cookie pieces together or use the double-sided fusible appliqué to adhere them to avoid shifting.
Stitch the outer edge of the cookie using a blanket stitch again following the same instructions from the iced cookies.
Bury the thread ends to avoid the edges of your holiday cookies from unraveling.
 Finishing the Cookies

To complete the cookies for use (not consumption) use a needle and floss to add a string to hang the cookie by. Other options: Use ribbon instead of floss if you want to use a wire ornament hanger. Use a needle to poke a small hole in the top to use a wire earring hook if making jewelry.
Share Your Favorite Cookies!
Do you have a favorite type of cookie? Gingerbread, molasses, sugar?
Tell us in the comments below what kind of cookies you are going to whip up on your BERNINA and what you’ll make with them: ornaments, gift tags, jewelry or something else.
Thanks so much for sewing with me. Please be sure to tag me #kidgiddy and @kidgiddy on Instagram and Facebook to share your finished cookies.
Used Products
What you might also like


147 comments on “How to Sew Tiny Holiday Cookies”
-
I just finished making Christmas placemats for brunch with my family, and a Christmas bib for youngest grandson. For the remainder of the year, I will be making bibs to donate to charity.
-
I purchased fabric in Playa Del Carmen two weeks ago for my daughter and granddaughter and am finishing up their Christmas garments!!! I have 3 days left and will make my deadline!! Am also finishing up 4 mug rugs that I designed and digitized and will give to special friends!! Merry Christmas to all!!!
-
I’m going to start planning on making a jelly roll rug.
-
I’m gonna finish up a quilt and I’ll be adding an interesting element…..yo yos!
-
-
The rest of 2021…starting/finishing quilt projects for my husband and waiting for 2021 to finally be gone…hopefully 2022 will better than the last two years. Happy Holidays & everyone Stay Safe!!
-
The rest of 2021…starting/finishing quilt projects my husband requested, and waiting for 2021 to finally be gone…hopefully 2022 will better than the last two years. Happy Holidays & everyone Stay Safe!!
-
I just finished Christmas stockings for my new family! And for the rest of the year I plan to embroider blocks for a quilt program from a local quilt shop, designs from OESD of course
-
-
I have been working so long on gifts for friends and relatives and now it is time to make things for ME!!
-
There isn’t much left of the year, but I’ll be sandwiching and machine quilting my latest quilt.
-
I have a stack of charity quilts to finish quilting.
-
Sadly, my machine needs to be serviced, so I won’t be sewing anything until I get it back.
-
Still making lace angels
Where are the patterns?-
Hello, the pattern can be found here. Happy stitching!
-
-
Make 18 blocks for a quilt after Christmas and maybe one finish my embroidered Christmas cards.
-
My sewing plans are to start an art quilt project for my art quilt mini group and perhaps work on a UFO or two!
-
I will be trying to set up my sewing space after moving and having a surgery, with the added goal of getting my LQS block of the month finished 🙂
-
I just finished a t-shirt quilt I’d been commissioned to do. I have two more to finish and get out to their eager recipients.
-
Fsl snowflakes and a table runner
-
Finished up all holiday projects and now working on items for spring.
-
-
Bind a tree skirt, quilt a Christmas table runner.
-
Plans are to catch up on unfinished projects. I have dog beds to repair and a couple quilts to quilt. Also I seem to loose my face masks so I may need to make some more.
-
My sewing plans for the rest of the year? Clean my sewing machine, reorganize my sewing room, and plan out next year’s sewing projects.
-
I still have a few Hawaiian fabric requests to sew small home dec items for a neighbor.
-
-
I will be practicing ruler quilting on a couple of UFOs before starting a set of seasonal table runners.
-
My sewing plans for the rest of the year is to finish binding a quilt and sort out my 770QE upgrade
-
A quilting friend of mine sews costumes for a local theater. I thought she could get a 50% discount for my daughter & I to see a show, but she actually used her credits & gave us 2 tickets!! I am going to make her a quilted sewing kit & quilted journal cover. Thank you for your wonderful tutorials! Our Berninas are amazing & these tutorials help us explore so many fun projects!!
-
For the remainder of 2021 I’ll be altering clothes for my son and prepping for the Bernina Stitching Cosmos Course. Looking forward to spending lots more time with my 880+ in 2022!!
-
Finish up a few gifts and start on next year’s birthday quilts.
-
I’ve been making doll clothes and aprons. The new year will see me making more historical style doll clothes
-
I am going to make bowl cozies and a new tree skirt. There is a quilt calling my name from Scott’s 4th and Main My Bernina Dealer – The Presser Foot – is offering a class in the New Year.
-
For the remainder of this year, I’ll be finishing some customer orders, and hopefully starting my first wall hanging guilt.
-
I’ve been busy and haven’t found much time for sewing lately. But I’m looking forward to the days between Christmas and New Years when I can work on my adding machine tape scrap quilts. I made two tops and now need to get them backed, quilted and bound.
-
I’m making as many “by Annie” items as I can!
-
Since we flooded and I lost my sewing/crafting area in September and with the renovated room just finished, I will attempt to make some Christmas presents in the few days I have left.
-
I’m working on some “thread snip” travel gifts for stockings!
-
I’m embroidering lace ornaments to give away as party favors. My guests love them
-
I am planning on sewing a project bag so I can practice using different Bernina feet and I have 2 quilt tops to finishing. One is almost done and the other is a small square quilt. If time permits, I want to sew 2 cowboy Christmas stockings for my horseback riding buddies. Merry Christmas and many blessings to ALL!
-
I will be starting a quilt for my grandson.
-
I’m spending the rest of 2021 sewing through a mountain of fabric scraps, making string quilt blocks. That’s in addition to baking, house cleaning, etc.! My goal for 2022 is to finish up several quilts that are in process on my 780. Thanks for the opportunity to win this lovely prize.
-
I’m all planned out for the year with six quilt patterns and the fabric for them stored in my future projects shelves. A couple are new techniques I’ve not done before. I’m also hoping to attend my first quilt festival in Texas.
-
I have a January pillow of the month to finish before the new year.
-
Working on a quilt for my uncle to send him after New Years
-
I am making a “Welcome Home” banner for church with the “O” being an embroidered scene that will change every month. After Christmas I will be embroidering my Women’s retreat logo on face masks to use at the Spring retreat. I also plan to start a LOT earlier next year-LOL!
-
This would be the best project with my little sewer girls! How fun.
-
Since Covid altered my travel plans, I’m pintucking the bodices of two nightgowns with my two new pintuck feet. The fabrics are lovely batiste from my Bernina of Naperville store. Hard part is designing the decorative patterns I want to use. I am eager to see how the varigated matching threads look in the decorative patterns as well. I’m going to focus on learning all I can about other uses for these different size feet because Bernina feet can do so much beyond their basic purpose I found. I’m a sewist, not much of a quilter so that’s why the focus on stitch mastery effort. My Bernina gives me such fantastic options. Happy 2022 to the We All Sew member family. 🙂
-
I have a quilt to finish and I want to embroider several things that I didn’t have time to do before Christmas. Love this project.
-
Working on snowman and ornaments.
-
Won’t have time to sew for the rest of the year however, in January I plan on making 3 memory bears – one for my brother, one for my sister and one for me using an old quilt that cannot be saved. Then I am going to use my mother’s wedding dress to make a wedding dress for each of the bears.
-
Finished Holiday Projects and working on a Baby Quilt
-
My sewing project(s) for the rest of the year are to make two aprons for a friend and nine little stockings for my chickens!
-
Sewing gifts for family and quilting some ufos laying around!
-
For the rest of 2021 I’m planning on starting a quilt for a Mother’s Day gift. Will be using my 780 to sew it and my q16 to quilt it.
-
Work on finishing two t-shirt quilts for a friend of mine on my 880 and Q24.
Work on some gingerbread and Kimberbell designs on my E16.
-
I plan to fmq a practice quilt to try to improve some skills.
-
I’m finally going to be able to sew, I’m making oven mitts for family and friends. I haven’t sewn since two years ago when I started caring for a family member. Shortly before that I had replaced my incredible 440 because I was told it was too expensive to repair it. I’ll be getting to know my “new” Bernina all over again. I remember how much I love the larger bobbins. I’ll be busy sewing for quite awhile. Merry Christmas!
-
I will be sewing binding a few quilts and start practicing ruler quilting!
-
For the end of the year…. I am being selfish. I am all done with Christmas sewing and sewing for our American Hero qroup (full size quilts go to the Wounded Warriors). I am enjoying working on my 880 for me! Finishing up a couple of applique wall hangings and art quilts. I do spend about 8-10 hrs sewing.
-
My sewing plans for the rest of the year are to start quilting a wall hanging and hopefully get a hoodie cut out and sewn up!
-
The rest of the year I am babysitting three kids until they return to school, so very little sewing will get done. What will happen is that I will dream up new projects for when my time is my own again.
-
I am currently working on some fabric envelopes to put some Christmas presents in. As soon as I finish those, I’ll be sewing up some Christmas napkins. The rest of the month will be spent catching up on a couple BOMs that I’ve set aside for the last few months.
-
I just finished all my Christmas projects. I will now start a baby quilt for my grand niece’s baby.
-
For the remaining days of this year I will finish Christmas gifts: a t-shirt quilt for my son and two minkee plush throws for my grandchildren.
Between Christmas and New Years I have a few birthday gifts to complete for friends, and if I have any free time leftover, I want to work on the “Postcards from Sweden” quilt for myself.
I love all of the beautiful colors in it!
? -
I’m finishing up a bunch of little sewing projects and will add these cute ornaments to my list for next year!
-
I plan to finish quilting a 60 X 70 quilt for my friend; also, my June 2021 retreat quilt, a Daniela Stout pattern plus quilt my wine quilt from several years ago. It will all depend on my husband’s heart health. As you all know, we plan and God laughs.
-
There are too many ? to pick one love them all. I will be finishing up some Christmas ?.
-
These are adorable! My sewing plans for the remainder of the year include a self-binding baby blanket, zipper pouches, and a table runner.
-
I just finished 3 sets of pillow cases with my new 890 serger anda casserole cover with 13 x 9 dish inside. For the rest of the year I will be finishing a Quilt of Valor for the Honor Guard at Dover AFB.
-
I just finished the last of my gifts and home decor projects. Many kudos to my new 770 QE Plus for being so creative and precise – love this machine! Now I will take some time for myself and make a holiday tote bag with candy cane zipper. After that, a few embroidery projects for some table runners. Will be ready to start the new year with a larger quilt project. Happy Bernina time!!!
-
I will be making wristlets for gifts!
-
Sewing for the remainder of 2021 means hand-work, since seven more people will be staying with us over the holidays! With my sewing room turned into a second guest room, my lovely Bernina will be tucked-away safely ready for lots of machine sewing in 2022. Thanks for the chance to win your generous giveaway!
-
For the remainder of 2021 – I will be too busy cooking and baking, but I might sneek in some shortening of pants for my visiting daughter.
-
I will be finishing some Christmas ornaments, hemming some pants and making a couple of pot holders to try out quilt square designs. Happy Holidays everyone!
-
Mittens & mitten covers for the twin grandsons as well as Bible book covers are the projects for before Christmas. I must get busy! There are always quilts to make too!
-
Need to finish some gift tags, then I plan on starting a new Christmas quilt for next year’s display in my home. ???
-
Making costumes for a high school theater production of Little Mermaid
-
I am planning on starting a mystery quilt challenge so that I can try out my new quilting frame.
-
For the remainder of the year, I need to make 2 bags for Christmas gifts and then I’m doing some selfish sewing, making a skirt and starting a coat.
-
Thanks for the cookie recipe 🙂 I’m going to try to finish up a quilt and use my serger to sew a sweater.
-
I got a Bernina L890 machine for Christmas, and I plan on using it for the rest of the year making any and everything. Can’t wait to get started and have home dec and clothing projects ready to go. I’ll probably start off the new year sewing on this wonderful machine as well!
-
I plan on finishing quilts by doing ruler work. Wish me luck.
-
Finishing up two duffel bags for my grandsons with some embroidery of their names. Love my 770 QE Plus.
-
I’m working on throw quilts for.great granddaughters.
-
The only thing I have left to sew before Christmas is dog toys from recycled jeans. After Christmas, I’m going to start a simple quilt that will be relaxing to make.
-
Hi, looks like I will be making some more ornaments before Christmas. Afterwards I will be working on some unfinished quilts. Love my Bernina.
-
I am finishing up fabric Christmas trees, kitchen towel holders and pillowcases. My next project is to organize my sewing room…UGH!
-
I’ll be finishing PUL cosmetic bags for granddaughters.
-
Planning on some sewing time with my granddaughter will she is visiting
-
Finished 12 embroidered kitchen towels. One embroidered lap blanket. 5 “buckets” lined with flannel and of course embroidered. And packed it all away…sent out in the mail. For me, about 15 new tree ornaments, a new project that I have never tried (but the directions look great). From now to the end of the year…it’s all about me!
-
I’ve just finished and wrapped a Star Wars Mandalorian lap quilt, two rag quilts for my cat-loving granddaughters, and a Hot Wheels jelly roll rug for a grandson. Busy time! Getting ready to start on a math-themed wall quilt for my husband for his classroom. Loving my 570 QE! Happy Holidays to all!
-
Giving back to those who need help will be my last week of 2021. You always get back more than you give.
-
Love the ornaments. I make some every year for my daughter’s family so will keep these in mind for next year. I am still working on a pillow with a pieced dog on it but most likely won’t finish it this year.
-
I’m working on hemming the pants that have been in my closet all year! Then learning to use my embroidery module is on my New Year’s list.
-
I will be trying to master my embroidery module on my 770QE. I have had the machine and embroidery module for several years.
-
I’m finishing up holiday face masks for friends and family. Since this pandemic is not going away anytime soon, we might as well make ours masks a fashion statement.
-
Finish up a few more personal machine embroidered Xmas ornaments for grands, then work on tee shirt quilt and I still have some UFO’s quilt tops that need quilting. I’m pretty sure I’ll be heading into New Year with some of these projects.
Never enough time! -
I’m going to use the time between Christmas and the new year to plan my next projects–decide on a quilt pattern, select and purchase the fabric and have everything ready to begin.
-
These are more fun (and less fattening!) to sew on my Bernina 750QE than making cookies with sugar and sprinkles.
-
Work on reducing my UFOs.
-
I have 2 pillowcases to make for the neighbor who looks out for my packages when I can’t and 2 small quilts to quilt for the 2 babies on the way in 2022!
-
I am finishing a tote and a ruffled cosmetic bag, using breast cancer awareness fabric for my sis,she is once again battling cancer. I am also making a few of these gingerbread cookies. They look like so much came be done in small amounts of time here and there. Thanks for all the fun projects you show to tempt me. Happy Holidays to all.
-
I hope to sew the rest of the year finishing my UFO’s clothes and craft projects 🙂
-
I plan to sew a few teddy pairs from clothes, formally worn by my grandma. This is our 1st Christmas without her. The Betty Bears will be treasured.
-
I’m finishing up Christmas gifts for friends and family and have big plans to reorganize my sewing room.
-
I’m finishing a baby quilt!
-
I am finishing an apron for my daughter for Christmas and then cutting out and sewing a Sapporo coat out of a gorgeous wool for me.
-
making quilts will be my projects
-
Finishing up a few Christmas quilts, but the are not gifts, even though the will be given to my daughters. Will longarm a few quilts for clients that were not expecting to be done prior to holidays.
-
I’m going to make a baptismal gown for my new grandson!
-
-
I just receive a Bernina 770, Christmas gift, so I will be learning my new machine. Hopefully there is a quilt in my future makes.
-
I’m working on Bonnie Hunter’s mystery and Pat Sloans Happy Everything.
-
I will be organizing my sewing room and then starting the Christmas quilt I promised to make for ME – hopefully finished before NEXT Christmas!
-
I am still working on 10 mug rugs and a coupon holder
Once I complete theses tasks I have cosmetic bags and totes and several quilts to finish whew!!!! -
I am finishing up a plaid wool vest for my husband to wear to the nutcracker on Christmas Eve!
-
As soon as all the company leaves by the 27th, I will be sewing several gifts that didn’t get done! I am so anxious to get to my sewing room, it’s on my mind at least once per hour. I guess you could say I am obsessed! ??❤️?
-
Starting a basket quilt and wanted to start some home dec projects
-
I have been sewing kitchen boas with names embroidered on the towels. Very useful.
-
I need to finish a dress before February 5. I have recently gotten back into knitting so that is cutting into my sewing time
-
Finish some projects that I put aside to make gifts for others.
-
My sewing plans for the rest of the year are to finish quilting a king size quilt for my daughter and her husband. It’s a beautiful gray and white with a modern feel. When I finish I’ll be cleaning the sewing room for a fresh start for the new year!!!
-
Working on the 5 baby quilts I need to finish for babies due in the next 6-12 weeks!
-
Finish a quilt. Embroider some dish towels. Make some hotpads. Finish two doll nests. And make a tee shirt, if time permits.
-
2021- complete a couple of projects I started and learn more techniques on my newly purchased Bernina sewing machine. Get ready for my retreat! Yay
-
I have just finished a little wall hanging using triangle crumbs, interchanging through different feet through thread play, edge stitching and stippling.
-
Finishing up projects and cleaning my room with the Hope of making room for the presser foot mountain that I would LOVE to win! Praying you select me! I love my Bernina’s and the precision they provide nothing as fabulous as my Bernina!
-
I plan on making some quilted potholders I wasn’t able to get to this year for Christmas. So then I will be ahead for next Christmas. I also need to machine quilt a Christmas quilt for myself.
-
I just finished Bobbin the Elf. He is so stinking’ cute that I will make a couple more before the end of the uear.
-
I’m working on a lovely baby quilt with very large half square triangles.
-
Love the creativity in the foot Bernina Mountain!
I’ll be making a jacket for my husband. It’s cut out and ready to sew!! ? -
A few more embroidered Christmas ornaments and I’m done!
-
I’m planning to finish the quilts ornaments I started for my grands ?
-
Just finished a penguin party pillow by Elizabeth Hartman as a Christmas gift. Hoping to get back into quilting and binding a WIP I started in February before the year is done!
-
Halloween quilt, Christmas pillows, drink cozies, bowl cozies, and maybe some sleep! ????
-
I have a few more Christmas gifts (baskets) to sew before Christmas. I also will be making a bag before the end of the year.
-
I am going to work on my Christmas quilt now that all my Christmas presents are finished.
Thank you -
Ready to sandwich and quilt an adorable cat face rug for my office at school. Then, I want to sew up embroidery patches and sacks for my Etsy shop. Thank you for the wonderful cookie idea. Add to my “Christmas in July” project list: quilted cookie jacket, cookie placemats, and cookie patches for my sacks.
-
I love those “cookies” and their calorie count. For the rest of the year I am going to practice using my new circular foot and some ruler work quilting. I just need to touch fabric everyday!
-
I’m currently putting binding on a quilt for my husband.
-
I finishing up 3 bench pillows. Once those are done, the rest of the year will be playing on my Q20 and getting some UFO’s finished!
-
I plan to sew doll clothes for a young Girl Scout’s quest to help foster children.
-
I am completing quilts for the entire family. That’s 12 of us. Hoping I can finish them before Christmas 2022!
-
I have lots of bindings to complete!
-
My plans for the remaining time this year is to finish my Christmas sewing projects, start a baby quilt for my first great granddaughter (due in February) and to become more familiar with my new Bernina 880 Plus.
-
I have been busy embroidering dishtowels for friends and family now to end the year start on a purse for me!
-
Purchased the embroider attachment for my Bernina 570QE a year ago, finally took a class this month and embroidered my first project, a baby hooded towel with my grandson’s name on the hood. Felt really good about the results so I am anxious to continue and learn all I can about embroidery.
Leave a Reply
You must be logged in to post a comment.

BERNINA Golden Presser Foot and Presser Foot Mountain Giveaway
This giveaway is now closed. Thank you to all of our WeAllSew fans who entered!
Congratulations to our winner(s):
Keep an eye out for the next WeAllSew giveaway!