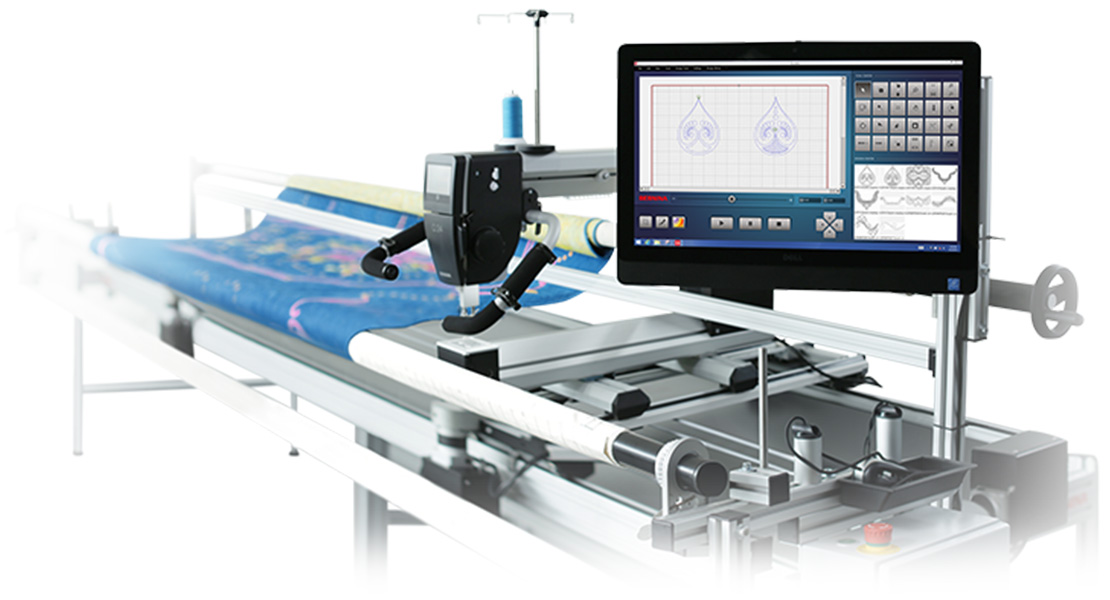
Corners and Borders With BERNINA Q-matic
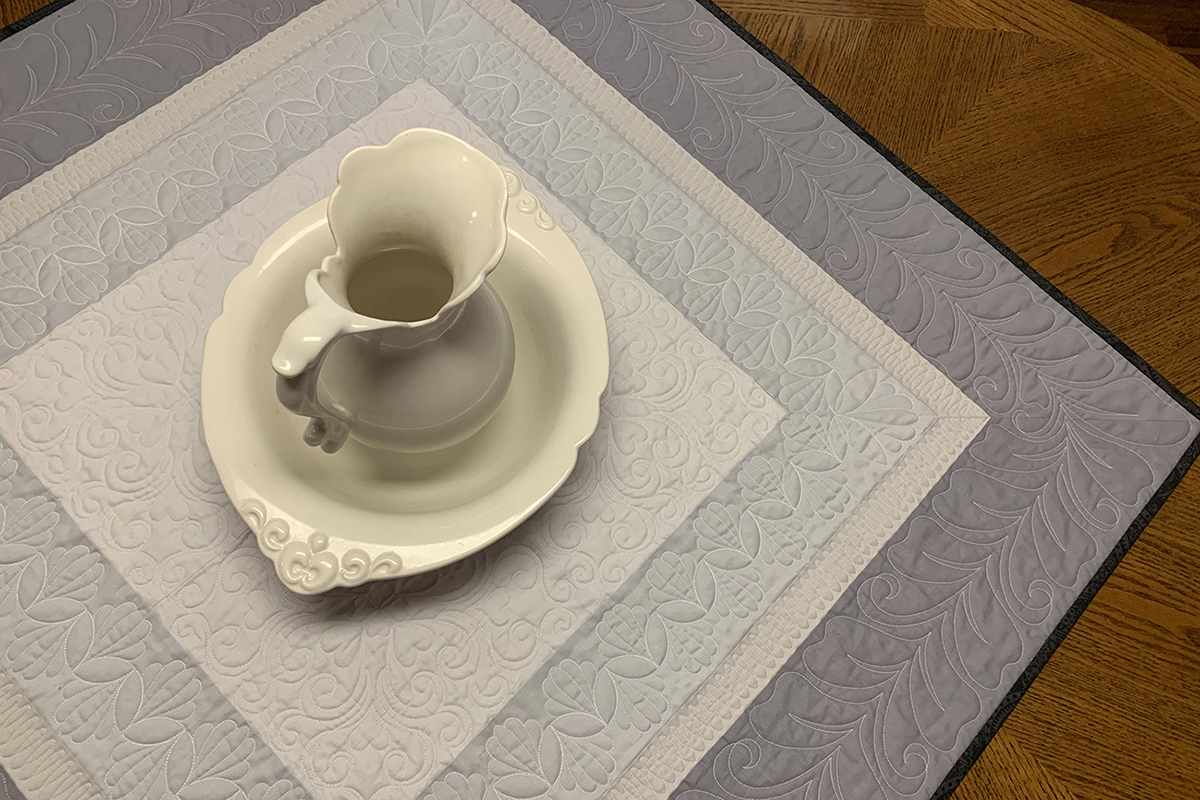
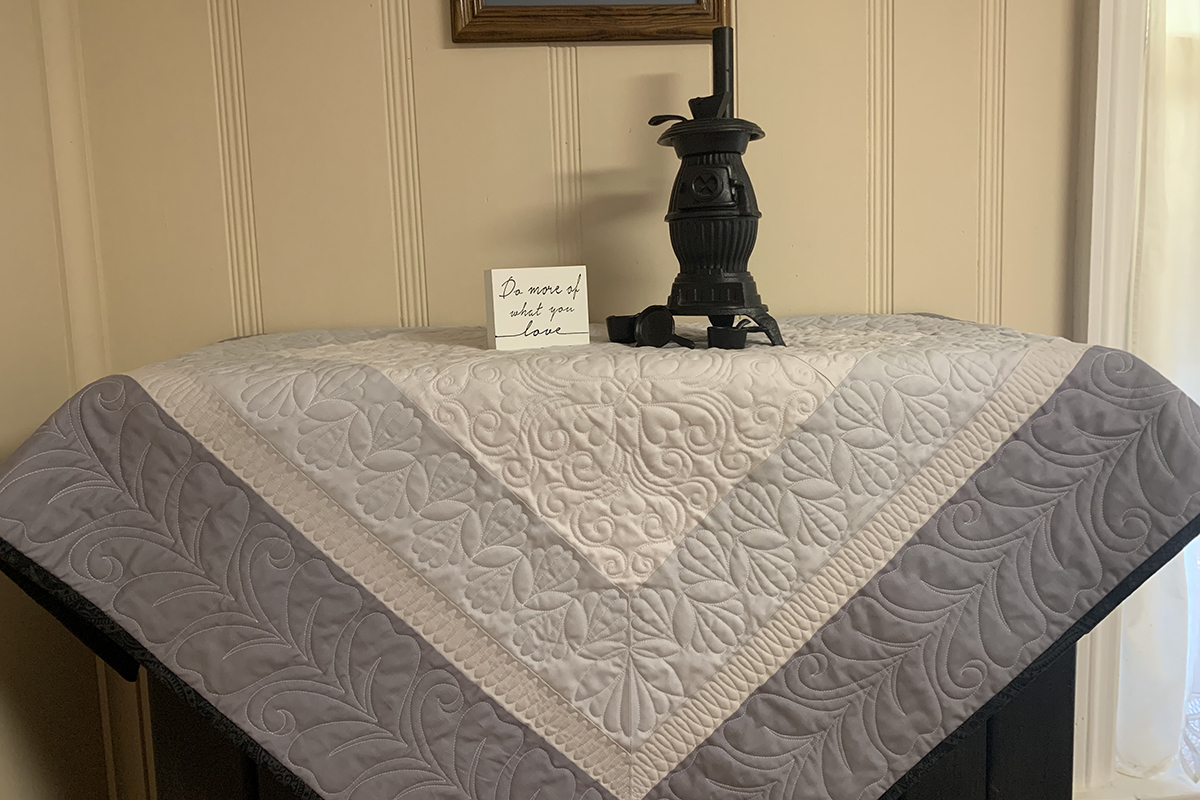
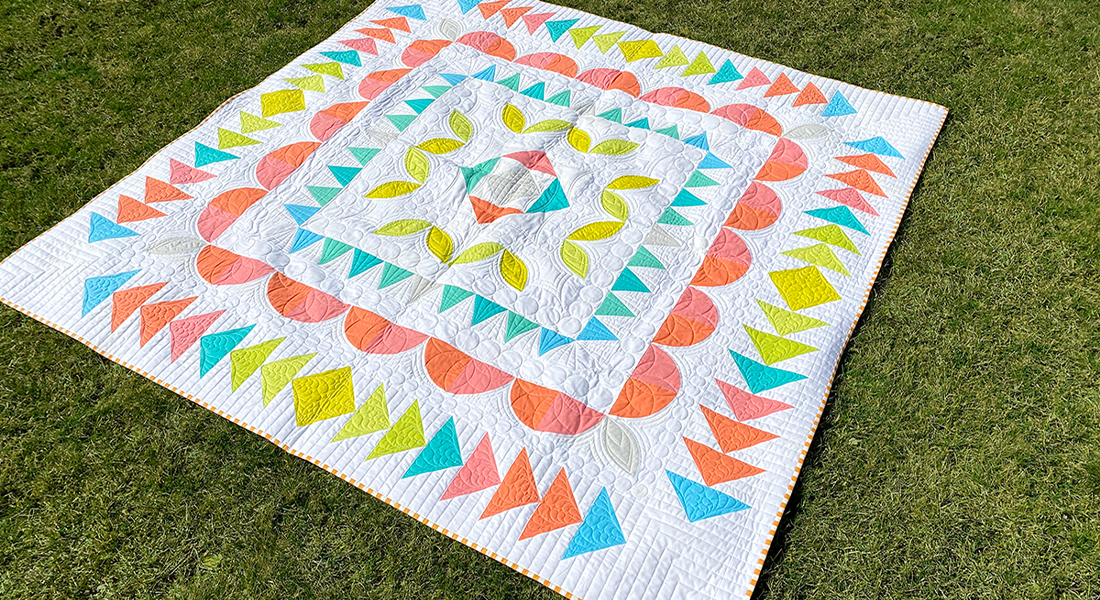
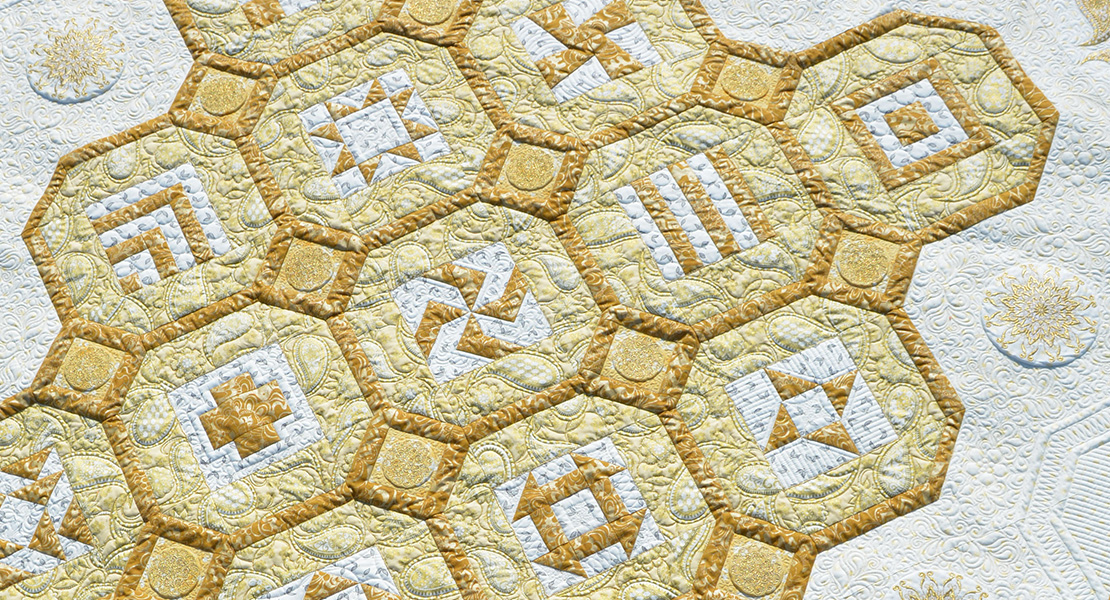
Create this 50” square table-top quilt to practice your borders and corners with BERNINA Q-matic!
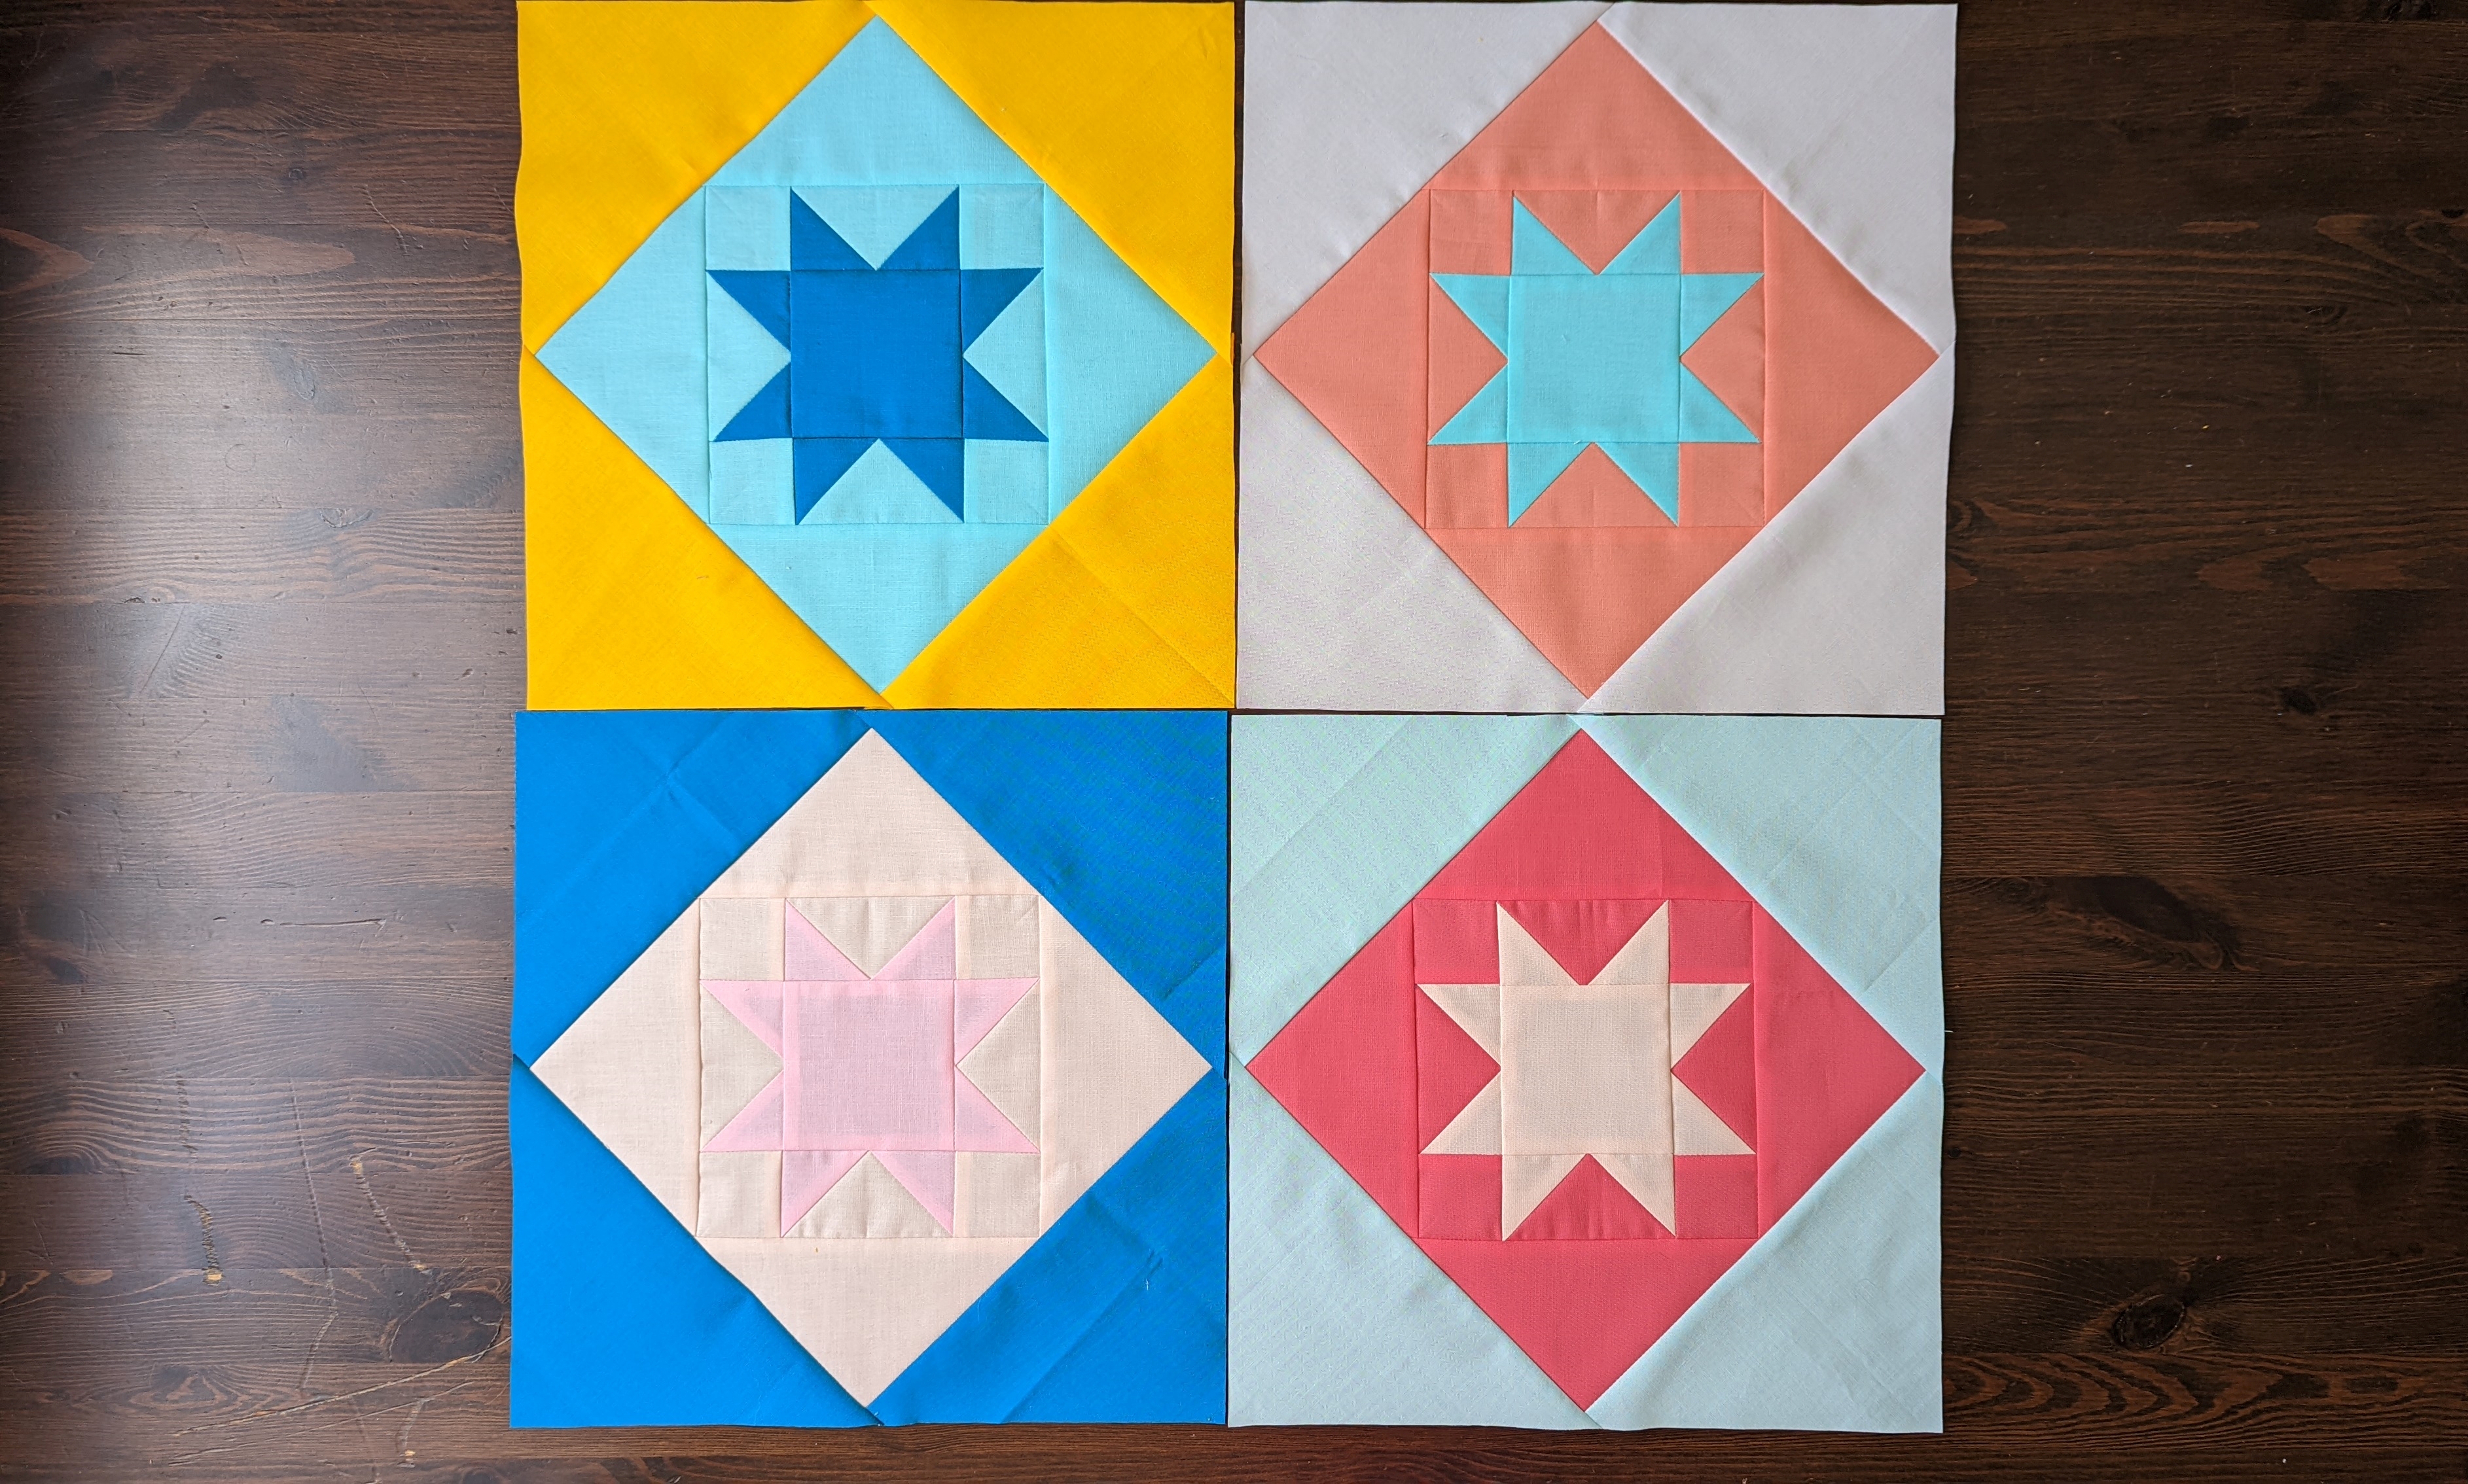
Project size: 50″ x 50″
Four 10″ blocks for center
Inner border 5″
Middle border 2 1/2″
Outside border 7 1/2″
Quilting Designs used: Amanda Murphy Quilting designs from OESD
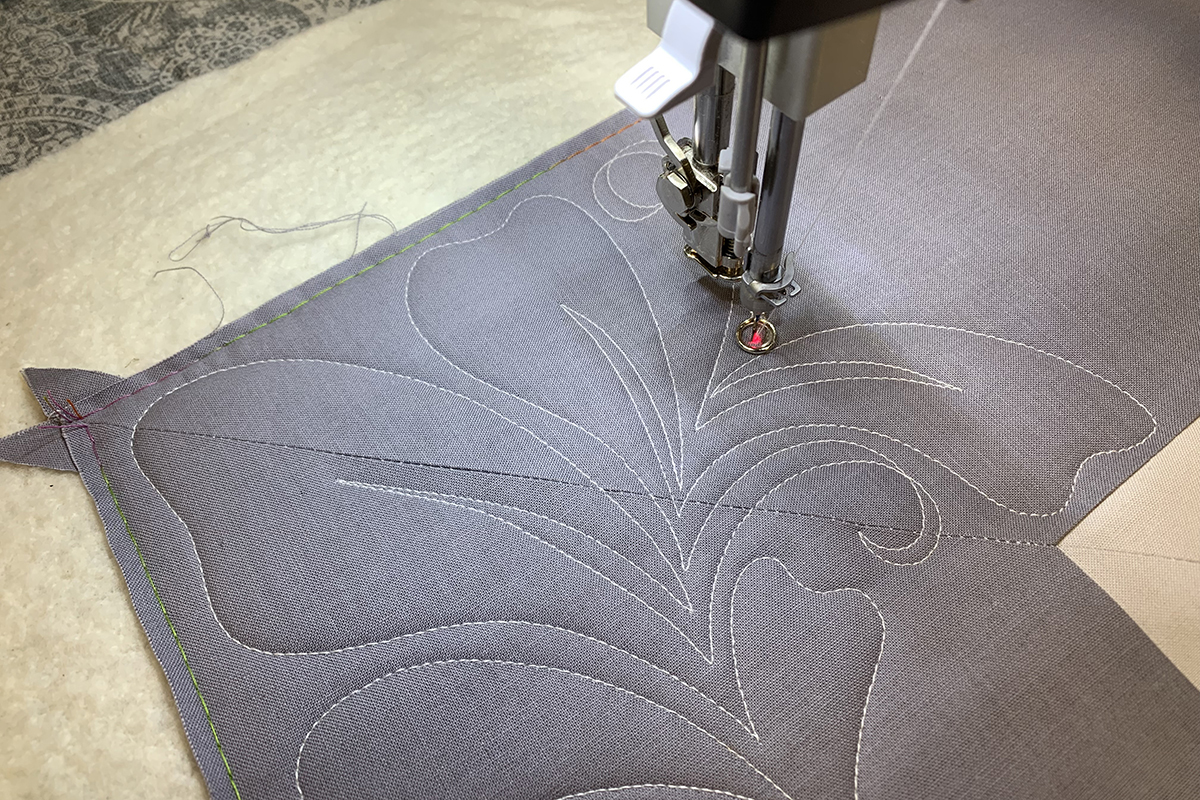
Center Blocks: #80214 Hearts Quilting by Amanda Murphy
LA80214-01.bqm
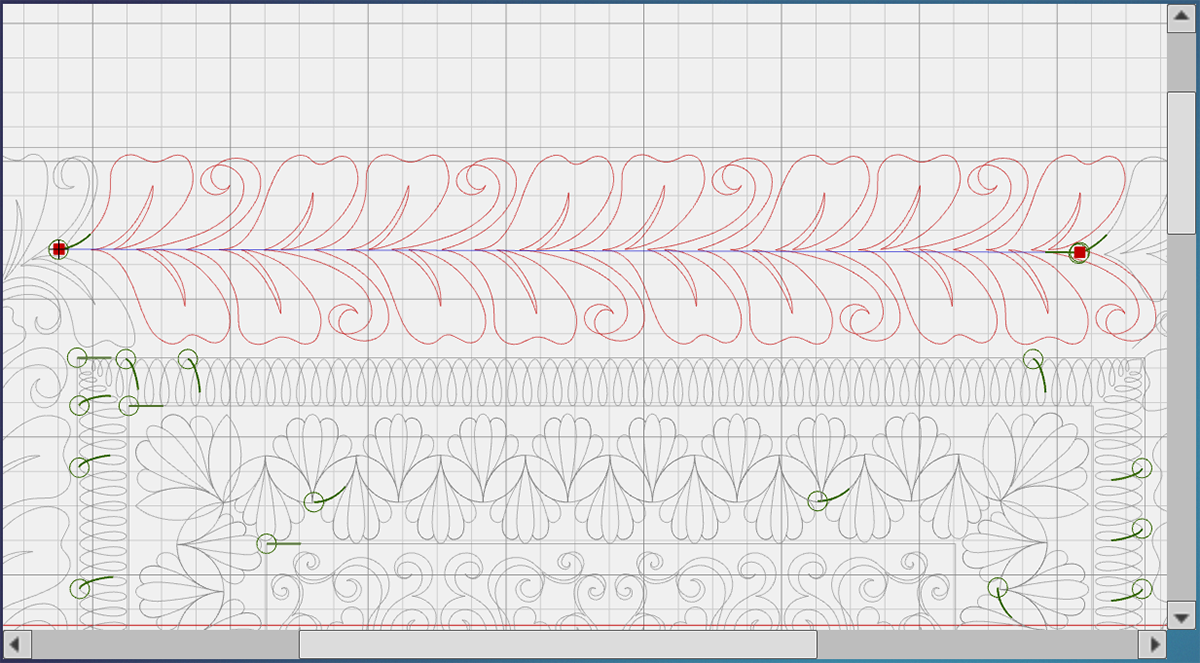
Inner border: #80259 Traditional Feathers 3 by Amanda Murphy
LA80259-02.bqm
LA80259-05.bqm
Middle border: #80263 Loops Quilting by Amanda Murphy
LA80263-02.bqm
LA80263-04.bqm
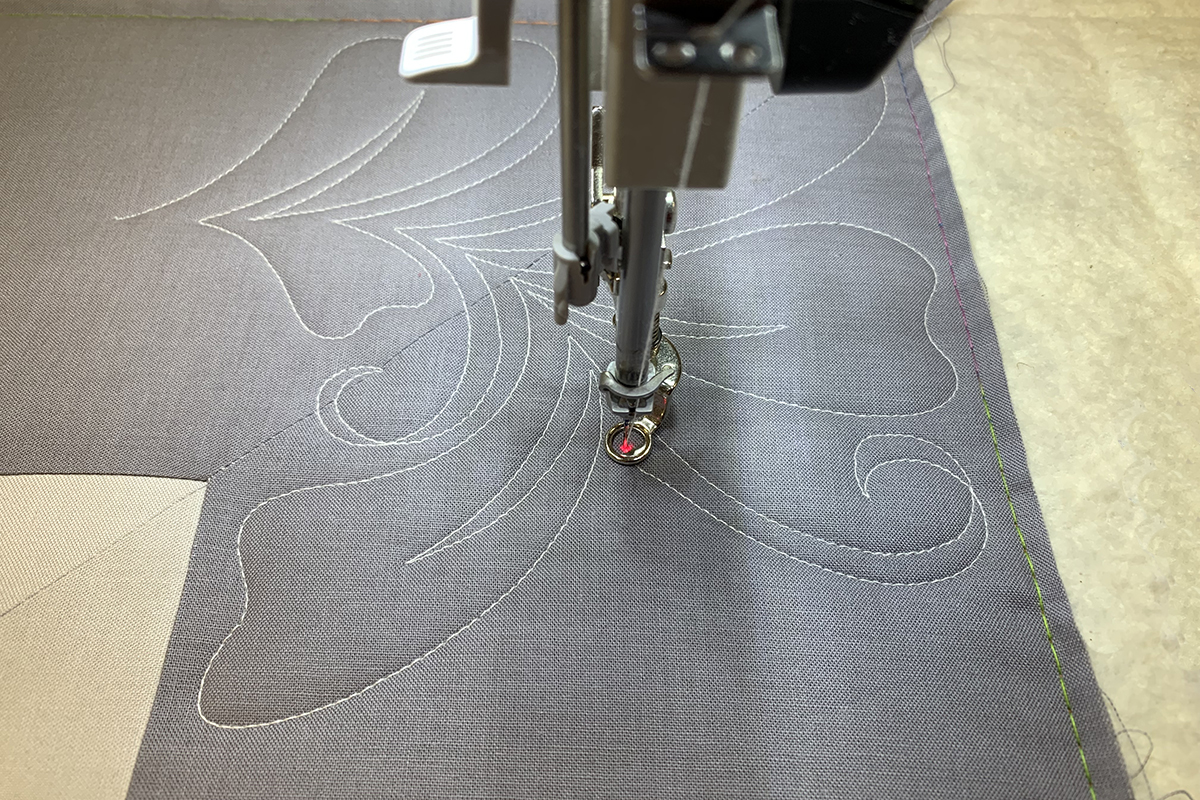
Outside border: #80261 Heart Shaped Leaves by Amanda Murphy
LA80261-02.bqm
LA80261-04.bqm
Kona fabrics
EverSewn 80/20 Cotton Blend Batting
Metter Silk Finish thread
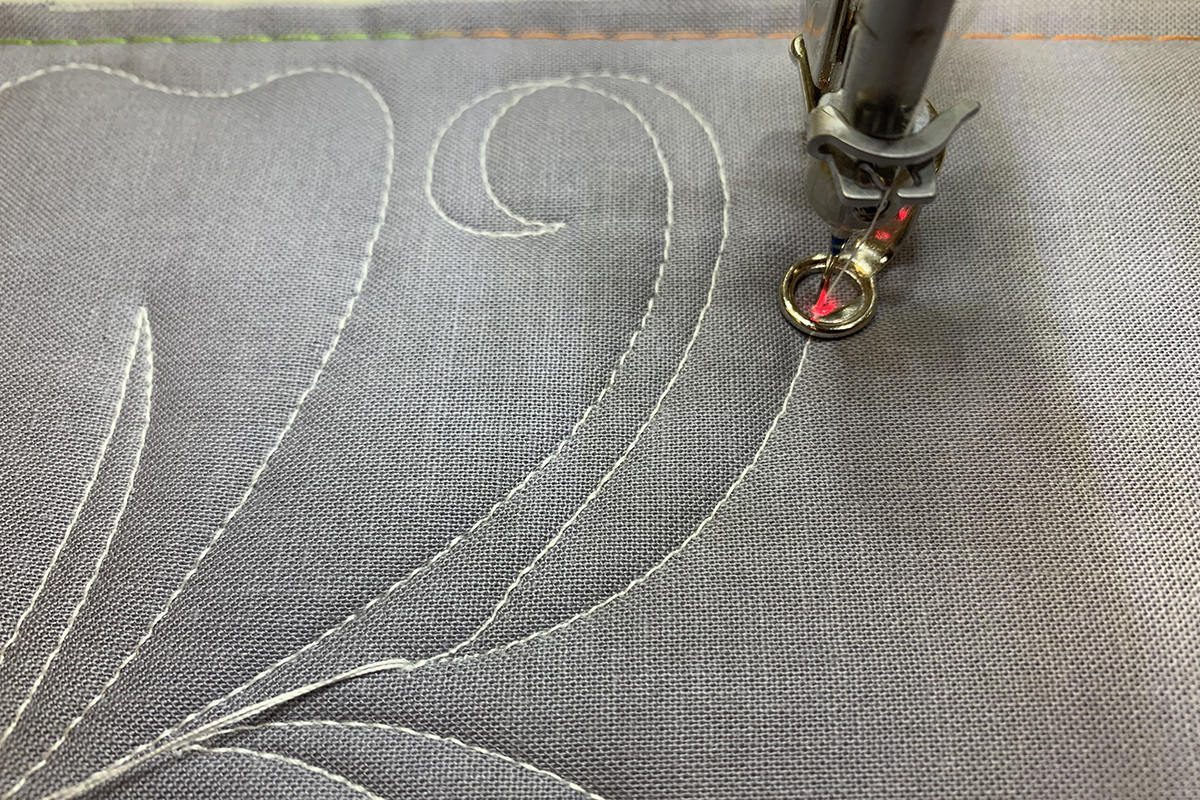
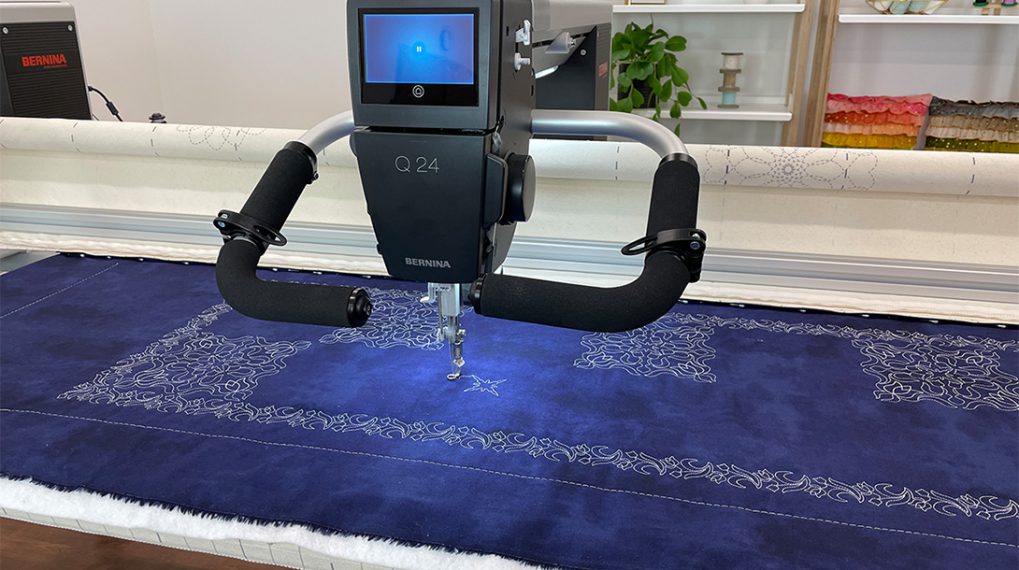
There could be many different ways to create corners and borders in the BERNINA Q-matic Longarm Quilting Automation System, but the following information is the way I thought it would be the easiest way to create them.
Keep these thoughts in mind when you are creating your layout in Q-matic:
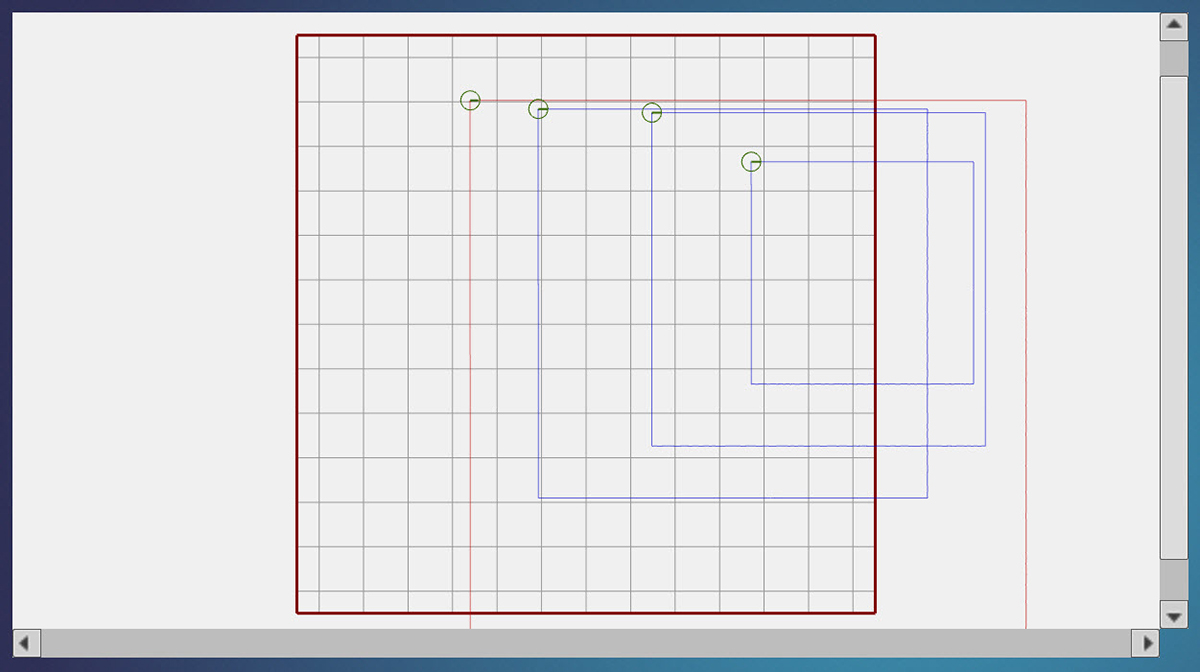
• Use Attach instead of E2E+ for the sides. You will want to Un-connect them as you go in order to stitch them when they are in your Safe Area.
• Use Reverse Sew when needed. This will come in very handy when placing the design next to the ones you have already stitched to get a better view of what is happening. You can always reverse them back after placing.
• When going across or down the sides you may need to rotate. Use Rotate to move the design in very small increments. There is 0.1 degree clockwise or counter-clockwise. If you place the Start Point where you need it, you can select “Start Point” to rotate around for better placement.
• Remember Zoom. It may be easier to get to where you need to be if you use the Zoom to fine tune things.
• Use the Block design in Q-matic to create a visual for your borders.
• Use Markers to place your designs and rows.
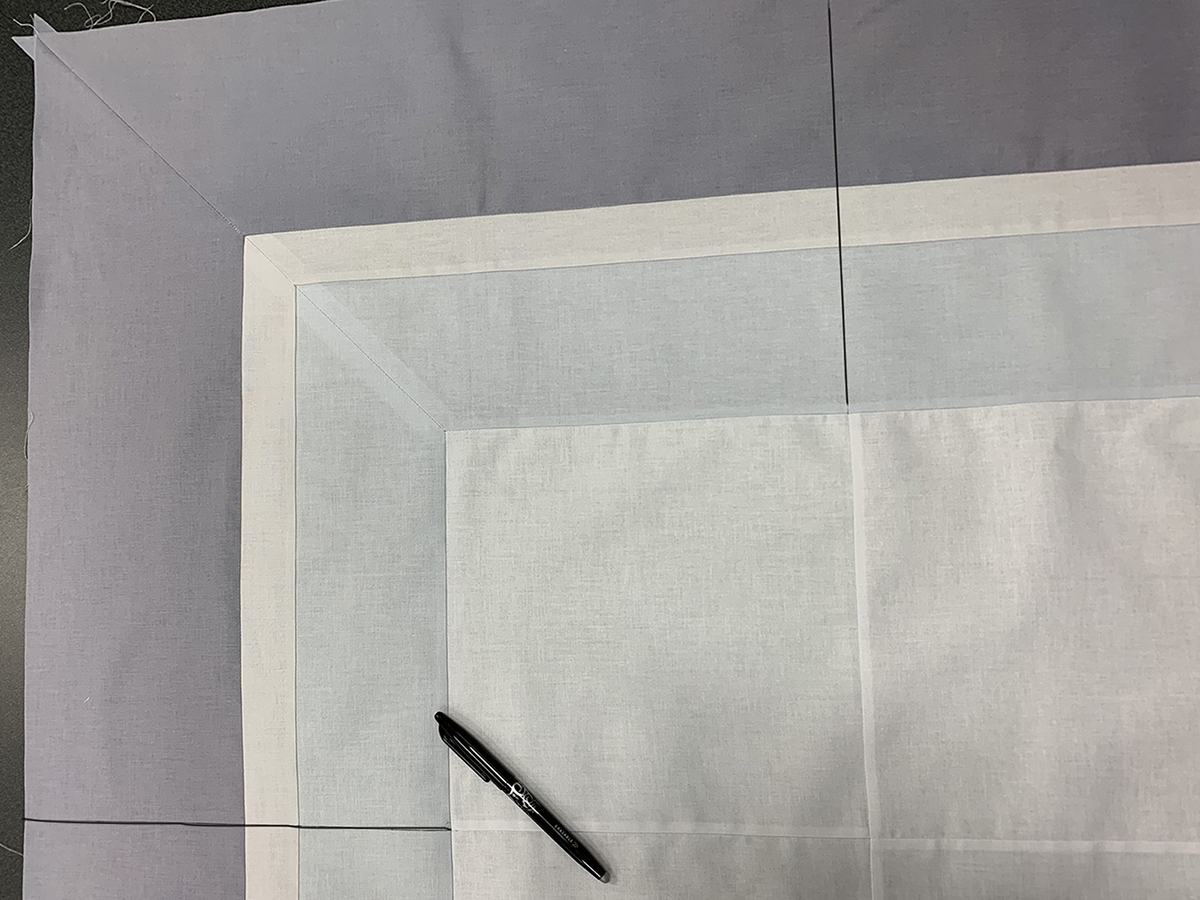
• Mark the seam for your binding. I stitched 1/4 inch from the edge. You could mark with chalk or a Frixion (heat erasable) pen.
• Mark the center of your quilt top horizontally and vertically on the computer screen using Markers and on your quilt top with a fabric marker to make sure you will not have to stretch or shrink the designs when you get to the bottom. If doing a very large border, you may want to mark the quarters too.
• It is always easier to leave a space than it is to hit a line. I left a space on both sides of my borders.
• When working with borders and given the fact that not all borders are straight and even, it is acceptable to “massage” the quilt as you go to make sure you stitch where you want.
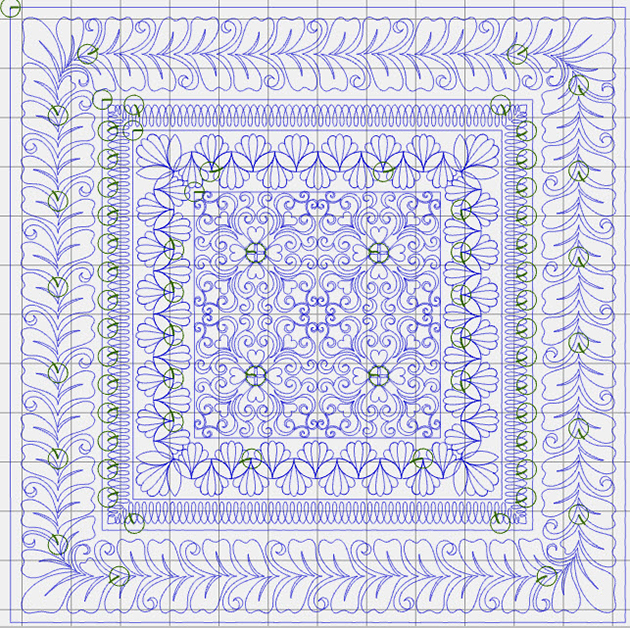
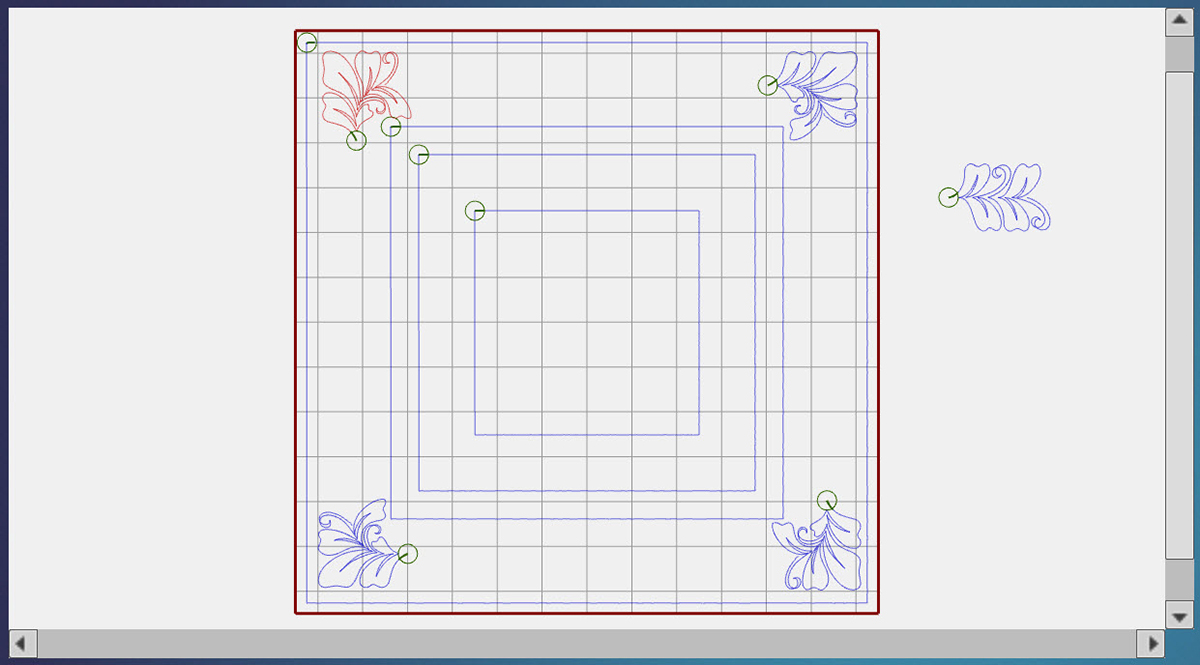
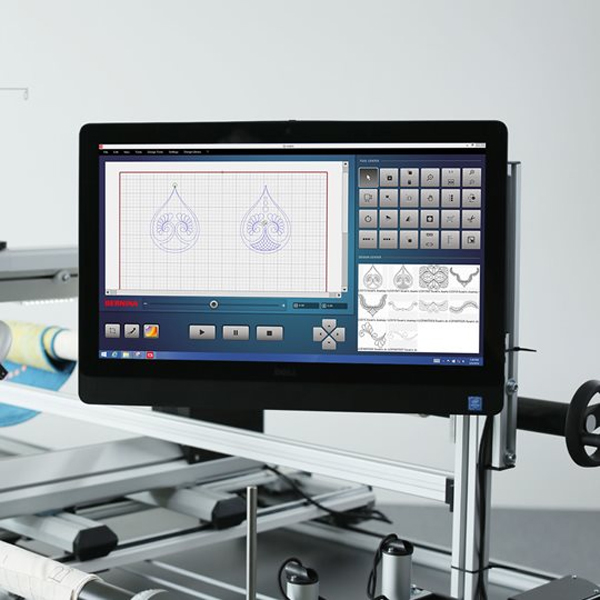
Creating the layout in Q-matic:
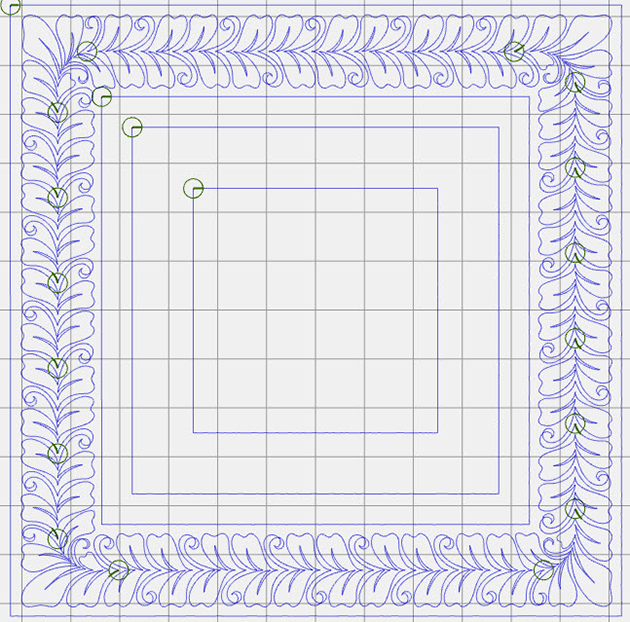
1. Place four Square designs from the Q-matic library on the Quilting Area of the screen.
2. Resize to be 20” x 20”, 30” x 30”, 35” x 35” and 50” x 50”.
3. Use the Align tool to align them horizontally and vertically.
4. If you only are doing one border, you will need two squares to resize for the outside and inside of the border.
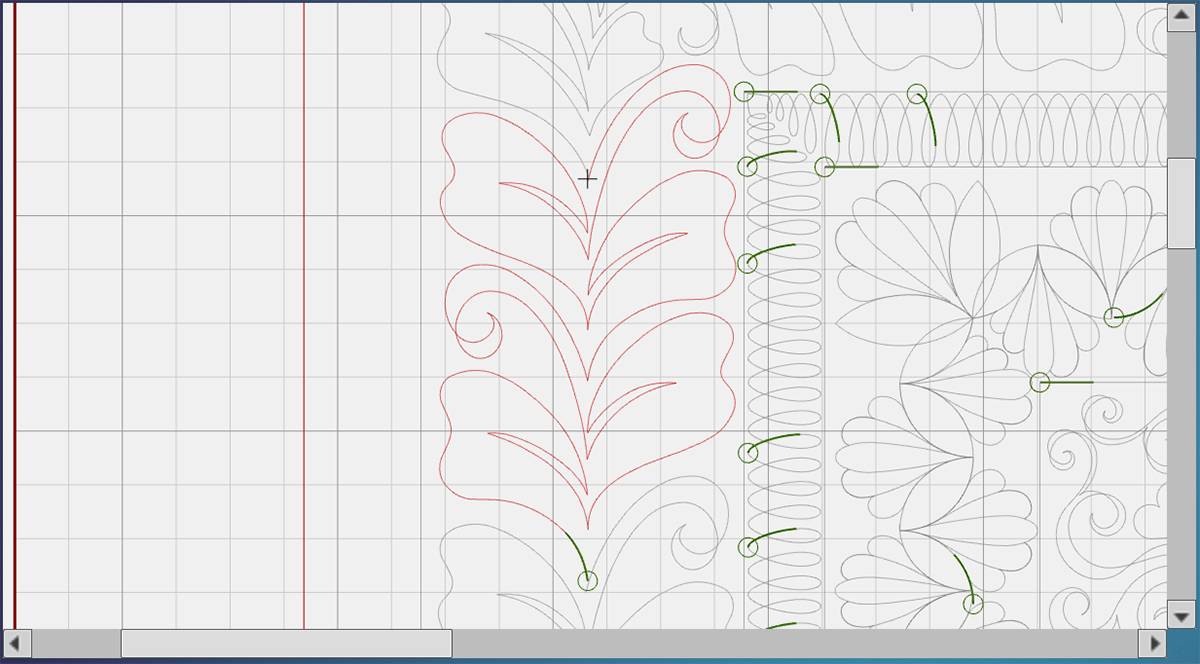
5. Bring all designs being used into Design Center.
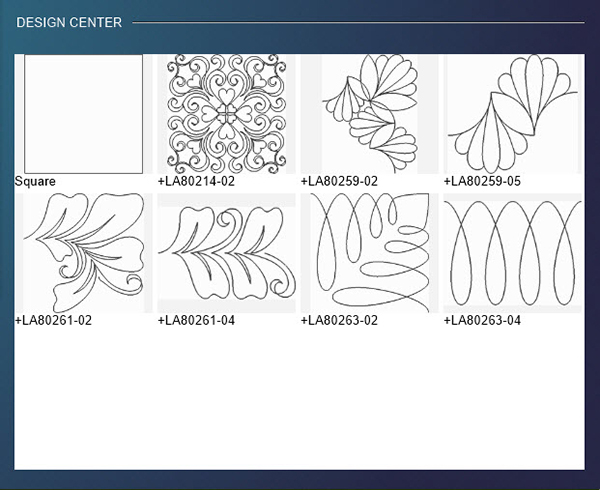
6. Place them on the Quilt Area and arrange in the border.
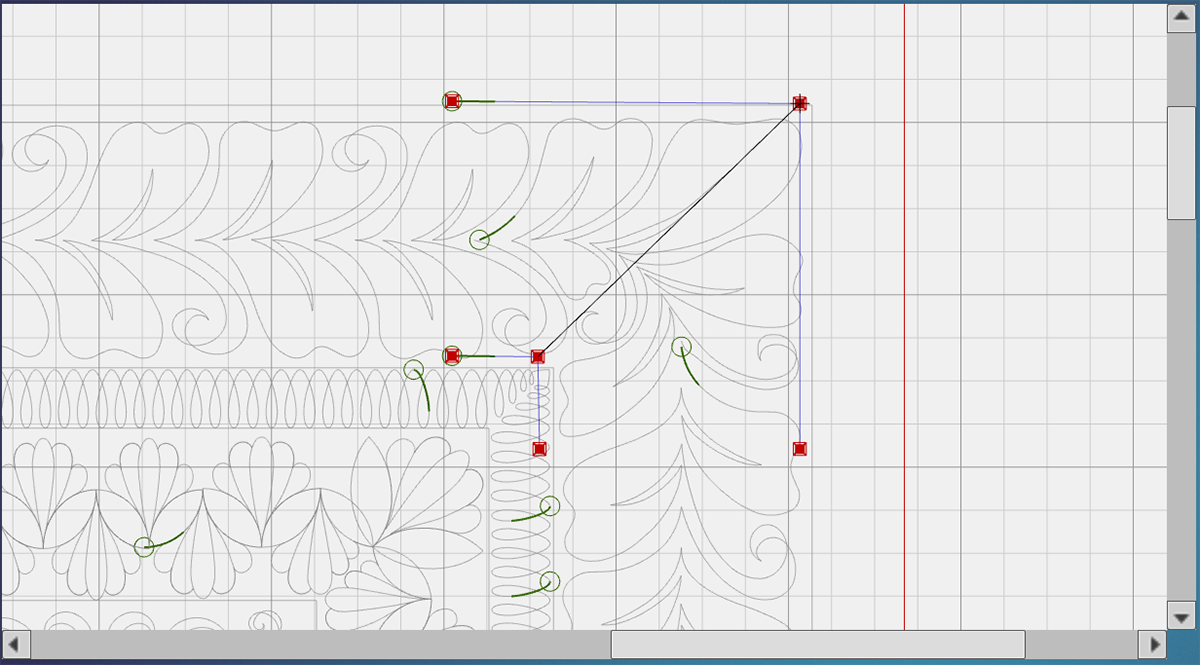
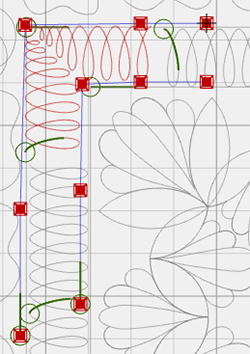
7. Copy the corner design so that you have four of them. Rotate the designs so that they all would connect clockwise or counter-clockwise. Make any adjustment in size of design needed.
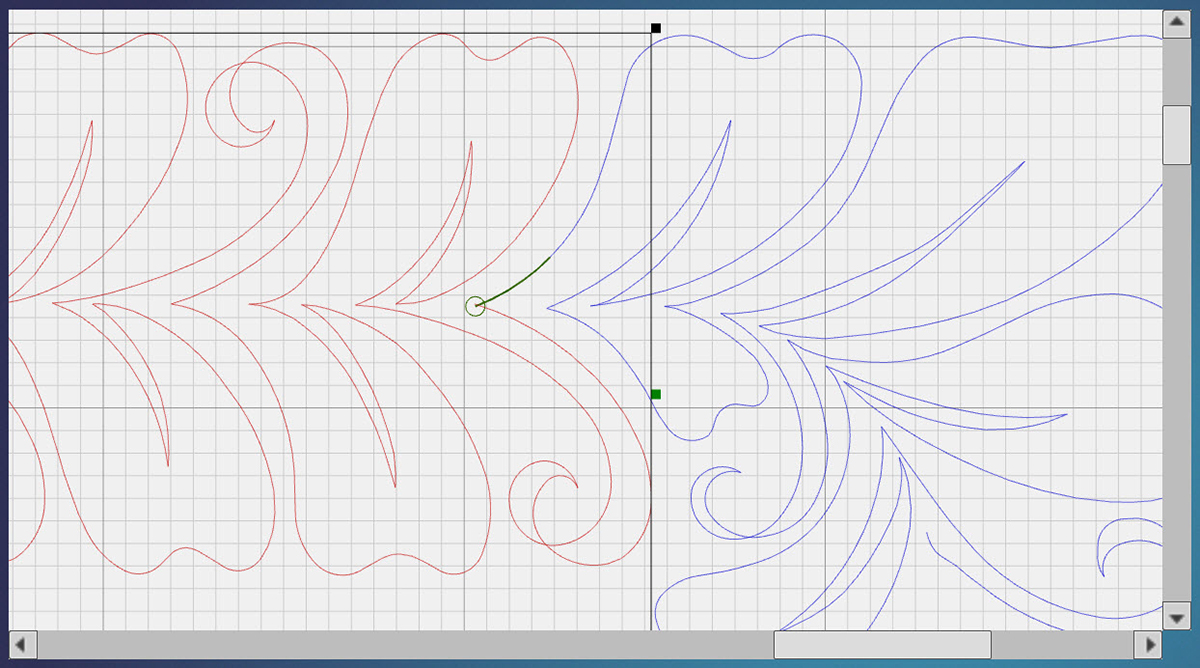
8. Add in the border side and top/bottom designs. Make sure you use Copy and Attach when going down the sides. Make the size adjustment if needed to fit the width of the border.
9. Adjust the size to make it fit between the corners. Use Resize and uncheck Maintain Ratio. Now right click on the black handle that is in the middle on the right side to make it green so you can resize just the width.
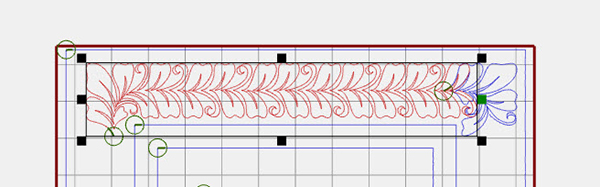
10. Slide the green handle to the left to match up with the corners’ start point.
11. Copy the border and place it at the bottom and rotate 180 degrees.
Some adjustment may be needed.
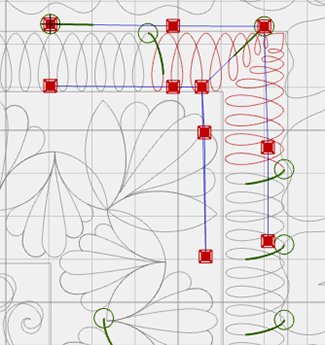
12. Create the sides now. Copy the border design as many times as needed. I used five copies and opted to make the row of designs a little shorter by resizing as we did before.


13. Copy that side and rotate 180 degrees and place on other side. Some resizing and adjusting may be needed.
Repeat this process until you have all of your borders created.
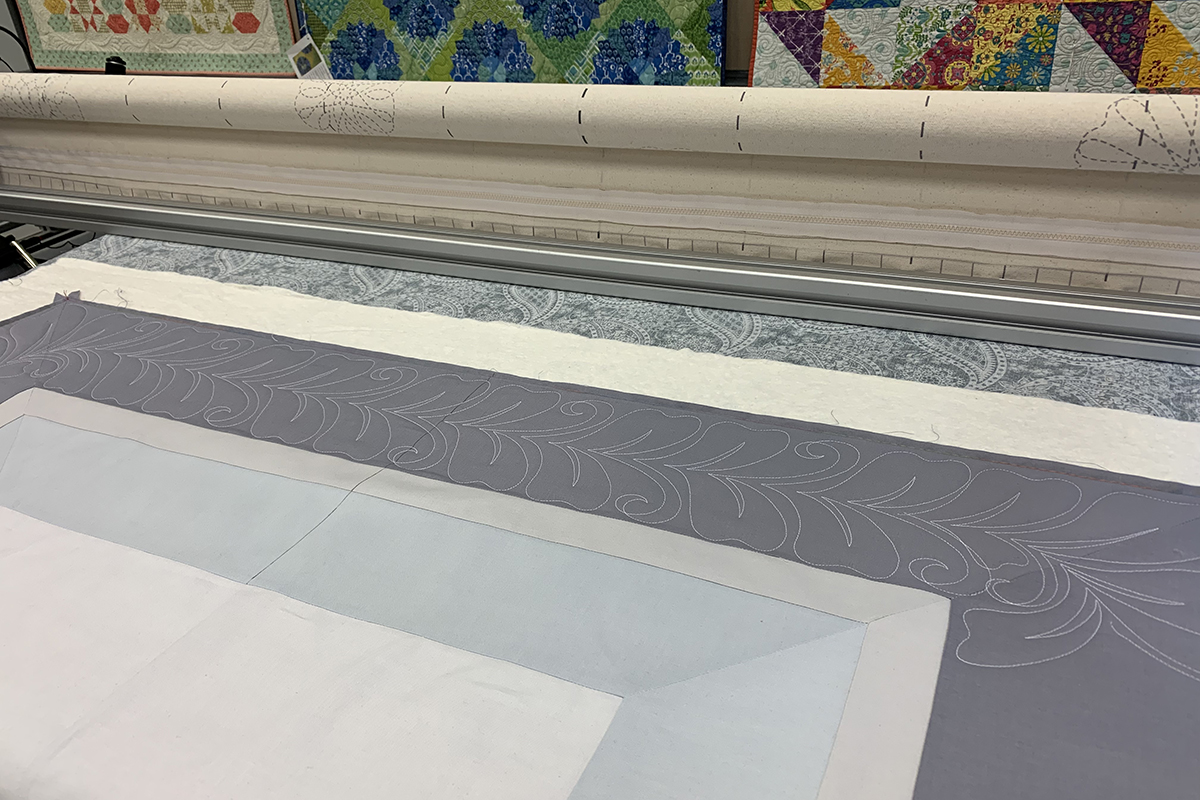
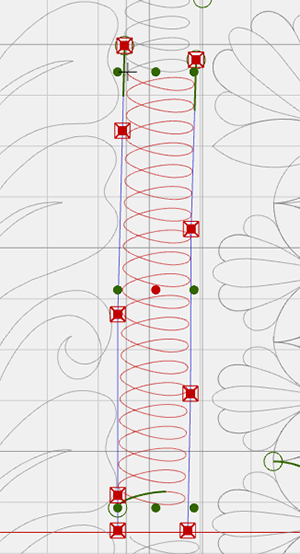
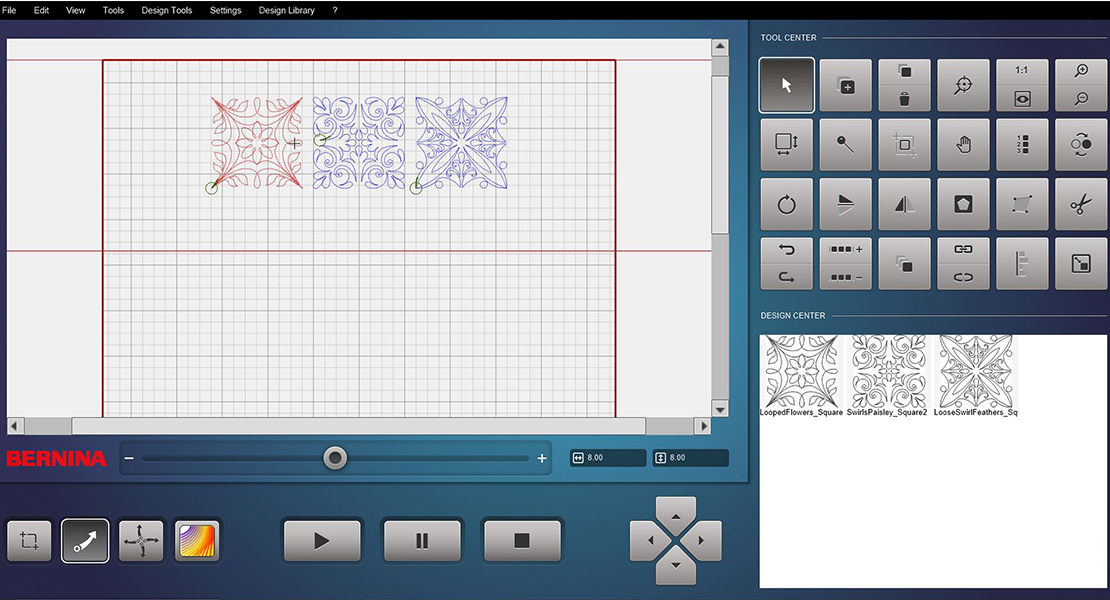
I did not change the size of the designs for the outer border, but for the middle border, I changed the border design to 2.33” x 1.75” and the corner to 2.13” x 2.13”. On the inner border, I had to change the sizes of the border design to 4.91” x 4.50” and the corner to 6.13” x 7.77”. This step could take some time but it is worth it. Resize the border design first, then the corner and make sure they match up before going on. Use Attach to make sure they are good and then Un-connect to work with them.
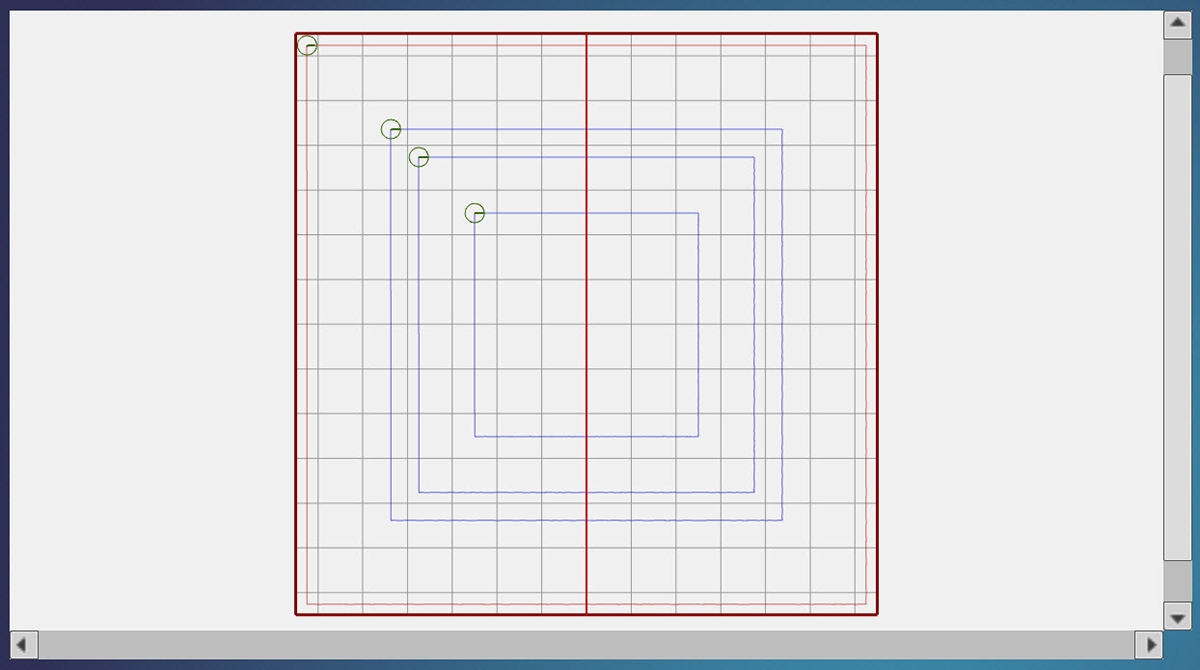
Middle border.
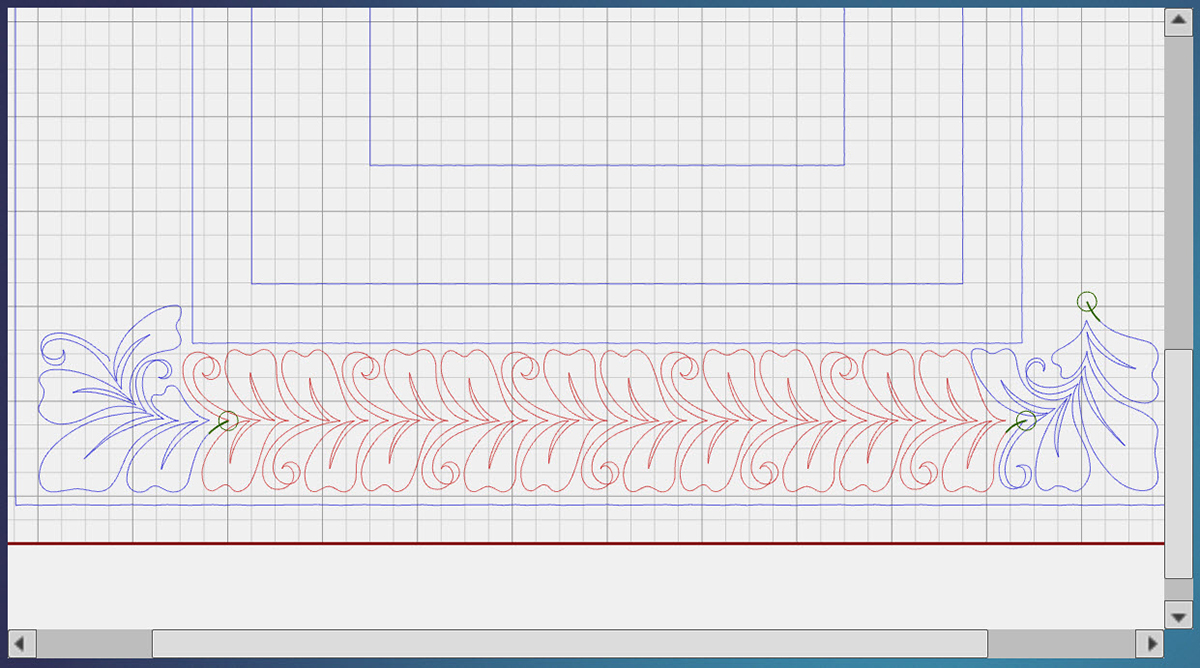
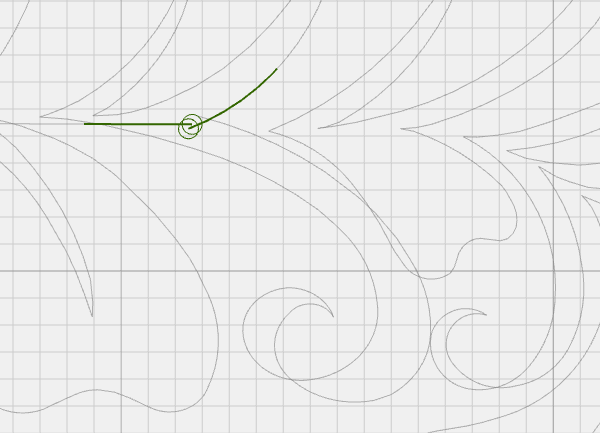
Note that side borders are unconnected with many start points indicated by the small circle with the green line coming out of it.
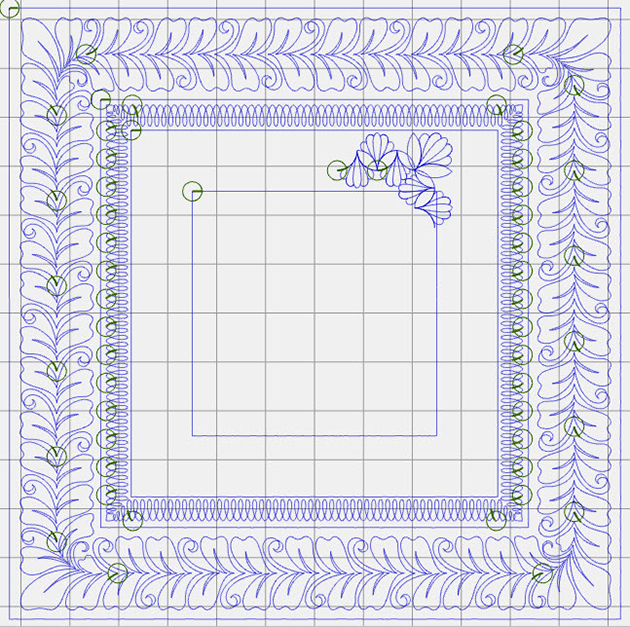
14. Inner border.
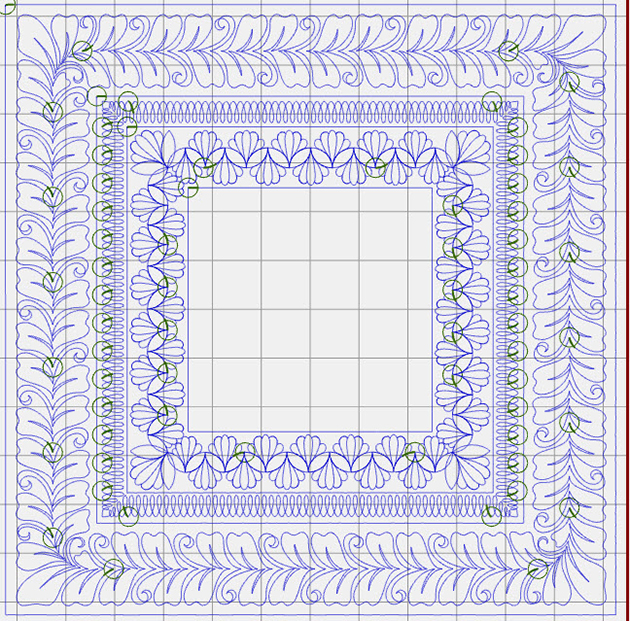
For the blocks in the center, I changed the size of the blocks to 10-inch squares, but used Boundary and Morph to Fit to place them.

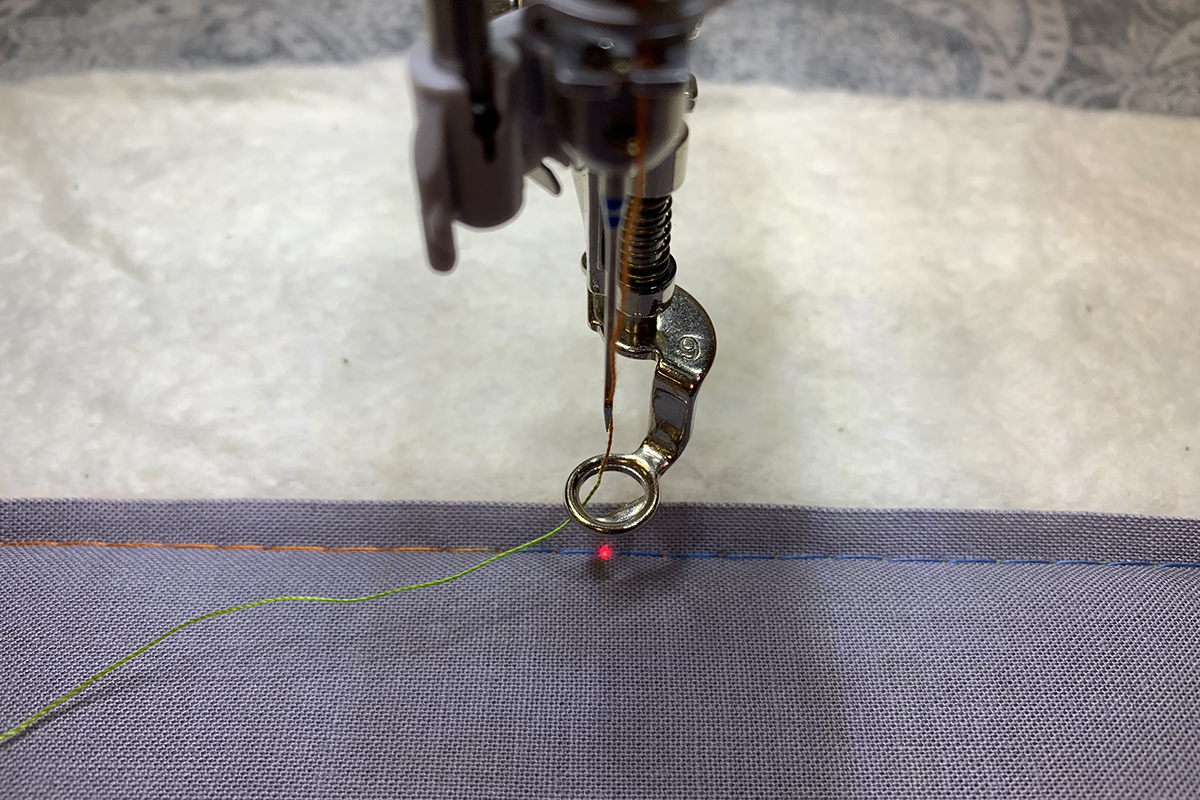
15. Load quilt and mark center with Markers. Don’t forget to make sure you have your seam allowance marked on the outside edge so that you can place your outside border evenly.
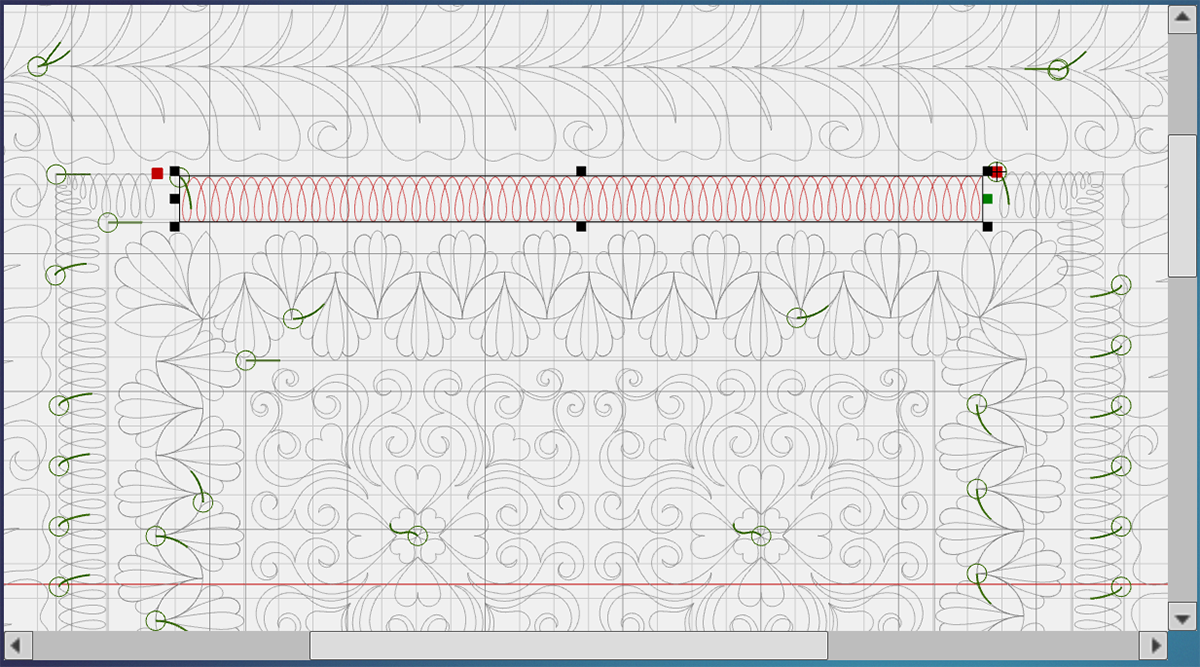
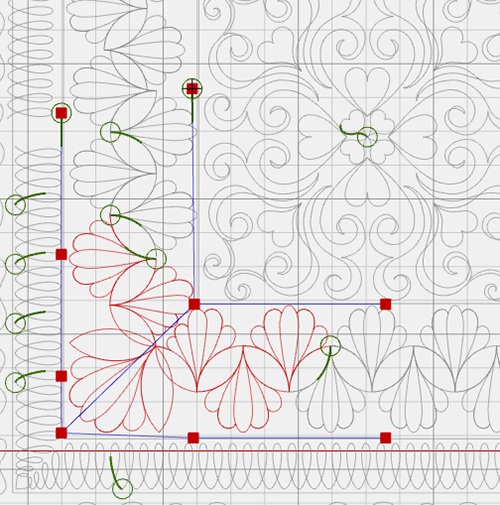
Starting at the top with the corners, place the corner using markers and connect¬ the markers on the outer edge and inner edge. Make any adjustments in the corner that is needed.

16. Dequeue All in Sew Options and Queue only the corner and stitch out.
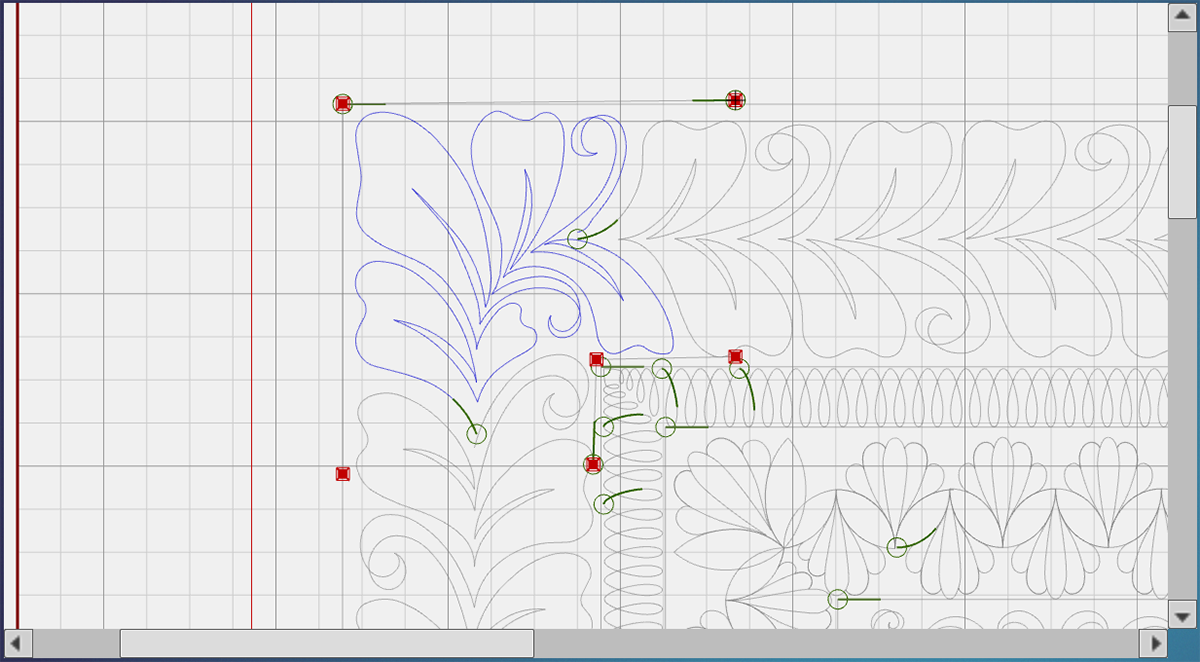
17. Place, queue and stitch the other corner of the outer border. You could connect the markers to show a miter in the corner if that helps you place the design.
18. Select and place the top row between the corners.
There will need to be some adjustments made. Quilting will take up some room and fabric is pliable unlike wood or metal. Zoom in close to see what needs to be done.
If you need to resize, remember you can do that without maintaining the ratio. You can also rotate the design if needed to make the stitches match up. You can even rotate around the start point, so place it first and then rotate the other end of the row.
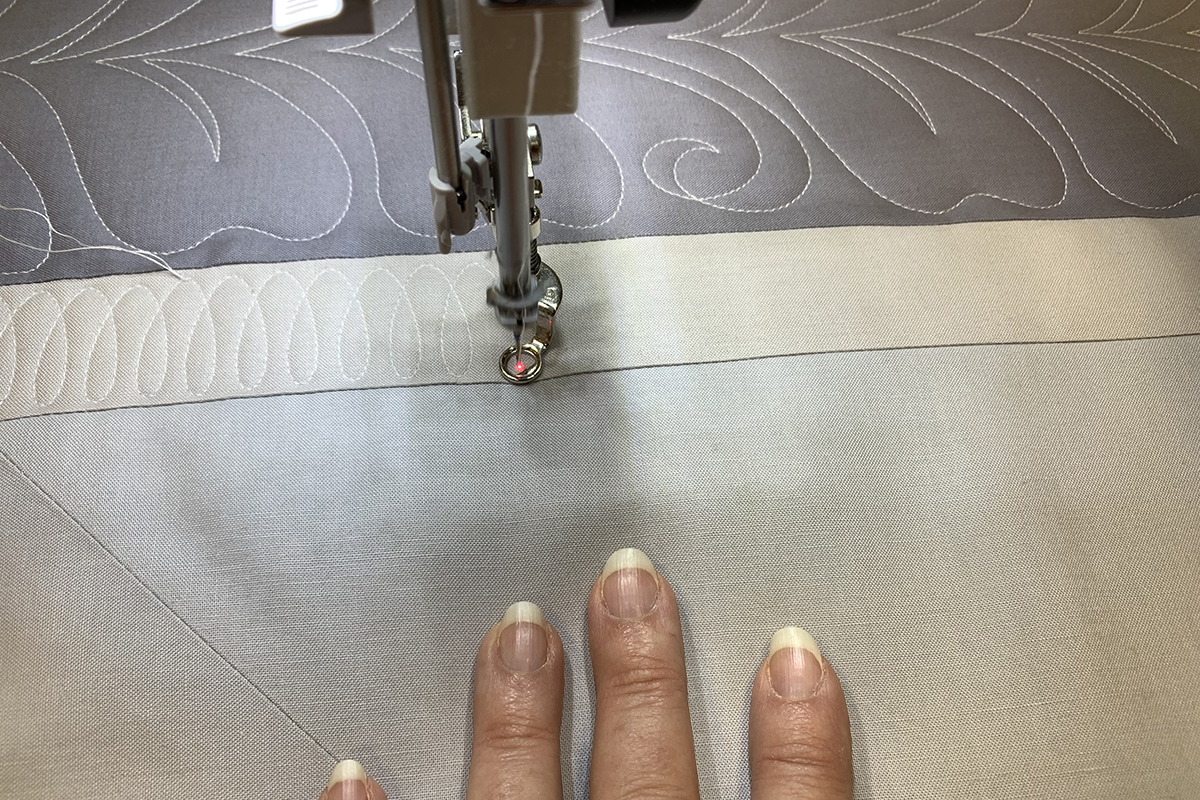
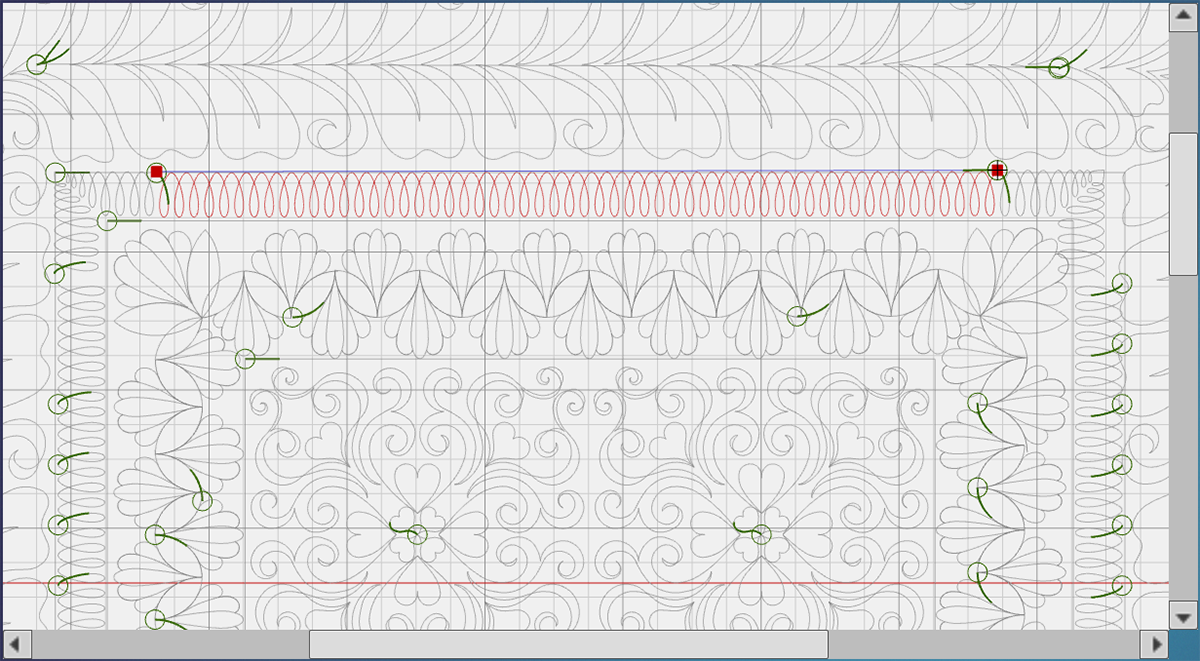
19. I then started down the sides that was still in my Safe Area. Select the first one on the left side. Move so that it touches the ending stitch on the already-stitched design. To make sure you are at the correct spot, place the needle over the stitch and look at the crosshairs on the computer screen to place correctly. Move design to match needle crosshairs. It may not match on the computer screen, but should match to the needle crosshairs. Queue and stitch the one on the left then repeat the process to place, queue and stitch the one on the right.
20. I was only able to do one of the outer border designs on each side at a time as there was only one in the Safe Area. When doing the middle and inner borders I was able to stitch more designs on the sides because they are much smaller designs. Only queue and stitch what is in the Safe Area each time.
We are stitching from the top of the quilt to the bottom of the quilt without turning the quilt to do side borders so we will now need to do the middle border.
Follow the same process for the middle border as you did for the outer border.
Start with the top left corner first. Place using Markers and connecting the ones on the outer sides and the ones on the inside. Make any adjustments in size if needed.
21. Queue in Sew Options and stitch.
22. Stitch the other corner using the same process.
23. Now select and place the row in between the corners. Resize to fit.
24. Most likely you will also need to rotate. Place the start point and the select to rotate around the “start point” and move the other end to match where the stitching is. Don’t forget that the crosshairs of the needle are great for this. I found that I had to do more adjusting on the middle border and the inner border than I did on the outer border.
25. Queue and stitch. Watching carefully to make sure things line up correctly. Massaging the quilt is acceptable in these cases.
26. Now we will want to stitch the part of the side border that is in our Safe Area. Select the designs that are in the Safe Area and use Attach to connect them. This way they will all stitch at one time. Take your time and resize if need as well as rotate when needed. You can resize without maintaining the ratio. There is always some shrinking and moving of the fabric during the quilting process.
![]()
27. Repeat this for the other side.
Now following the same process, place corners and stitch them for the inner border. Stitch the row between the two corners of the inner border then stitch down the side what will fit in the Safe Area.
28. Stitch the designs that are in the side borders as you go, only queueing and stitching what is in the Safe Area. Always work from side to side.
The blocks in the center of the layout should be quilted when they are in your Safe Area. I used the Boundary tool with Morph to Fit to place each of the designs one at a time.
Be sure and use Realign as you advance the quilt so that your layout will continue to look the same and the designs will all be easier to place.
I opted to wait to stitch one design in each of the side borders until after I had the bottom stitched. I stitched the corners first and then the row in between. I then went to the last design in each of the sides and resized it as needed and stitched it last.
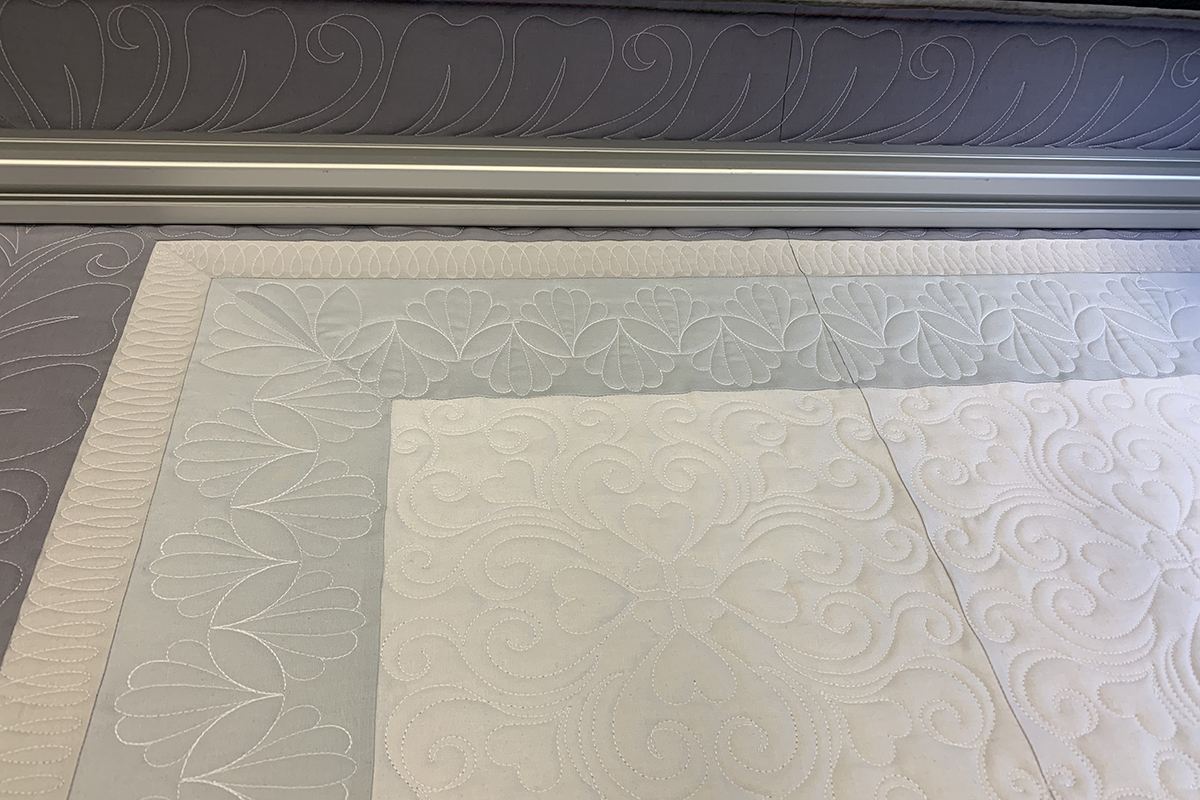
Unload your quilt and trim to bind in your favorite way.
All finished!
Used Products

What you might also like


19 comments on “Corners and Borders With BERNINA Q-matic”
-
-
I can’t wait for you to do it too. Thank you so much. It was so much fun.
-
-
Thank you for this tutorial! I have Qmatic and I’m very comfortable with E2E but I’ve wanted to try “custom”. This is great!
-
Thank you. I know you are going to have so much fun doing this project or just using the information on you own project.
Happy Quilting
Denise
-
-
Are the material dimensions listed above cut measurements or finished measurements?
Can’t wait to get started on this and learn how to tackle borders on my Longarm!! Thanks!-
They are the finished measurements. You can use any size borders you want. Any border can be filled with the designs using the instructions from the post. Have fun and let us know how it goes.
Happy Quilting,
Denise-
Thanks!! Will do!
-
-
-
Help! Where do we find the Amanda Murphy patterns as required? We have a brand new Qmatic and have spent 2 days trying without success to find these patterns then trying others that don t seem to work for this tabletopper. Any suggestions where to find them?
-
The designs I used in this project are from Embroidery Online. If you click on their Designs and then click on Longarm when the drop down opens it will take you right there. You can buy them by collection or by each design. I used designs from several different collections. Here is the link to the Longarm Design Session of their website. https://www.embroideryonline.com/products/designs/techniques/longarm-quilting-designs/ (Copy and Paste in browser)
Many of Amanda’s Longarm Designs will work with this project.
Thanks and Happy Quilting,
Denise -
Are the Amanda Murphy designs already in the Qmatic software? I have clicked into OESD and enter the numbers of the designs provided but nothing comes up. I have found Hearts block in Volume 11 but cannot find any others in the volumes. Could you please advise which volumes have the designs you mention please.
Cheers
Pam-
Hi Pam,
I apologize that the site did not recognizing the numbers. Here are the Volumes they are in of Amanda Murphy’s Longarm Designs.
80214-02 Vol #11
80259-02 and -05 Vol #1
80263-02 and -04 Vol #9
80261-02 and -04 Vol #11Have lots of fun quilting,
Denise
-
-
Hi Denise, I really would like to try to do this project, but the files for the designs have been moved. I tried to find them on OESD’s website, but was not successful. Is there any way to get them? I am just now learning the Q-matic and struggle to just follow the directions, so I don’t think I have the skills to substitute designs at this point.
-
Hi,
I am so glad you want to give this a try but it is really not a beginner project. Maybe you could work your way through the Q-matic Mastery Workbook first and get the feel for things. There are three quick and easy projects in the workbook that will get you started. There are even videos that go with the tools so you know how everything works. This is the link to download the workbook https://www.bernina.com/en-US/Learn-Create-US/Mastery-Workbooks/Longarm-Quilting/Q-matic. You will want to save it electronically so that you can access the videos when needed.
As for the designs in the Borders and Corners Post here is where you can find the.:
Center Blocks: #80214 Hearts Quilting by Amanda Murphy
LA80214-02.bqm Collection #11
Inner border: #80259 Traditional Feathers 3 by Amanda Murphy
LA80259-02.bqm Collection #1
LA80259-05.bqm Collection #1
Middle border: #80263 Loops Quilting by Amanda Murphy
LA80263-02.bqm Collection #9
LA80263-04.bqm Collection #9
Outside border: #80261 Heart Shaped Leaves by Amanda Murphy
LA80261-02.bqm Collection #11
LA80261-04.bqm Collection #11
Happy Quilting,
Denise
-
-
Hi Denise. I have worked through the Mastery Workbook and I am ready to tackle borders and corners. Will you be teaching this as an on-line class anytime soon? If not, is there another introductory video for how to do borders and corners?
Thanks,
Maureen-
Hi Maureen,
I am so glad you are ready for Borders and Corners. I also appreciate you working through the workbook and I hope you found it helpful. They are currently working on my online classes for the rest of the year and hopefully they will be up soon on the BERNINA site.
Thank you so much,
Denise-
Thank you Denise. You are an awesome instructor and I hope to take classes from you in the near future. I am assuming that the Q-Matic course in November is a hands-on version of the Mastery Workbook. Is that correct, or do you cover more?
-
The Exploring Q-matic class in November of 2021 will cover some of the same information that the Mastery Workbook does. In the class we will cut and stitch a quilt top on day 1. On day 2 we will work on the Q-matic computer learning the tools and how to use them. On day 3 we will quilt an Edge 2 Edge project created on day 2 and then on day 4 we will custom quilt the top created on day 1 using the layout created on day 2. It is a lot of fun and we all get to share ideas and information. We always learn from each other. Hope to see you in a class soon.
Thanks,
Denise
-
-
-
-
HI Denise, WOW!!! ,amazing would love to be able to attend one of your classes ,We haven’t any
hands on classes at all in New Zealand. You have to get all your information from YouTube.
So very grateful to you for all your help, You are an awesome teacher and very easy to follow .
Working my way through the book and finding it very helpful,
Do you think there is any chance you will be doing a video on placing corners and boards .?
Thank you once again for your help…..really appreciated !!!!
Leela-
Leela thank you so much for your very kind words. I will bring this up to see if in the future a video might be possible.
Thanks again,
Denise
-
Leave a Reply
You must be logged in to post a comment.

Beautiful Denise! I can’t wait to try it!