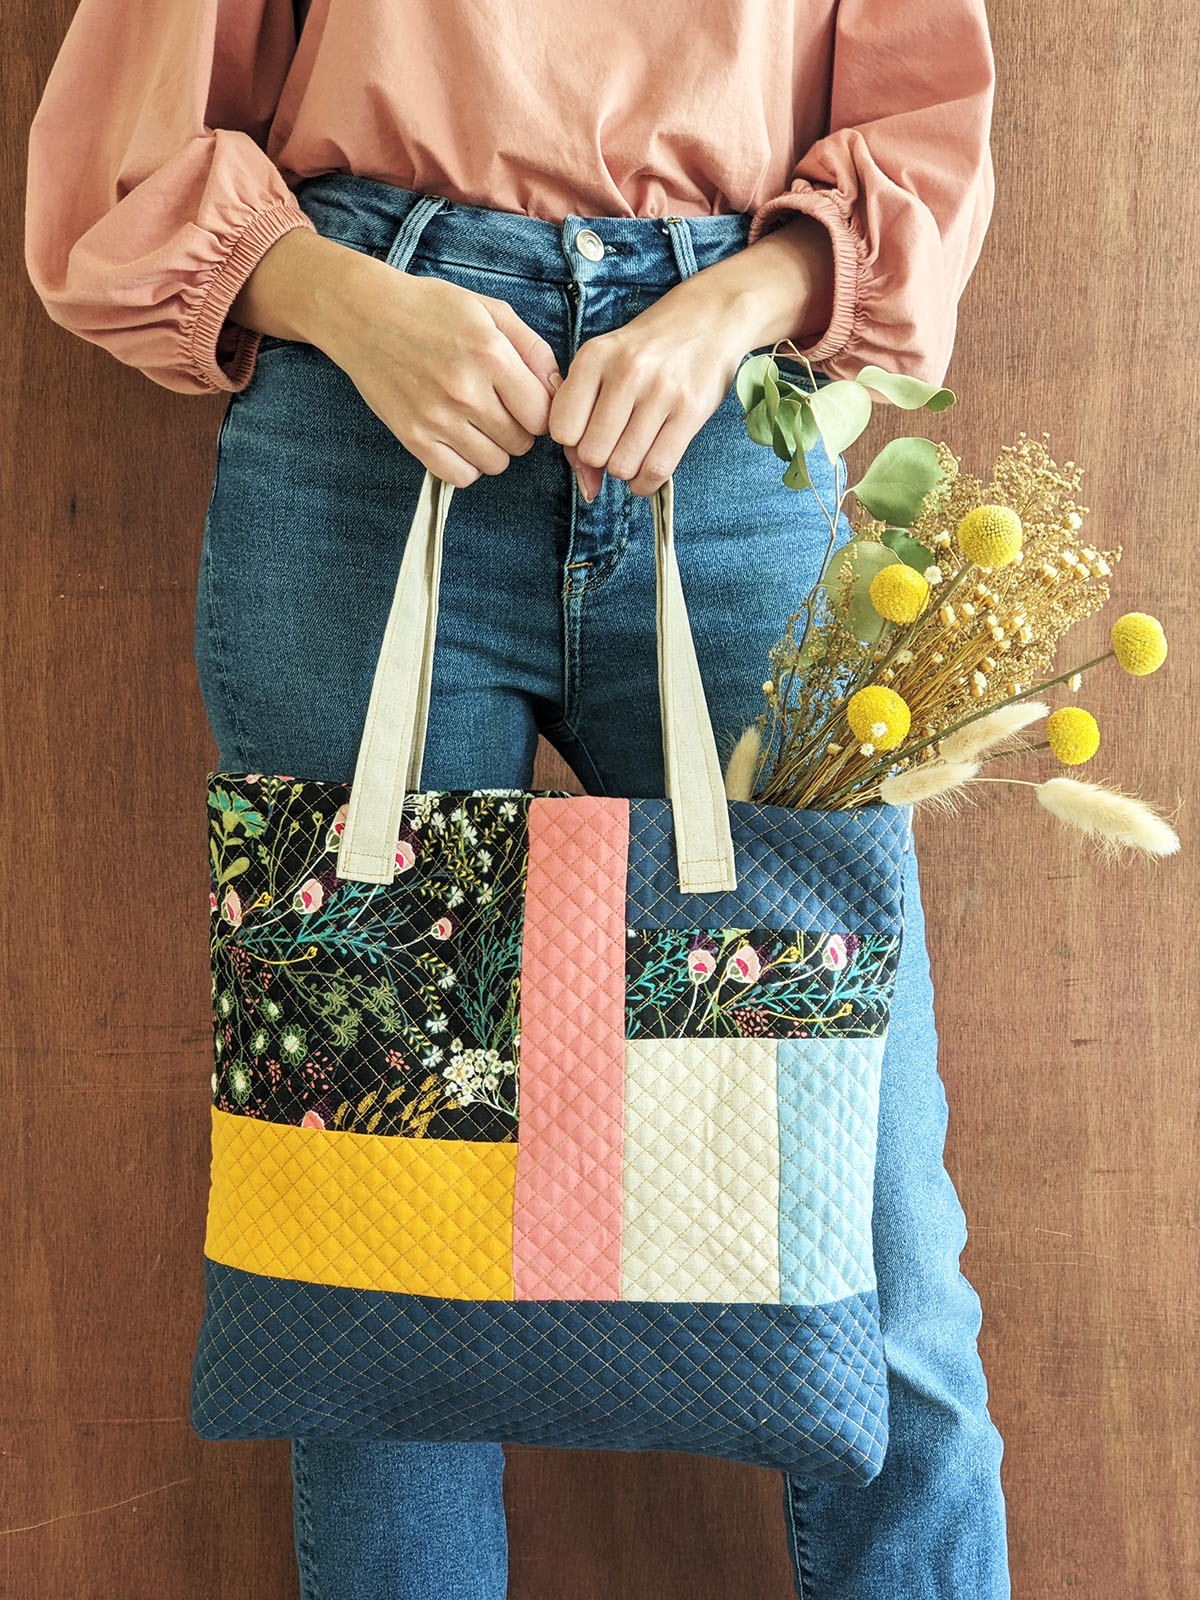
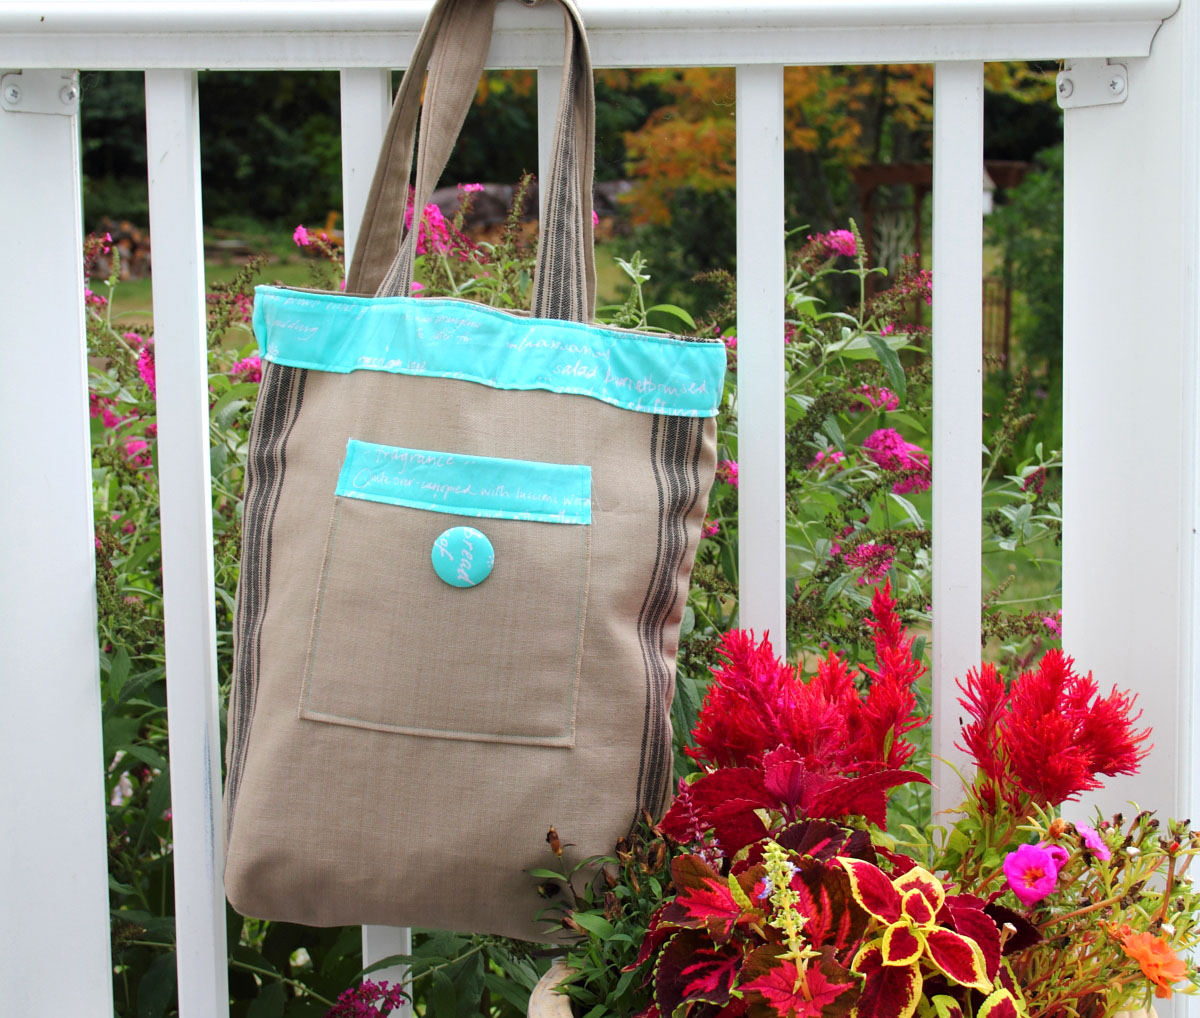
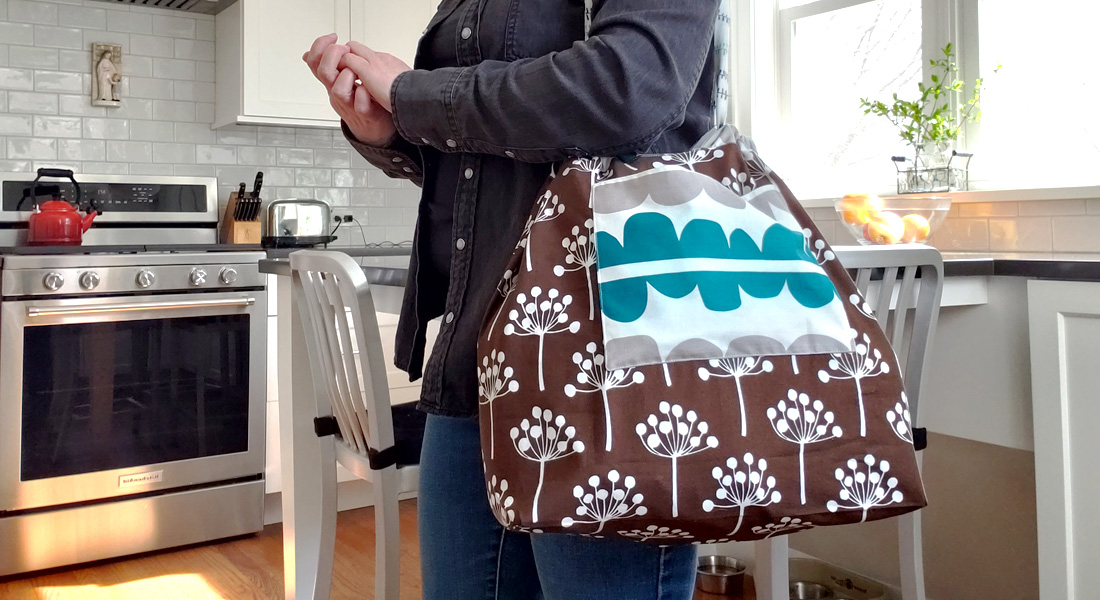
How to Sew an Autumn Flannel Tote Bag

Follow along with me on how to create this fun and easy project!
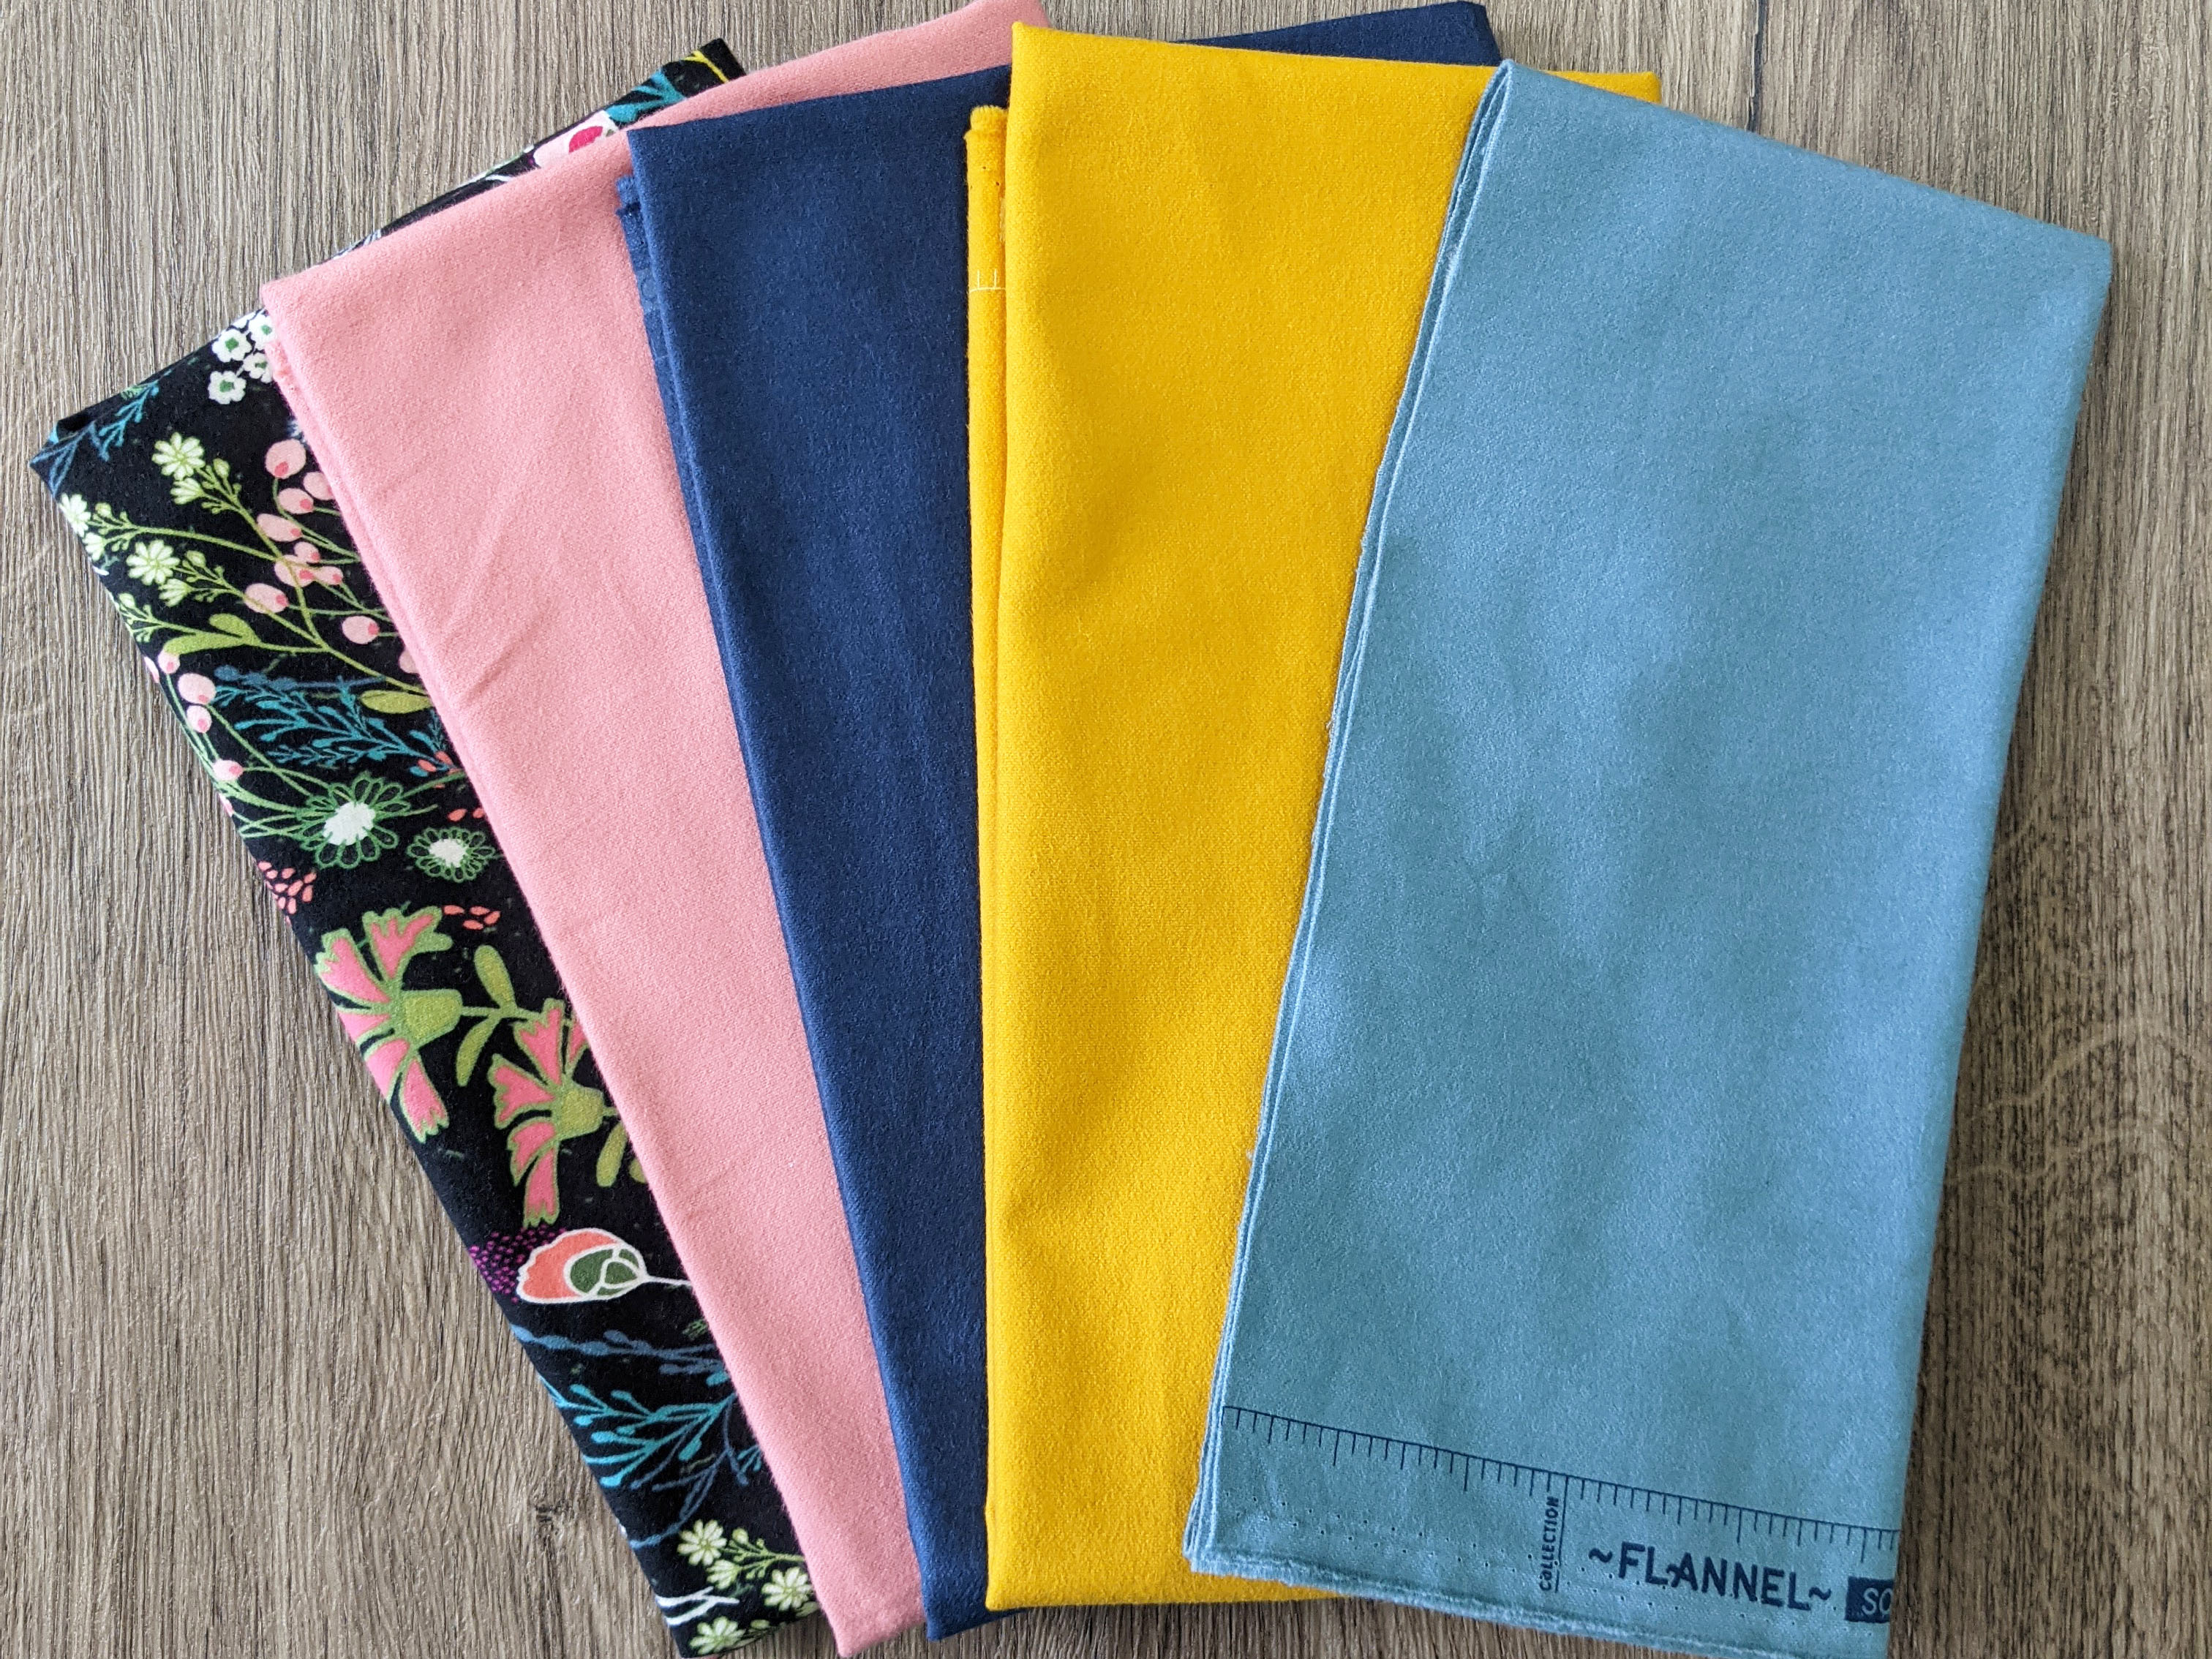
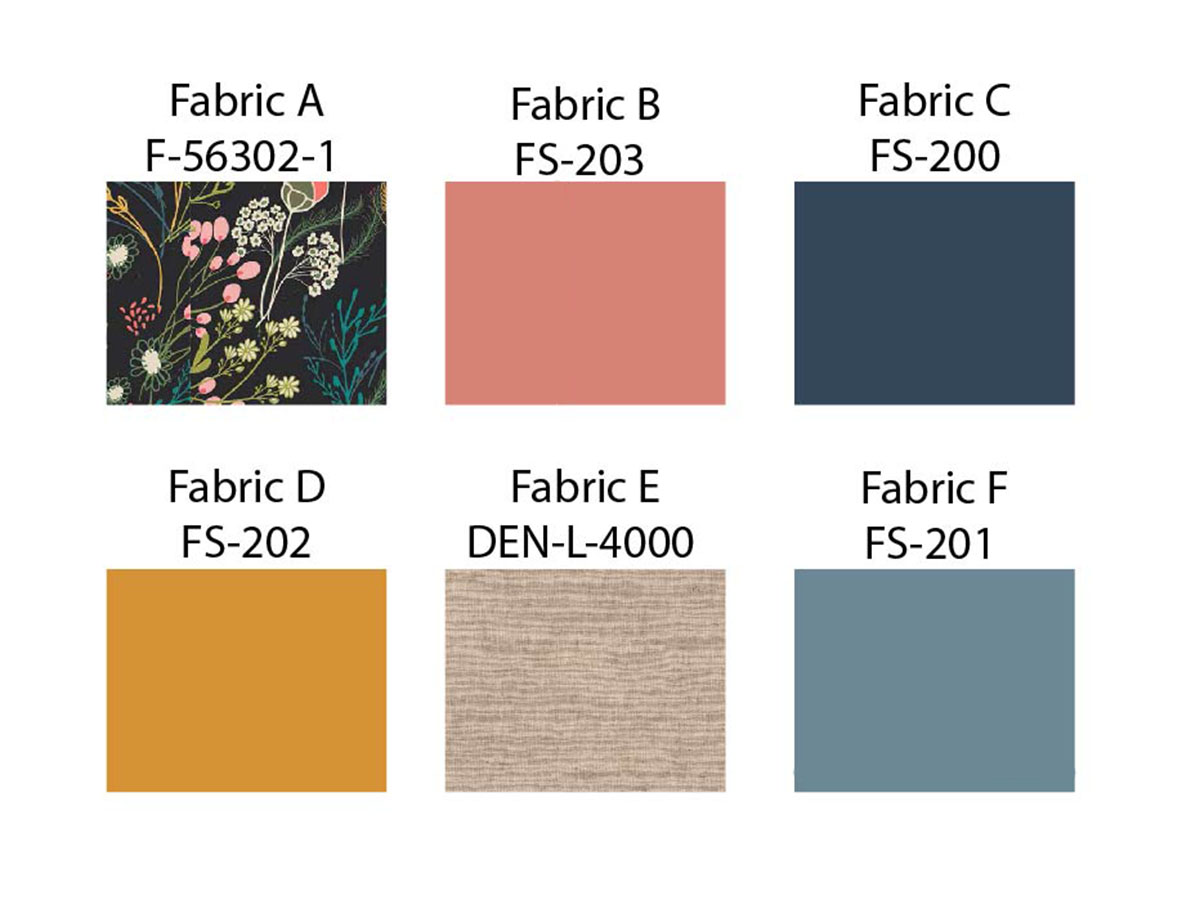
Fabric Requirements to Sew the Autumn Flannel Tote Bag
- Fabric A F-56302-1 1/2yd
- Fabric B FS-203 1/8yd
- Fabric C FS-200 1/4yd
- Fabric D FS-202 1/8yd
- Fabric E DEN-L-4000 3/4yd
- Fabric F FS-201 1/8yd
Additional Materials to Sew the Autumn Flannel Tote Bag
- One (1) 20” x 20” squares of batting
- Coordinating quilting thread
- Reverse Pattern foot #1D
Cutting Instructions:
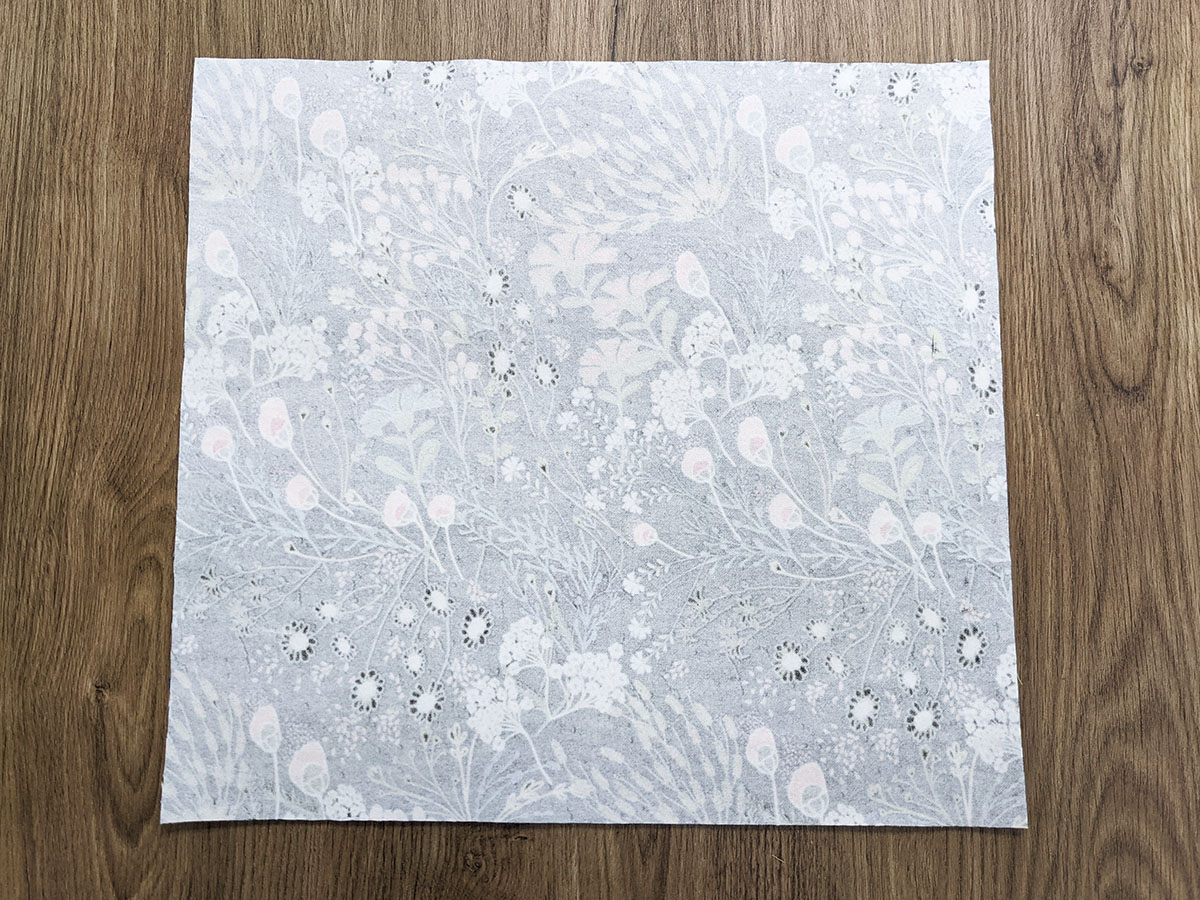
- One (1) 8 1/2’’ x 7 1/2’’ rectangle from fabric A.
- One (1) 6 1/2’’ x 2 1/2’’ rectangle from fabric A.
- One (1) 16 1/2’’ x 15 1/2’’ rectangle from fabric A (back of tote)
- One (1) 10 1/2’’ x 2 1/2’’ rectangle from fabric B.
- One (1) 6 1/2’’ x 3 1/2’’ rectangle from fabric C.
- One (1) 16 1/2’’ x 5 1/2’’ rectangle from fabric C.
- One (1) 8 1/2’’ x 3 1/2’’ rectangle from fabric D.
- One (1) 5 1/2’’ x 3 1/2’’ rectangle from fabric E.
- Two (2) 16 1/2’’ x 15 1/2’’ rectangle from fabric E (lining).
- Two (2) 23’’ x 4’’ strips from fabric E (handles).
- One (1) 5 1/2’’ x 3 1/2’’ rectangle from fabric F.
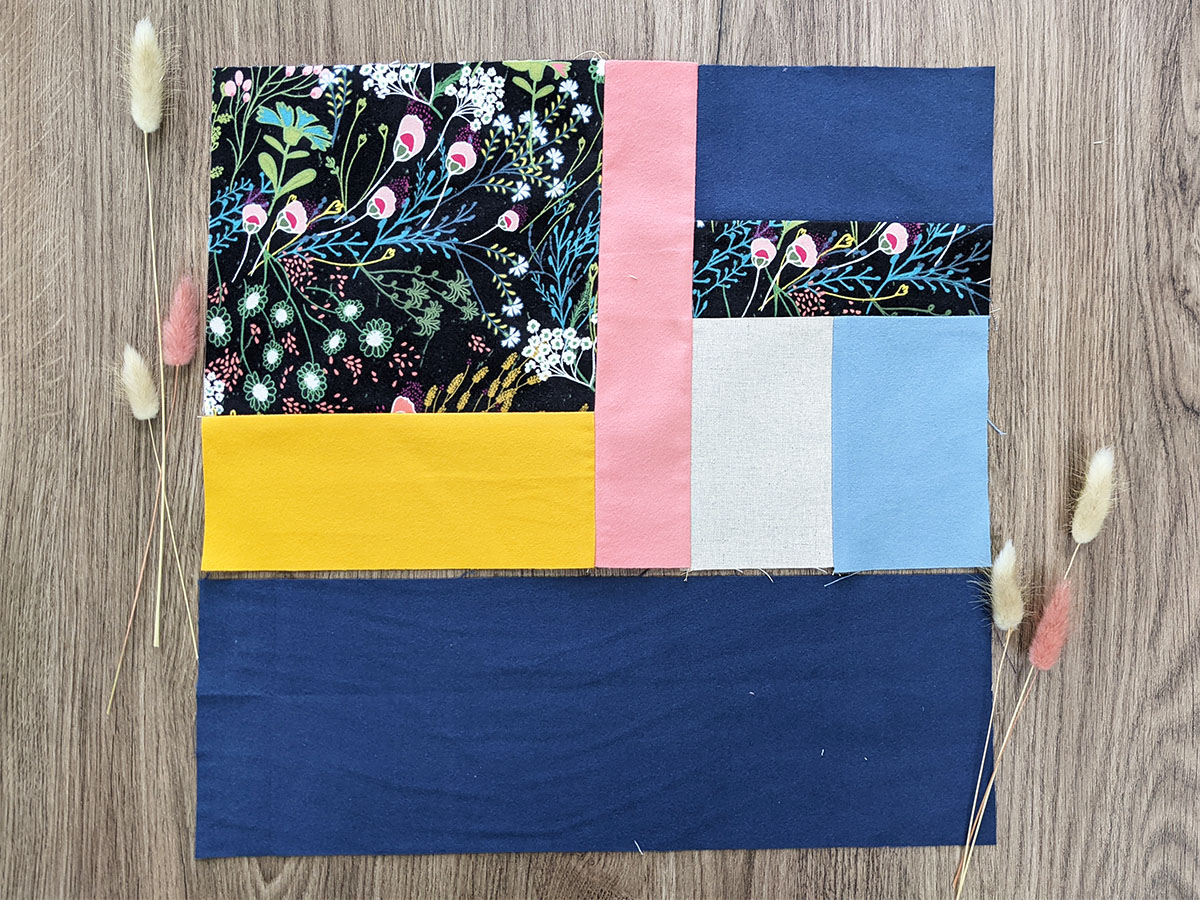
Steps to Sew the Autumn Flannel Tote Bag
Step 1:
Join one (1) 8 1/2’’ x 7 1/2’’ piece from fabric A with one (1) 8 1/2’’ x 3 1/2’’ rectangle from fabric D.
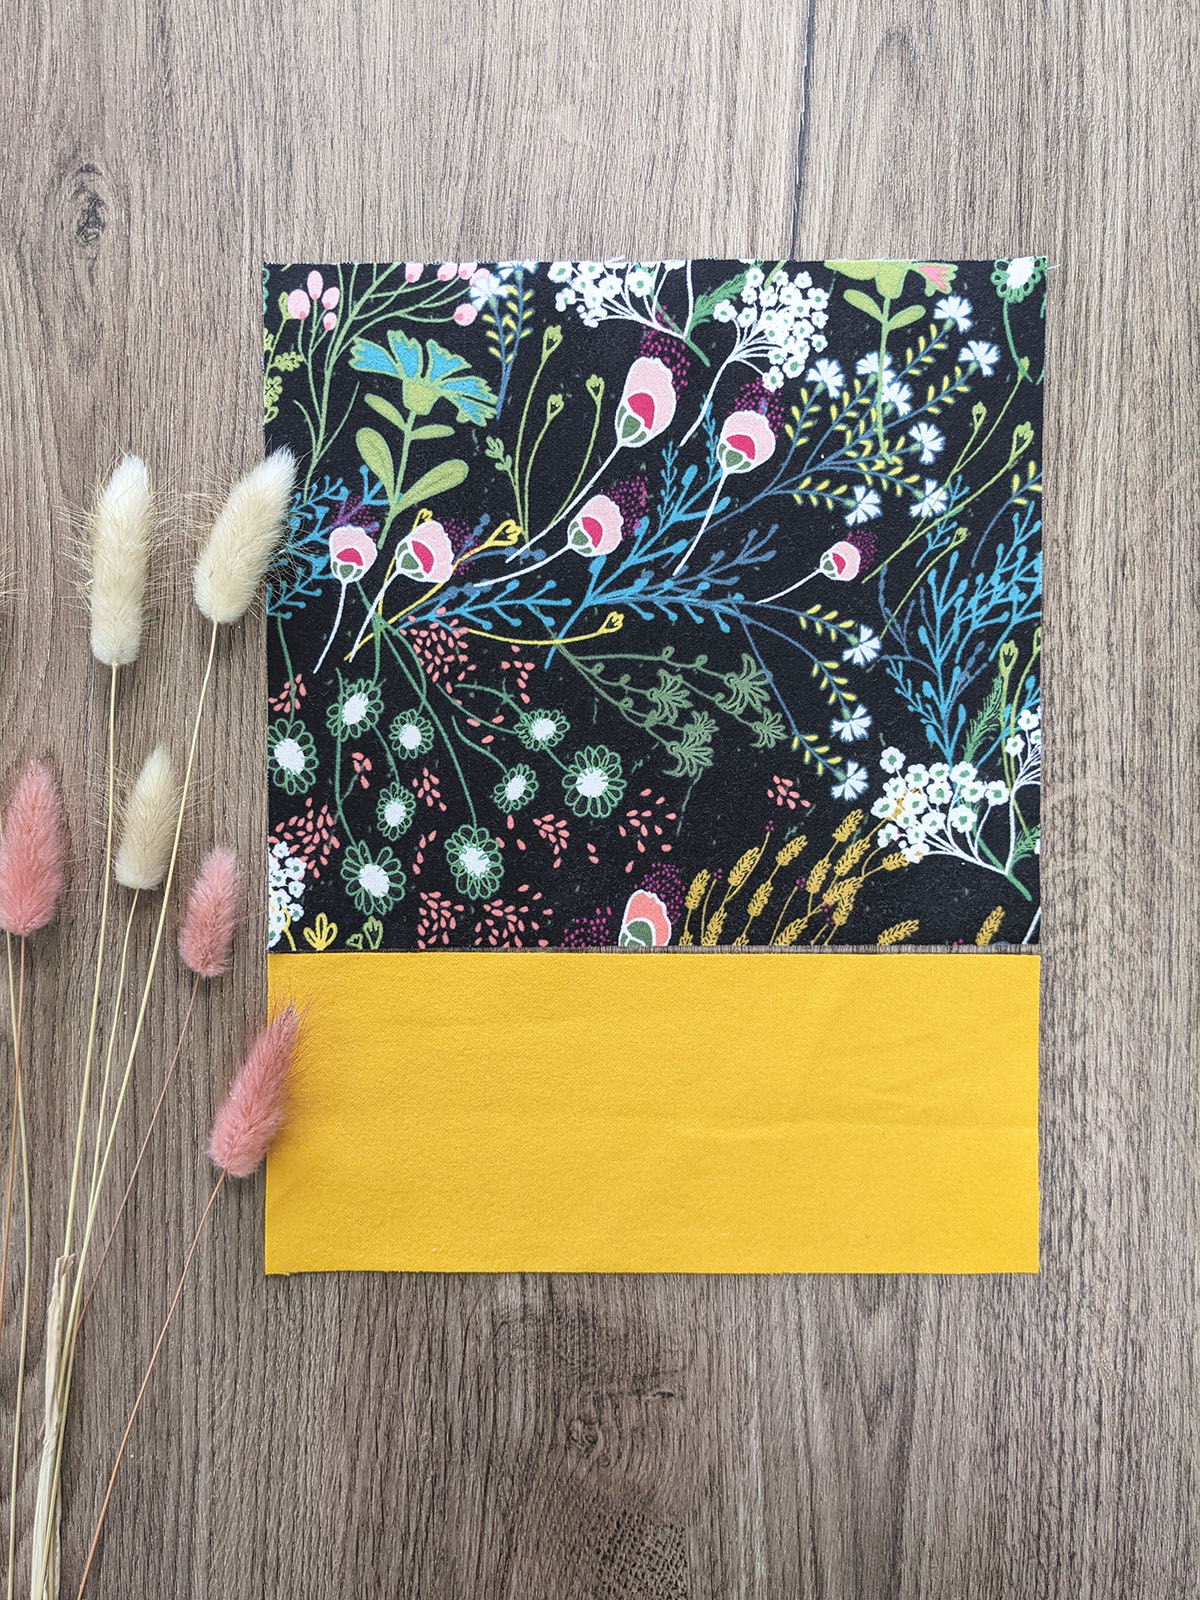
Sew at a 1/4” seam allowance.

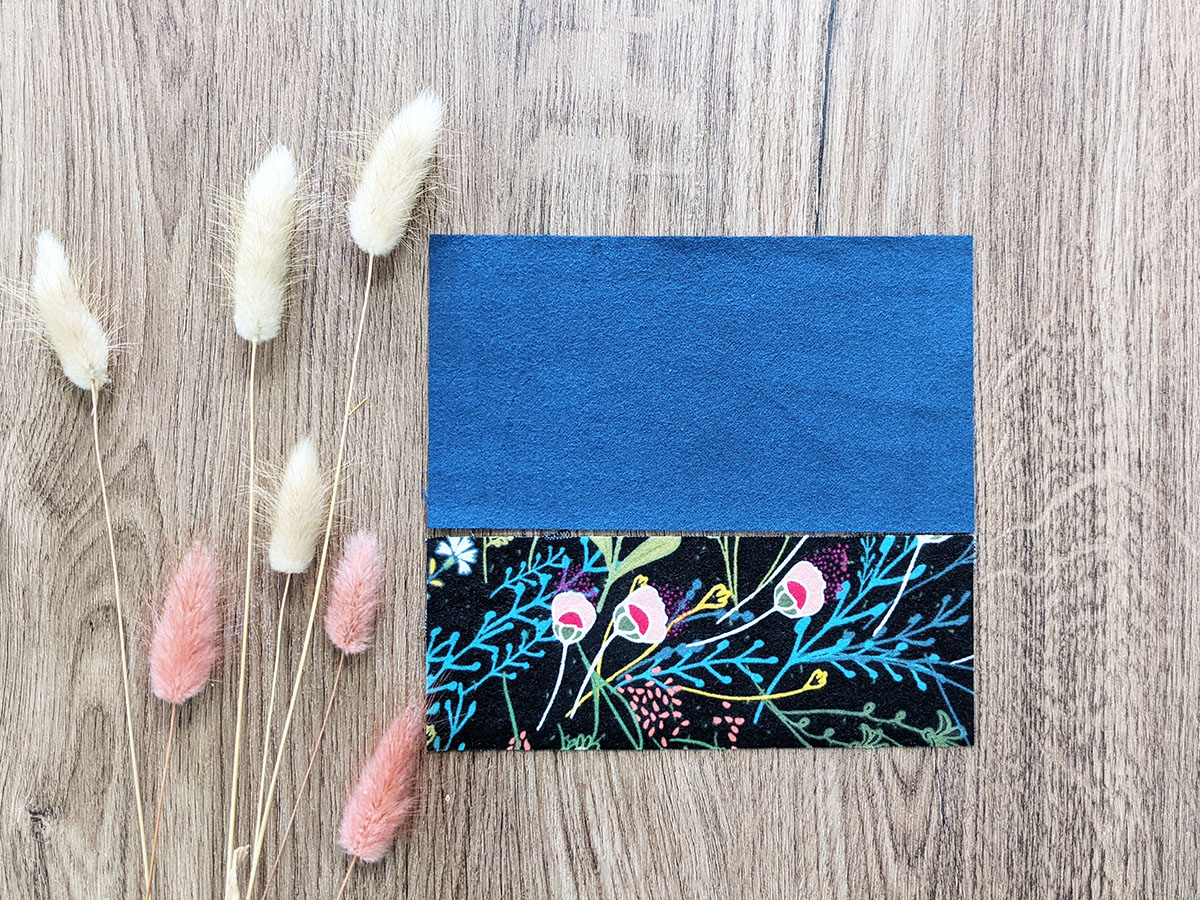
Step 2:
Join one (1) 6 1/2’’ x 3 1/2’’ piece from fabric C with one (1) 6 1/2’’ x 2 1/2’’ rectangle from fabric A.
Step 3:
Join one (1) 5 1/2’’ x 3 1/2’’ piece from fabric E with one (1) 5 1/2’’ x 3 1/2’’ rectangle from fabric E.
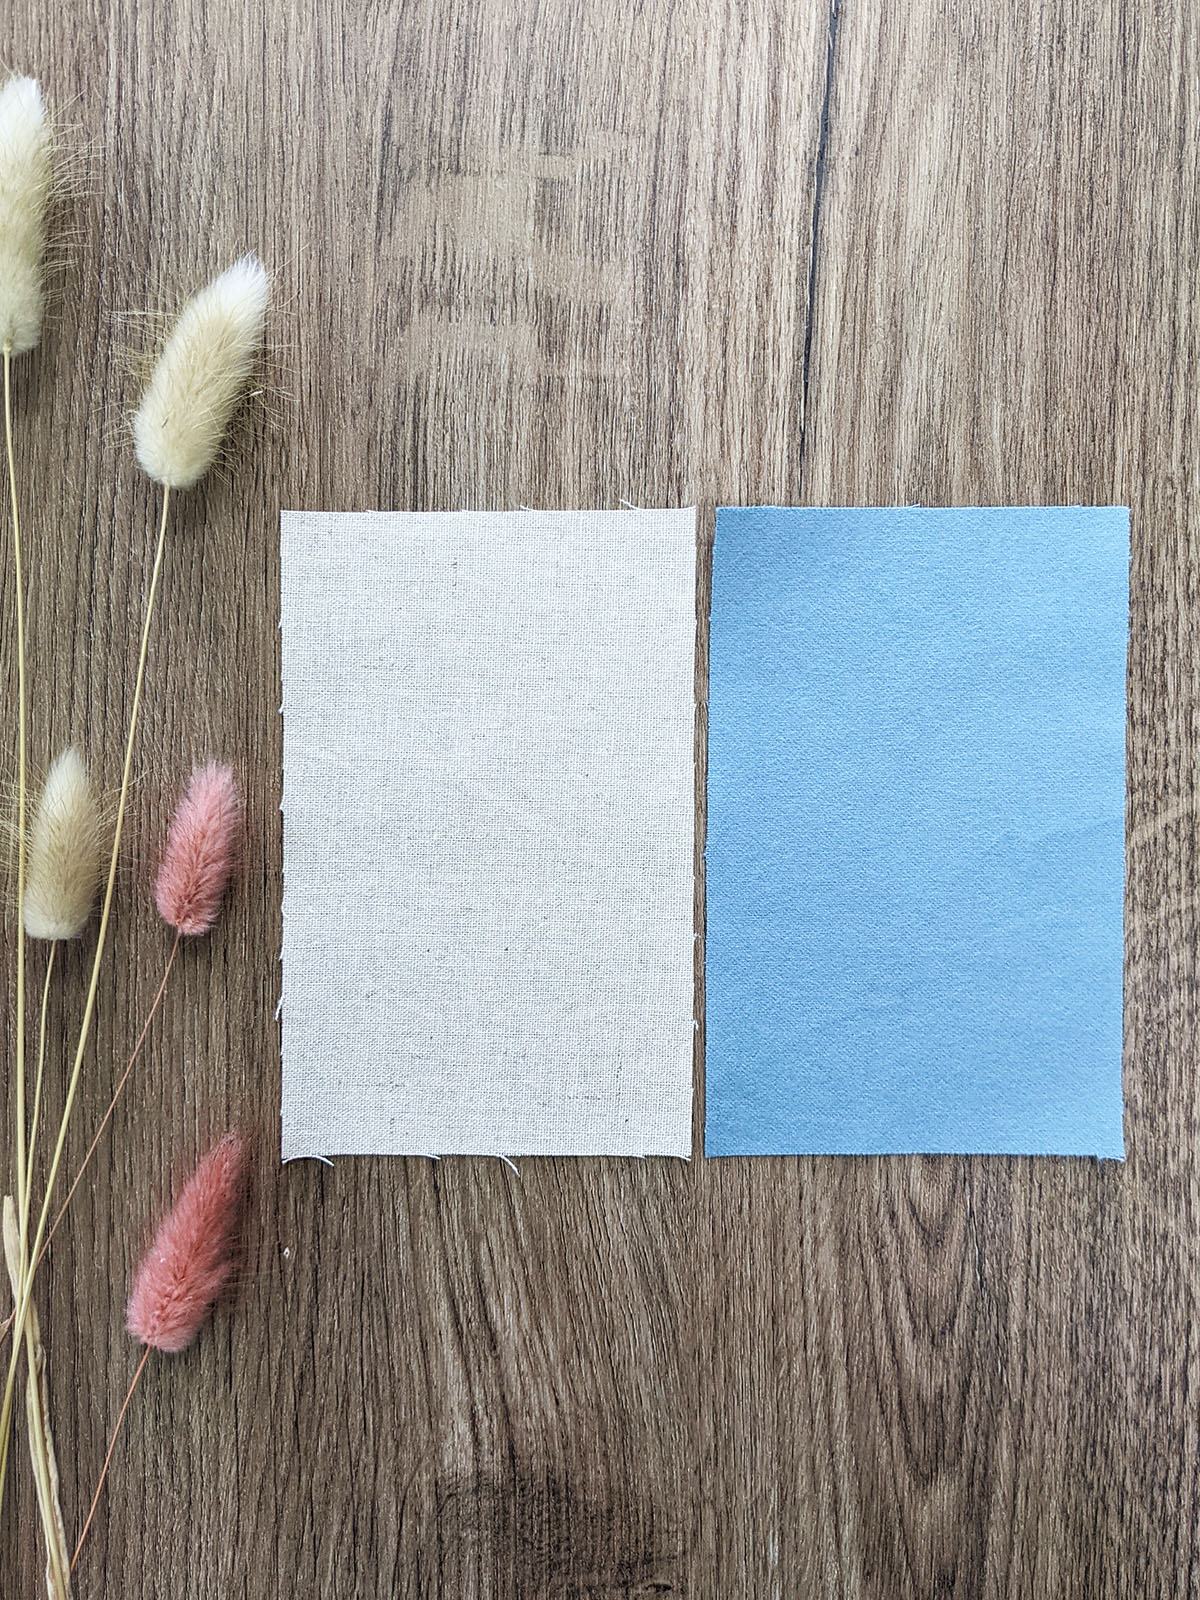
Now, join both pieces together.
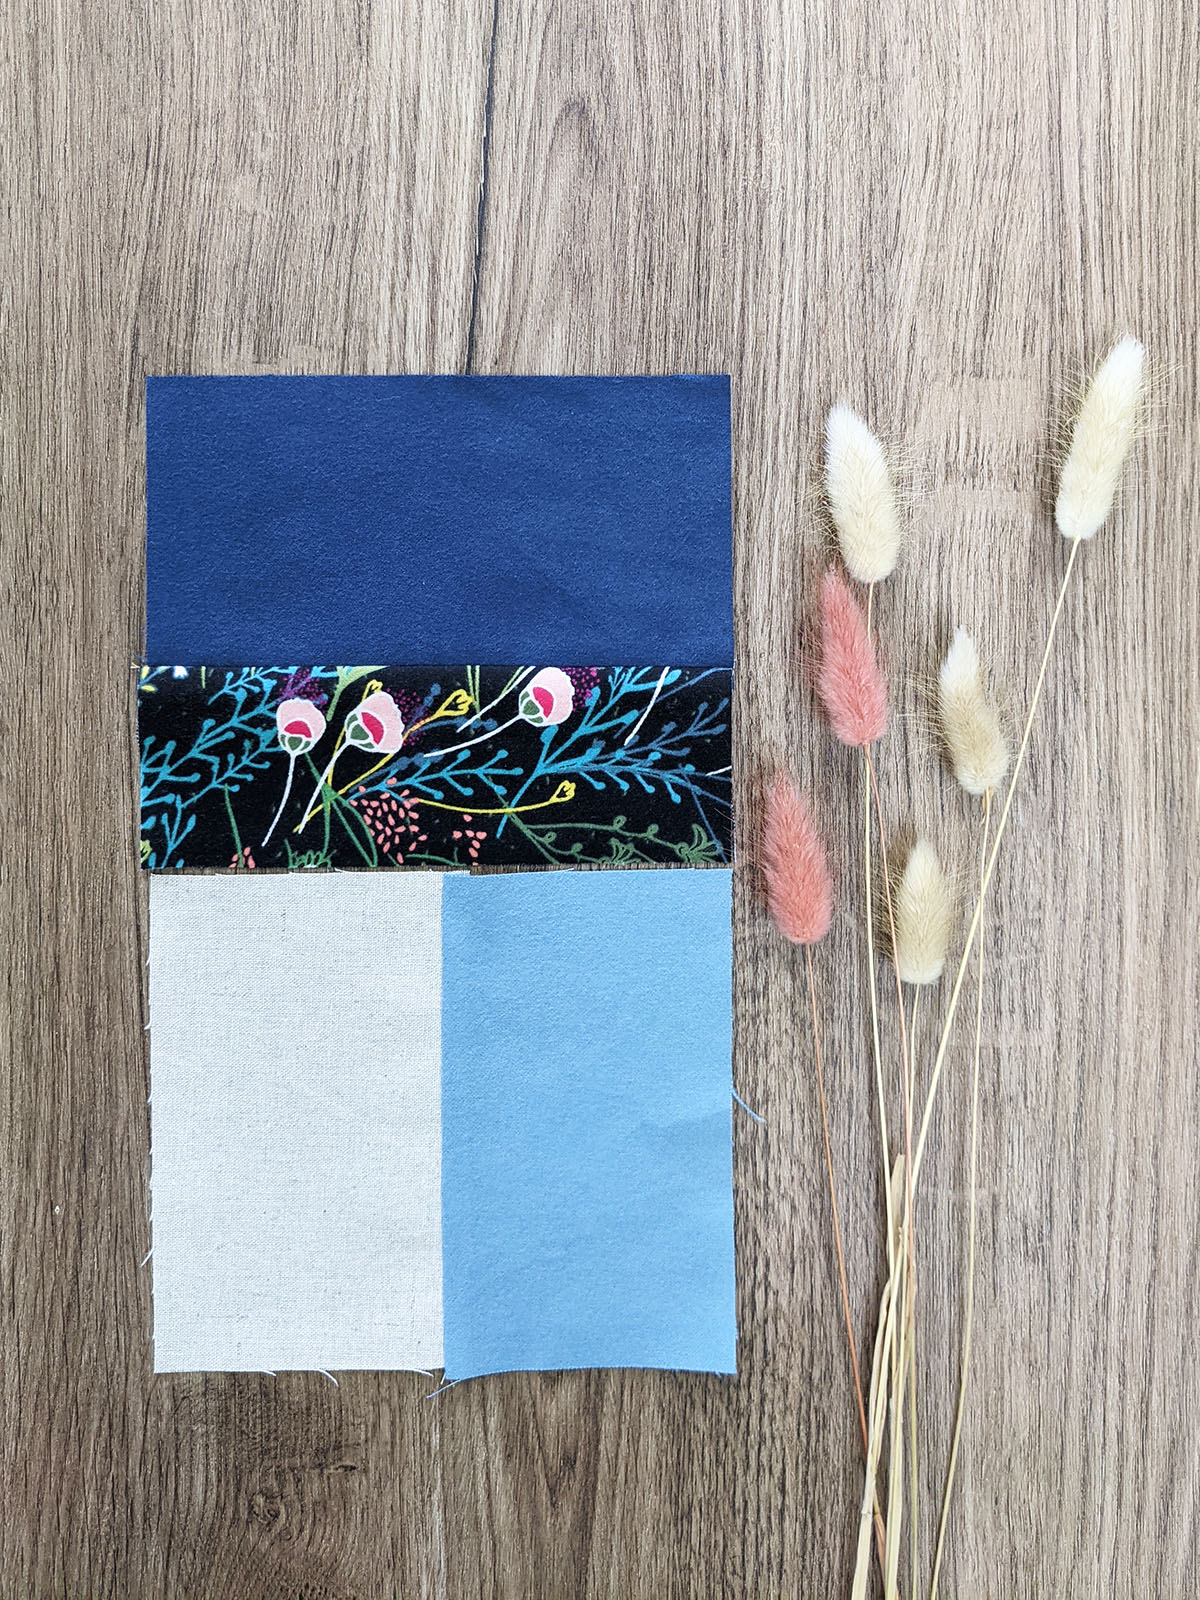

Step 4:
Take the first assembled piece, one (1) 2 1/2” x 10 1/2” rectangle from fabric B, and the second assembled piece and join them in a row.
Sew at a 1/4” seam allowance.
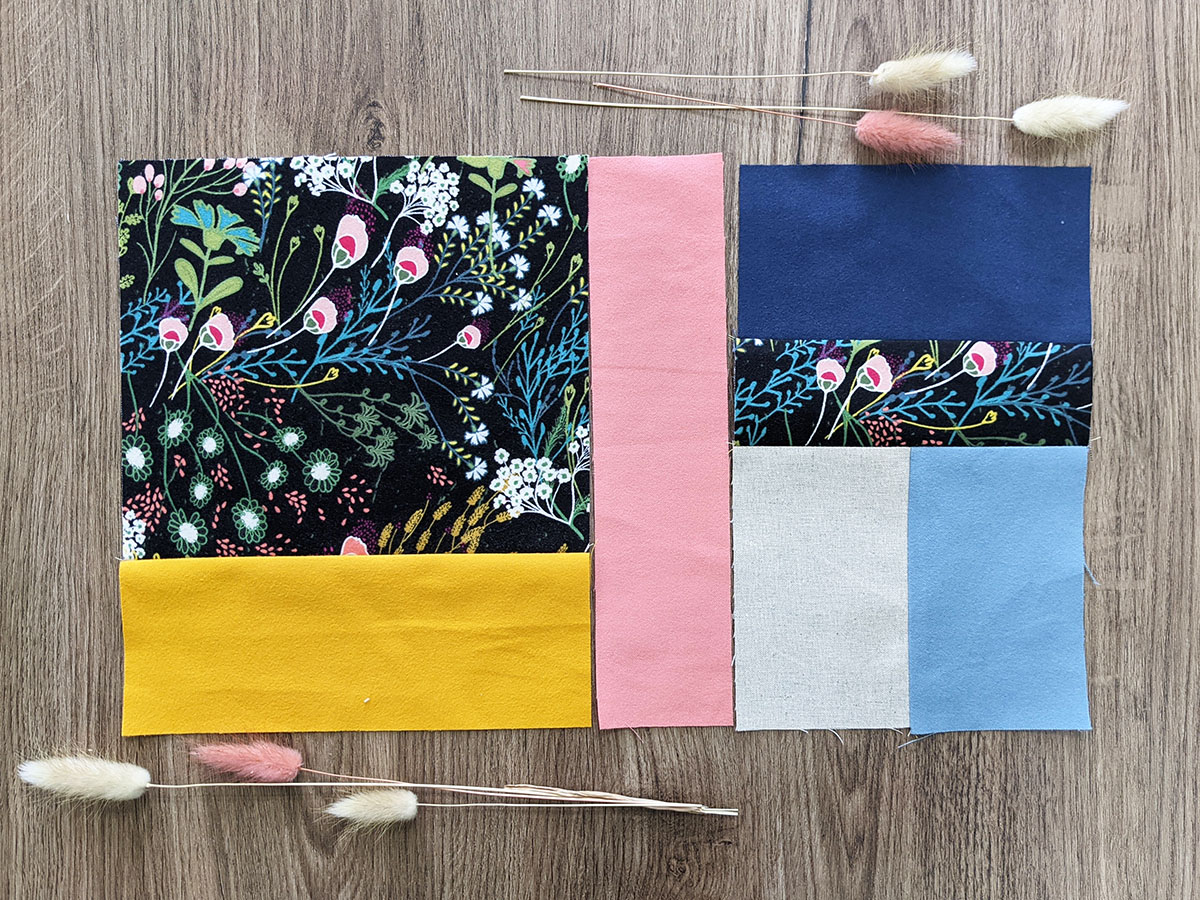
Step 5:
Join one (1) 16 1/2” x 5 1/2” rectangle from fabric C on the bottom part of the assembled piece.
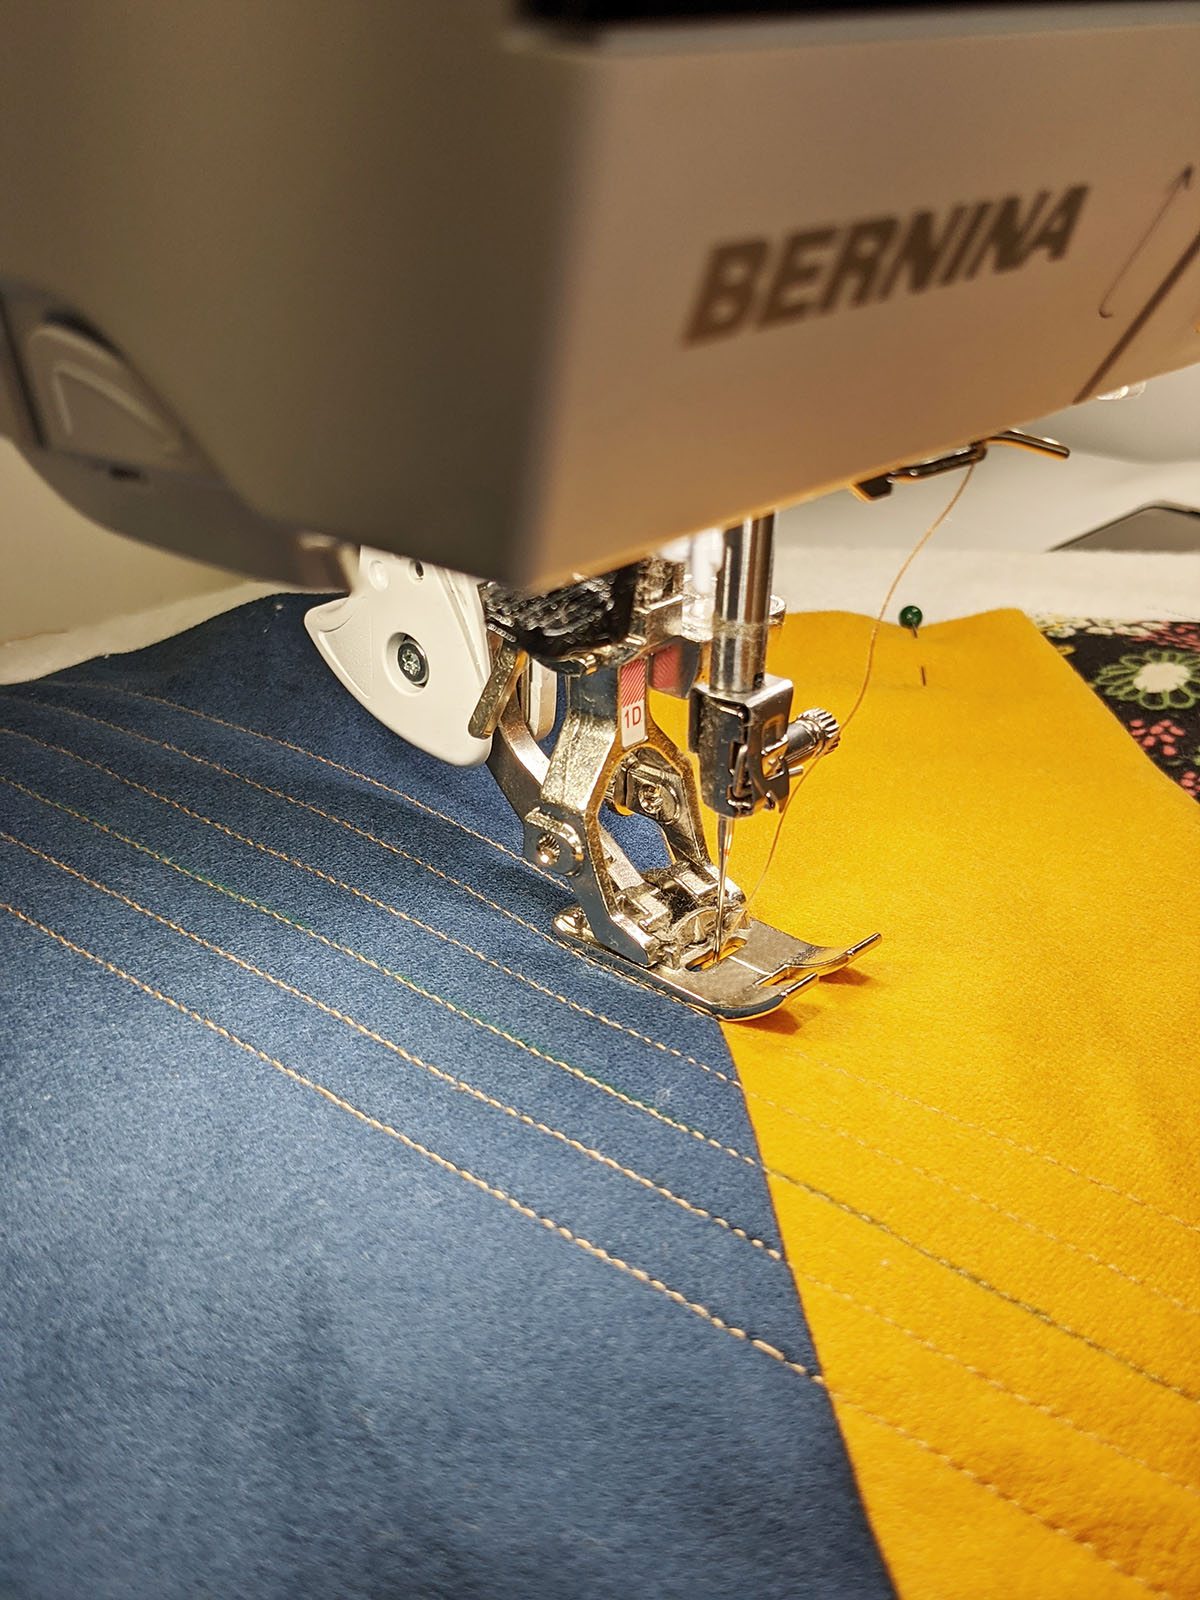
Step 6:
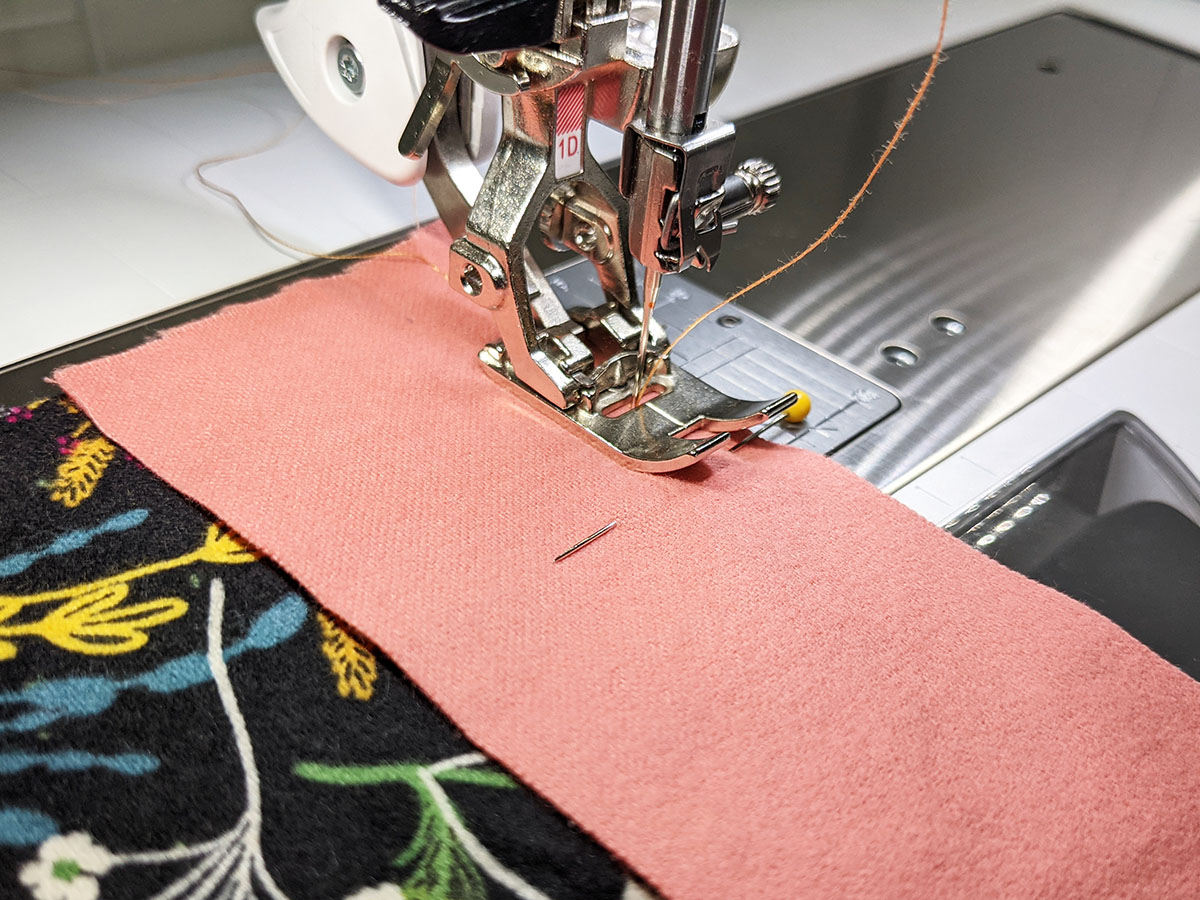
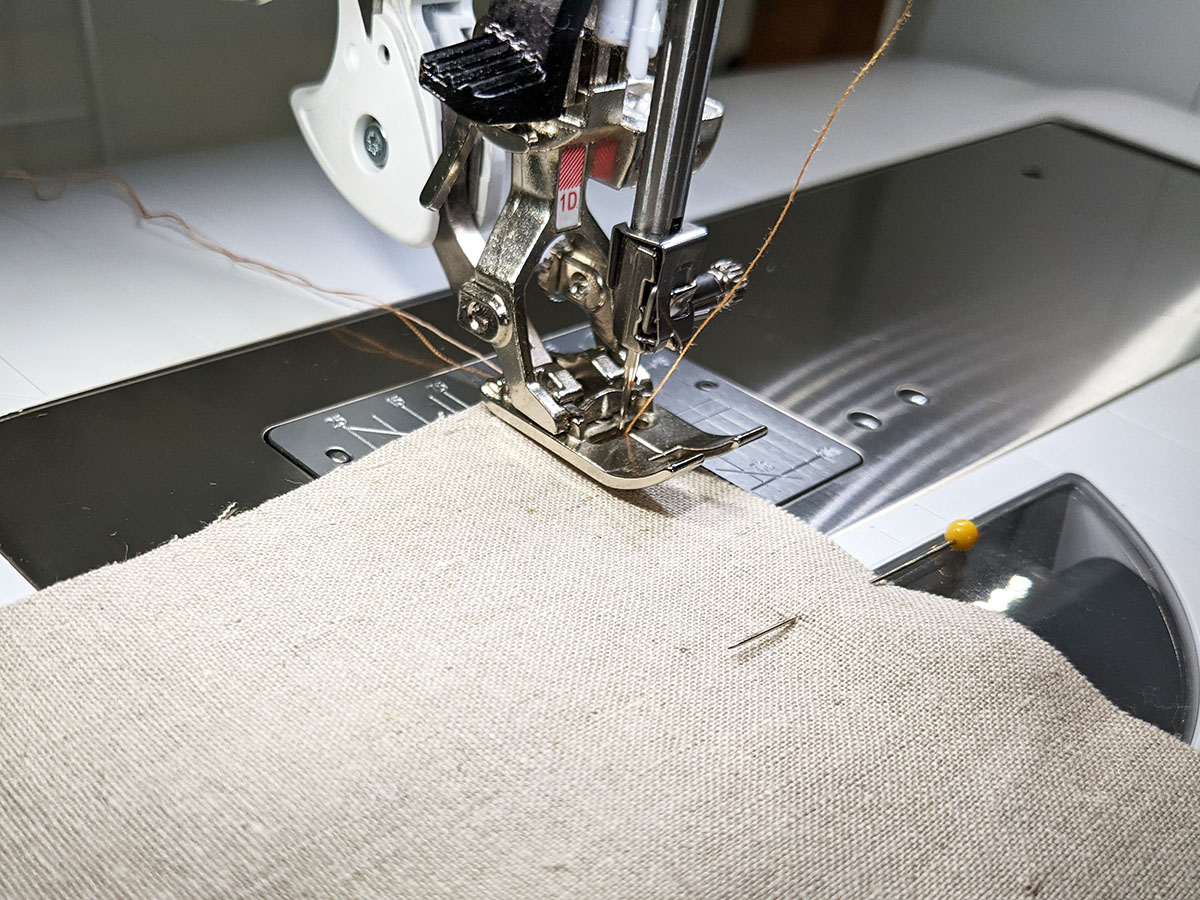
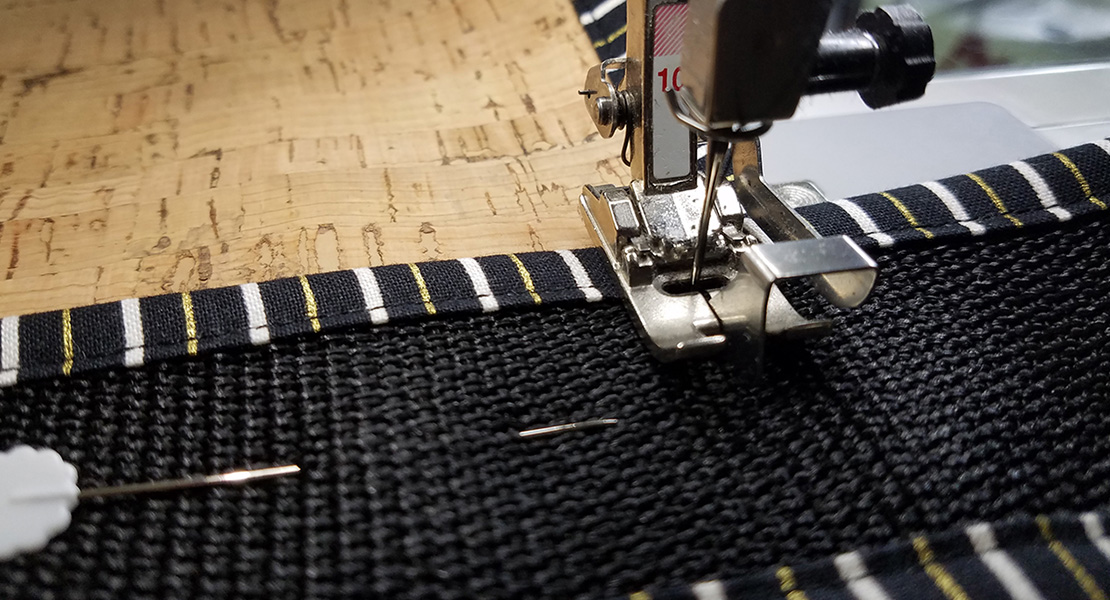
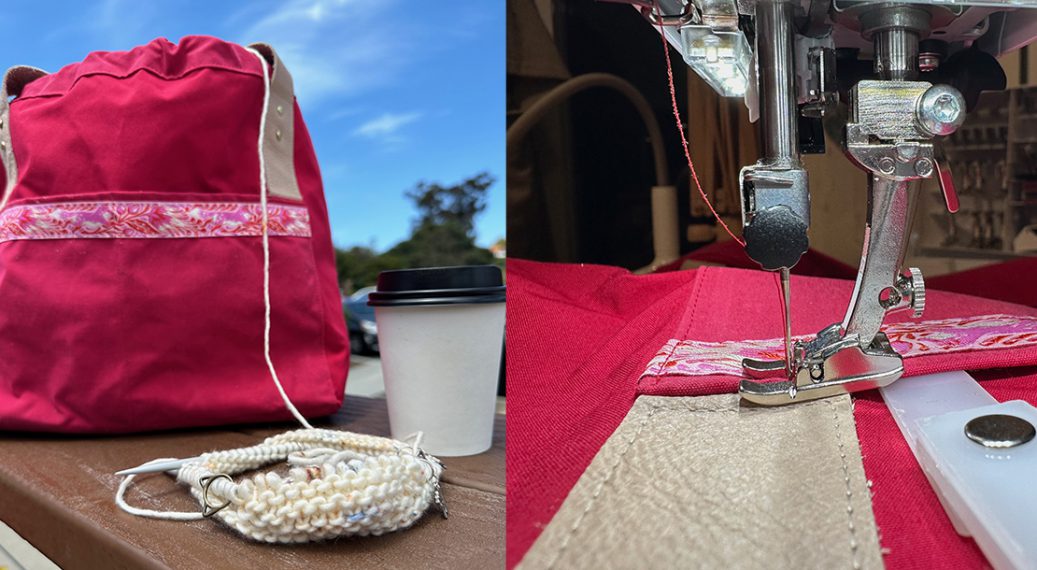
Place batting on the wrong side of the piece and pin all around. Quilt your piece.
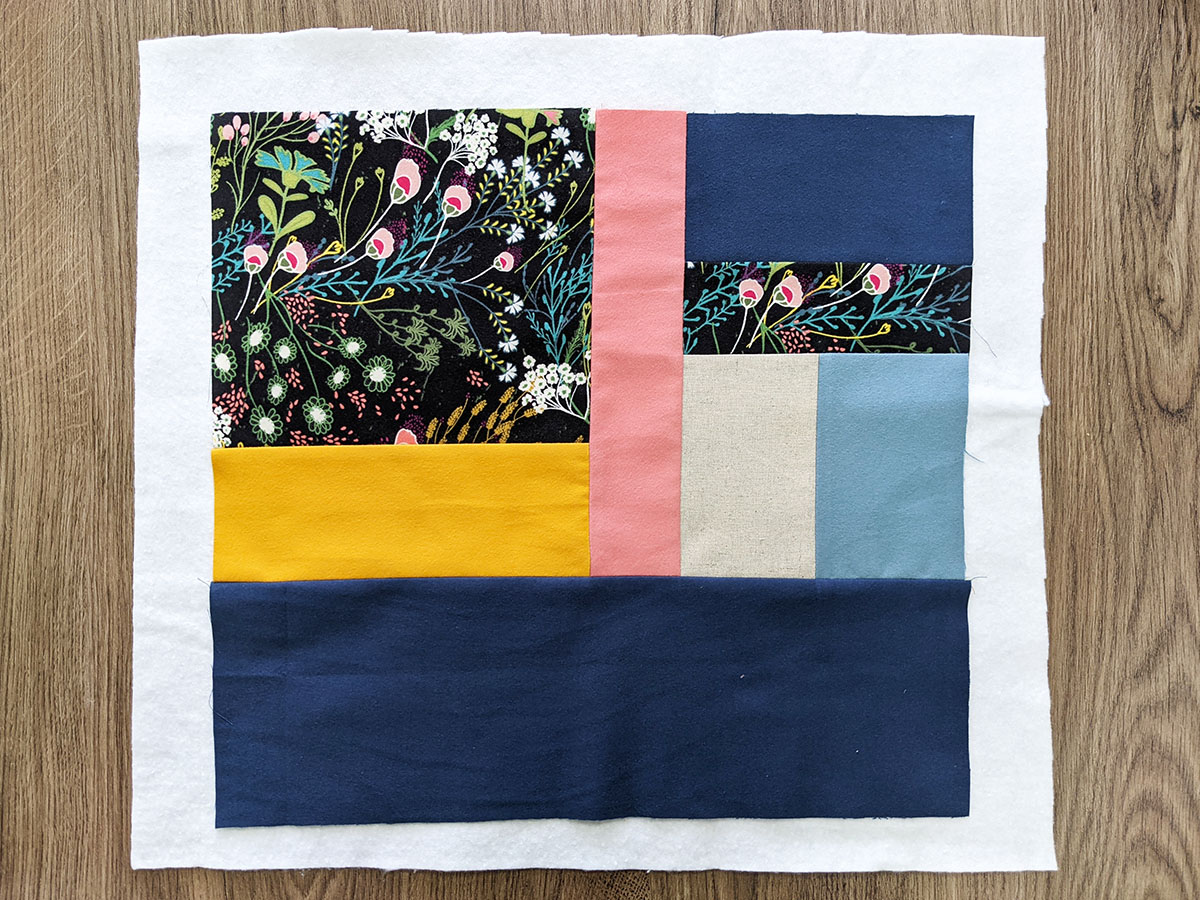
I decided to do a diamond motif at a 3/8” distance and using the Reverse Pattern Foot #1D, I was able to make a perfect stitch line.
Step 7:
Now, take the front and back of the tote and place them right sides facing and pin.
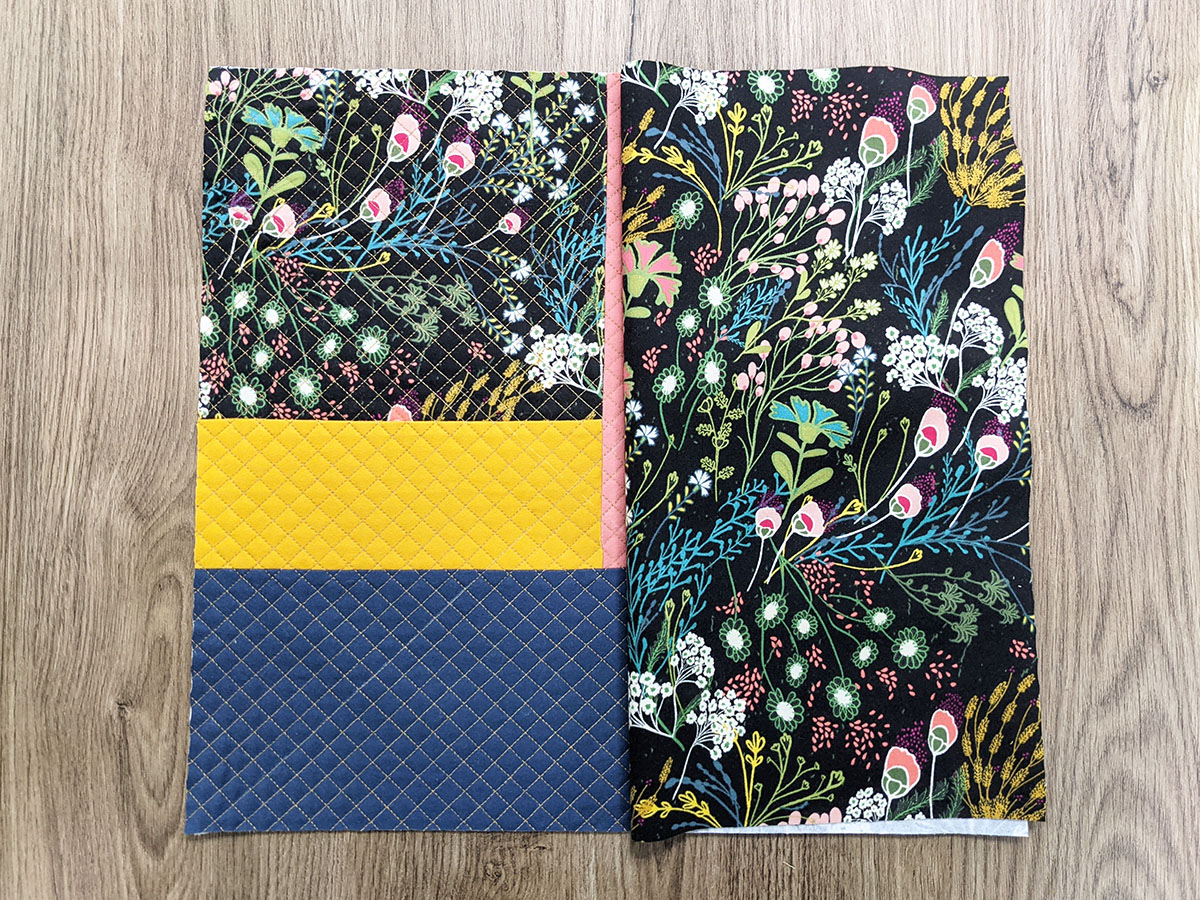
Sew all three sides at a 1/4’’ seam allowance.
Repeat the same with your lining piece, by placing them right sides together and sewing all three sides at a 1/4” seam allowance, leaving about 3” of opening.
Step 8:
To make the boxed corners, fold the corner to align your seams in the center. Press the corner & seams with an iron.
Measure and mark along both sides of the corner for your desired depth. In this example, I used 1″ on each side, which will give us a 2″ finished corner seam. Use a ruler to connect the two marks with a straight line.

Sew along the line you drew, back tacking both ends. Cut off the corner.
Turn your project right side out to form your box corner. Repeat the same process for the lining.
Step 9:
Now, insert the tote inside the lining, right sides facing together. Make sure to line up the seams together and pin your tote.

Sew all around the top part of the tote. Remove the free-arm table of your machine to sew more comfortably and be able to rotate your tote.
Then, from the 3” opening, turn your piece inside out and close the opening by hand or machine stitch.
Step 10:
To create your handles, follow the instructions on Step 6 in my How to Sew Back-to-school Pencil Rolls tutorial.

Fold the ends of the handles and place them in front of the tote, 3 1/2” distance from each side and 6” apart from each end. Pin in place.
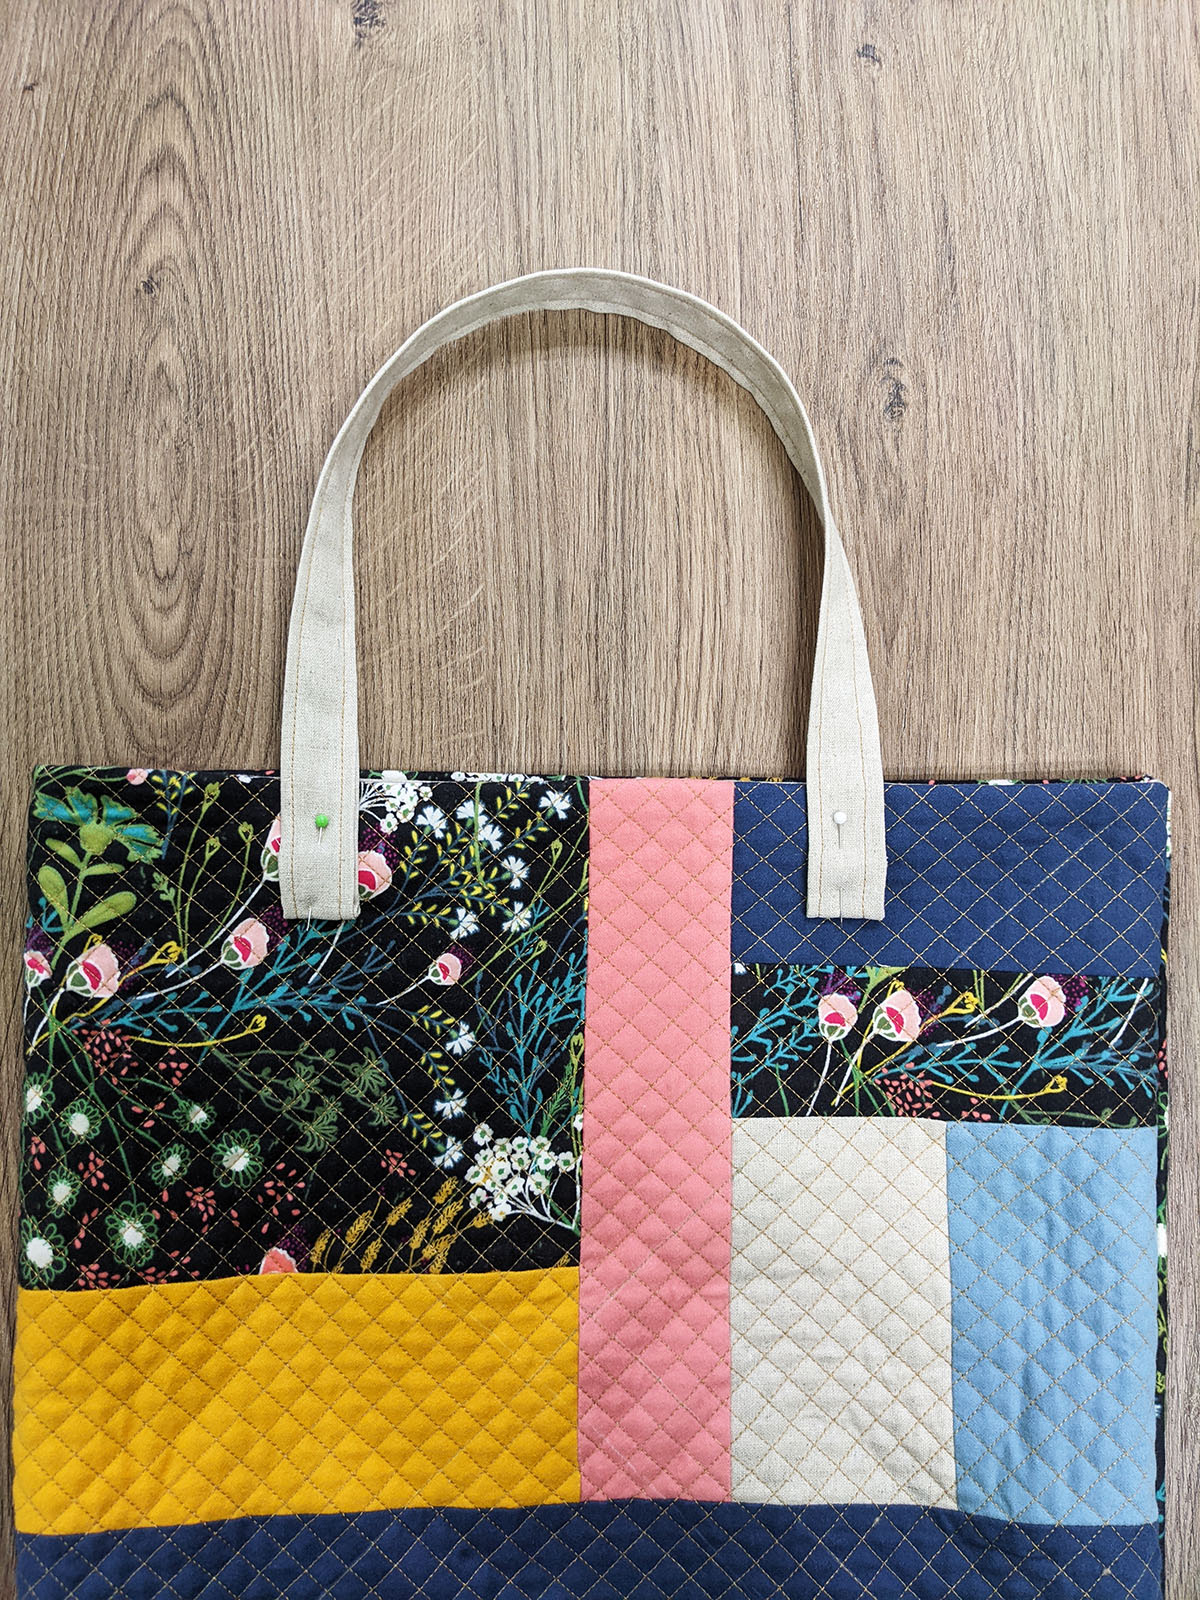
Sew a 1/2” rectangle in order to attach the handles repeating the same for the other end. Sew the other handle on the backside of the tote.
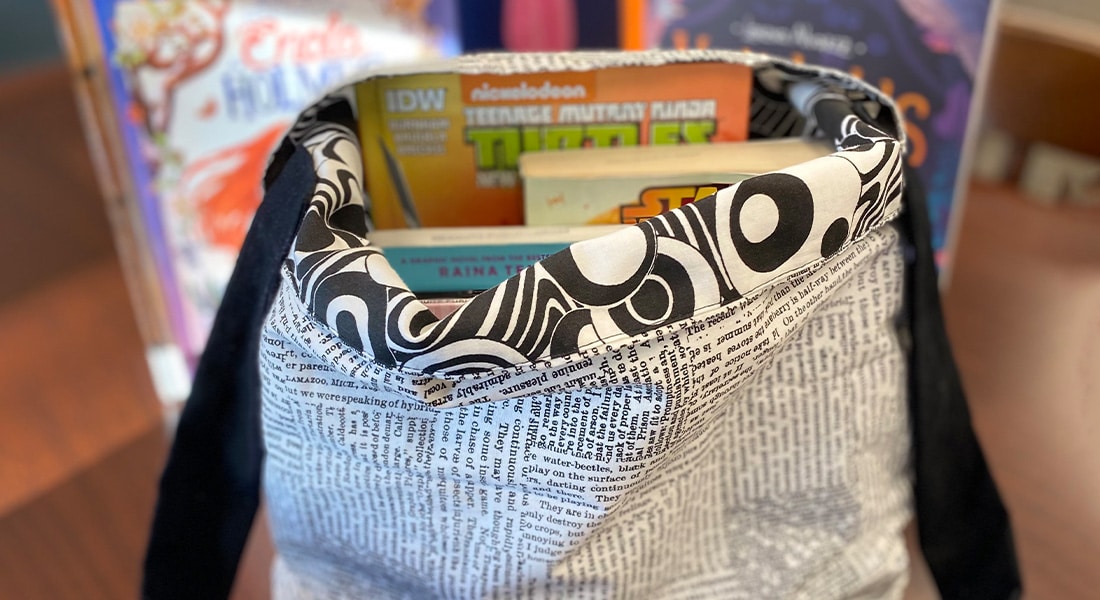
Now you have yourself a beautiful autumn flannel tote!
Used Products

What you might also like


303 comments on “How to Sew an Autumn Flannel Tote Bag”
-
I am working on a laptop sleeve for my son’s computer; and hand puppets for my grandsons.
-
This is a darling project!!! I can see a use of scraps, machine quilting, and embroidered areas!! Will make a wonderful Christmas gift(s)!!! Thanks!
-
uh oh, forgot to say what I was working on…..quilts, an American Girl dollhouse with custom furniture, quilts, cushions, Christmas table runners and now I will add this sweet bag to my list!!!
-
Working on a baby quilt.
-
I’m sewing Christmas gifts – and gift tags!
I love my Bernina’s. Thank you for this tote tutorial! It will be a perfect gift ?. -
I’m working on a quilt that I will use my Q16 to quilt with the use of rulers
-
This is simple and adorable. I need to make a tote for a friend returning to work and this will be perfect.
-
I’m working on a baby quilt.
-
Greetings! I love this quilted bag pattern! I am making a miniature quilt that features a dresden plate pattern!
-
I am working on making Christmas gifts.
-
This is a gorgeous bag!! I am currently working on a “giving thanks” quilt in fall colors.
-
Great idea for my scrap pieces of flannel. Great idea for Christmas.
-
Working on Christmas stockings and pillow shams.
-
-
I love this tote! Currently I am working on a costume for my granddaughter with an embroidery on the front that I have used my Artista 730 to create. I am also working on a tote bag and pencil cases for my grandchildren and daughter for Christmas. I am making them from pieces of my Dad’s old silk ties. Next I will make golf club covers for my brother and his wife.
-
I’m working on quilts for my daughters for Christmas.
-
I am starting work on Christmas cards using fabric.
-
I am working on several projects; first a UFO to give as a Christmas present, it’s a Queen sized quilt.
Next a couple of garments.
And I have items to embroider for Christmas gifts too.
Whatever I can get done.
Thanks,
Rae -
I am looking for ways to incorporate flannel into my quilting. Would like to try by making a flannel bas. I also do Kimber Bear.
-
My projects for the winter are: (1) a bucket bag; (2) the wristlets for Christmas presents; and (3) mastering the BSR! Thank you for all of the inspiring notes in the newsletters!
-
I am working on some charity quilts and hope to get some off soon.
-
I’m working on finishing a quilted collage wall hanging and then have Christmas gifts in the planning stage – need a new table topper, too, in a Christmas theme. Love this bag – Have been looking for a pattern like this (for myself 😉 !
-
I am working on a Stitching Cosmos quilt and planning a tote bag using “crumbs”. So many ideas. So little time.
Thanks for another good idea. -
I am currently working on a foundation paper piecing Star block that I want to use as a pillow project. I hope to donate it to our Symphony Christmas Auction in December. This bag would also make a nice auction item.
-
Love this bag. Currently I am working on quilting two autumn wall hangings.
-
-
I’m working on a throw for my daughter.
-
I am working on soup cozies
-
Where did you find your pattern for the soup cozies? I love those and would like to make some for Christmas gifts.
-
-
-
Beautiful. Can’t wait to make one.
-
This bag is beautiful! Thank you so much for the instructions.
I’m working on a snowman table topper, a sweet little doll and some cute little wallets.
-
-
Love, Love bags. I am working on several projects but I know I’ll finish the bag first.
-
Nice project! Thanks for all the lovely details with the tutorial. Much appreciated. I am working on several UFO’s this fall…always my goal at the first of the year is not to start anything new…then something comes along and bingo…more UFO’s!
-
This is really beautiful. I will keep it for my next project. Hopefully I can find the fabric.
I am working on a Christmas wall hanging called Santa Clause Land plus I just finished
2-Reading Pillows for our grand-daughters. -
Currently working on some cool weather clothing for the grand littles for Christmas, a fall table runner with napkins and placemats, and some embroidered dish towels. There’s more but that’s what I work on daily u til one is finished and then I add more.
-
I’m back working on my first quilt which I never finished. I moved on to other projects before I finished it. All I need to do is add the binding and it’s done – a high school graduation gift for my daughter who just turned 50! Sometimes life gets in the way of UFO’s. The upside is that it is quilted in a current pattern that would not have been available at the time. A blend of old and new for her.
-
I’m working on an art tote for my granddaughter and a tote bag for me. 🙂
-
Love this! Hope to have time to sew again soon, (after the garden produce is finished)!
-
I’m working on clearing out my UFO list and hopefully a flannel quilt for my wife.
-
I am working on table runners for Thanksgiving.
-
I’m working on a t-shirt quilt for my daughter’s friend. I would love to make this tote and the fabrics are beautiful.
-
I am working Holiday table runners and potholders for family. I also am trying to make some quilts for family members. I would love to create this tote. It is a perfect size to take things to the pool.
-
I’m working on a quilt for a neighbor.
-
Working on a long wrap coat
-
Lots of Christmas presents — never too early to start!
-
Working on pillow covers for fall.
-
I’m working on a patchwork baby quilt.
-
Beautiful fabrics and they are showcased well on the bag! I am working on trapunto squares for Christmas table runner using machine embroidery! Having fun and the 790 is zipping right through these designs.
-
Hi! I am working on pjs and cozy robes when I saw your email and decided to check out what was happening on this site. Lots of stuff. Info about sewing feet and that free project and this one. well, read all that I had time for today. Have to go back to working on a robe for my hubby. Thanks for the information about how to make this tote. That will be a future project for me after all the pjs are done. Love thIs site. Thanks and Bye
-
I currently have several quilts going, different bags for Christmas gifts, and a unique hanging towel pattern I found on a Facebook group. Never enough hours in the day!
-
This fall, I am working on several items: catching up on two BOMs, embroidering Christmas ornaments and decorations, making advent calendar wall hangings, and making some holiday table runners with matching placemats.
-
Finishing my Kaffe quilt Gather No Moss & working on Christmas place mats using my 570QE
-
Beautiful Fabric! I am working on a quilt and a few travel bags this Fall Season. Looking ahead for Christmas gift giving.
-
Working on the Fresh Blooms embroidery quilt!
-
I’m working on a quilted pillow with pieced apples on it.
-
Currently working on some Fall table runners for our family gathering.
-
Due to surgery I’m not able to work on anything right now. Hope to start Christmas next month.
-
this is my next project.thank you for sharing
-
Finishing our Widding quilt.
-
This fall I am making a cute Halloween quilt with lots of flying geese! Love these beautiful fabrics. Thanks for sharing the cute tote! Fun project!
-
As soon as we are settled in our new home I will be finishing up a lap quilt for winter use.
-
I’m finishing up a couple WIP’s, a puff ombre quilt, using of course AGF’s, and a queen size Homecoming quilt by @loandbeholdstitchery, oh and finishing up my Nebula quilt by @jaybird.. and I have 2 yards of 4 layer double gauze that I’m backing with @sharonhollands flannel and handstitching it.. busy.. busy.. not to mention some Christmas gifts
-
Holiday table runners.
-
I am working on the Grainline studio Tamarack Jacket. Using flannel for the lining. So cozy!
-
I am working on a quilt top for a friend and I am quilting a Christmas tablecloth.
-
I am going to try making a quilt and i am new to sewing.
-
I would love to receive the bundle to make this bag for my mom’s wheelchair.
-
I am making a Sunflower Sue baby quilt, some totes and zippered pouches.
-
I love this bag.
-
I’m working on a costume for my daughter!
-
I am working on fall place-mats and possibly a cover for my water holder.
-
I am still working on Halloween. There are some neat new Gnome things to embroidery and turn into totes and table runners. I have a 770QE that I use for embroidery while I sew on my 880. I am a happy Quilter.
-
Lovely bag and I especially like the diamond quilting. I am working on a quilt for my nephews wedding. Will try this for a couple of Christmas beach bags. So cute with some beach themes.
-
Currently working on a quilted wall hanging
-
Once the yard and garden are ready for winter I have a few quilt tops to finish on my longarm.
-
I am working on a quilt top for Lutheran World Relief
-
Just today I was asked to make 3 memory pillows from a friend’s father who passed away. I am always honored to make these since they are so sentimental. I use the sleeves to make heart-shaped stuffed ornaments to hang on their trees. I’ll probably make a few table runners to give as gifts too.
-
I really LOVE that bag…add one more thing to my list of wanna do projects. Right now I’m working on learning the ins and outs of my B790+ and trying to become comfortable with some embroidery…but my quilting project wanna dos are taking over my sewing room!
Thanks for the tutorial
-
My latest project is building row blocks for a sister exchange quilt.
-
I am working on a Kimberbell halloween bench pillow.
-
Really like the fabrics you used.
-
I’m working on a Thanksgiving table runner.
-
Trying my hand at rope coasters and recycling vintage curtains to bed caddies.
-
I’m making a fall table runner, a Christmas wreath wall hanging, and a nice piece of thermal knit to make a Henley shirt.
-
I should be making Christmas ornaments but I am finishing charity quilts.
-
embroidering shirts then converting them into dresses for my 6 yr old daughter and embroidering on towels
-
At present I am working on totes for my daughter, daughter-in-law, and granddaughter for Christmas, using Linda Lee’s patterns. This pattern (autumn-flannel-tote-bag) I will use to make myself a tote using my L890 and ideas I just learned from Shelly at a class for my machine.
-
Working on PJs. Flannel for the winter!
-
Making a zip up vest out of a soft quilted knit in black and white plaid. Today I need to cut bias binding and tissue fit.
-
Love flannel! Have to finish a good cleanse and clean of the sewing space. Then I have to finish the quilt for my great granddaughter. So much to do, so little time.
-
Cuddle blankets for the cooler months ahead
-
I’m working on a Halloween ? themed pajama nitie top plus some flannel pj’s. Preparing for the cooler weather of fall.
-
I’m finishing up 2 queen-size quilts for Xmas gifts and thanksgiving wall hanging. Love the bag and a great idea to use up my flannel scraps.
-
I’m working on finishing a king size for my daughter and her husband. Also planning to monogram towels and make soup cozies for Christmas gifts.
-
I am currently working on embroidered pillowcases for our granddaughters 4th birthday.
-
Just finished a sports themed quilt for my niece. It is at the long armers now. Working on a Quilt of Valor next
-
I’m working on placemats for Thanksgiving and a Christmasy wall hanging.
-
This looks like an easy project. A great gift idea! Directions were very clear! Thanks!
-
Finishing up a graduation quilt for my granddaughter, a bit behind due to brain surgery interrupted it’s completion.
-
I’m working on a table runner for Christmas.
-
Working on quilts for Christmas gifts.
-
I am working on Christmas gifts for friends. A teapot quilt, Dresden quilt, and a secret gift for a couple friends that may read this post! I am also working on mask ornaments with an added vaccination charm.
-
I have many projects for the fall. I am finishing up Acorn Woods now and then will start on a fall table topper.
-
I’m working on some wool applique projects for holiday gifts.
-
I always cut 1 1/2” squares from my scraps and keep them for that “future” project. My daughter has met a wonderful man and his parents have a sweet Boston terrier. I’m going to make a Boston Terrier quilt using those 1 1/2” squares. Lap size- so I expect it to take around 4 months to design and sew. Very excited!
-
I have been working on a fall table runner for myself and my friend, a Christmas quilt, and a fun wall hang for my sewing room! ??
-
What a cute bag…and a great opportunity to practice straight line quilting. I really need to try a bag in flannel…I’ve made lots of bag but never one with flannel!
-
I’m making house blocks for a charity raffle quilt using Carrie Nelson’s Village pattern from Moda.
-
Working on Christmas presents!!!
-
I’m making potholders and smaller projects: table toppers, napkins. I will make some folded fabric Christmas ornaments.
-
I am working on. Baby quilt and a crumb border for another quilt. I hope to start some fall table runners or placemats.
-
Awesome tutorial and a nice giveaway, thank you!
I am working on a couple baby quilts, placemats and table runner. -
I am working on a quilt, a table runner and some zipper pouches for gifts. This is a great pattern for gifts too. ????
-
I just purchased some of this AGF flannel to make a fall shirt. Also have a quilt and some Halloween placemats going.
-
❤️ this project!
-
Currently working on a fall colors king size quilt
-
would love to see
-
-
I’ve been doing postcard swaps for “Tulaween” (Tula pink fabric for Halloween) and next thanksgiving. Also planning to finish the first quilt ive ever made for myself. Wish I could just hire a maid, quit my job and see forever!
-
I’m working on an English paper piecing hexagon quilt project.
-
Working on Christmas gifts and quilts!
-
This Fall I am sewing quilts to give to my grown children for Christmas. I am also making table runners for gifts. And I think I will be making some of these totes for friends too! ❤️?
-
I am working on a block for the Social Justice Sewing Academy and a commissioned quilt for my friends birthday.
-
Baby quilts for the holidays
-
Working on two Halloween costumes, a Halloween themed wall hanging, and performance leotards in preparation for the gymnastics competitive season! Yikes!!
-
A first time jacket make for me, and one to give to my mom. Hoping all goes well!!
-
Fun bag! Currently working on various quilted christmas gifts!
-
Cute tote. I have lots of flannel scraps that would be perfect for the project.
-
What a great project. I am making tote bags and towel toppers for Christmas gifts.
-
I’m working on a postage stamp quilt.
-
Making a Tula Pink Holiday Homies flannel rag quilt for my nephew. Will use the leftovers for this cute bag!
-
Working on a T-shirt quilt for a Christmas gift.
-
I am making towel holders and potholders for gifts.
-
I am sewing a One Block Wonder – it’s a challenge with all the set in seams!
-
Currently working on a pumpkin quilt, and a Christmas village quilt and also making pillowcases for each of the grandkids to use instead of wrapping paper for their Christmas presents. Just finished a customer’s queen size t-shirt quilt with Minky borders, backing and binding.
-
I’m working on cleaning my sewing room – how unmotivating! I plan on doing a sew along on Nov 6 with flannel fabric. Maybe I’ll discover which flannel to use while cleaning my sewing room!
-
I’m making flannel quilts for everyone in the family including grand baby on the way
-
I am finishing a baby quilt from charm squares. Hope to finish it this week,. Would love to make a tote bag.
-
I’m sewing leftover scraps into potholders and mug rugs for hostess gifts!
-
I am working on Christmas cards and a Christmas tiling scene.
-
Working on the beautiful Quitmania Mystery Quilt.
-
I’m working on sewing dresses for my granddaughters. However, I might just work in some time to make this beautiful flannel bag for myself!!!
-
I am working on cassarole carriers .
-
Flannel tote bags in various sizes for holiday gift-giving instead of wrapping paper!
-
I’m sewing some warm long sleeve t-shirts and a jacket.
-
I am doing charity lap quilts for the VA hospital, bibs and burp clothes for the pregnancy crisis center
-
What perfect timing! I am working on three flannel quilts for homeless school children right now. A flannel tote will be the perfect way to gift them!
-
Would not of though about flannel for a totebag..but what fun and super durable.
Will need to make up some with patchwork block for holiday presents…sew THANKS Bernina for inspirations and positive vibes! -
I’m working on a couple of merino wool turtlenecks, and planning my next lap quilt.
-
I am working on Christmas gifts
-
Working on 2 quilts for my twin great nephews
-
Working on a quilt to help a family hit hard by EF2 Tornado, now live in a city of blue tarps and still major clean-ups going on.
-
I am working on Christmas Quilts on my Q20
-
So many projects! I’m making a wall hanging for Halloween, man’s shirt, stretch denim jeans and Christmas ornaments to sell for the benefit of a non profit group. The flannel tote bag might make a great addition to the list.
-
I’ll be working on an Autumn patchwork quilt for my cousin and her husband.
-
I’m working on various gifts for family and friends to give this Christmas.
-
I am sewing seats for custom built folding chairs. Also sewing throws, stockings, and other gifts.
-
Would love to win these fabrics, I have a wonderful daughter in law that loves bags, this would make a nice gift. I am working on two Christmas Dresses for two of my great grand daughters.
-
I’m finishing up a T-Shirt quilt for my granddaughter. Next project is starting on Christmas gifts for family members.
-
This is my 4th BERNINA and I love it. I’m making a quilt for my grandaughter.
-
Making a queen size quilt for the RV, chevron pattern. Challenge is the curved binding.
-
I haven’t done much with flannel – this big looks like a great way to start.
-
Working on flannel rag lap quilt for watching tv. Great heather toned quirky monkey print here and there. Starting on FSL christmas ornaments. Some coY flannel loungenpants for the family for the holidys
-
I am working on fall table runners, a few little Christmas gifts, and wedding accessories for my granddaughter made from my wedding gown.
-
Wow I would love to get my hands on this wonderful flannel thanks for the chance, I am currently working on a machine embroidery quilt for Halloween, along with trick or treat bags.
-
I am working on the Harvest Quilt as a 48 1/2 X 48 1/2 as a Table Topper by Kim Schaefer (Festive Fall Quilts)
almost done. Now I get to play with my BSR (love this foot). Also working on Pumpkin placemats
Now I will start making the Autumn Tote. Thank You for the tutorial it is going to be fun and great for presents. -
What a fantastic opportunity to see/touch and create with these lovely fabrics!!! I took an amazing lecture class through Quiltfolk, called “The Bronte Sisters’ quilt” and so that is what I’m going to begin today. I’ve never made anything like this, so it will be challenging and rewarding!
-
Playing with Xmas fabrics to make a wall hanging at present.
-
I am working on making Doll Clothes for my Grand Daughters and Nieces for Christmas.
-
Almost forgot to say the Fabric you used for the tote is beautiful and festive
-
I am putting the binding on several quilts and a border on another quilt. It will be nice to get these projects finished.
-
2 Memory Quilts for a friend whose husband of 35 years passed.
-
I have 2 quilts, a set of placemats and a wall hanging to work on this fall. I’m also working on some in the hoop embroidery projects as well.
-
I am working like crazy trying to finish up Rob Arpel’s guitars. I was not pleased with the fusing alone so have been sewing on all the applique pieces. Want to complete it so I can finish up a Christmas present quilt for his son. Hope to send both with my brother-in-law and avoid the skyrocketing postage costs.
-
I absolutely love flannel! This fall, I’m making flannel pillow cases for my grandchildren.
-
I just finished the quilting on a flannel throw for our sofa – hand sewing the binding on now. I used some quilt shop quality flannels for top & back and I love the softness of flannel.
Would love to win the gift flannels & make that tote!
-
I’m working on a quilt, bra and knitting my first sweater.
-
I will be concentrating on small projects. This tote bag is a perfect one to use! I will also be making lap quilts I hope!!
-
I am working on sewing little girl things. I am so excited to be a grandma, again, and this time a little girl. I have 3 grandsons so this is exciting to use girlie colors. The nursery is in purples, Grey’s and browns. I will have to sew this autumn bag, or three, to put all the stuff in when I get them sewn.???
-
I have so many ideas of what I can make for gifts this year. I think flannel handwarmers are in the mix!
-
I LOVE making bags and this is sew cute!! I am working on a couple of ByAnnie bags, quilts for my daughters, an English Paper Piecing BOM and trying to clean out my stash a bit!!! Ugh!!
-
I just finished two Christmas tiling scenes, so now I’m getting ready to make all 15 grandkids some fleece hats for Christmas.
-
Working on a quilt for my grand-daughter. Should finish this week. Then will make a quilt for my grand-son. After that making Christmas quilts…….so many patterns and not enough time.
-
Making Quilts. I have no plans for them. It is simply an addiction.
-
Making a jelly roll lap quilt for Halloween ? ??
-
I am working on a ByAnnie Place for Everything bag to store my knitting needles and gadgets
-
Projects I am working on this Fall… gifts galore for Christmas this year. Everything you post winds up made and wrapped for a gift as soon as it is done. This is one Christmas that I will be ready for even with the shortage of goods sitting off the coast of CA.
-
Getting ready to participate in a sew along for a flannel quilt. Trying to finiah current quilt project so I’ll be ready in November.
-
I am working on 3 quilts for my 3 daughters to give them for Christmas.
-
I am working on christmas quilts.
-
I’m working on Christmas decorations to give to friends and family. Mostly small wall quilts and a few tree ornaments.
Judy Schwarzmann -
Several quilts to finish. Binding to sew on two and finishing up free motion quilting on another. Love to make tote bags.
-
Working on a growth chart for my grandsons!
-
I’m working on Halloween projects and prayer blankets
-
I’m currently working on a BOM and tote bags
-
I’m making little zippered pyramid bags with chanukah fabric for chanukah gelt.
-
I’m working on the Enchanted Santa tile scene with the Happy Snowman tile scene next on deck. I need to squeeze in the winter mug rugs and a quilt for my grandson.
-
Fall is clean up month, getting ready for the holidays to come. Time to clean up the sewing room, re-organize and re-think prior impulse purchases. There’s a box of material set aside for a paper piecing project (learning a new skill) and 3 yds of fleece (future jacket) waiting for me.
-
Working on doll clothes for my granddaughter and pet beds for local cat rescue and a national rescue group.
-
I’m making a quilt “christmas tree’ that my disabled brother can decorate with velcro-ed flat felt ornaments. He loves Christmas Trees!
-
I am finishing up a baby quilt of butterflies.
-
I’m working on pumpkins and Christmas Table Runners!
-
I am currently working on embroidering towels for my friends new home. Then it will be time to start on Christmas gifts.
-
I am making flannel pajamas!
-
I am working on tote bags for Christmas. This tote looks easy to make.
-
I am working on a patchwork pet embroidery for my Granddaughter. Her pet is a blonde grayhound dog.
-
Senior Dining Bibs for our family and others at a long term care facility in the area! Hope they enjoy the holiday theme fabric!!
-
Making lots of Christmas presents.
-
I’m working on some table runners for Christmas gifts
-
I’m working on small Fall and Christmas quilt projects for wall in entry hall into our home.
-
I’m working on quilting a lap quilt and a couple of small Halloween projects. Tote is really cute!
-
This looks like a super fun tote! Perfect for a fun fall gift! Or a great project to do with our grandchildren when they come to sew. I have two T-shirt quilts to make and a Sunbonnet Sue quilt to piece. The blocks were embroidered by church ladies in the 1940s. They are SO beautifully hand appliquéd.
-
I am working on a t-shirt quilt for my DIL. She saved her middle and high school shirts since mid-1990s.
-
I’m currently finishing up a series of three table runners (one for each of my three sisters). I’m making them reversible with Halloween fabric on one side and Christmas fabric on the other. I skipped right over Thanksgiving because I had no Turkey fabric!
-
I am working on last years unfinished projects ?With new ideas and new energy! Thanks for the inspiration!
-
Our neighborhood group is currently making a tote bag, but I’d still like to make this one
-
I’m working on the border of a Jinny Beyer quilt I started several years ago, Shenandoah Baskets. It was a free Craftsy.com 2015 Block of the Month class. Hmm, 6 years but I’m also starting a Puff baby quilt I need done for a baby shower in November. I like the Puff Quilt youtube.com tutorial from Missouri Star Quilts. The fabric in this giveaway is so pretty; I would enjoy working with it. Thank you.
-
This fall I am working on camo curtains for my husband’s garage. And when I get that done I have about 39 other projects planned…hoping I can get through some of them before the end of the year!
-
I love the bag, it would be great to go shopping with.
-
I’m working on rope bowls, fabric pumpkins and small quilts ?
-
I’m making a quilt and nursery items for my first grandchild who is due on January.
-
I’m making men’s flannel PJs and there is always a quilt in the works at my house! ?
-
With my 770 embroidery module I am creating quilt tops with embroidered squares and quilting in the hoop. Love, love, love what Bernina’s embroidery module enables me to do!
-
I’m working on porch pillows and a fall flag this season.
-
Halloween candy holders come first. Then on to the 3D pumpkins. After that I’m hoping to complete my 3D train from OESD. The OESD 3D pumpkins are such a great gift! Everybody loves them and I love making them.
-
I’m working on a “throw” to keep me and my hubby warm as we sit on the bleachers for our grandchildren’s sporting events. I love the flannel tote. Great idea and love how easy this one looks to make. Gotta make one!
-
I’m working on my first quilt .. the one hour serger quilt, but I think I’ll need to try this one too! thanks for post.
-
Those flannel fabrics beautiful! I really like the tote design in those fabrics. I just finished a small oval table topper in Halloween fabrics for the Featherweight table that my husband built me. Now I am working on a dining table runner in the same fabrics.
-
I’m making sleeves for my extension pieces for my dining room suite. And, taking sewing classes.
-
I am working on a tree skirt for one of my daughters-in-law. It was an unfinished project that I hope to complete this year.
-
Just finished a fleece jacket. Now working on a fleece coat, pair of cute pants and a top. Plans for several flannel jackets soon.
-
I am making various embroidered motifs of different sizes with my 770QE. I am putting these in bamboo embroidery hoops, embellishing the outer hoop. They can be hung or displayed on an easel. My favorite is a Sulky cross stitch coffee cup. A nice quick diversion!
-
I am trying to finish off some table runners. With these table runners, I want to learn free- motion quilting and ruler work to quilt these table runners.
-
Trying to use up some scraps! This bag will be perfect for that!
-
I am working on table runners as gifts. I like to use 2 different holiday fabrics – one as the top and the other as the backing. So when Christmas is over, just flip the runner over and you’re all set for the next holiday… say Valentine’s Day. St. Patrick’s day can be paired with Easter.
-
I love that idea !
-
-
I am currently working on receiving blankets and burp cloths for two nieces, one due in November and the other due in December. Am now thinking would be cute to package them in a tote bag. Thanks for the pattern.
-
I am currently working on several community service quilts for my quilt guild and getting the binding on one to donate for a fire victim,
-
Christmas gifts: Wall hangings for each season using my embroidery module. Also, a tote bag using my new L890. Practicing the stitches 🙂
-
I’m working on make-up bags for gifts.
-
I am trying to finish a lap size Halloween quilt before Halloween. The top is done so I am half way there.
-
I am working on denim quilts and baby girl quilts! All are gifts for friends. Bags are on of my weaknesses. Especially if I get to make one! My kids call me the bag lady?. And yours is gorgeous!
-
I love that tote! I make lots of bags, some for raffle donations. I’m working on a couple of quilts and small holiday projects.
-
I am currently working on a Christmas wall hanging with matching table runner. Love the flannel tote bag!
-
I’m making table runners and wall hangings using the Patchabilities patterns for gifts for Christmas. I just got a new 570 Bernina. My third Bernini in 50 years.. Just hope I’m up to all the new techie .
-
This fall my “Sassy Stitchers” sewing group in our community and I are making bags for the cancer center and filling them with entertaining and helpful things for the patients going through treatment. These flannel winnings would be great for us! Hope I win!
-
I am making a quilt for a December birthday and finishing up a Dream panel on the Q20, only 12 more petals to quilt.
-
Currently working on a flannel “plague doctor’s” robe for granddaughter for Halloween.
-
I am working on Alex Anderson’s “Spinning Spools” quilt, “Color My World” quilt, and several leather bags. I hope to finish most by Christmas!! I really like the tote bag above. Will definitely add this to my list.
-
I’m working on making Holiday gifts.
-
I am working on napkins for Halloween.
-
Working on Christmas presents–lots of gnomes and flannel.
-
Working on a heart quilt for my daughter for Christmas
-
I’m working on a child’s dinosaur quilt using a design by my 8 year old nephew. Also, a wall quilt featuring a traditional maple leaf block and unique sashing.
-
I am currently working a quilt, finishing up with some free motion. Love the tote bag and will try to put one together for a Christmas Gift, thank you for sharing the pattern.
-
I am working on table runners for gifts.
-
What a cute bag to make. I’m sewing for Christmas gift giving items. I’m now adding the key fobs to my Christmas list since viewing the tutorial included in this email. Have a baby quilt planned and this flannel fabric would be a great helper to my sewing budget. Thanks for the give away offer.
-
I am working on several quilts and reusable lunch bags on my serger.
-
This looks like such a fun project for my small quilt group.
-
This tote bag would be a wonderful gift for a friend of mine. Will add it to my project list.
-
Working on a few small presents and some home decorating items for the upcoming holidays. And maybe a new tote bag for me!!!
-
Currently, I’m finishing up a pair of knit pants (trying out a new pattern)…. then I’m going to start work on the Circle Tree Quilt (on this blog) and look forward to using my newest foot purchase: the #83 circular embroidery attachment.
-
Quilts for Christmas!!
-
I am looking forward to getting back into sewing this fall I have been busy with other things, but hope that life slows down so I can get back to creating
-
Getting ideas for Christmas gifts and finishing my Halloween outfits for the Grandkids.
-
I’m finishing up some wool felt Halloween monsters for my grandson.
-
Once I finish making flash diffusers for my son-in-law (he’s photographer), I have a couple of quilts I would love to complete before the holidays along with mug rugs.
-
I am working on a Lori Holt quilt. Also cutting all my scraps into blocks and strips.
-
Want to get some flannel and make the flannel tote.
-
I am working on Christmas hot pads which I plan to give to neighbors and friends for – you guessed it – Christmas!!!
-
I want to make some totes, quilts and Christmas presents.
-
I have been making three market tote bags. One has embroidered sea creatures and another was made from a panel that my granddaughter found at my guilds quilt show. b
-
Beautiful flannel! I just finished a paper pieced leaf table runner and next will size down a shirt that’s a bit big!
-
After unexpected delays, I am excited to finish a quilt, and making bowl cozies for gifts. then finish some UFO’s. Thanks Bernina !
-
This fall I am finishing “Summer Solstice” and beginning work on “Peripherals” (jelly roll inspired quilt).
-
I am working on quilted throws. IF I can master the quilting on my Bernina. Thanks for all the suggestions and hints you supply regularly on this site.
-
I am gearing up to do my first embroidery wallhanging.
-
I am sewing place mats for fall and a quilt for my son and daughter-in-law.
-
Great bag & instructions! The colors of the flannel are very pretty and look so soft. I usually start using flannel in the fall….it seems to go together.
-
Love the colors of this bag! I’m working on Halloween candy bags for my niece and nephew.
-
I am teaching my 7 year old grandson to sew so we are working on simple projects that he can do. Right now it is little Christmas bags so he can gift them to his cousins.
-
I am making a dinosaur quilt for my grand nephew, a halloween door quilt, and a huge cat pillow.
-
I am finishing my Christmas tree skirt, my first ever quilting project and has been a true labor of love. We Will have a Christmas Tree this year !
I also will be completing a Flannel Nurse theme blanket for my daughter. -
Just finished a bark cloth tote bag with a matching bucket hat!
-
I am working on two projects currently– Christmas tree skirt with beading on it, and a Ten Commandments wall quilt. Just have the actual quilting and finishing left to do on the quilt.
-
I just purchased a Bernina and would like to make this bag to get acquainted with the quilting techniques.
-
A soft doll for my niece! She’s so much fun to sew for 🙂
-
Can I buy flannel fabric for Making Tote
-
Love the tote bag…beautiful! I am working on small fabric boxes in fall and Christmas colors. Sewing up some community projects for our Guild. Sewing on Christmas presents for my family and trying to catch up on the never ending UFO’ls.
-
I have started sewing Christmas gifts for family and friends. My fall projects are just about complete having sewn several table runners/toppers and napkins to go with them. All is left is a little handwork.
-
I’ve been working on a couple of quilts, a sew long that Sharon Holland and Maureen Cracknell did on Instagram, and fiddling with little projects along the way, thinking about Christmas gifts for all. These Art Gallery flannels are beautiful!
-
I am working on a high school graduation quilt for my niece that combines embroidery and quilting. She loves horses.
-
I am working on a Hunter’s Star quilt for myself and a Sunbonnet Sue for my granddaughter’s “big girl bed”.
-
Many quilting projects are my focus this fall. My sister gave me blocks her mom-in-law had cut out. I am also making a “Puzzle Pieces” quilt.
-
My Halloween craft projects are piked higher than my free time! I finished 3 cat Halloween Potholders. Have the AGF Halloween quilt all cut out, and partially sewn together. Six wash clothes are read to be embroidered. Picked out the fabrics for a ghost Halloween table runner, but have not even cut it out yet! Hope to finish all but the table runner for Halloween!
-
I am working on new projects like a tote bag from faux leather as well as wallets, wristlet keychains and other gift items for friends and family. I may attempt some coasters and mug rugs too.
-
I am working on a baby quilt due in Feb 2022!
Also want to start a birthday candle table runner. -
As luck would have it, I plan to work on two flannel quilts.
-
I just got a sparkling new Bernette 77! I am looking forward to finishing the quilt I was making when my super crappy old Project Runway sewing machine broke. 🙂
-
I’m sewing a twin bed quilt for my granddaughter, sewing Christmas gifts, and Sewing car seat covers.
Leave a Reply
You must be logged in to post a comment.

Autumn Tote Fabric Giveaway
This giveaway is now closed. Thank you to all of our WeAllSew fans who entered!
Congratulations to our winner(s):
Keep an eye out for the next WeAllSew giveaway!