Decorative Stitch Tips
Welcome to our 125 years celebration of the BERNINA company! We’re celebrating by bringing you lots of inspiration and focusing on the technique of decorative stitches this month, and giving you the chance to win a fun prize package! Scroll down to the bottom of the post to find the giveaway.
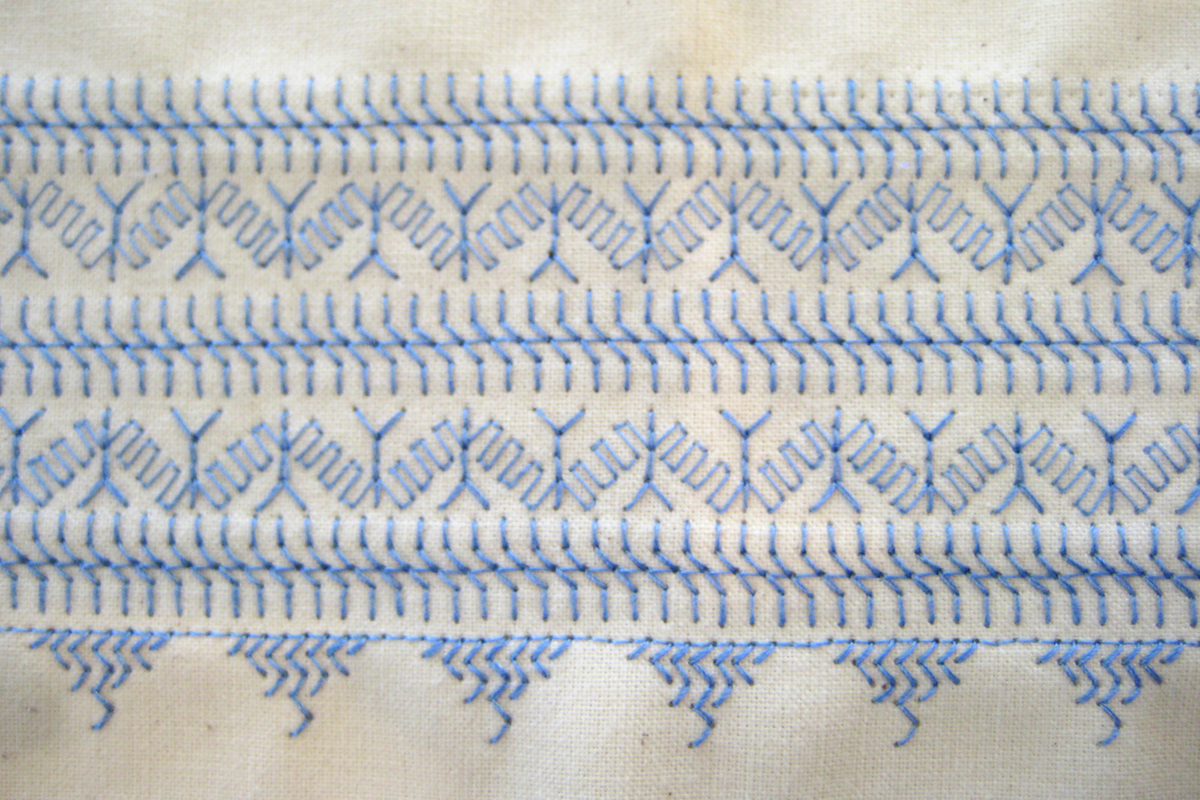
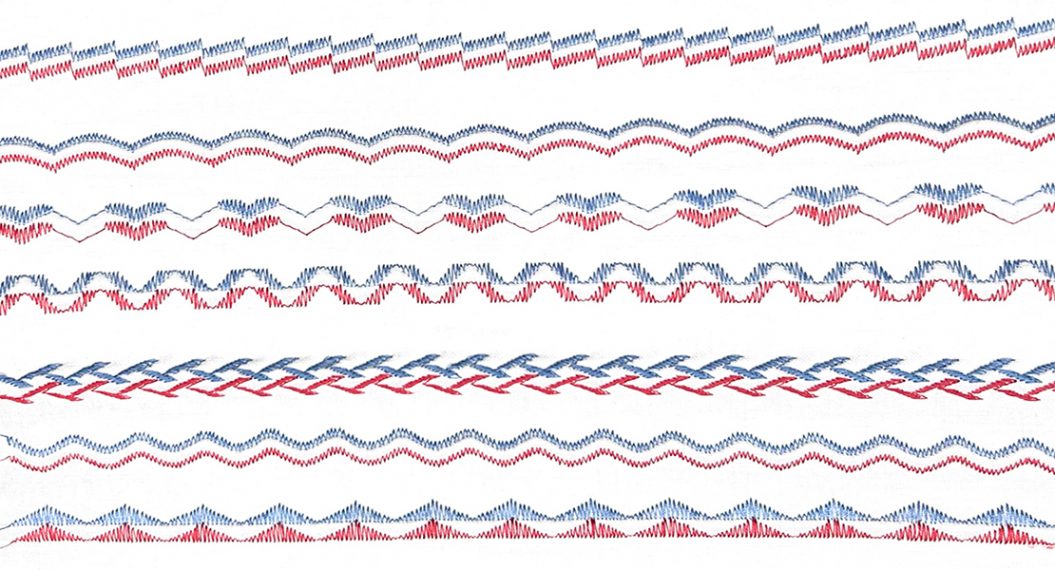
The decorative stitches included in your sewing machine can be grouped into two main categories: open stitches and dense or satin stitches. Both open and dense styles of decorative stitches can add decoration to any project you are stitching, but each type of stitch has different needs to create the perfect looking finished stitch. Follow these tips and tricks to make the most out of your open style and dense style sewing machine decorative stitches.
Open Decorative Stitches
Stitches that are categorized as open are made of single stitches repeating to make a design or letters. Open decorative stitch patterns often work by moving back-and-forth under the needle to create the finished stitch pattern.
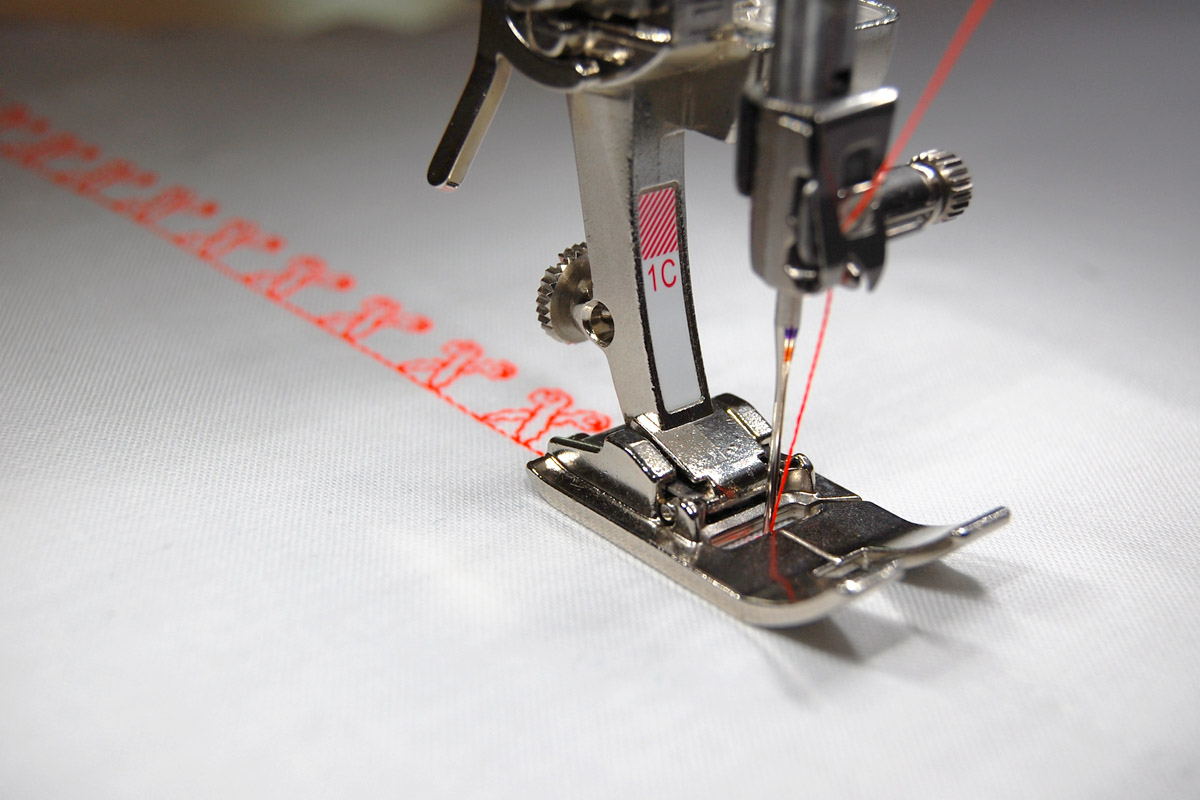
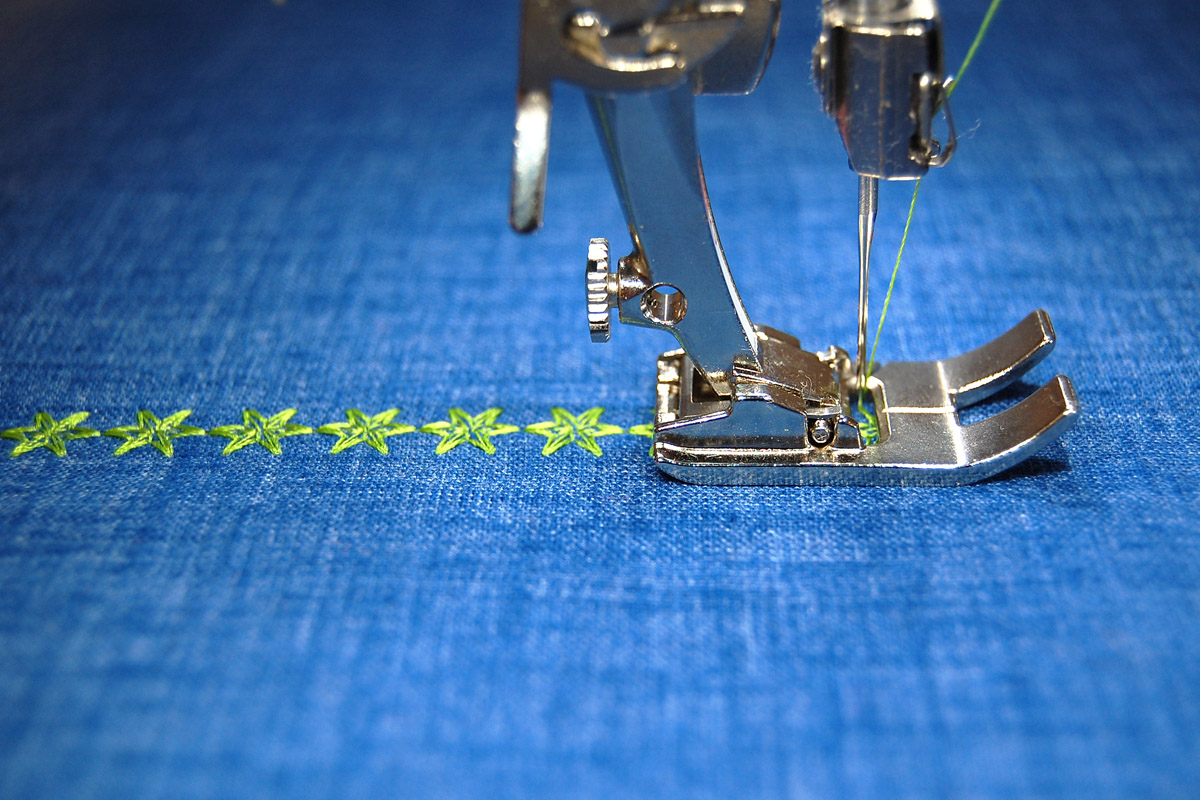
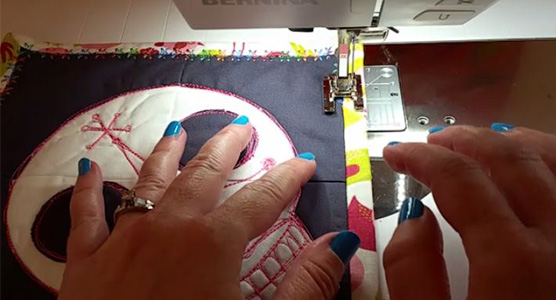
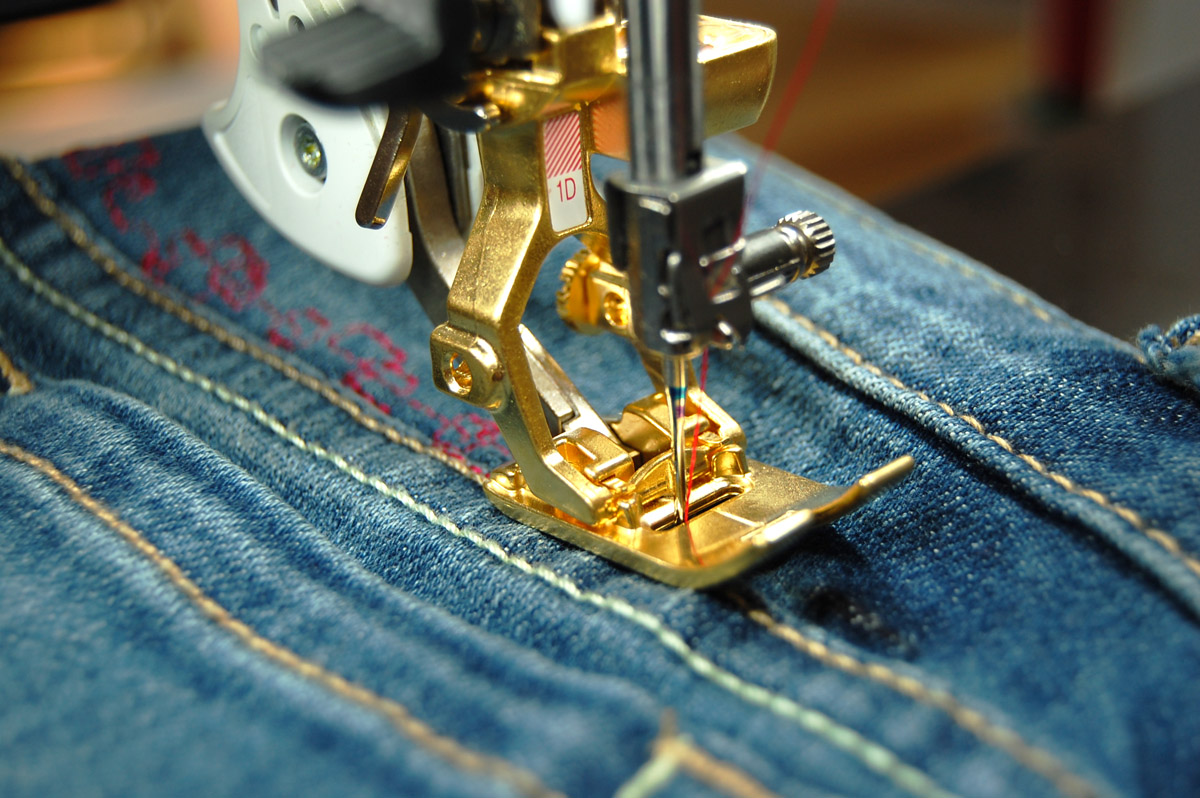
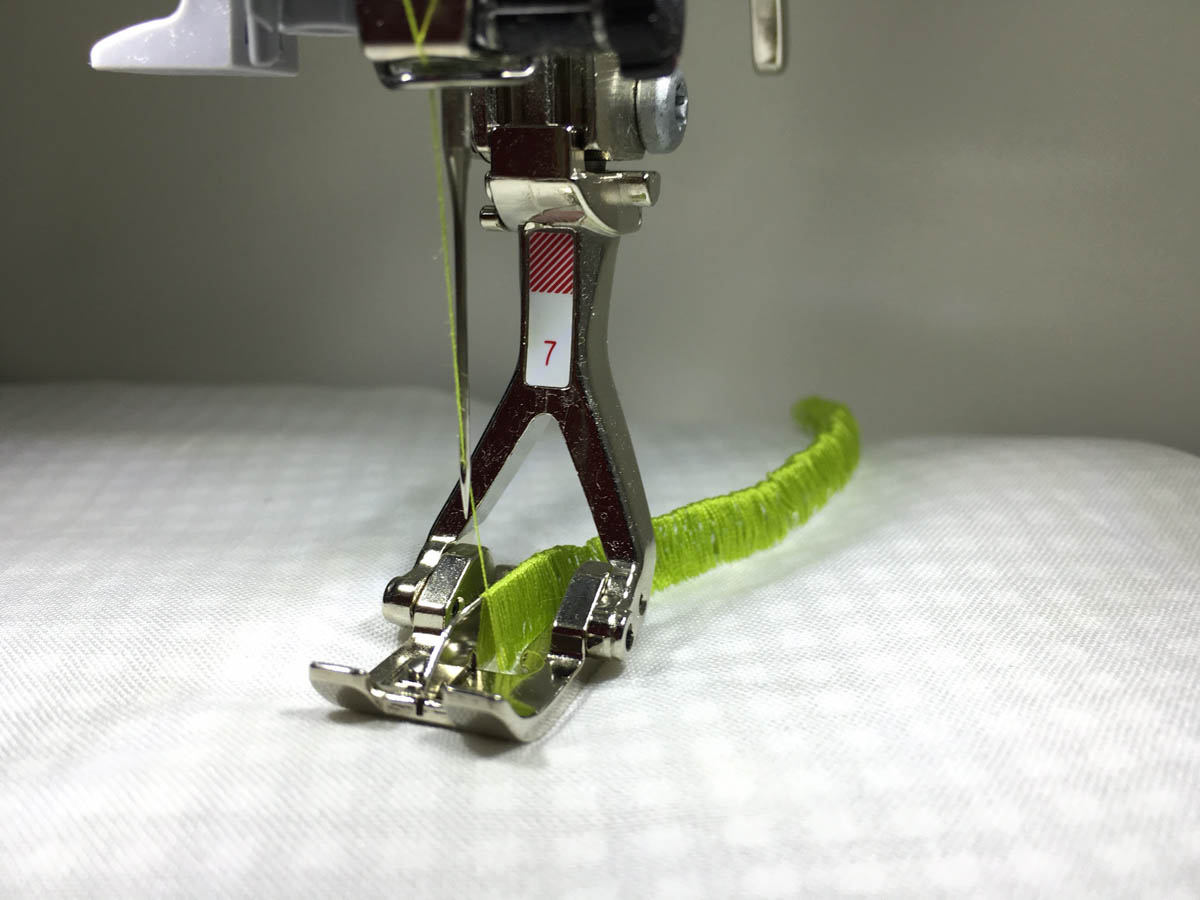
The Reverse pattern foot #1/#1C/#1D is specially designed to help the sewing machine form perfect open stitches. Creating perfectly sewn open decorative stitches is this foot’s special superpower! The Reverse pattern foot is engineered with a special indentation under the foot both in front of and behind the needle, to allow the stitching of thread patterns that move forward and backward. The foot is marked with a clearly indented center line to help you align stitches as you sew. While this is the perfect foot for sewing open decorative stitches, it’s not ideal for the thicker build-up of threads created with dense or satin style decorative stitches.
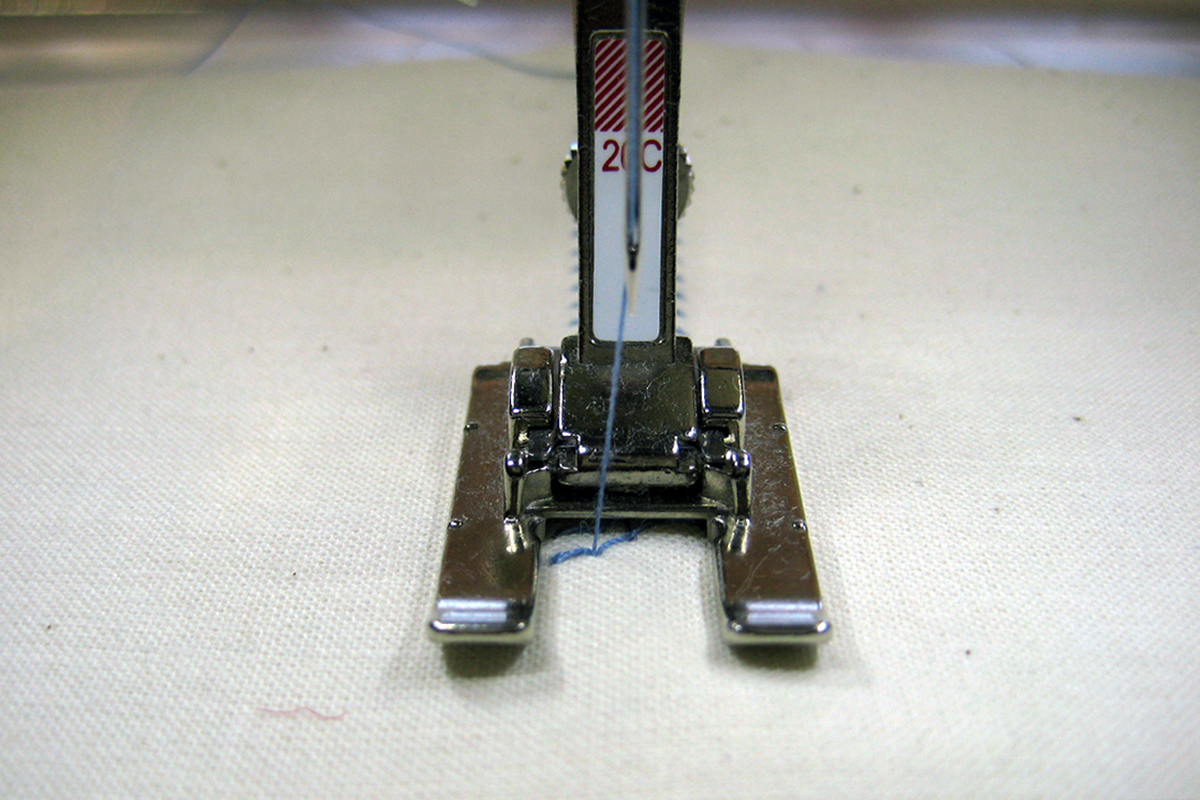
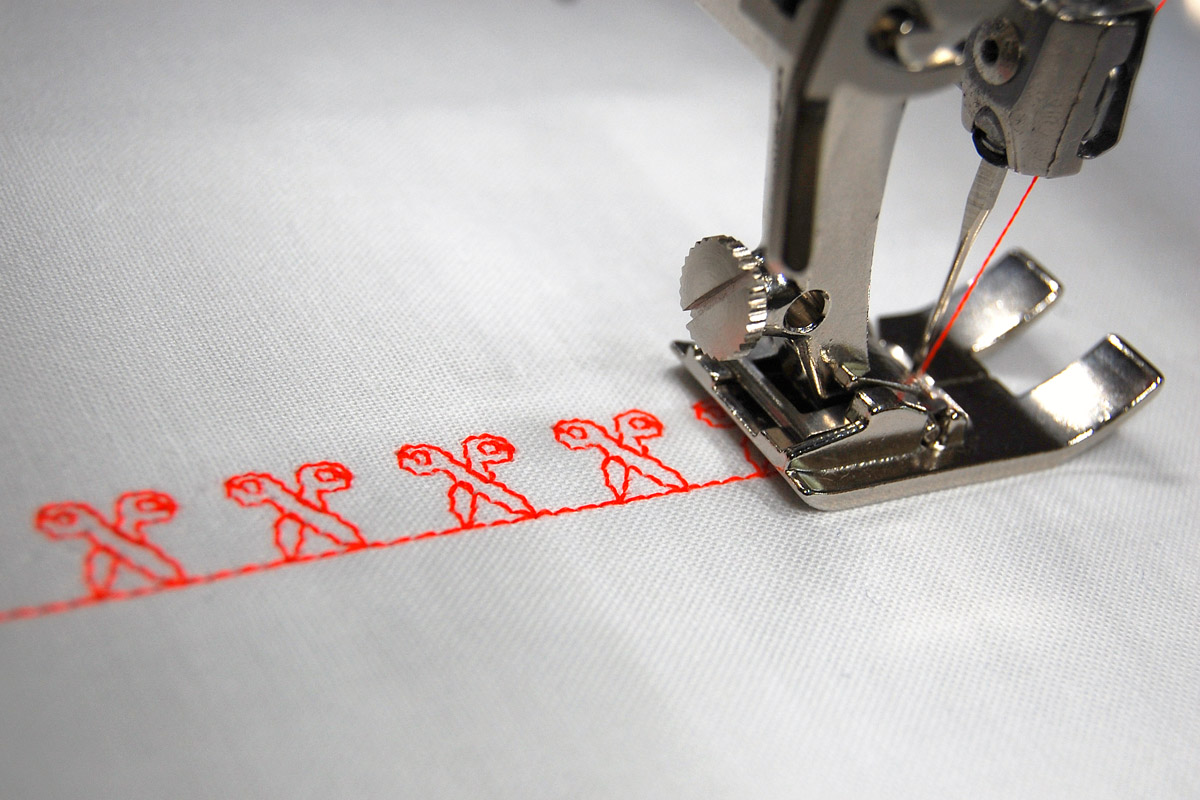
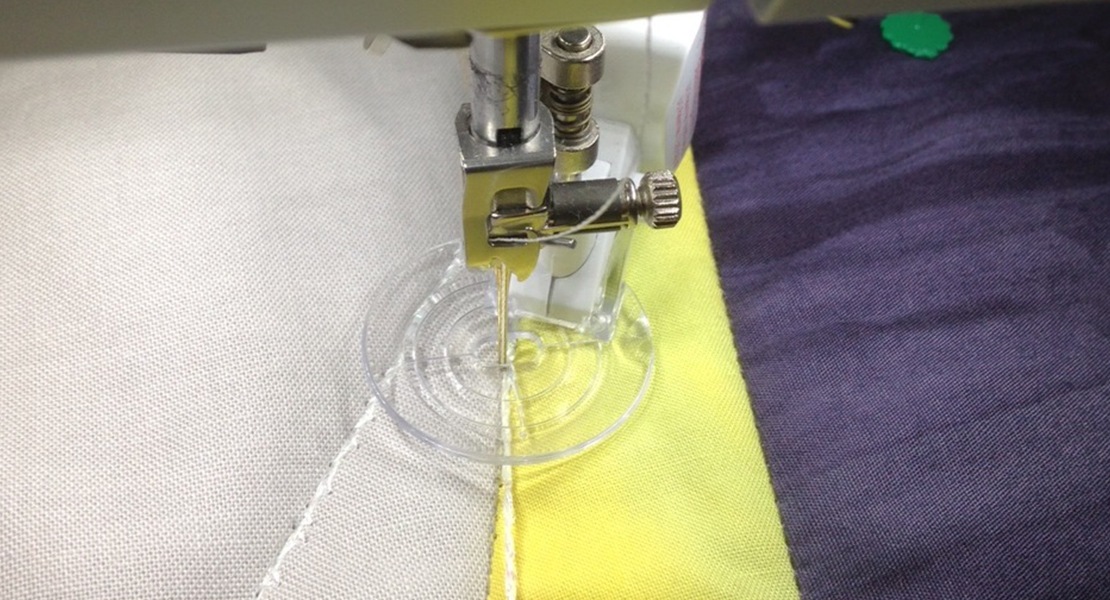
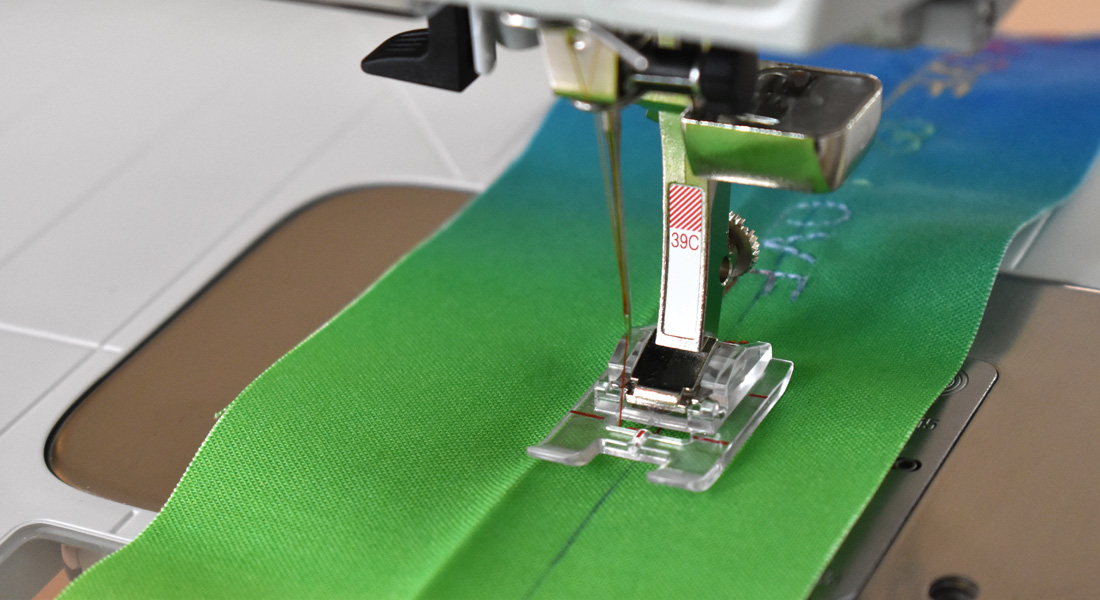
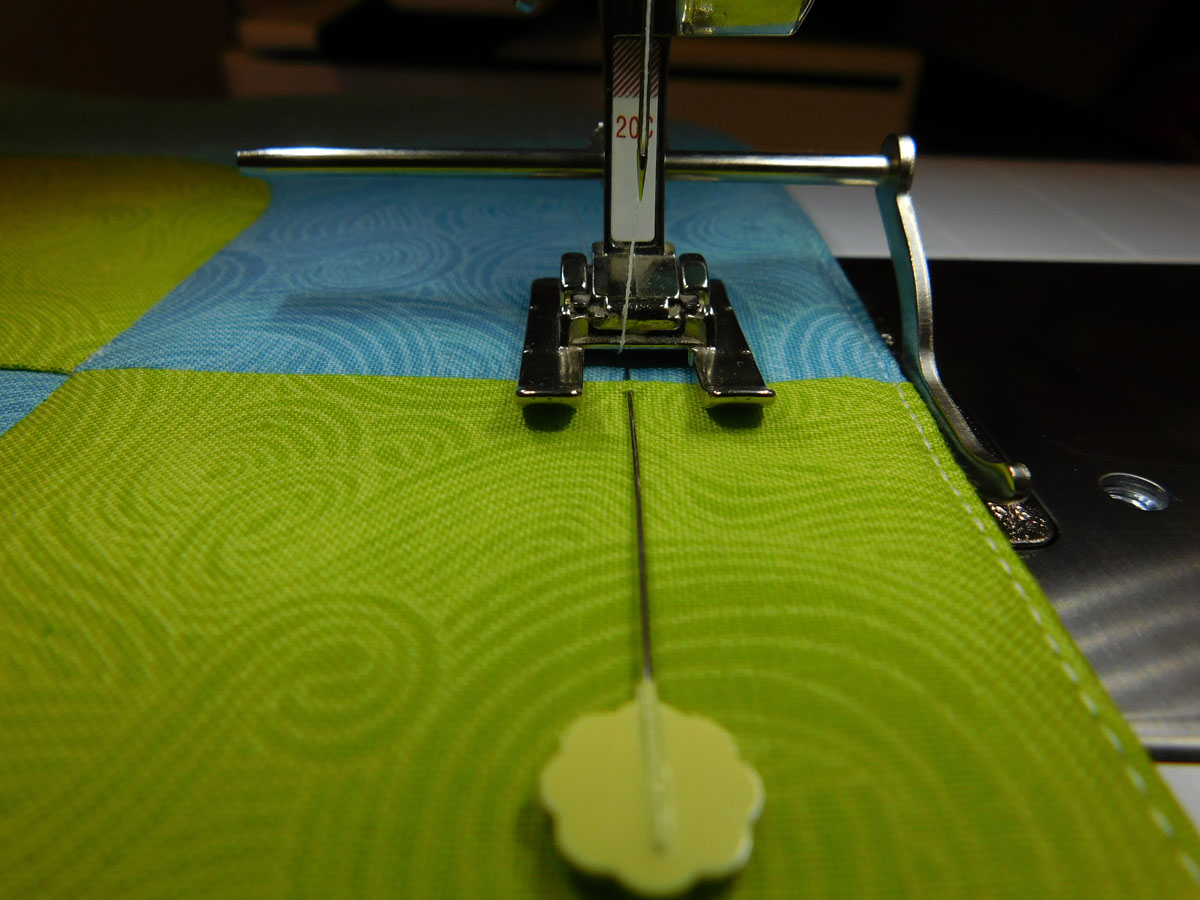
The Open embroidery foot #20/#20C/#20D is perfect for sewing decorative stitches when you really need to see exactly where your stitches are going, such as on a border or around an appliqué shape. The wide open area in front of the needle gives you maximum visibility while the smooth indentation under the foot allows the stitches room to form properly.
Other favorite feet to use when creating open decorative stitches include the Reverse pattern foot with clear sole #34/#34C/#34D, Clear embroidery foot #39/#39C and the Non-stick zigzag foot #52/#52C/#52D for sewing oilcloth or tacky fabrics.
Open Decorative Stitch Tips
- Remember to prepare your project for decorative stitching by using the right kind of stabilizer for your project. The stabilizer will help to support the stitches and keep the fabric from pulling together with the stitches to form tucks or tunneling.
- Your sewing machine needle greatly affects your stitches, make sure to use a new needle type and size for the fabric you are sewing.
- Since open stitches do not create a dense or thick bunch of thread on your project, you can use the same thread in the bobbin as you are using in the top thread.
- Always run a test stitch first. Use a scrap of fabric from your project with stabilizer to make sure your thread tension is set correctly. Adjust the thread tension if necessary.
- Changing the stitch length or width will affect what the final decorative stitch looks like. If you decide to make any changes, write down your sewing machine settings in case you need to duplicate the stitch at a later time.
- If you stitch doesn’t look quite like it should, some sewing machine models have the ability to adjust the fine balance of your decorative stitches. Check your sewing machine manual to learn how to balance decorative stitches if your machine offers this feature, or ask for help from your local BERNINA store.
Lettering Stitch Tips
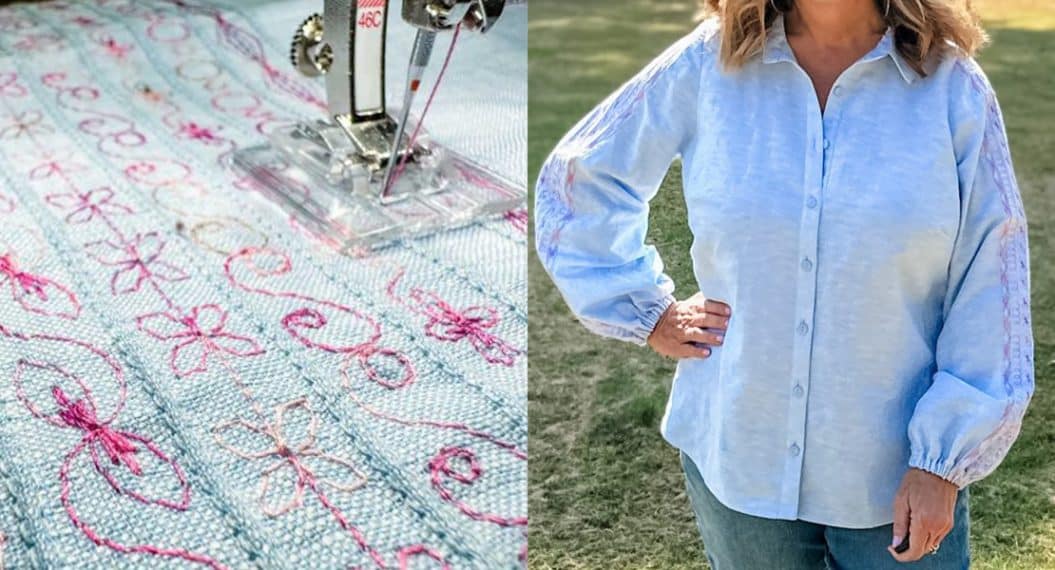
One of the most popular type of built-in decorative stitches are the lettering stitches. Not all models have lettering stitches available, but this feature is a fun way to personalize your sewing projects. Read up in your sewing machine manual to find directions for adding individual letters to your memory in order to stitch out complete words, names, or phrases. You can follow all of the same tips above to make the most of your lettering stitches. Use lettering to stitch a name on grosgrain ribbon to create simple name tape, great for tagging your sewing supplies at class or retreat, or for sewing names into clothing.
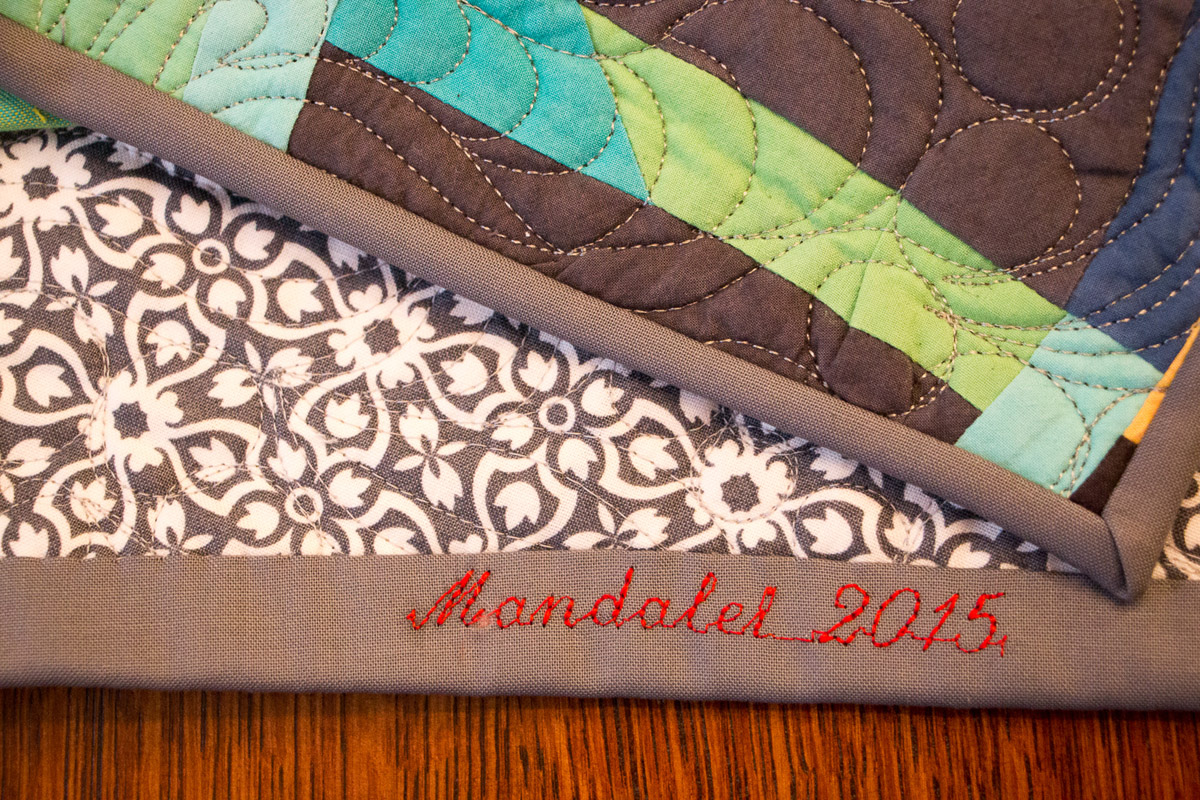
Use lettering stitches in the binding of your quilt to add your name, a date, or a personal message.
Dense Decorative Stitches
Stitches that are categorized as dense or satin style decorative stitches are made of stitches formed very close together with a narrow zigzag stitch. Dense or satin style decorative stitches form behind the needle as the machine sews to create the finished stitch pattern.
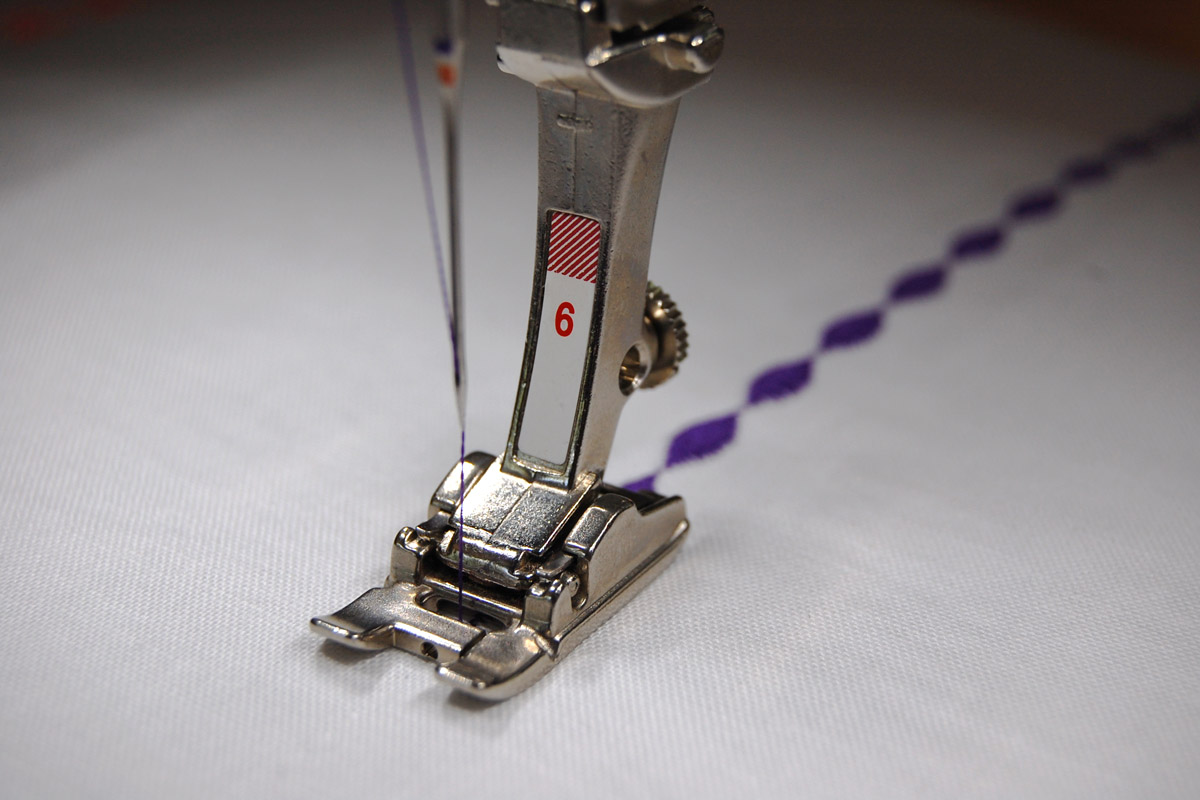
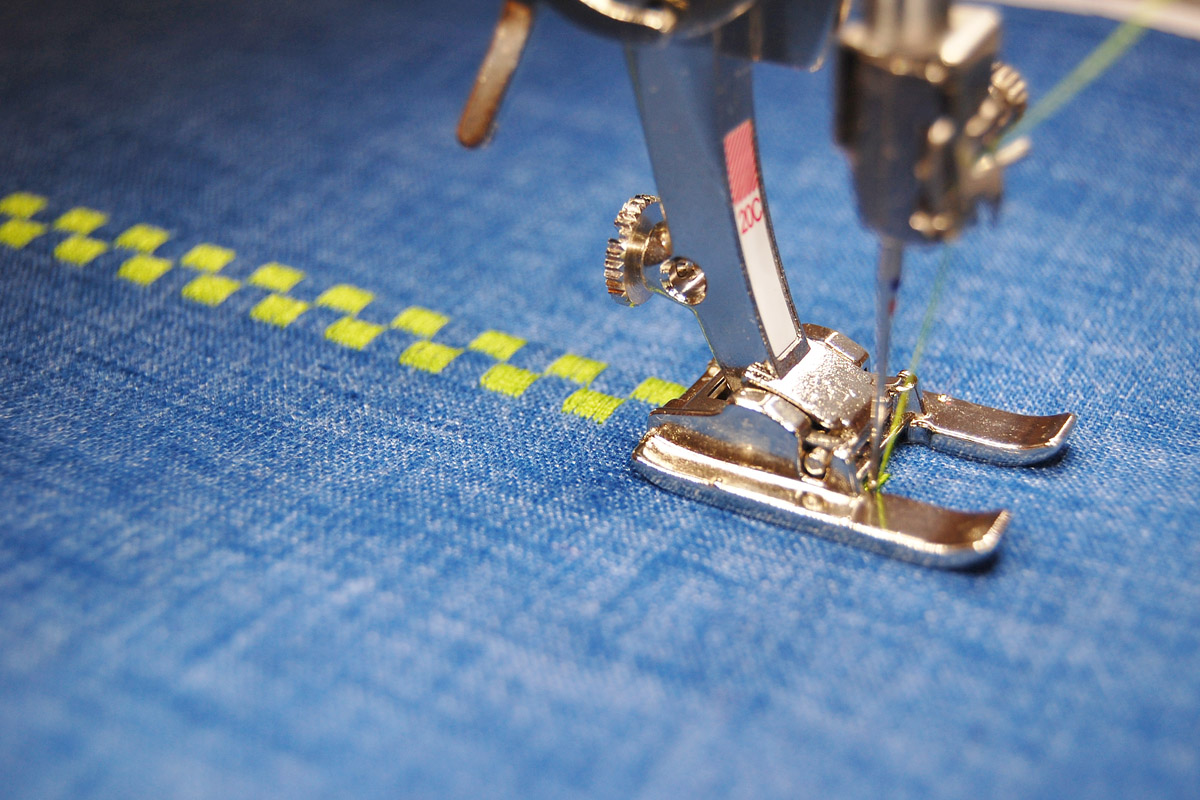
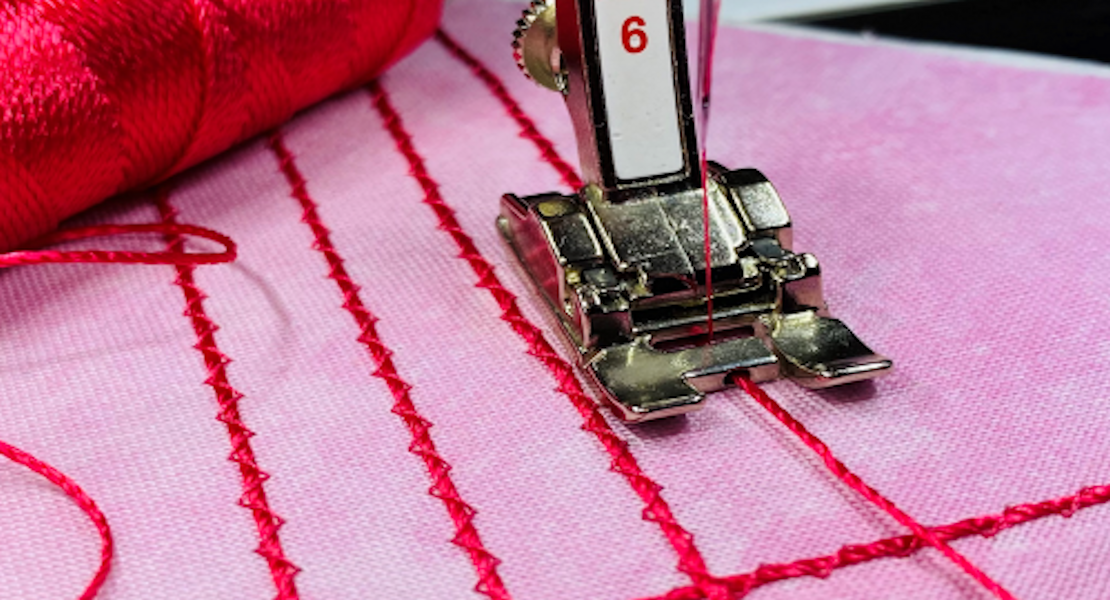
The Embroidery foot #6 has a wide indentation on the sole to allow the dense stitches to form when coming off the needle. The indentation is wider at the back of the foot to allow for turning smoothly around corners and curves. There is a small metal bridge in front of the needle which provides extra stabilization for fabrics to help prevent tunneling or puckering while sewing. This is the perfect foot to help you create the best dense decorative stitches up to 5mm wide.
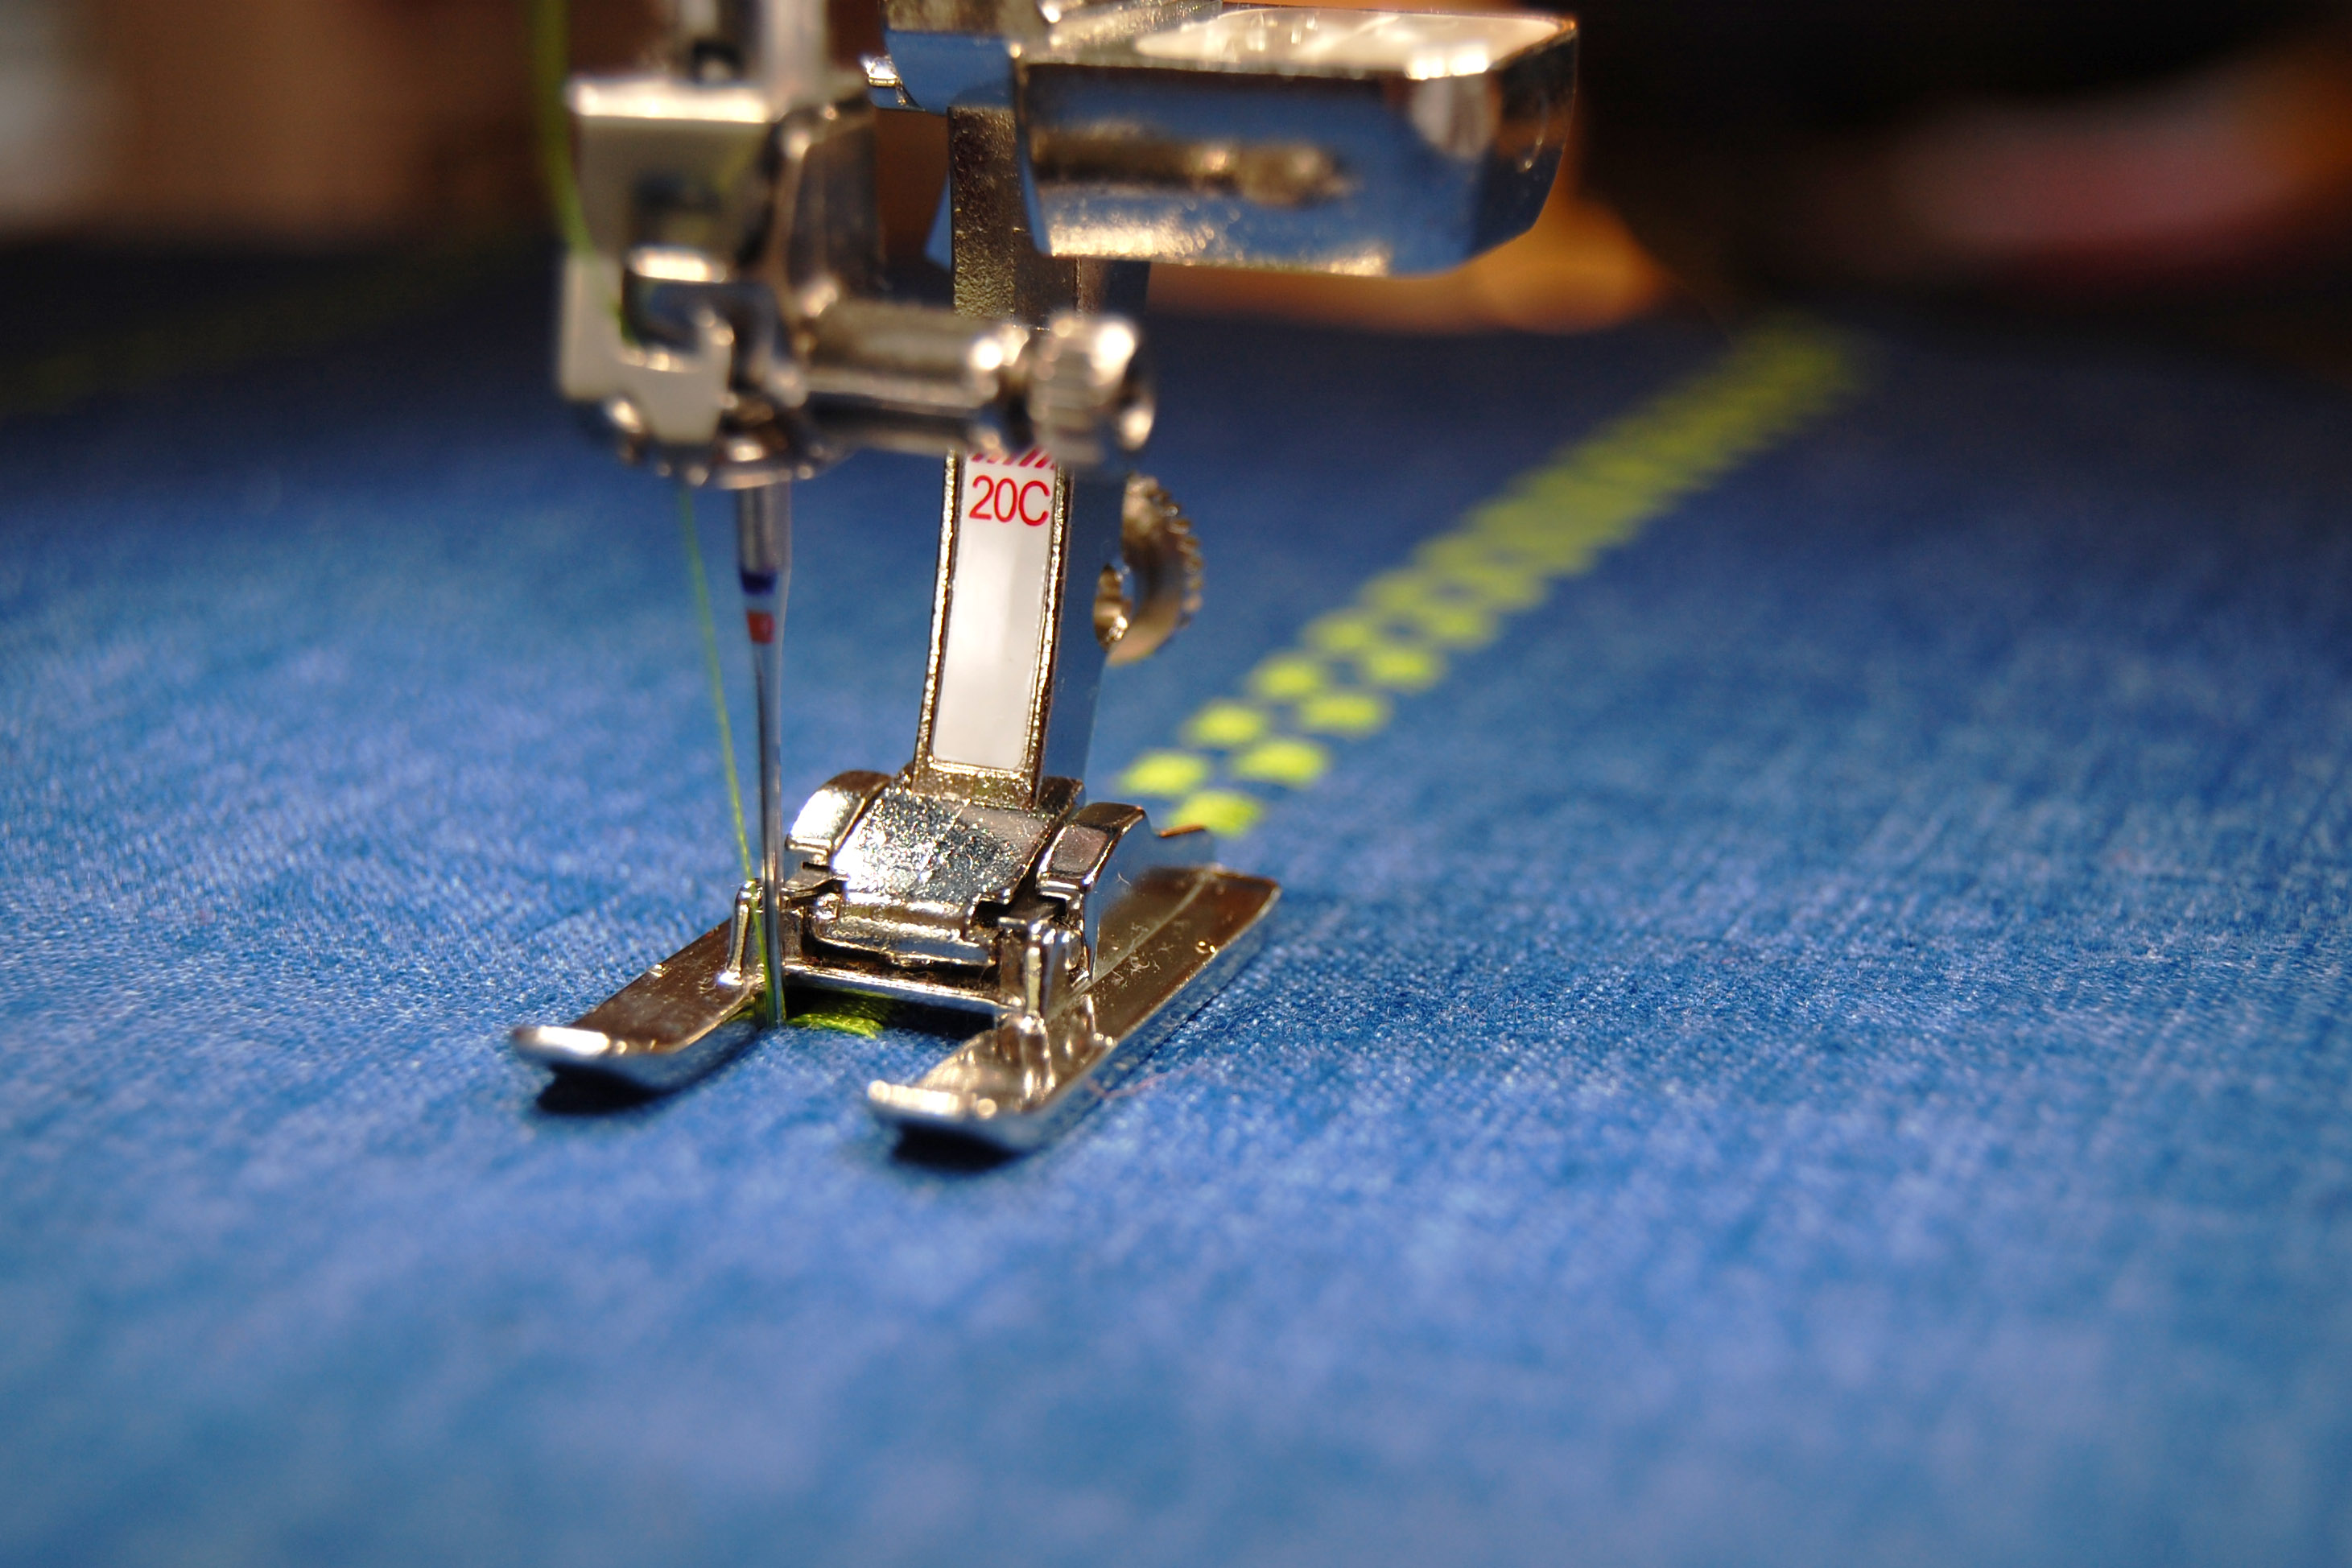
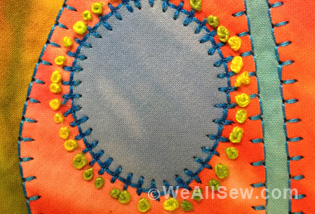
The Open embroidery foot #20/#20C/#20D is perfect for sewing dense decorative and satin stitches up to 9mm in width. It is very similar to Embroidery foot #6 with a wide, smooth indentation behind the needle, but the area in front of the needle is completely open to offer maximum visibility. This foot is a favorite for sewing dense or satin stitches on the edges of appliqué shapes, or any project that demands precise placement of your decorative stitches.
Other feet that work well with dense decorative stitches are the Clear appliqué foot #23 and Embroidery foot with clear sole #39/#39C.
Dense Decorative Stitch Tips
- Remember to prepare your project for decorative stitching by using the right kind of stabilizer for your project. The stabilizer will help to support the tight, dense stitches and keep the fabric from puckering or tunneling with the stitch.
- Your sewing machine needle greatly affects your stitches, make sure to use a new needle type and size for the fabric you are sewing.
- Dense and satin stitches create a lot of bulk with thread. To help avoid a build-up of thick thread, use a lighter weight thread in the bobbin and decrease the top tension so that the upper thread will show along the edges of the stitch on the wrong side of the fabric.
- Always run a test stitch first. Use a scrap of fabric from your project with stabilizer to make sure your thread tension is set correctly. Adjust the thread tension if necessary.
- Changing the stitch length or width will affect what the final decorative stitch looks like. Write down your sewing machine settings if you make any changes, even little ones, in case you need to repeat the stitch at a later time.
Fun With Decorative Stitches
Here are some fun things you can do with decorative stitches!
Pair several decorative stitches together to create a new look! Learn how to make your own Stitch Recipe in this post at WeAllSew.
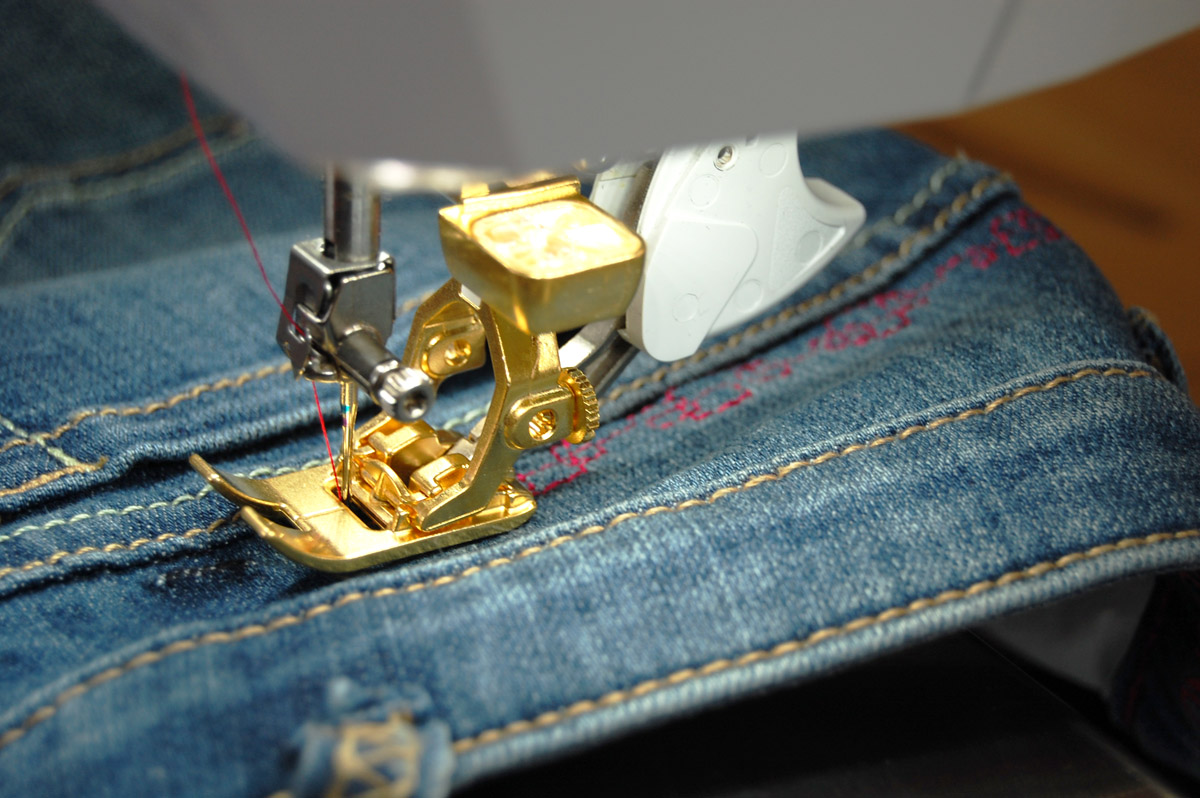
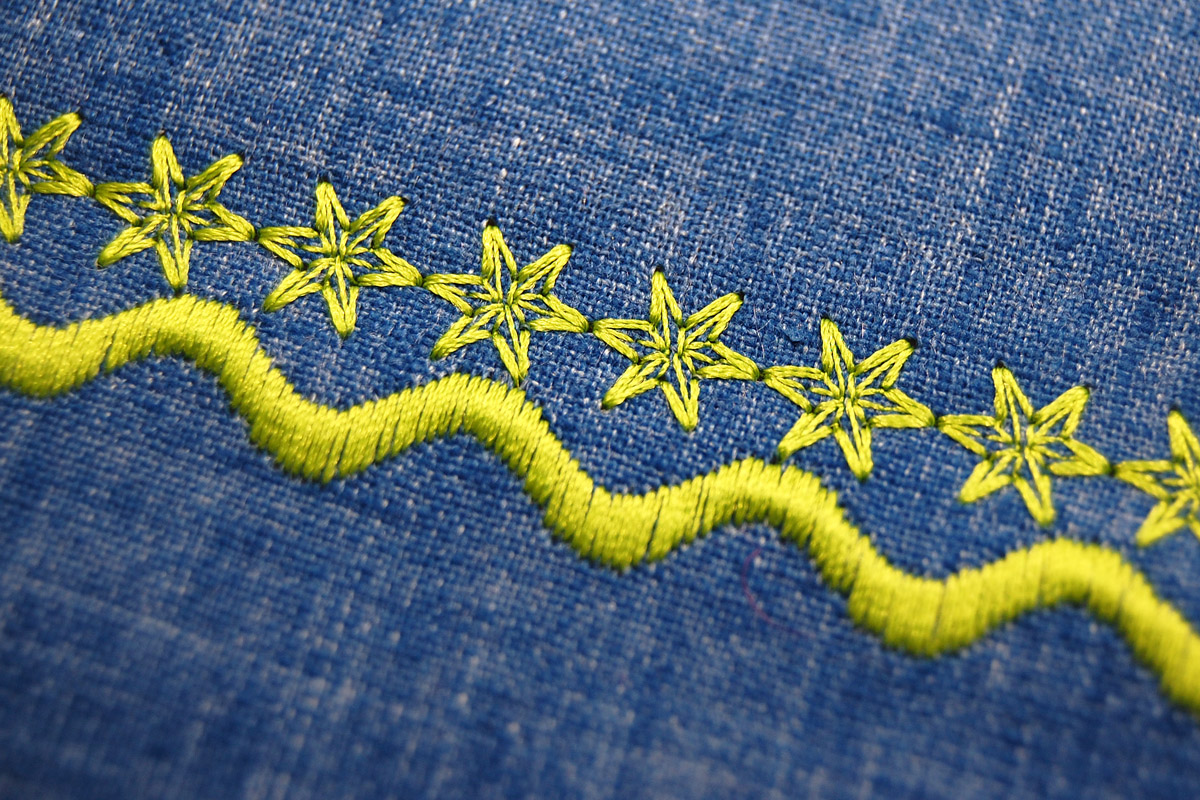
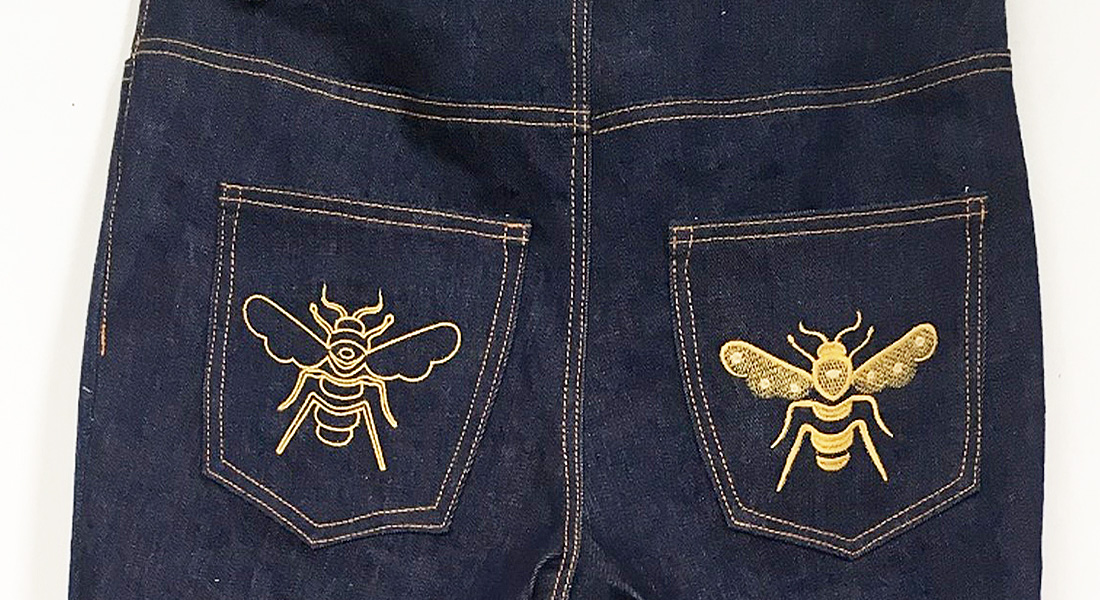
Add a fun embellishment to a pair of jeans or any existing garment with this tip! Learn about Adding Decorative Stitches to Jeans in this post.

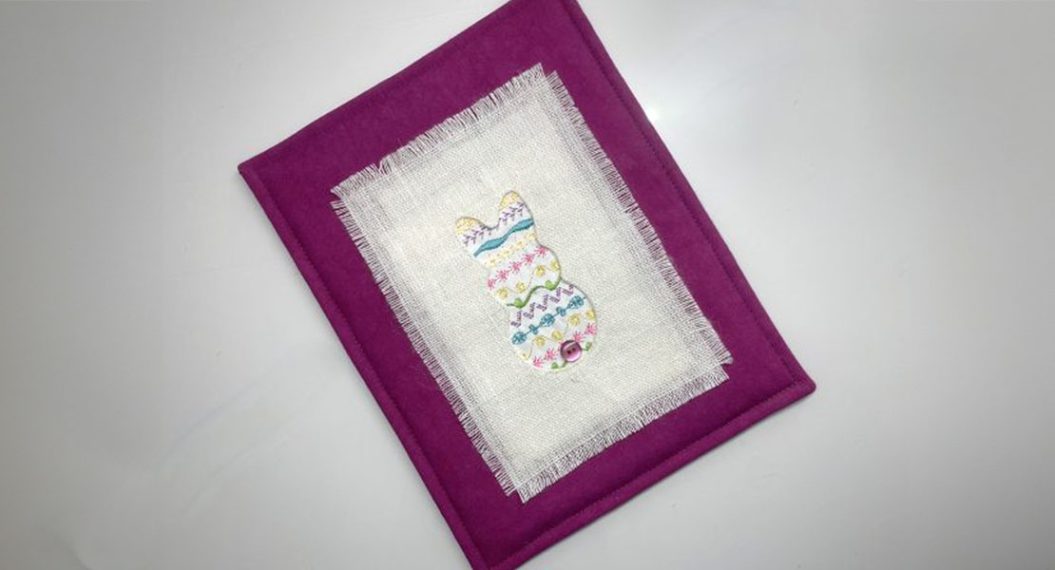
Want to see what all of those decorative stitches look like when sewn out? Learn how to Make a Stitch Sampler Book as a quick and handy guide!
Your Chance to Win!
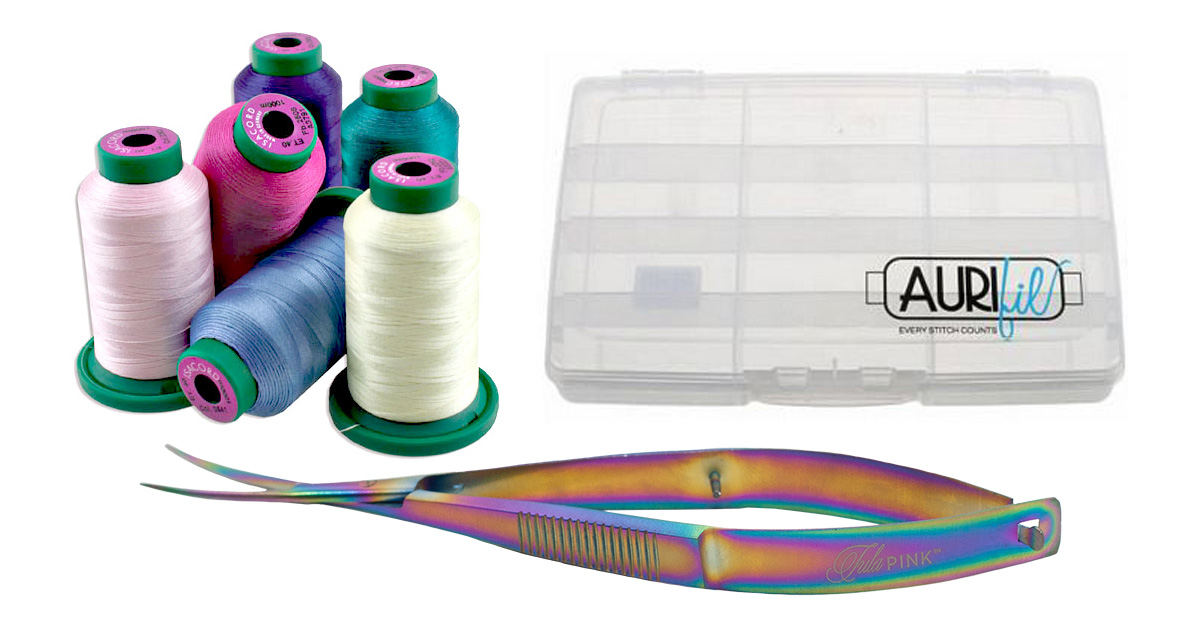
One lucky WeAllSew reader will win this decorative stitch prize package including a set of 6 assorted bright Isacord embroidery thread, one thread storage box, and one Tula Pink Hardware thread snips!
All you have to do is post a comment below and answer the question, “What is your favorite way to use decorative machine stitches?” The the giveaway is open through Friday, May 18, 2018!
The giveaway is open to residents of the 50 United States and the District of Columbia. One comment per fan. Comment must be submitted to the WeAllSew.com blog by Friday, May 18, 2018 at 11:59 PM Central Time. Winner will be chosen randomly. Winner will be notified by email and will have 48 hours to contact to claim the prize.


What you might also like


431 comments on “Decorative Stitch Tips”
-
-
Sewing on bindings and making labels as well as applique!
-
I also like using decorative stitched on bindings.
-
I love to use Bernina’s decorative stitches on bindings that I use on my quilts and also on cuffs and the purses that I make.
It also dresses up some of the napkins that I make.
So, you could just say I love using them in many different ways!
-
-
-
I am just starting out. So i hope to learn a lot about decorative stitches. I want to work on small items that i can handle. I am in a wheelchair and want to start small
-
Top stitching and quilting.
-
I like the decorative stitch along a zippered bag!
\ -
I use the decorative stitches when I make artistic home décor pillows.
-
I use the decorative stitches when I make crazy quilted items and wall hangings. Very often I add hand embroidery with floss or ribbon to the simpler stitches.
-
I add a “Made by Grandma” in an inconspicuous place on the items I make my grandchildren. I also add my name and dare to the binding on all quilts I make.
-
I use curved decorative stitching to quilt water patterns.
-
Is the gold 1d available? I so want one
-
I like to use decorative stitches on my Granddaughters dresses and doll clothes
-
My granddaughter is learning to sew. Together we are making small quilt for her teddy. She loves to use decorative stitches. So do I.
-
I like to sign my quilts in the binding using decorative stitches. They are fun for embellishing other projects too!
-
I use them to add interest to “mini” quilts, and on labels for handmade items.
-
I like to use decorative stitches with bobbin work
-
I like to use decorative stitches on décor I make for the home and children items .
-
Perfect for small 14″ quilts.
-
I use them on fun kids quilts
-
Accents to bags!!
-
Just made a cute sun bonnet for my great niece and used decorative stitches around the edge. Turned out great using my bernina!
-
I like to use this technique on Angie’s for quilt binding
-
-
My favorite way to use decorative stitches is to add a little “oomph” to quilt blocks…amazing how a line of decorative stitching can make just a little more extra special.
-
Do you ever use a double needle for decorative stitches
-
-
I love to use decorative stitches when I hem a garment. It makes it like my trademark. I don’t think I’d be using them to do that if I didn’t own a Bernina. Mine is a 1230 and as the saying goes, I love my Bernina.
-
My favorite way to use decorative stitches is when I am quilting. I like to add these stitches to create interest and to fill areas that seem too “empty” once I’ve quilted a project.
-
Like to use decorative stitches on my pouches!!
-
I’ve used them on quilts (quilting), on table toppers/runners, placemats, and on garments. They are fun to do and can add just the right touch to an item.
-
I like to use decorative stitches on tea towels.
-
Very pretty on pillowcases and matching sheets
-
I have used it to add interest next to quilt binding and to jazz up mug rugs.
-
My favorite way to use decorative stitches is around appliques or on quilt bindings.
-
I love using the stitches along the quilt bindings to add a touch of character on the edges of the quilts. Also, like to use on topstitching when making purses or zippered clutches.
-
Decorative Stitches look nice on simple sashings on baby quilts, which I like to do for charity.
Thank You for sharing. [email protected] -
I love using decoratie stitches to enhance stitching on a garment or bag. I create custom prayer shawls and headcoverings- I love to ceate a ribbon effect, using rows of stitches to create a band.
-
I have just started using my new machine. I used the name stitches and tractor to put on a bib for my grandson.
-
I just got my Benina so I am still learning about all of the wonderful things it has to offer!
-
I’m so inspired to use my embroidery stitches! I’ve rarely used them but they do look good on woven things I make my girls. I really want to get a circle attachment and use it with that.
-
I use decorative switches to enhance necklines, plackets and cuffs as well as my infant grandson’s outfits.
-
I’ll fill plain squares in a quilt with different decorative stitches and then echo them on the binding.
-
I love to use decorative stitches on mugrugs. ?
-
I use them on the edge of appliqués.
-
I like the lettering stitches. I’m looking forward to using more decorative stitching with some of my new projects.
-
I like top-stitching or hemming with decorative stitches. It gives an item a little pop it wouldn’t normally have.
-
I use decorative stitches for applique quilting, and for hems on children’s dresses.
-
I love to use my decorative stitches on my 830 LE to embellish table runners and to quilt small objects like mug rugs and potholders.
-
The buttonhole placket…adds a little spice! I also did stitches on every block of my daughters T-shirt quilt.
-
My favorite way to use decorative machine stitches is to make customized labels for my quilts.
-
I love to make zippered pouches and add a special personal quote with the lettering stitches on the front of the pouch for the receiver of the gift!
-
I use decorative stitches for quilting, monogramming quilts I give away as gifts, name tags on ribbons, and embelishments on pillow cases. However, I must say I love the scissors and sewing machine decorative stitches! My Bernina does not have them…but I still love my Beenina (all three of them!)!
-
I use decorative stitches on the seams of crazy quilts, and for fused applique.
-
I will definitely use the idea to write my quilt label on the binding. What a great way to use the alphabet and decorative stitches.
-
I am working on using the circular embroidery attachment to make my own “fabric..boy is that fun! So many different stitches to play with. Thanks for the great tips.
-
Love to use Berninadecorative stitches on pillowcases, baby blankets, and burp clothes. They always add so much pazazz!
-
My favorite way to use decorative stitches? I’m just learning about them, but so far I have used them in quilting ?
-
I’ve made quite a few I Spy lap quilts and companion pillow cases for many 2 year olds. Co-ordinating decorative stitching adds beautiful touches to each pair. That’s what their moms tell me!
-
Decorative stitches add a little bit of happiness to any project. The more creative you are with the stitches the more awe & smiles you will get. And then add in colored thread & WOW!!!! Decorative stitches always give a great “first impression” to any project. ?
-
I love to use decorative stitces with home decor items. They are great on placemats, napkins and on the back of pillows for added interest
-
I love to use decorative stitches on kitchen linn towels and also on patchwork potholders.
-
I use my decorative stitches on quilt labels and baby quilts.
-
I like decorating girl’s dresses.
-
Love using decorative stitches to embellish just about anything!
-
I love to decorative stitches on my Quilts and sleeves of shirts I make!
-
I love to sew a decorative stitch on pillow cases
-
Top stitching on joined quilt blocks.
-
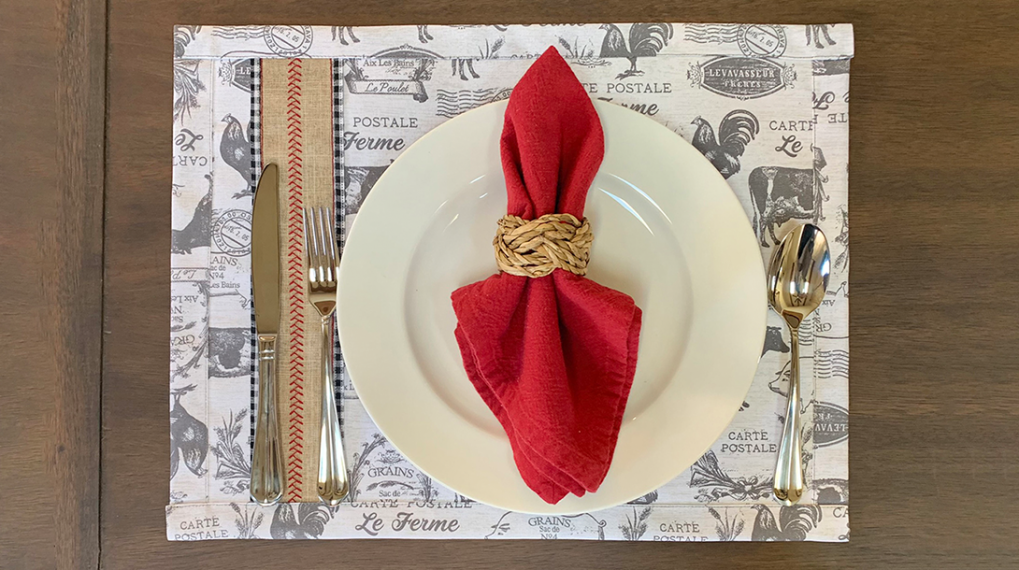
Placemats and table runners as well as dinner napkins!
-
I like using decorative stitches on childrens clothing.
-
I use decorative stitches when making fabric postcards. rmc
-
While I love decorative stitches for embellishment of clothing, I also like to add it on my flimsy quilt tops in the sashing, especially for baby quilts.
-
I love to personalize gifts with the various alphabets on my machine.
-
I used some on a bag and on a couple quilts and I am looking forward to using more.
-
I like to embellish zipper pouches with decorative stitches. Sometimes I add beads too.
-
I enjoy making handmade bibs and often use decorative stitching on them to make each one distinctive and unique!
-
My favorite way to use decorative machine stitches is on pillowcases to match my bedroom.
-
I love all the stitch combinations my Bernina can make
-
Stitching words onto ribbon
-
I used decorative stitches around applique pieces in a wall hanging
-
Sometimes I use my decorative stitches to quilt my quilts. Depending on the area and design.
-
I love the decorative stitches on appliques, pillow cases, baby and toddler clothes.
-
I like to use decorative stitches on pillow cases and napkins to dress them up as gifts. Thanks for a chance to win!!!!
-
I’ve used decorative stitches around applique blocks to give a move interesting look.
-
I have a Sew Steady table that allows me to stitch in circles. I recently mde a cushion cover using this technique. I also like to use decorative stitches in my quilting.
-
I like to use decorative stitches in terms, cuffs, collars and as stay stitching on tight curves (like baby and children’s necklines.)
-
I have so much fun using my 20D foot with all the different combinations of decorative stitches, creating customize background material for various projects
-
I’ve enjoyed using the decorative stitches in creating a nature scene with leaves, flower petals, ferns, and tree bark in various sizes. The decorative stitches make a 3D picture.
-
Decorate dish towels
-
I have fun playing with decorative stitches when I construct textile necklaces and brooches.
-
I love to use decorative stitches on baby blankets and bibs-
-
I love to use the alphabet in my binding on quilts or projects that I can’t put a label on. That way I’ll know when it was made and any other details necessary,
-
I love using the decorative stitches on anything and everything that I possibly can, especially dresses for baby girls. The idea for jeans is great, gonna do that soon! What number stitch is that flower in the first picture?
-
I like to use decorative stitches on doll clothes I make for my Granddaughter.
-
I love using decorative stitches to embelish the bottoms and sleeves of my grandaughters clothing. She always tells me that i make her clothes beautiful!! I also followed a previous recommendation and use the lettering function to sign and date my quilt binding!! Thanks Bernina for putting such lovely functions on my machines!
-
My favorite way to use decorative stitches is to add texture, interest and color to an otherwise visually neutral fabric. What do I use the fabric for? That is another comment waiting in the wings!
-
Quilt squares!
-
Dibble Dabble here and there, I recently created 3 stitches in the stitch designer program, LOVE IT!!! A lot of fun and excited to use on a self made sewing machine cover. Love my Bernina’s 🙂
-
I like to use them to embellish quilt blocks and applique. Nice information on which foot you should use. Thanks!
-
I love all the great stitches on my 790 and add lots of decorative stitches to my quilt blocks. Especailly Row by Row. It really makes those blocks pop
-
I use decorative stitches around the edges of cloth napkins and on quilted table runners.
-
I love to use for my quilt labels. Want to try labeling in my binding next!
-
I love to make Rag Dolls…I use decorative stitches to embellish, aprons and clothing on dolls. And on some of my own clothing. I have 4 BERNINA’s 1090, 440, 830, and now the 700. I Love all the stitches on all the machines.
-
As decoratvie edging around collars.
-
I like using the decorative stitches for quilt labels. I’ve used the letters, and I also like to do decorative stitches around the outer edges of the label as trim. A second use I like is to finish off bindings, especially on baby quilts that will get lots of wear and washing.
-
I am a new Bernini owner. I am just learning about everything my machine can do. I love everything! Sew much fun!
-
I am a new Bernina owner. I am just learning about everything my machine can do. I love everything! Sew much fun!
-
I use the lettering to add my name in a small corner on my quilts. I am a new Bernina owner but am loving all the possibilities of what I can do!
-
Decorative stitches are beautiful on heirloom clothing!
-
I like to use decorative stitches as I applique quilt blocks!
-
My favorite way to use decorative stitches on my Bernina are with appliqué and along hems.
-
I love decorative stitching on apparel and crafts.
-
I like to use decorative stitches on my quilt labels. Thanks for all of the great tips. I am printing this tutorial for future reference.
-
I use decorative stitches when I use a machine stitch to finish my binding.
-
I use decorative stitches on my quilt labels, on applique, and quilts. I think they really had class to projects that just need a little more interest.
-
I love using decorative stitches to “make” my own fabric. My pouch panels end up being personalized to to receiver of said pouches.
-
I don’t know yet but the possibilities look endless. Looks perfect for finishing quilts with a signature!
-
So far my favorite way to use decorative stitches on my new Bernina has been with sewing a small zippered handbag. The vinyl used was brown and I used a contrasting brownish/peach thread for the decorative stitching on both sides of the handbag. It turned out so nicely that the first person who saw it after I made it, asked if they could have it lol! Best compliment ever! Thanks for making my life fun Bernina!
-
So many ways including all the previous comments, also on the front bodice, rows of stitches to dress it up.
-
I have added some decorative stitches to plain white sheets to make them special and add flare. It would be great to do more of that.
-
I like using the stitches on towels.
-
I use decorative stitches to make the final stitching on quilt binding. If I had to do it by hand, it would never get done!
-
I love using decorative stitches down the front of shirt plackets and along the sleeve cuffs.
-
Fancy stitches on the border of a quilt
-
I like to use decorative stitching on my Bernina on labels that I make for my quilts and garment sewing. They add interest and a personal touch. The hardest thing is selecting which ones.
-
Very cool! I like to use them down the center of burp cloths.
-
I like to embellish quilt blocks or highlight areas of a quilt with special stitches.
-
On purses!
-
I like to use decorative stitches to create my own fabric then turn it into beautiful things. Clothing, pillows or beautiful Art. My Bernina 830, 580 and quilt frame make this easy.
-
I love to give borders of a quilt a little pizzaz by adding decorative stitches. I love my 790 that makes it look professionally done easily.
-
There are so many ways to use decorative stitching, but a few of my favorites are stitching around a collar, a hem and sleeve. I have made quilt blocks with decorative stitching. Purses and cosmetic pouches are another great way to add personalization.
-
I used decorative stitches to complement applique on a quilt.
-
I use decorative stitches to quilt for my family and friends. I choose a stitch that is meaningful for the recipient.
-
I am making a huge effort to finish quilts and have been successful. Binding is not my favorite thing to do but since I have begun machine stitching them on….wow!!! I seam the binding on the back and then bring the fold edge to the top (or front) of the quilt. I then run the decorative stitch along the fold edge making sure to carefully & evenly position it so as to catch the back of the binding as well. Works so great and is so much faster than hand stitching it!!!!
-
Just got my new machine as well and have tried decorative stitches on the baby items I sew. Love this machine but I have alot to learn and many feet to purchase
-
I use decorative stitches on baby blankets
-
I like using decorative stitches to embellish garments. Rece
-
I love the ability to take a decorative stitch and move it to my embroidery module where I can incorporate it into a design. Bernina 765. I love this machine.
-
Baby blankets and children’s clothing!?
-
I use decorative stitches to make a “necklace” around the bias neckline of aprons. I’ve made over 150 of them, almost all given away!
-
I like using decorative stitches just about anytime to enhance a basic style on clothing, or to help a plain color “pop”
-
I like to use the decorative stitches in my quilts, pot holders, and clothing.
-
I just recently discovered the joy of using decorative stitches while binding the edges of clear vinyl pockets with fabric. It adds a sweet touch to the pocket edge and looks great. Love my 770!
-
I love to make borders on sheets
-
I use a decorative stitch to sew the quilt binding to the front of the quilt (I stitch it to the back first). It is much faster than hand stitching and quite durable for quilts that are going to be loved and washed a lot.
-
I like to use decorative stitches as a top-stitch around the bibs I make for for my Granddaughter who has CP and needs bigger bibs that don’t look babyish. I am still learning my machine and this tip sheet really helped. Thank you 🙂
-
The decorative stitches are perfect along the hemmed edge of a pillowcase, especially when used in combination with each other!!
-
My favorite way to use decorative stitches is in appliqué and crazy quilt blocks.
-
I like to use decorative stitches on tote bags and also on quilt bindings.
-
Love using decorative for jeans, my daughter’s dress bodice, and on gifts as a “signature.”
-
I love using decorative stitches on appliqué quilt blocks.
-
I love being able to do the decorative stitches on my grandkids pillowcases, and kitchen linens. Thank you!
-
I stitch about three repeats of a decorative stitch in a tonal color of thread to mark the centers on the hems at the top and bottom of my sheets and blankets. The effect is similar to a monogram, and it helps me get the bedding centered on the bed when I change the sheets. That’s one chore finished better and faster!
-
Quilt Labels!!
Each one is uniquely my own. -
I volunteer in the sewing room of a local hospital where I make colorful pillowcases for the patients. The decorative stitches enable me to make each pillowcase one of a kind.
-
I use a number of decorative stitches to create a recipe look to decorate bags. I love how that looks.
-
Decorative stitches elevate charity christening and burial gowns to a more wonderful, beautiful level.
-
I use decorative stitches around the collar, neckline and sleeves of my grand daughters dresses. I also use them to stitch around baby blankets and burp cloths.
-
My favorite way to use the decorative stitches is to enhance the doll clothes I make for my granddaughter. I love how just using a fancy stitch can make them look so beautiful. I also like enhancing quilt blocks with decorative stitches. Beauty from a needle. Looks like you spent hours on it ?
-
I love to use them to add a little extra fun to childen’s clothing.
-
I use them for decorative quilt blocks and recently starting experimenting with machine sewing the binding on and using a decorative stitch on the front of the quilt to secure the binding. Fun and fast.
-
I used the letters to put names on the cuffs of the stockings I made for my daughter and her family!
-
I like to use the letter stitches to make nicely finished labels for quilts and other sewing projects.
-
I like to use them on activewear as a faux flatlock. It adds a little pizzazz!
-
I use it in decorating quilts and table runners too. I use them as borders for labels.
-
My favorite use of decorative stitches is on children’s clothing ~ dresses and overalls, bibs and even little fabric shoes.
-
My favorite way to use decorative stitches is as trim on doll clothes.
-
I love putting them on just about any edge! Headbands, cuffs, ribbons – you name it!
-
on quilt blocks
-
I love to use decorative stitches on quilt blocks to mimic hand embroidery, and also when making labels, where I use the lettering features.
-
I love to use these stitches. Always ready to learn more. Thank you!
-
I use decorative stitches on applique and sashing.
-
I use them on bindings and when I make aprons. When I was prego with my first son….long time ago, I made all the cloth diapers and layette and used the stitches and colored thread when sewing them. Used them on all 4 of my boys!!!!
-
I use decorative stitching on bags and pouches, as well as quilts and other small projects like pot holders, etc.
-
My favorite project was stitching strings of Mardi Gras beads on a jeans jacket for my granddaughter. They looked great.
-
Love to decorate pillows!
-
Love using decorative stitches with bobbin work and specialty threads such as perle cotton and embroidery floss and even satin ribbon.
-
I forget that there are built in stitches on my wonderful machine. I will have to use them!
-
I used decorative stitches to create channels in hot mitts.
-
I like to add decorative stitching when I patch my husband’s “working in the yard” jeans.
-
I like to edge my charitable baby blankets and alone the necklines of my dresses
-
I use some decorative stitches for machine quilting with my walking foot, especially #4.
-
I love my 9mm decorative stitches. I use decorative stitches on purses, shirts and jean jackets. I also free motion decorative stitches on Christmas decorations.
-
I like to add a row of decorative stitches to the binding on Linus quilts. Often the added texture of the stitches become a “fidget” for very sick children.
-
I use my decorative stitches on dresses that I make for my granddaughter. She loves to look “fancy” with the extra stitches!
-
Decorative stitches are wonderful when making an easy baby blanket, the back side flips to the front and sew around the blanket “binding” with decorative stitches make a beautiful final touch.
-
I love using decorative stitches on my art quilts especially when I am vouching fibers and adding decorative trims!
-
I’ve stitch decorative stitches on ribbon to use as labels in garments I’ve created.
-
Purchased a Bernina in October, just made a crazy quilt, used decorative stitches on every seam. Its beautiful!!
-
My favorite way to use the decorative stitches is on appliqués. For instance on a pattern that has a valance, the decorative stitching looks like a crochet edge on the valance
-
I love to use decorative stitches on quilt labels.
-
I use decorative stitches on narrow sashing strips.
-
I am just discovering the beauty of decorative stitches and plan to use them on my young daughters’ dresses and on tops for myself. They are so fun and pretty and a great way to customize a piece!
-
I use decorative stitches on receiving blankets that I make for my grandchildren and friend’s grandchildren. Just started applique and cannot wait to try some other stitches!
-
I like to add decorative stitching and personalization to baby quilt bindings.
-
I love making gifts for family and friends.all kinds of pouches and bags. Perhaps a table runner or mug rugs. My deco stitches adds unique touches for each person and/or project. Ideas are endless
-
I lie to use decorative stitches on everything. I love to all that special touch of embellishing to towels, tea towels, and anything create. It is fun to make our own choices and combinations of stitches to make it “your own”.
My Bernina has so many, many choices it is unending ! -
I like to put a decorative stitch on the pockets of aprons I make for sale in the Tehachapi Railroad Depot gift shop.
-
I have used decorative stitches to embellish quilt panels.
-
I use the decorative stitch for my quilt binding! It adds a special touch to the quilt!
-
I have used some of the decorative stitches on my 440QE to sew hems in children’s and doll clothes, to add interest to quilt blocks, in place of topstitching on clothing, bags and other items. I keep a stitch sampler pinned to the board above my machine for reference, and use it constantly.
-
My favorite place to use decorative stitches is on the hems and seams of garments. I just finished a pair of Thai fisherman pants and ran decorative stitches down the hems on the edges. As it is such a simple garment it is a great way to make it a little less plain without going overboard. I am starting to quilt more so I hope to find more uses!!!
-
On Quilt borders. Lots of rows of decorative stitches.
-
I love using decorative stitches as a special trim on the small premie burial clothes I make for my local hospital. Since the majority of premies are male and most purchased trims tend to be feminine, it really helps to have the variety of stitches found on my Bernina.
-
I use decorative stitches whenever I can, on purses, garments, and in quilt blocks. It is so much fun and easy to do. Love my Bernina 880 Plus.
-
I have used decorative stitches in a crazy quilt/hanging.
-
decorative edging on collars, cuffs and little girls’ hems
-
I love to use decorative stitches on clothing and on quilts! I love my Bernina’s. I quilt and embroider with the 880, sew clothes with my 530 an 460. I’d love to win these treats!
-
I love using decorative stitches on quilt as you go sashing and around all things baby.
-
I make fabric hats and sell them. On one style that is like a beret, I use the 5 rows of decorative stitching around the bias cut of the side and. I love my Bernie!!
-
i use my decorative stitches on bindings on quilts,love them
-
To personalize a gift quilt with the person’s name. My grandchildren love seeing their names on their quilts!
-
I use my decorative stitches on bibs, baby blankets and quilts.
-
I love to stitch decorative stitches on the gifts I make, most famous is tea bag holders, cross body bags, purses and quilts! I recently upgraded from Bernina 830 to 880 Plus and I love it!
-
I usually make wide bindings and I like to use the decorative stitches to compliment the quilt.
-
I would like to start using them on the clothing I am sewing for my grandchildren.
-
I use decorative stitches on edges, hems, bindings, as a trim on the bottom of towels. I started with a 180 and enjoyed and still have many of the “stitch recipe” cards from then. It’s a little different process on newer machines but same beautiful stitch-outs!
-
I like to use decorative stitches on crazy quilts.
-
I like to use decorative stitches on quilt binding.
-
Thanks for all of the great info and the chance to play! I have used my decorative stitches for a crazy quilt.
-
i like to use decorative stitches on jeans, capris, grandkids dresses, pillowcases, quilts, purses, in the hoop projects. so much fun.
-
My favorite way too use decorative stitches is on the items I make my little granddaughter. I have made her quilts incorporating various stitches and, of course, cute overalls, tops, and dresses.
-
I have use decorative stitching on bags. The stitching really stands out and gives the bag that special look. I have used the stitches on quilted items and clothing. Love my 830.
Cynthia
-
i love the decorative stitches. I use them mostly on my grandkids clothes (jeans pockets), towels. pillowcases, just about anything that needs a border.
-
I sometimes like to use either decorative stitching or lettering in the borders of a quilt. Once I used “Hugs and Kisses” continuously all the way around the border of a quilt made with a Hugs & Kisses block. It was so cute and different!
-
I like to add decorative stitches on the binding of small quilt projects. On small patchwork projects I use a different stitch for each row of quilting for a sampler effect. I I also just made an Easter Egg Garland and used lots of decorative stitches for that. I used a variegated thread for more effect when needed.
-
I’ve used decorative stitching on white t-shirts and white shorts to create sleep sets for girls.
-
I would use on decorative blocks and binding for quilts.
-
Following instructions from Susan Cleveland, I’ve use decorative stitches to jazz points. Very cool.
-
Decorative stitches are great to use as accents on Appliqué Quilts.
-
I like to use the various button hole stitches for raw edge appliqué.
-
I use decorative stitches on quilts.
-
I enjoy using the “fancy” stitches on table runners, baby quilts, and burp cloths!
-
I love using the Bernina Circular Embroider Attachment and a variety of decorative stitches and lettering to make everything from mini quilts to hot pads. Love, LOVE, L-O-V-E!!!
-
Love to place decorative stitches on zipper pouches and on the edges of baby burp cloths and blankets
-
I love to use decorative stitches for applique.
-
I love decorative stitches on the bags I sell at farmers markets!
-
My favorite use for decorative stitches is quilting and making quilt labels…well maybe 2 favorite uses. 🙂
-
Oh…and this is a good article. I may need to purchase a 20C foot for my machine..Is it available for the 1230?
-
-
making decorative fabrics for bags and pouches
-
Like to use decorative stitching in the sashing between quilt blocks and border.
-
I like using decorative stitches when making quilt labels.
-
I don’t have one particular item that I put decorative stitches on, as I like to put them on as many things as I can. They add such a special touch to anything.
-
I like to use decorative stitches on crazy quilted pieces!
-
I like to use the decorative stitches to embroider small sections of plain fabric that I then use to make a coordinating yoke,collar or cuffs. Really makes a high end look on the garment.
-
I use decorative stitches to embellish shirts!
-
I like to embellish my denim clothing. Collars, cuffs, hems and back piece. Plus many other small quilting projects.
-
I luv making bags and pouches in solid bright fabrics and use decorative stitches to jazz them up!
-
Zippy Bags and Quilted Notebook Covers
-
I love to take off my jeans belt loops and use decorative stitches on them and the waistband.
-
I love using decorative stitches when top stitching a placemat or a table runner. Finishes off in a special way.
-
I love using alphabet to place my quilt label on my bindings.
-
I use decorative stitches on all kinds of baby things, bibs, blankets burb bibs.
-
Love to use decorative stitches on my quilts but esp on baby quilts. Seems to be just the icing on the cake – so to speak!
-
I use the decorative stitches in a variety of ways. To accent garments always adds a nice touch, but when I used some to accent the “story” of the quilt I received so many compliments! Try them using metallic threads for some super impact. Yes, they can be tricky, but the results are just so much fun!
-
I love to use them on Quilt Blocks
-
Machine decorative stitches are a friendly substitute for hand embroidery on crazy quilt blocks.
-
I have used decorative stitches on quilts, table runners, baby quilts.
-
I use the decorative stitches for greeting cards, quilting, cuffs, collars, pouches, labels, and the list goes on.
-
I love to add decorative stitches to children’s items and some craft projects.
-
I love all my Berninas! I also used the decorative stitches every chance I get on most
Everything. Really like making my quilt labels also. -
love to use them all around a quilt – instead of ‘stitch in the ditch’ when quilting – so decorative!
-
I use decorative stitches on bindings and in piecing my quilts
-
I enjoy using the decorative stitches on quilt tops and on the bindings. Thanks for the chance to win!
-
I use decorative stitches on sheets and pillowcases.
-
I like to make denim tote bags made from strips of denim cut from used jeans. I use many difference decorative stickers for each vertical row of the bag. Using various colors of Jean Thread makes the stitches stand out!
-
In the comment above I meant to type Stitches, not Stickers!
-
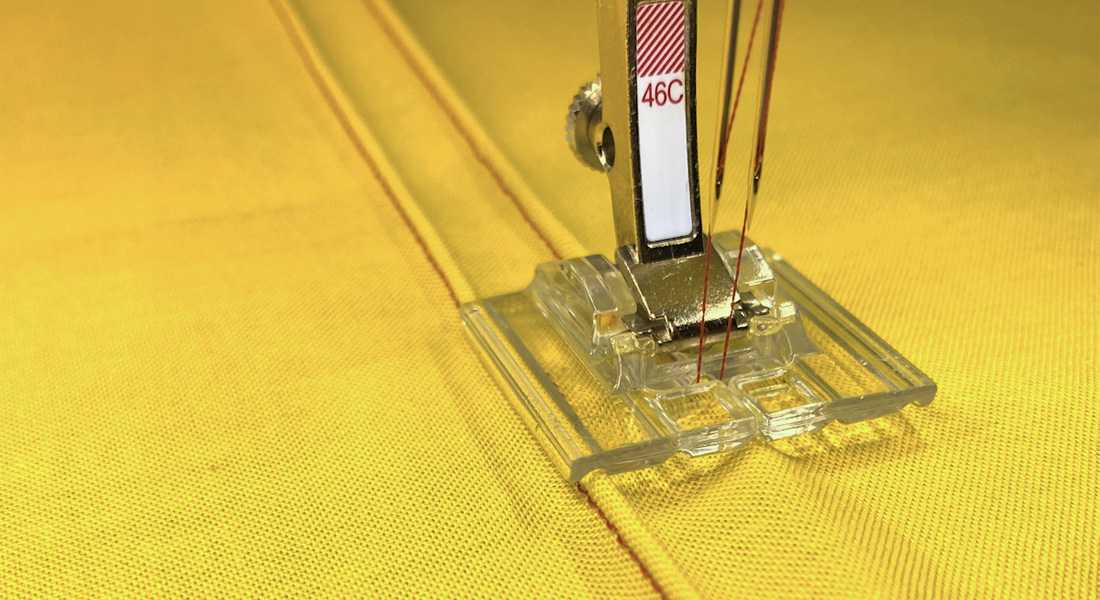
I like to use a decorative stitch to sew in a zipper. I use the #46C foot which is a pintuck foot. I use one of the grooves under the foot to ride over the coils of the zipper – this lets me get close the zipper coils with the stitch. I do this for zippered pockets in bag/tote – it gives the pockets a little jazz!
-
When I make the quilt lable. But I’m going to use it on the binding back. Thanks for showing that to me.
Nancy P. -
I love to use these stitches on my clothes and outfits for the Grands
-
In so many ways. . .on my little granddaughters’ clothing, on bags, on quilts. . .just about anywhere I can fit them!!!!
-
Decorative stitches are great in varied combinations on appliqué and pieced quilt blocks, small projects, handmade bags and bindings.
-
I like to use decorative stitches anywhere instructions tell me to top stitch. A single line seams so boring when our machines have this wonderful library of stitches that we can decorate with. Usually the area is already stabilized or can be adapted.
-
I like to use decorative stitches to put a little “Pop” into various projects.
-
I love using decorative stitches in my quilt labels! My hope is that someday I will find the perfect combination that depicts something about me! Kind of like my signature!
-
I mostly use the decorative stitches on Quilts I’ve done. I have done a couple baby blankets and taggies as well. I like the idea on quilt binding.
-
I think decorative stitches used with the circular attachment are really cool! I love the Ipad holder we made in Chicago a few years ago at an 830 event!
-
I love the Bernina decorative stitches for applique and for stitching down bindings – a great way to add another element to my quilts.
-
Decorative stitches are great for creating quilt labels, both in lettering as well as decorating.
Jeri Niksich [email protected] -
I like to use decorative stitches on baby blankets.
-
I love my decorative stitches. I use them on my applique and my granddaughters dresses. I have figured plans for Christmas decorations.
-
I use decorative stitches in stead of straight “stitch-in-the-ditch” to anchor the front and back of a quilt. Thanks for all the tips.
-
I love using all of the decorative stitches on my Bernina sewing machine, lovingly referred to as Betsy ☺️. Lately, I use them for decorative edging on baby items I make a lot of: receiving blankets, burp cloths, double gauze swaddlers, and window valances.
-
I use decorative stitches to create the quilt label and to stitch on the binding.
-
Love my Bermina 880 and especially the decorative stitches that I use on my granddaughters outfits that I make for them. They just add something special.
-
I like to use decorative stitches on quilt labels.
-
The myriad of choices coupled with the ability to vustomize each is one of the features I love on my 880. Id like more ideas from Bernina ambassadors to embellish tailored, classic clothing. Im a “senior” and want a tailored/sophisticated look in stitches.
-
To embellish the hem on doll clothes
-
I like the lettering options for quilt labels and putting messages on the binding.
-
Wow, choose one way! Guess it would have to be on crazy quilts. However, decorating clothing is fun. On other hand, decorating quilt binding is also fun. Hum, very undecided
-
I like to use them on crazy quilts.
-
I love to use decorative machine stitches along the hem of clothing – especially tops.
-
When I make pillowcases for children in the hospital, I do a decorative stitch to hold the flange flat against the pillow. If I don’t do that, the flange wrinkles and looks terrible as soon as the pillowcase is washed.
-
I love decorative stitches! They can be used on everything. I identify my children’s items by placing a certain pattern on their items.
-
On anyhting when I want some pizzazz!
-
I have used them when fmq on seams when that is all the fmq I choose to do. I have also used them on sashings and borders. This information was very informative, thanks for the info.
-
Have used combinations of stitch patterns and thread colors to create the perfect match for hard to coordinate fabrics on some of my quilt blocks and garments.
-
I like to use decorative stitches on baby quilts I make and donate.
-
I use decorative stitching a lot in my quilts. I make a lot of donation quilts that decorative stitching is my main quilting. I also use a lot of decorative stitching in my applique work.
-
My favorite way to use decorative stitching is to enhance any fabric edge.
-
I have used decorative stitches on a dress I made for my granddaughter and other items for my grandchildren such as little zip pouches for small toys for travel and often they like to sew with me as they are fascinated with just creating the decorative stitches on scraps.
-
My favorite way to use decorative stitches is on crazy quilt blocks.
-
I like to use decorative stitches on tote bags for a fun effect.
-
I like to use decorative stitches on quilts for children and on fabric learning books, as well. I have also used them on crazy quilts.
-
I recently used decorative stitches around the neckline of a denim top. I love the look.
-
I love making quilt labels!
-
I like to use decorative stitches to turn a plain fabric into a fantastic fabric to use in my quilts.
-
I use decorative stitches on kids wear, pillowcases and of course the fun kiddie quilts.
-
I like decorative stitches on quilted gifts.
-
My favorite way to use decorative stitches is on pillows that I make for my friends!
-
-
Using decorative stitches is a fun way to make your own fabric by adding the stitches to you fabric before using it in your project; quilt, purse, garment or anything…
-
I love them on Christmas gift bags. I have also used them on a color blocked jacket, edging the different colors with a combination of stitches.
-
My most favorite way to use decorative stitches is in my stitch library. I love seeing what all designs I can create when combining stitches 🙂
-
I use decorative stitches when making cloth diapers and burp clothes for babies.
-
I find a stitch that relates to my Quilt and use it to frame the label.
-
I love the stitch recipe shown on this post. I also like to use machine decorative stitches between pintucks on blouses.
-
I use decorative stitches in my free motion quilting.
-
I enjoy using decorative stitches on pouches and bags. I also like to finish binding this way instead of sewing by hand.
-
I love decorative stitching on pillowcases and decor items like throw pillows, curtains, table scarfs
-
I have an older Bernina, but I still enjoy making burb clothes for friends and family for new babies. It simple: purchase the white burb clothes, then simply give them a decorative stitch around the outside in the stitch and color you like. You can coordinate with bedroom colors, baby quilt or create your own palette. In no time you have some handy clothes to be used in so many ways.
-
I mostly use decorative stitches on crazy quilts. Able to try out all different ones!
-
i love my Berninas – I have an 1130 Special Edition and an 830. I like to use the decorative stitches
around applique and when I am quilting a simple baby quilt in the ditch. Adds interest and keeps the
layers together. -
I use decorative stitches to sew down binding on charity quilts, to attach ribbon to a project, and to finish raw edge applique.
-
I love Vogue pattern designer Sandra Betzina’s Today’s Fit patterns. One pattern she calls the “puzzle” pant, made out of Ponte, has a lot of intricate seaming and I use decorative stitching on the right side to highlight and embellish those seams. It is also fun on purses, pillows, and table runners, as well as christmas stockings.
-
I love to use decorative stitches on heirloom dresses.
-
I love using my decorative stitches to turn plain patchwork into a Crazy Quilt. I also have made a pillow with woven strips decorated with assorted stitches and then woven oven the pillow top.
-
Who doesn’t like to win? Thanks! I use decorative stitches mostly on art quilts and hom dec projects.
-
One of my favorite ways to used decorative stitches is to create stitch patterns for the spine of portfolio covers or for the inside flaps of portfolio covers.
-
Love to use colorful decorative stitches on my granddaughter’s clothes. Even one row can transform a plain piece. Being able to combine and save a group of stitches is a fantastic benefit of a Bernina.
-
I use them in crazy quilts and hems
-
I like them best as borders where I also want to give a little structural support, like to keep multiple layers together. I’ve used them for extra stitches on a quilt border and a purse made from old pants.
-
I have used them for hemming robes–around the bottom and sleeves. Love having a sew-out of all the stitches-it’s amazing how much better they look than just in pictures!
-
I like to use fancy stitches when doing applique and bindings. It is always a treat to play with colors, patterns and textures.
-
My favorite way to use decorative stitches is on appliqué as well as quilting stitches.
Also fun to use on bindings and ribbon. -
On charity quilts, I roll the backing to front of the quilt to be the binding. A decorate stitch finishes the mock binding beautifully.
-
I use decorative stitches around elastic casing on a waistband.
-
I like using decorative stitches on zipper tape when making the zipper a decorative accent. I also like them for bags and totes.
-
I use them for many things.
My favorite is adding to jeans and on quilt labels -
I love using decorative stitches with my Bernina770 QE on my binding; it really makes my quilt pop. Super cute.
-
Decorative stitches are the perfect finish to any project
-
My favorite places to use decorative stitches as a top stitching in jacket lines and on table rinners
-
I like decorative stitches on my Grand-daughters yokes & hems (dresses).
-
I use them on my applique projects and I love using the circle embroidery tool with the decorative stitches. So fun!
-
My decorative stitches are used on crazy quilting, applique and purses.
-
I love to use the decorative stitches to attach the binding on smaller quilts, mug rugs and so on. It does add an interest to my gift items.
By the way ‘“love”❤️ Tula Pink’s fabrics.
Thanks -
I’ve used them as decorative accents to quilt blocks, for quilting itself, around pants and shirt cuffs, on the edge of pillowcases…I’m planning to expand my repertoire after reading this post!
-
My kids (and I!) love to find little animals or flowers around the edges of their clothing!
-
I like to use simpler stitches as quilting stitches…adds a nice touch.
-
I love the way they look on pillowcases…and they add a special detail to other home goods like tote bags, cloth napkins, and more!
-
I love putting them on different projects. From curtains, quilt blocks to my lastest project a leather guitar strap.
-
My favorite us is to embellish my granddaughter’s clothing. Her mother has gotten lots of compliments on her ‘home-made outfits’ from Gamay with lots of fun stitching. She’s now 7 and is learning from Gamay how to sew herself. She can’t wait to choose her own stitches!
-
I like to use decorative stitches on bindings, crazy quilt blocks, and quilt labels.
-
I use decorative stitches to hide repairs to garments. It’s a win win. I can continue to wear a favorite garment and I get lot of compliments.
-
On anything I can get my hands on that is blank ?
-
When adding a bit of being to zip bags/pouches,top stitch zip in. Also with quilting a small lap quilt. Rows of decorative stitches really adds to quilt. Glide thread works really well for this application. Very durable.
-
I like to use the decorative stitching on accessories and artsy pieces.
-
I love to use decorative stitches on my quilt bindings
-
I love the look of embroidery around hems.
-
I like to use decorative stitching on top stitching, pockets and bindings. I have also used them on applicate and quilting. When you lengthen or widen or both the designs can be great for quilting with a walking foot. Although I have many of the presser feet mentioned, I also find the walking foot is very good for the decorative stitching. Another foot I like is the circle foot, I have put decorative stitches on place mats/mugs rugs using this attachment with great success.
-
I like to make small zipper bags and pillow cases. Decorative stitches are always perfect for both projects.
-
I like to use them for applique & finishing binding
-
I am using decorative stitches to applique. Fun!
-
I love to use decorative stitches on my projects. I haven’t explored all the stitches on my new machines as I have been embroidering instead–I love that too.
-
On a christening dress.
-
I’ve been using the built-in alphabets on my machines to add my name, date and any other details I’d like to the bindings of my quilts for years. I do this in addition to a regular label on the back. This way, even if the label is one day removed for some reason, they will always be able to tell who created that quilt should they take the time to examine it.
-
Have thought of making one of those decorative stitches sample books, with notes for ease when I want to include on a project, but haven’t made the time! Do love my Bernina!!!
-
I make 13″ x 13″ quilts and decorative stitching is perfect on them.
-
Decorative stitches down the front of a blouse, on cuffs, and collars create a nice tailored look.
-
i
just got my new bernina. Will love to do decorative stitches on everything i do. So excited. -
I use decorative stitches in my quilting. It’s an easy way to quilt a piece.
-
I like to use the decorative stitches and alphabet around the edge of baby blankets with the baby’s name and Birthday along with little pictures and Bible verses.
-
i use the alphabet on my machine with variagated thread to make all my labels.the letters look very nice stated in variegated thread and add some interest to the label
-
I have used my decorative stitches in so many ways. One of my favorite ways is to combine machine embroidery with these stitches. I had embroidered a row of flowers for several pillows in my guest room. Above and below the flowers, I added rows of decorative stitches. I just loved the way the pillows turned out.
-
I’d like to use the letters to add a label to my quilts.
-
I just did a project with Stupendous Stitching. That was really fun.
-
I like to use decorative stitches when applying binding to a quilt (instead of a straight stitch) or when applying bias strips to a child’s garment (around the armhole or nick for instance) again rater than a straight stitch.
-
I use them for stitching in quilt blocks and for labels.
-
I’ve gotten where I use decorative stitches just about everywhere the stitching will show. I love them.
-
I like to use them on burp cloths for new moms.
-
I love using my decorative stitches in my quilts. I use them on my bindings, in my applique, and as my quilting designs.
-
I haven’t used my decorative stitches very much. I must say this post has motivated me to make a sampler.
I have most of the feet mentioned. I also have fabric and thread so what am I waiting for?
I especially like the idea of signing my quilt on the border. I don’t really like the idea of adding the info on the back on a label.
Thank you for the tips. -
I use my decorative stitches for Christening gowns, baby clothes, and doll clothes. My Bernina Dealer hosted a class with Libby Lehman and I learned so much about using and changing the stitches from her!
-
I’ve not used the decorative stitches as much as I would like but this has given me a new boost and confidence.
-
I like to make decorative fabric using a variety of decorative stitches
-
I like to put decorative stitches on my purses and pouches. I also put them on the bindings of my mug rugs and table runners. Having so much fun learning how all the stitches work. I will be making me a stitch book, that will be so handy.
-
I sometimes use my decorative stitches to sew my quilt binding with. I also use them to adorn ready-to-wear items to make them unique.
-
I love using the wonderful Bernina stitches to “create” my own fabric. With a combination of stitches one can elevate a plain fabric from adequate to fabulous.
-
in place of top stitching on bag seams and finishing perimeter of rag quilts
-
I love using decorative stitches! I look for ways to add them into a project whether it’s a garment, quilt, bag or collage. Makes you really use all of your machine ?
-
Love adding my quilt signature on the binding. Also enjoy adding decorative stitches along with wing needle stitching on napkins.
-
I use a combination of the decorative stiches along the edge of plain, solid color sheets and pillowcases – makes it look custom!
-
I use them onthe binding of baby quilts. I think it’s sturdier machine sewing rather than hand sewing them.
-
I use them on all seams on a crazy quilt after it is put together.
-
Labels and I love making tote bags and embellish them with decorative stitches, table linens
-
I’m learning to sew lightweight leather for handbags and outerwear. Decorative stitches add embellishemnts unique to the items I create.
-
I have used open decorative stitches to embellish around the edges of my placemats. The use of gold metallic thread gave extra interest.my Bernina has some great designs built in.
-
Since purchasing my 530 I have discovered the use of the decorative stitches is endless. I knew that if I didn’t try out each stitch I probably would never use them. So, my first task with my machine was to make a stitch sample book. I followed the exact guidelines and directions here on the blog. I even used red thread and a red binder! Now I can easily look at the samples I made to choose one or lay them side by side to determine which go together best for an heirloom effect. I have used the decorative stitches as a bar-tack on a pleated skirt (one little triangle), along hemlines, valances, decorative pillows, and on the yokes of tops. Super fun to use and easy to be creative! Thanks Bernina!
-
I’ve been struggling with my decorative stitches on my new 570QE, but I’m going to try again. I have a pillowcase project crying out for these!
-
I use decorative stitches for table runner edging, on crazy quilt blocks with beautiful threads and also on doll clothes. So many opportunities to embellish sewing creations.
-
My most frequent use of the decorative stitches is to make labels for my quilts. If I am sewing clothing or projects for my grandchildren, I use decorative stitches for topstitching and along hemlines.
-
Making a stitch recipe collection pattern as the centrepiece shape of a quilt block.
-
I use decorative stitches on quilt binding.
-
My favorite way to use the decorative stitches is to create a personalized quilt label. I use the alphabet function to “write” name, date, dedication, etc. and then I use a decorative stitch to finish it off. Flowers, hearts, whatever the person is fond of. My new Bernina 770Q makes it easy.
Clara -
I love using the blanket stitch on appliques. I also use decorative stitches on sashing strips . I also love using my circular attachment with decorative stitches.
-
I like to use decorative stitches around the hem of cover cloths I make for my lace pillows. and to make quilt labels for things I make for my grandkids.
-
I love to use the stitches to frame a monogram on towels.
It also adds a great finishing touch to tote bags. -
My favorite ways to use decorative machine stitches are on labels and ribbons for garment tags, and pocket hems, topstitching for collars to name a few.
-
Dish towels are a great place to add decorative stitches.
-
My favorite ways to use decorative machine stitches are on the seams of a quilt top when quilting as you go.
-
I love to use decorative stitches on raw edge appliqué blocks, on cuffs collars and pockets of clothing garment sew projects. I also use then in crazy quilts and anytime to update a piece or cover a mistake or fix a tear. love the stitches and ability I have with widths and all on my 790QE Bernina.
-
I love decorative stitches. One of my favorite techniques is to sew these stitches between rows of couching. I usually do not sew them in a straight line but in gentle meandering curves. I have done this on purses and wall hangings.
-
Thanks for the tips! I love to use decorative stitches on baby quilts and bibs.
-
I love the decorative stitching! It works so nicely on little girls clothing, napkins and other table linens, bed sheets and pillowcases, decorative pillows for the home, quilting and I could go on and on. I love this stuff!
-
I love to use original stitch recipes down the front of little girls dresses! It is much less expensive than ribbon and can be completely your own. I made dresses for two little junior bridesmaids and put lovely decorative stitches down the yokes of their dresses. They were really a hit! Couldn’t do it without my Bernina!
-
Why just topstitch when you could use a decorative stitch!?!
-
I love embellishing just about anything! pot holders, clothing, pillows, etc.
-
I like to use decorative stitches to stitch hems.
-
I use decorative stitches to create quilt labels.
-
I use decorative stitches on a lot of my projects, including quilts and quilt labels! So many uses and ways to add a personal touch!
-
Love to use decorative stitches in many ways – purses, craft projects, baby blankets, crazy quilting and ‘sew’ much more. Sometimes they’re purely for fun decorative touches and sometimes instead of a plain topstitch to secure seams for extra wear and tear. They are ‘sew’ much fun!
-
My favorite use of decorative stitches is to secure quilt binding. Not only does it look wonderful, but it covers imperfections.
-
I love using decorative stitches on everything.. always subtle with taste. Thank you for so many good tips!
-
Decorative stitches are nice to sew on bindings on baby quilts.
-
I use decorative stitching on totes and clothing for my grandchildren. I love we all sew, the projects and tips!
-
I embellish quilt labels and clothes
-
I have used decorative stitches to quilt “in the ditch.” It’s better for me than doing a straight line as I never stay in the ditch anyway! I’m hoping to branch out and use decorative stitches more. Thanks for the postings!
-
I make project bags for knitters and crocheters. Enjoy using the decorative stitches to enhance the look of the bags I make. I also love using decorative stitches when quilting as you go. I’m starting to make garments so can’t wait to try it out on garments.
-
The decorative stitches are such a wonderful way to add a personal or designer touch to just about anything I sew. Whether it’s a fun element for a child’s item or rows of combined stitches for an elegant touch, I love using them every chance I get.
-
I started to use decorative stitches on my knit tops that I make. I make stitch recipes using my Bernina software applying them in a half circle at the top neckline which turns an ordinary knit top into a dressy and custom top that no one else can have. Not only are the combinations endless but the threads and colors you use changes the whole look.
-
I’m trying to use them on more things. I mostly use them on quilts. Wow lots if posts from people.
Leave a Reply
You must be logged in to post a comment.

Around cuffs and collars