Sew a Hanukkah Menorah Table Runner
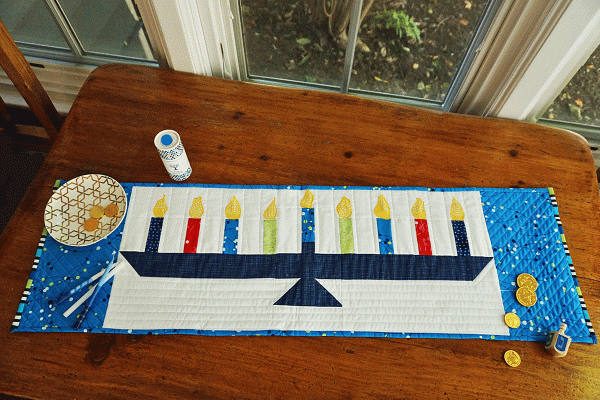
Hanukkah is the Festival of Lights, and what exemplifies that more than the Hanukkah menorah? This pieced table runner (which you can probably make from fabrics in your stash) is just the way to add a festive spirit to your house for the holiday.
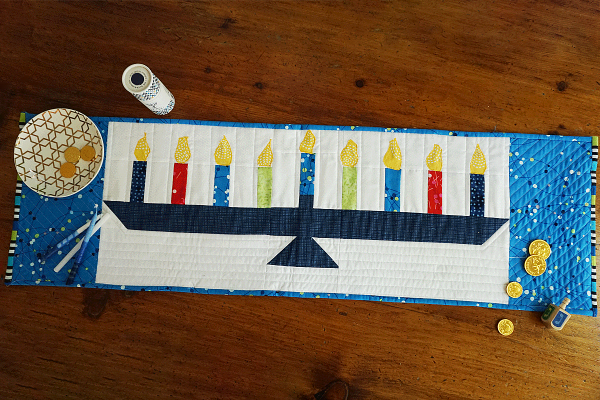
Although this table runner may look complicated, taken one step at a time it is pretty simple piecing. You may find you can accomplish it without buying any more fabric (although we all love a reason to buy more fabric, don’t we?!) This project may take a beginner a day to complete, more experienced piecers will find it goes together pretty quickly.
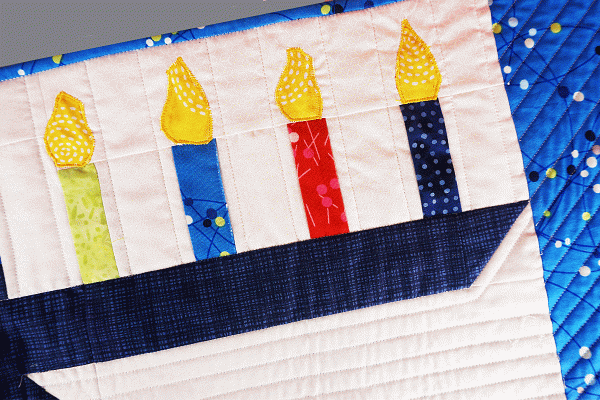
Materials to Sew a Hanukkah Menorah Table Runner
Fabric
- Background fabric: About one 1/3 yard
- Candle fabrics: Four (4) strips about 7 x ½” and one strip 3 ½ x ½” (these can be all the same or different)
- Menorah fabric: 1/4 yard
- Flame fabric: Piece about 2” x 8”
- Border fabric: 1/4 yard
- Backing and batting for finished table runner: About 12” x 36”
- Binding: Less than 1/4 yard (3 strips of fabric 2” wide)
Additional Materials
- Rotary cutter, mat and ruler
- Thread
- Neutral for piecing
- Colored or clear for the free motion stitching of the flames
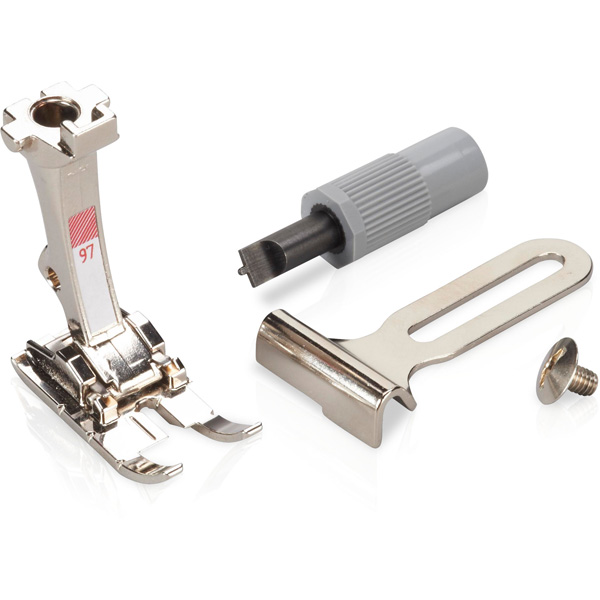
- BERNINA Patchwork Foot (Patchwork Foot #37/37D, Patchwork Foot with Guide #57/57D or Patchwork Foot #97/97D)
Let’s Get Started!
Cutting Fabric
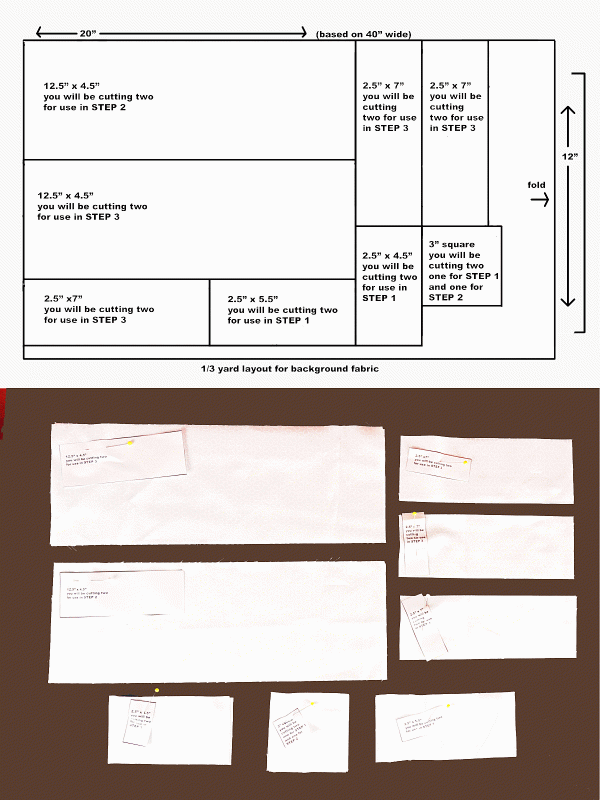
The most complicated part of the cutting are the various background fabric pieces. In order to maximize my yardage, I used the attached guide to cutting layout and pinned the identifying labels to the pieces as I cut, setting aside the different pieces by step. Because the layout is for folded fabric, each cut will yield TWO pieces.
Background Fabric
(Here I have used white)
- (2) 5 ½” x 2 ½”
- (2) 4 ½” x 2 ½”
- (2) 3” square
- (4) 12 ½” x 4 ½”
- (4) 2 ½” x 7”
This is the layout to maximize your yardage for your background fabric
Menorah Fabric
(Here I have used navy)
- (2) 3” square
- (2) 10 1/2 “ x 2 ½”
- (1) 2 ½” x 5 ½”
- (1) 1 ½” square
- (1) 2 ½” x 1 ½”
Candle Fabrics
- (1) 1 ½” x 3 ½”
- (4) 1 ½” x 7 (These can be the same or different—I used four different fabrics)
Edge Borders
- Two (2) 12 ½” x 6 ½” pieces (This can be a single fabric piece or you can piece it—finished two or three-inch squares would fit perfectly)
Backing and batting for the finished piece 36” x 12”
Binding Strips
- Three (3) strips—width of fabric each 2” wide
Steps to Sew a Hanukkah Menorah Table Runner
Step 1. Center Section with the “Shamash” Candle
This is the most complicated section but if you follow these steps, it should go together quickly.
Start by creating the four half-square triangles you will need for this project.
(Note: I do my half-square triangles a little differently than you may have learned. I always cut my fabric one inch larger than the finished size of the half-square triangle blocks. Why? Because that little bit of wiggle room ensures I can trim them to perfect half-square triangle blocks if my sewing is a little off. So for a block that is 2” inches finished in the quilt (2 ½” raw), I cut the squares at 3”.)
Place one background square and one menorah fabric square right sides together. Draw a line from one corner of the background fabric diagonally across to the other corner. This guideline is not a sewing line. Sew ¼” away from the line on one side and then ¼” away on the other. Cut on the drawn line and you will have two half-square triangle blocks.
Press them open and flat. Trim to 2 ½” square.
Your two menorah fabric 3” squares and two background fabric 3” squares will yield four half-square triangles, set two aside for Step 2.
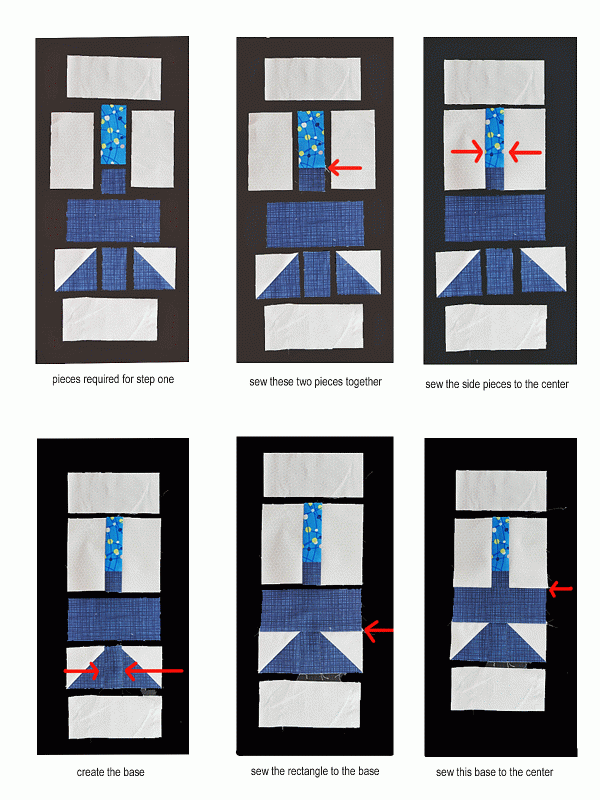
- Sew the 1 ½” menorah fabric square to the 1 ½” x 3 ½” candle rectangle as shown
- Sew a 2 ½” x 4 ½” piece of your background fabric (mine is white) to each side of that section
- Sew the two half-square triangles to the menorah fabric rectangle to form the base unit.
- Sew the 2 ½” x 5 ½” menorah piece to the top of this unit
- Sew this new base unit to the rest of the center unit
- Finish by sewing the top and bottom 5 ½” x 2 ½” background pieces to the center unit.
Step 2: The Menorah
You will be making two of these units, mirror images of each other.
You will be using the other two half square triangles you created in Step 1 for this step.
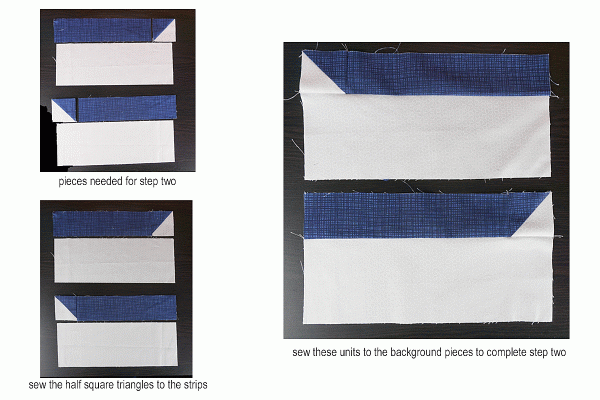
- Sew each half-square triangle to the end of a menorah fabric strip of 10 ½” x 2 ½” (be sure to orient them the right way)
- Sew these units to each 12 ½” x 4 ½” background piece
Step 3: The Candles
Here you will be making one unit that will be cut in half to form the two sets of candles.
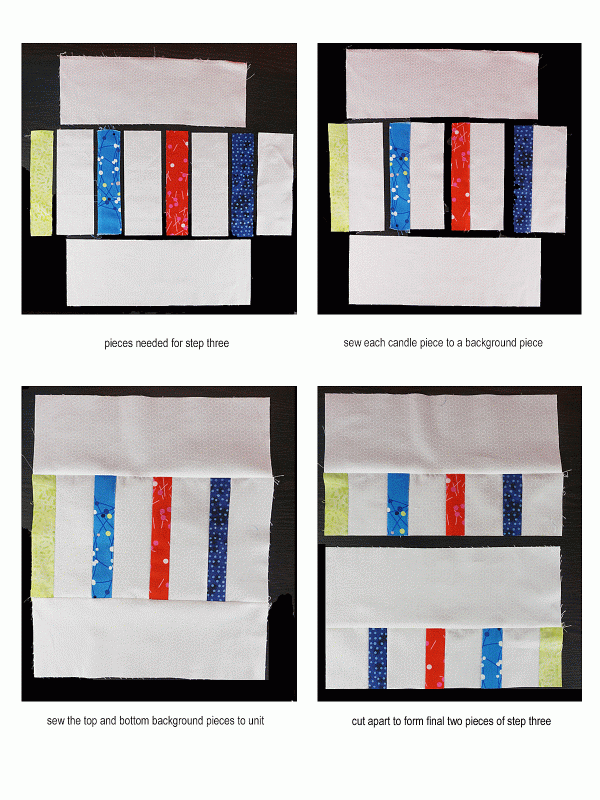
- Sew each candle 1 ½” x 7” strip to a 2 ½” x 7” background strip
- Sew these together to form a strip that alternates candle, background; candle, background; candle, background; candle, background
- Sew the 4 ½” x 12 ½” background pieces to the top and to the bottom of this unit
- Fold in half and press lightly to cut apart in the center, or simply measure up 3 1/4” from each horizontal seam to cut in half. You will now have two mirror-image units.
Step 4: Putting it all Together
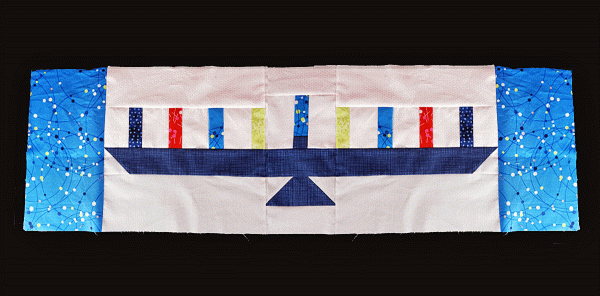
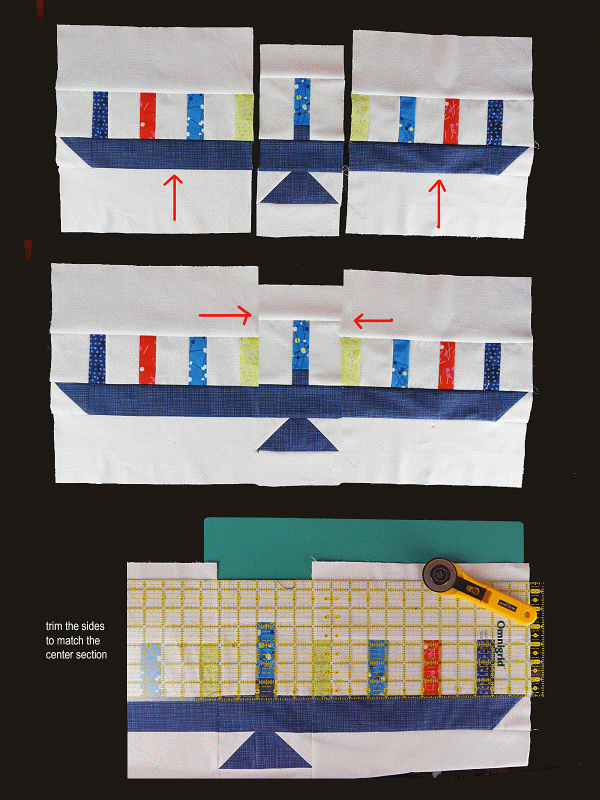
- Sew each candle unit to a menorah base unit, making sure that the first candle is on the “inside” edge like the sample shown
- Now attach these two pieces to the center unit, again with the orientation as shown, matching the seams of the menorah
- Trim the top of the table runner even with the top of the center section
- Sew the borders to either side—you can place any kind of border, any size you wish on the ends of your table runner. A single fabric as shown is fine, a scrappy piecing using all your candle fabrics could also be colorful and fun—and since the finished measurement for each side border is 12” x 6”, you can use either two or three-inch squares (finished). Add one to each side of the menorah unit.
- Layer with batting to sew the flames:
Don’t have a piece of batting the right size? Did you know you can combine leftover pieces of batting to make a useable piece? As long as the batting pieces are the same fiber and weight, simply cut a clean edge from the pieces you want to combine, butt them up against each other (no overlapping) and use a wide zig-zag stitch to connect them.
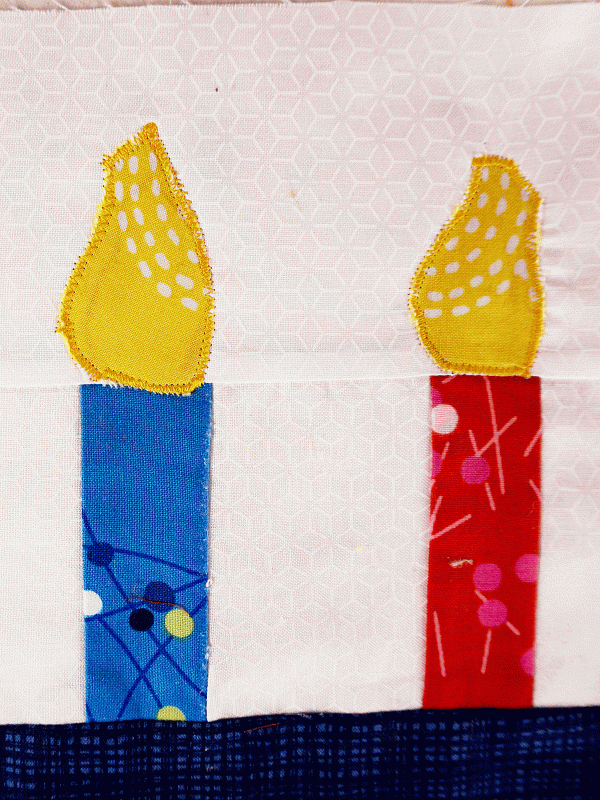
The candle flames are cut free-form out of fabric and attached in place using a satin stitch which is simply a zig-zag stitch set at about 0.5 width and 3 length. These numbers are not critical—you can set yours where you like the look of the satin stitch. You can also sew them on using a clear thread and a regular straight or zig-zag stitch around the edges. Either way, your choice.
Back it, quilt it, bind it.
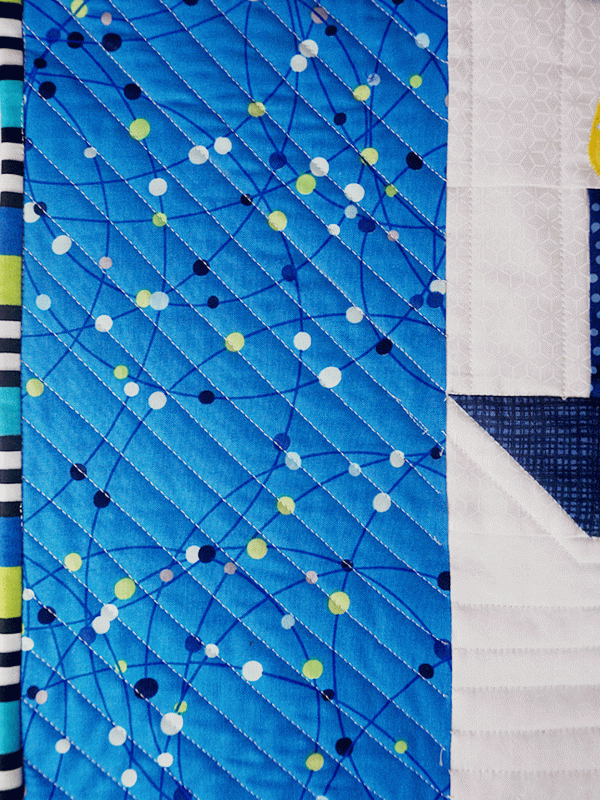
And you are done!
Leni Levenson Wiener | www.leniwiener.com
What you might also like
7 comments on “Sew a Hanukkah Menorah Table Runner”
-
-
So glad you like the projects. If you ever have any ideas about projects you would like to see for the Jewish Holidays, please email me and let me know. You can reach me at [email protected]
Happy Hanukah!!
-
-
Thanks so much for these projects! My family has really enjoyed watching Chanukah projects on my Bernina this year. Can’t wait to give them away! Thanks again. JSM
-
Have fun making them. My grand daughter and I spent some time at the BERINNA today, as well. Making projects and building memories.
Happy Hanukah!
-
-
Cute table runner. It inspires me to think of making one where I would embroider a menorah in the middle of the table runner and then make matching place mats with an embroidered candle or dreidel in the middle of each one. I would still do some piecing and would stitch in the ditch for quilting.
-
Thank you for mentioning this project in today’s email. I think I have time to make it this year. it will be fun for practicing some free motion quilting.
-
Glad you like the project. Since I made this the first time several years ago, it has become part of the hanukah tradition at our house. Hope you have fun with it, and enjoy it for years to come. Happy Hanukah!
Leave a Reply
You must be logged in to post a comment.




Thank you for finally including Hanukkah projects. They have been sorely missed.