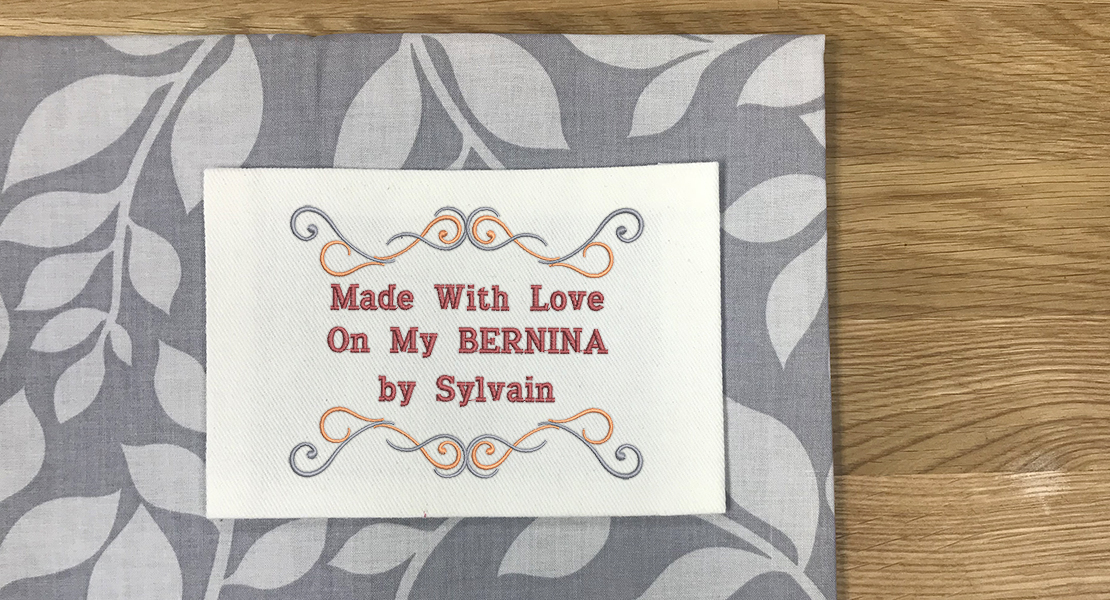
Fusible Quilt Label
Have a completed quilt that just needs a label? Can’t think of the perfect title for your masterpiece? Follow the instructions below to create a custom embroidery design to stitch out as a quilt label.
Materials to Create a Quilt Label
- BERNINA 590 and embroidery module
- Drop-Shaped Embroidery Foot #26
- Fabric for the label, large enough to hoop (12” x 15”)
- Ultra Clean and Tear Stabilizer large enough to hoop (12” x 15”)
- 505 Spray Adhesive
- Medium Weight Fusbile Interfacing 8” x 10”
- Isacord embroidery thread
- BERNINA Midi Hoop (recommended) or Large Oval Hoop
- OESD Tear Away Embroidery Tape
Download the Straight Stitch line to define the label contour
INSTRUCTIONS
Finished label size: 5” x 7 1/2”
STEP 1: Open the seam line design:
1. Set the machine to Metric measurements in Setup.
2. Open the design Fusible Layer Seam from the USB Stick.
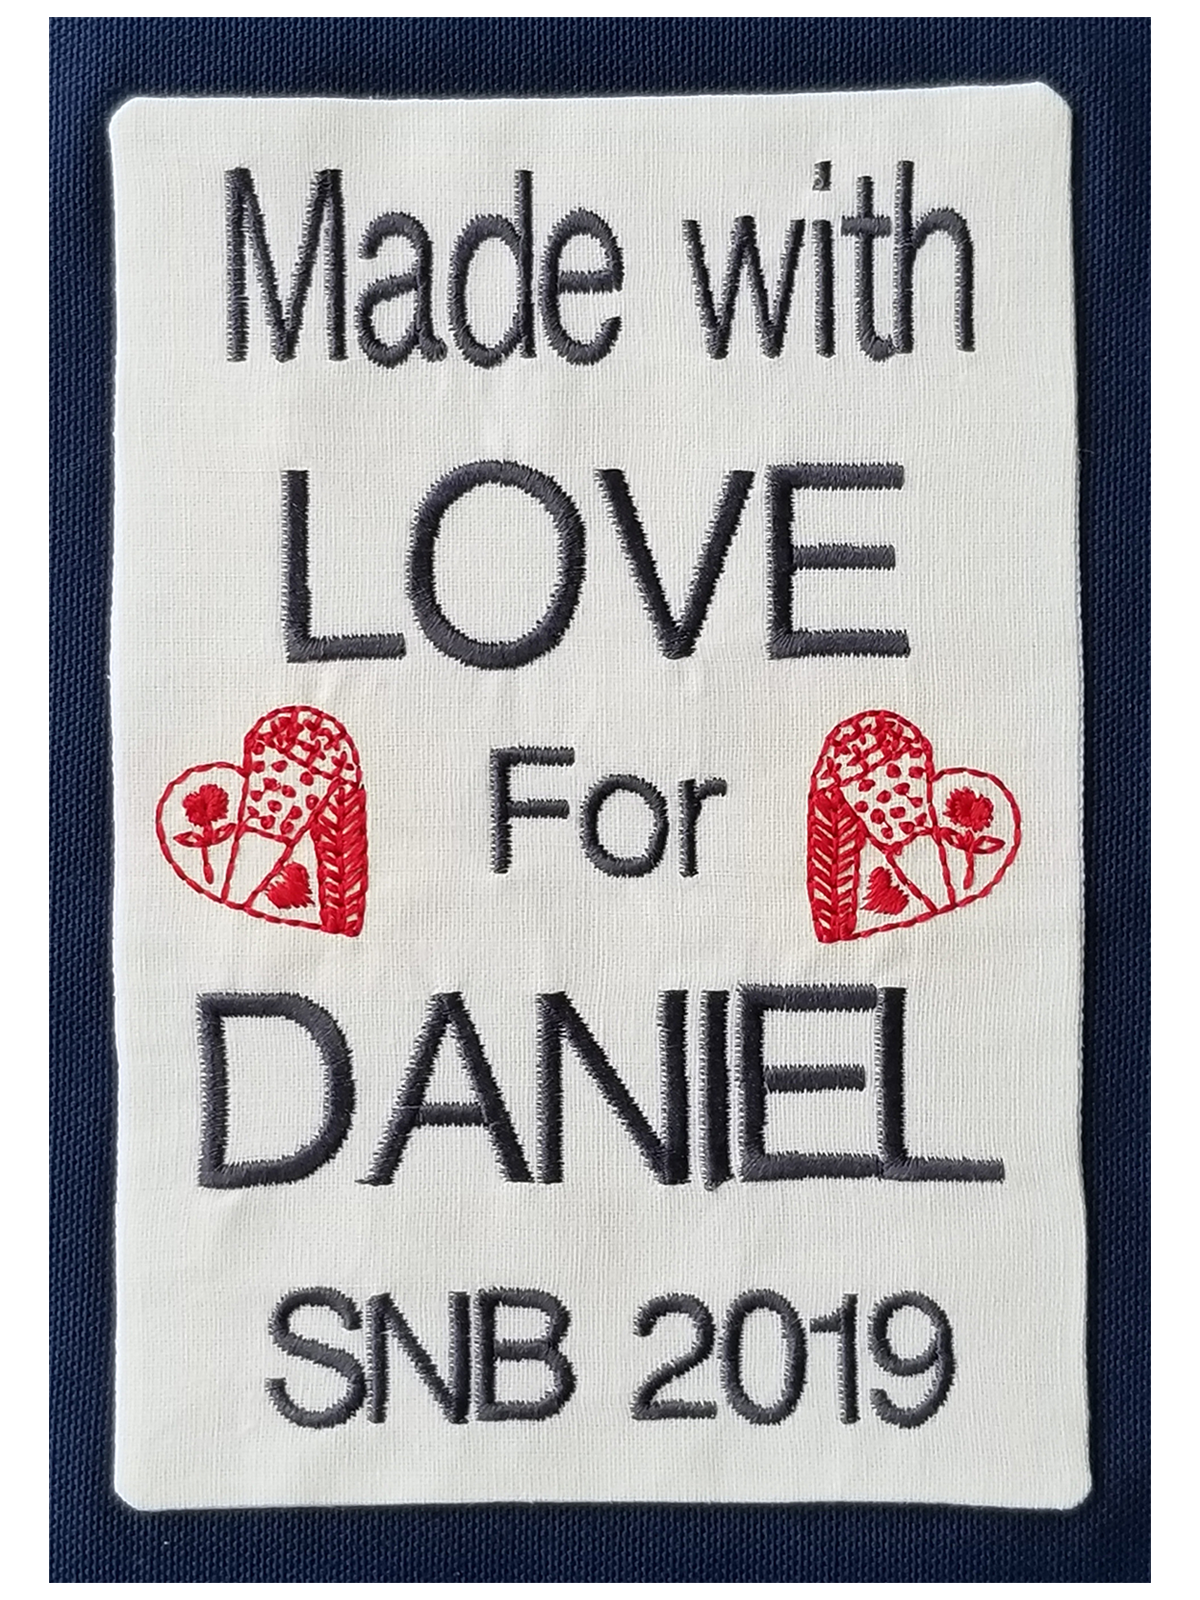
- This is a line of straight stitching that will attach the fusible layer to the actual quilt label. It is 130 mm wide by 190 mm tall and will fit in the Midi Hoop. It can be reduced slightly in size to fit a Large Oval Hoop.
- It will serve as the frame of reference, delineating the label edges.
- There is no gap in the line of stitching: the fusible layer will be slit from the back at the end to flip the project right side out.
- NOTE: The seam line will be moved to the end of the stitch sequence once the label is designed.
- PRO TIP: this seam line was created with a short stitch length to secure the layers firmly together and to help ensure crisp edges for the finished label. It can be resized independently (height separately from width) to accommodate various sizes and shapes of labels.
3. Verify hoop selection and show the grid:
- The design should have caused the machine to call for a Midi hoop. If another hoop is indicated on screen, select the Midi hoop. If using the oval hoop, select the oval hoop and then size the seam line to fit.
- While in the Hoop menu, show the full grid (touch the grid icon twice).
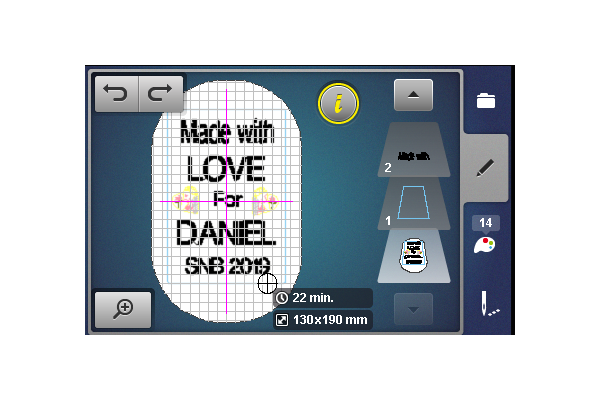
4. Your screen should now look like this:
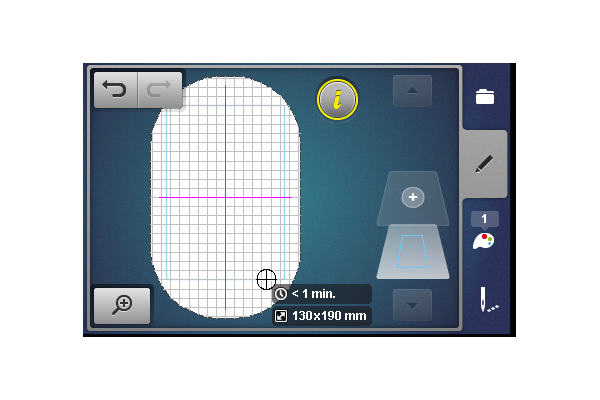
STEP 2: Add the text lines to the label:
1. To add the lettering in 4 lines:
- Touch Add (+) layer.
- Select the Machine and Alphabets folder.
- Select the alphabet of choice (here: Swiss Block).
2. Create each line separately and move it within the delineated label area to space the lines:
- Each line of text will be centered left-to-right when created. It only needs to be moved up or down (using the Information display (“i” icon) > Move Motif > Lower Multifunction knob) to position on screen.
3. The following guidelines will size and place the lettering on the label:
- You can fine-tune placement after the lettering is all created.
- This will yield a slightly larger spacing around the third line (“For”), making room for the decorations that will be added after the lettering.
- “Made with”
- Size: 66%
- 1 grid square below top of rectangle
- “LOVE”
- Size: 100 % (as is)
- 2 grid squares above the center cross hair
- “For”
- Size: 66%
- In the center of the hoop
- “DANIEL” (your recipient’s name)
- 100 % (as is, or smaller for longer names – make sure the name fits within the seam line with one grid square of margin)
- 2 grid squares below the center cross hair
- “SNB 2019” (your initials and year)
- Size: 66%
- 1 grid square above the bottom of the rectangle.
4. To adjust spacing between the lines of text:
- Note: the first and last lines should remain a grid square away from the top/bottom of the framing rectangle to maintain a margin around the label text.
- Select the other lines and nudge up or down, coordinating placement with the third line so as to leave more space above and below the third line for decoration placement.
5. Your design should now look like the following:
STEP 3: Add the embroidery decoration:
1. Add design 80284-48 (heart motif) from the Make Stitch Sew by Crabapple Hill – OESD Embroidery Collection 80284.
- Touch the Add (+) layer.
- Select the USB Stick, locate and select design 80284-48.
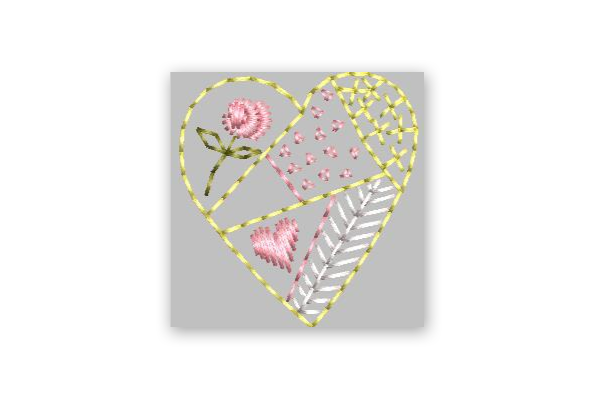
- Note: it will open in the center of the hoop and be selected automatically.
2. Rotate the heart to the left by 30 degrees:
- Information display > Rotate icon > turn Multifunction knob to the left
- This will make the slanted line of the heart vertical, for better framing of the name.
3. Position the heart to the left of “For”:
- About 1 1/2 grid square to the left of the “F”
- Vertically aligned against “For”.
- TIP: use the zoom tool to enlarge the grid view. It will make placement much simpler.
4. With the heart still selected:
- Duplicate it: Information display > Duplicate icon.
- Select Mirror Image left/right.
- Position the second heart to the right of the word “For”:
- About 1 1/2 grid square to the right of the “r”.
- Vertically aligned with the first heart
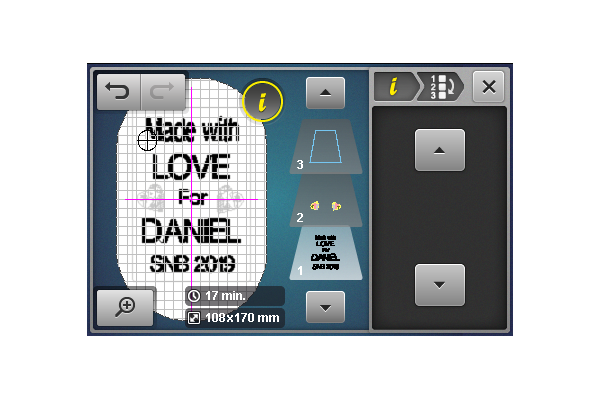
5. Your design should now look like the following:
STEP 4: Rearrange the embroidery sequence:
1. What will be done:
- Group the hearts together.
- Group the lettering lines together.
- Move the Fusible Layer Seam (rectangle) to the end of the sequence.
2. At this point, both copies of the heart motif are next to each other in the embroidery sequence (layers 6 and 7).
3. To group the two heart motifs together:
- Select layer 7.
- Select Information display > Group Embroidery Motifs > Group.
4. To group the five lines of text together:
- Select layer 2 (Made with LOVE).
- In the Information display, select Group and touch Group four times (4x) until all 5 lines of text are grouped into a single layer (Layer 2).
5. We now have 3 layers in the design:

- Layer 1: Fusible Layer seam
- Layer 2: Lettering
- Layer 3: Hearts (decorations)
6. Move the first layer (fusible layer seam rectangle) to the end of the embroidery sequence, so the construction step will happen after the embroidery is done.
- Select Layer 1 (the rectangle)
- Use the Information display, select the Rearrange Embroidery Motifs icon and use the UP arrow tool to move Layer 1 until it becomes Layer 3.
7. Your screen should now look like the following:
STEP 5: Stitch the design.
1. Hoop your piece of fabric together with your Ultra Clean and Tear stabilizer.
2. Stitch the lettering and hearts. You may choose to consolidate thread changes with the Color Resequence icon.
3. Before stitching the last color change (seam line), place the fusible interfacing on top of the label area, with the fusible side down.
4. Tape the interfacing in place with OESD Tear Away Embroidery Tape.
5. Stitch the seam line.
6. Remove the project from the hoop and remove the stabilizer only from the outside of the rectangle.
7. Trim the fabric and interfacing to 1/8” from seam line. Carefully clip corners, leaving 1/16” from seam line.
8. Cut a slit in the back of the interfacing and turn right side out, gently poking out corners.
9. Fuse the label to the back of the project, following the manufacturer’s instructions.
BERNINA Made to Create Studio Online Lessons
Equilateral Triangle Table Runner
Free-motion Quilting with Rulers
How to Quilt Feathers with Free-motion and Rulers
Used Products


What you might also like


22 comments on “Fusible Quilt Label”
-
-
We didn’t include a downloadable version of the heart motif since it’s a licensed design. You can use any small design from your collection or better yet, built into the machine to decorate the label.
-
Sorry for the confusion, I meant the Fusible Layer Seam file, not the decoration.
-
Good news! 🙂
our editing team added a download link to the straight stitch rectangle that both defines the label contour and attaches the fusible layer. Look for it at the top of the post, right after the link to download the handout.
s-
Thank you!!
-
-
-
You used the term “breadcrumbs” in this video. What are you referring to? Love your videos…very clearly presented for the most part. Thank you very much.
-
-
-
Sylvian, thank you for this informative video! I learned so much about embroidery lettering and combining layers, not to mention how to make a great quilt label.
-
Hello Sylvain! Loved watching this video and having such great instructions. As the first comment mentions you do not have a download for the seam file. Did you create that stitching frame? Or is it available somewhere that is just not obvious to me? Thanks again and Happy April!
-
Good news! 🙂
our editing team added a download link to the straight stitch rectangle that both defines the label contour and attaches the fusible layer. Look for it at the top of the post, right after the link to download the handout.
s
-
-
Sylvian, this was a great video. Love your presentation style!
The only part I didn’t understand was the file you got from your USB stick. I understand that the design is licensed and I can pick something else. What I didn’t understand was the other file. I think it was called the “fusible” file?? Or is that included with the design? It looked like there were two things on your USB.
-
Good news! 🙂
our editing team added a download link to the straight stitch rectangle that both defines the label contour and attaches the fusible layer. Look for it at the top of the post, right after the link to download the handout.
s
-
-
Wow that was a great video — I learned a lot just by watching our professional — I loved the large rectangular label but is there a pattern for making very small personal labels like you need for children’s oneseys? thank you!
-
We don’t have a post on this specific topic, however you may find these useful:
-
-
Thank you Sylvan for creating this post. This is very useful as I never seem to have the right label for my quilts. I can do as you’ve created or still make my own version within the size you created. Thank you!
-
Do you have a tutorial on hooping stabilizer in the midi hoop? I cannot get the stabilizer taught in the hoop. I have less trouble with the other hoops that came with the Bernina 770.
-
Hi Kathy,
this might help: https://weallsew.com/machine-embroidery-hooping-3-ways/
-
-
Great tutorial. Thank you!
-
Thank you for a great video. I would like to know if My Bernina 750qe has the capability to do this project. Thank you.
-
If memory serves, your B 750 QE E does not allow to combine lines of lettering on screen. That being said, you can create each line separately, position it in the hoop and then stitch it out. When one line is done, you can repeat the process with the next. It will be easier to position each line in turn if you mark horizontal lines (one for each line) along with a single vertical line in the center.
-
-
Fantastic video and instructions!! I find it very useful to see the steps on the machine screen. I’m still learning how to use the machine. Thank you for doing a great step by step video and look forward to seeing more!
-
How do you make the stitch line in Designplus v8.2? Can I make the file you gave us for download a larger size to use on another project? Thanks for the great tutorial
-
In DesignerPlus (any version) you would use the rectangle tool with a straight stitch outline stitch type to create the outline of the label. Note that the rectangle stitch file is provided at the top of this post (look for the link labeled: ‘Download the Straight Stitch line to define the label contour’)
-
Leave a Reply
You must be logged in to post a comment.

Thank you for a very clear video. I had never really understood how to combine several lines of lettering. This step by step, including several lines, was a great tutorial.
Did you mean to include a download of the seam file? I see the download of the instructions, but not the file you indicate is from the USB stick.