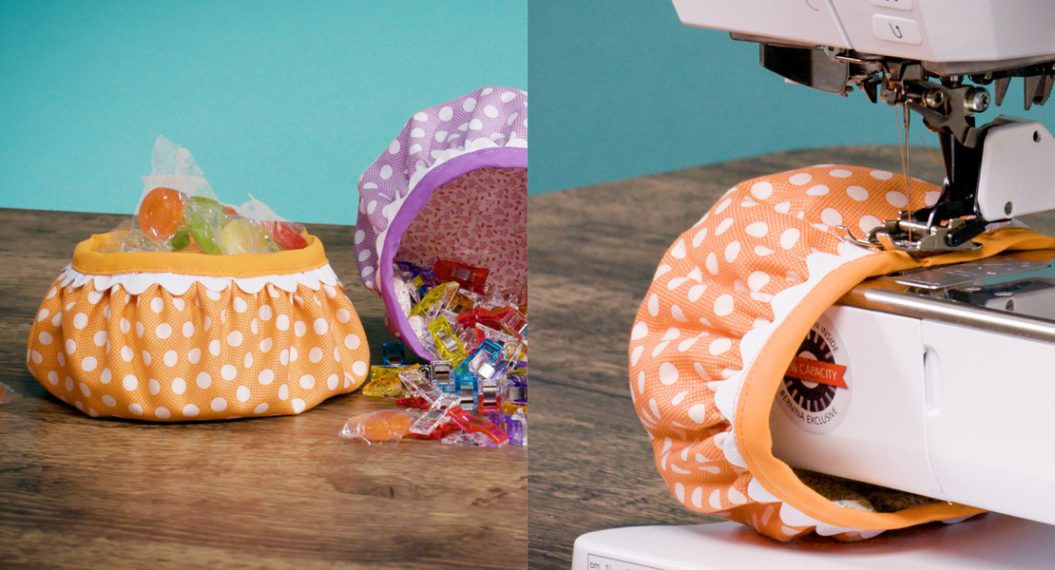
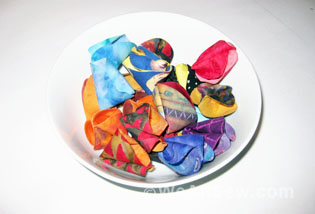
How to Sew a Fabric Candy Bowl
I love having small seasonal projects that can easily be swapped out, and this one has the bonus of being able to hold candy! This oh-so-easy bowl is so fun to make that you will create one for every holiday and all your friends!
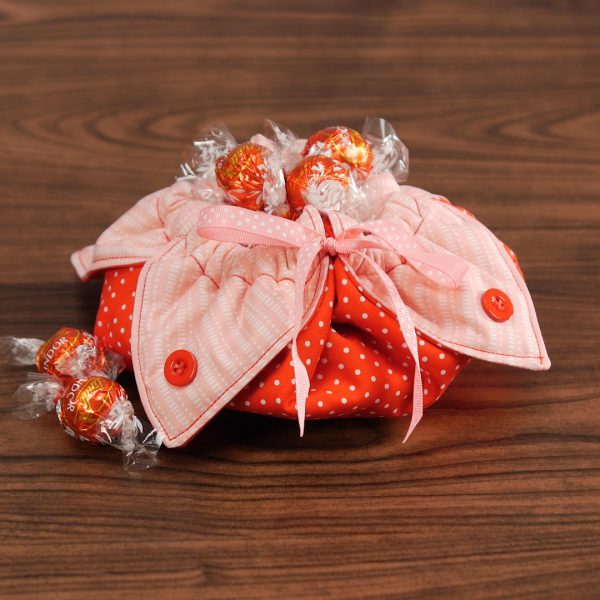
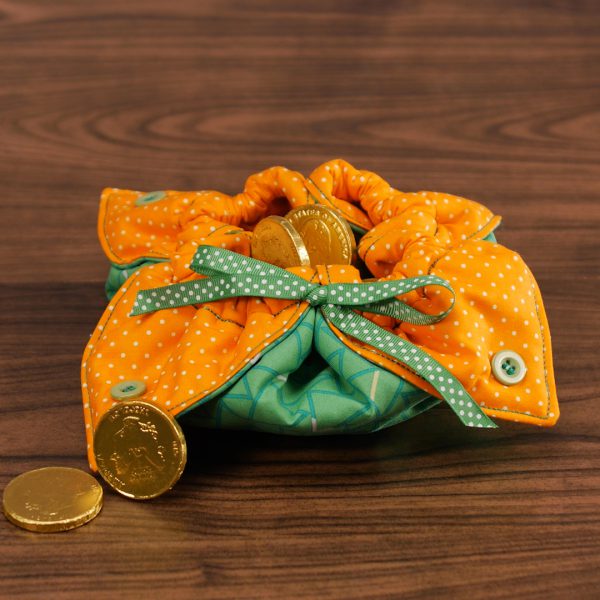
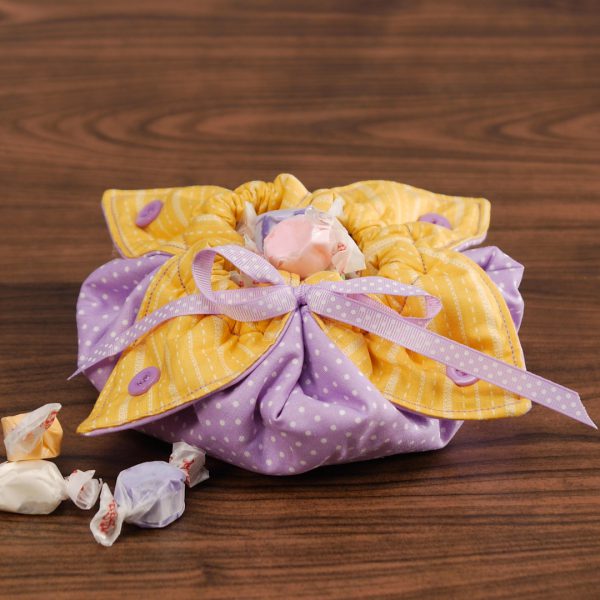
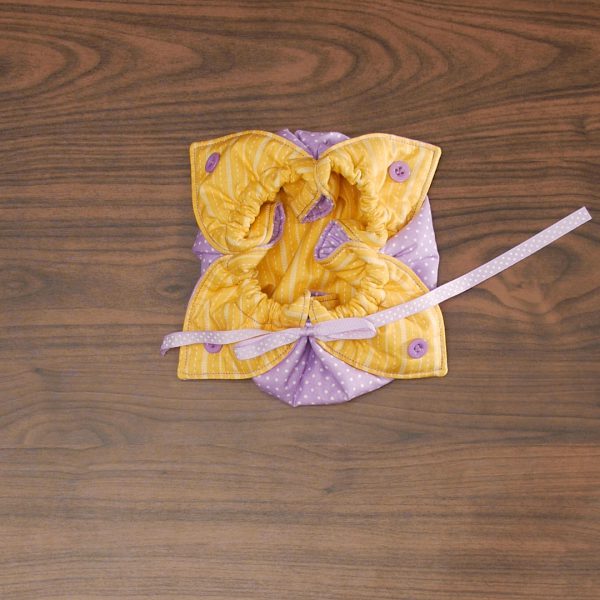
The trick that makes this project come together so quickly is that it is constructed flat, then made dimensional with a ribbon to gather up the sides.
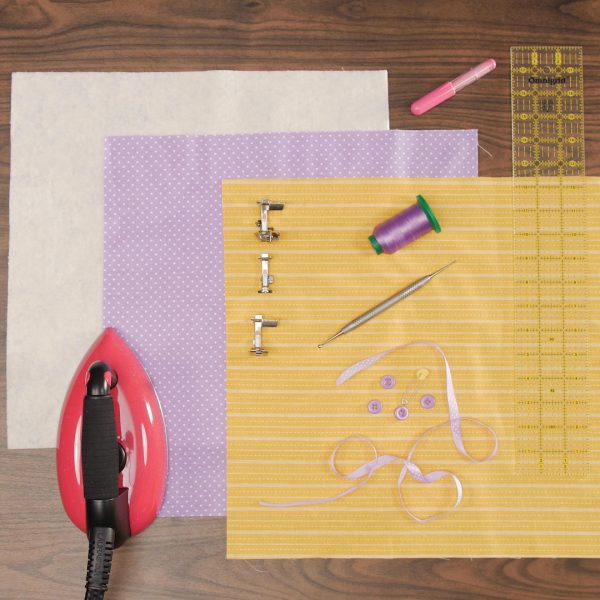
Supplies to Make a Fabric Candy Bowl
- (2) 16” squares fabric
- (1) 16” square batting
- 1 yard 3/8” ribbon
- 4 buttons
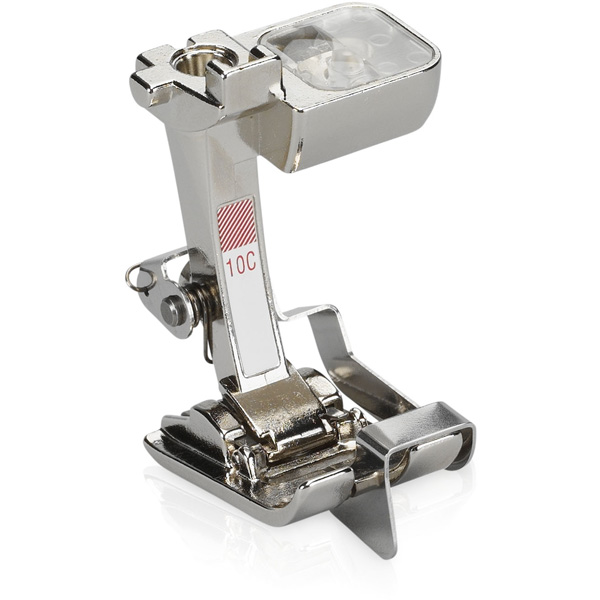
- Edgestitch Foot #10C
- Reverse Pattern Foot #1C
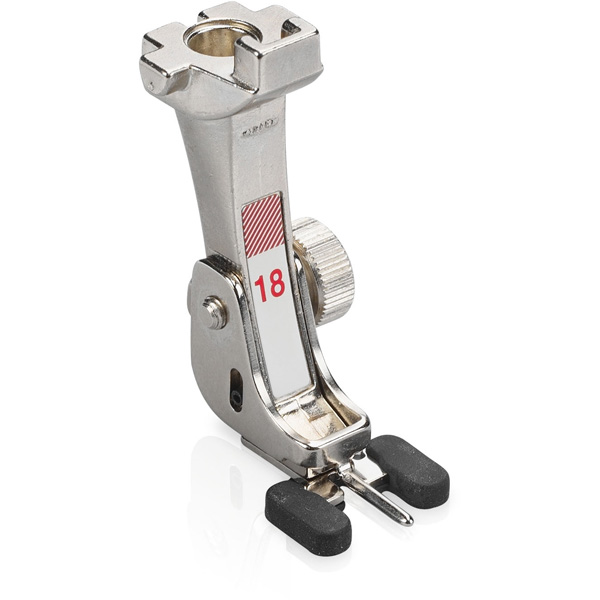
- Button Sew-on Foot #18
- Isacord 40 weight Embroidery Thread
- OESD Expert Point and Press Tool
- Iron
- BERNINA 480
- Marking pen
- Ruler
Steps to Make a Fabric Candy Bowl
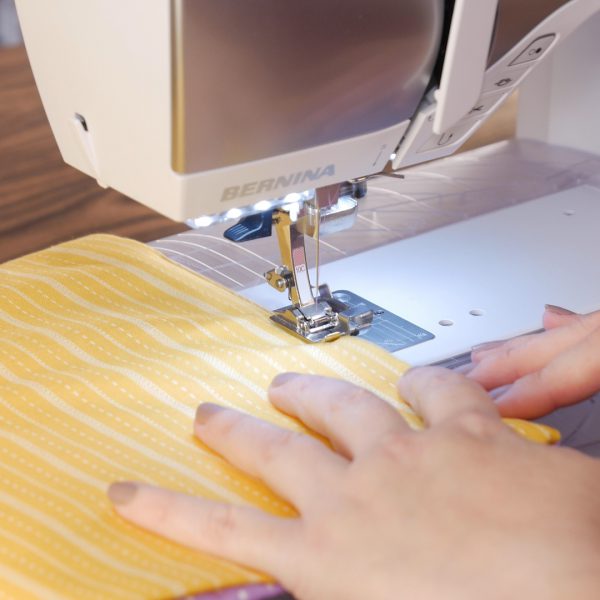
Layer the two fabrics, right sides together on top of the batting square.
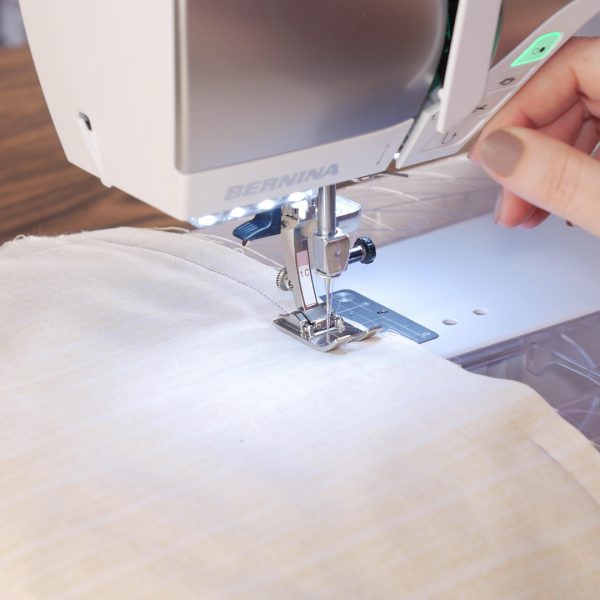
Thread the machine, top and bobbin, with Isacord.
Attach the Reverse Pattern Foot #1C. Using sewing thread and a ½” seam allowance, sew all the way around the outside of the square, leaving a 5” opening on one side. Don’t forget to backstitch!
Clip the corners.
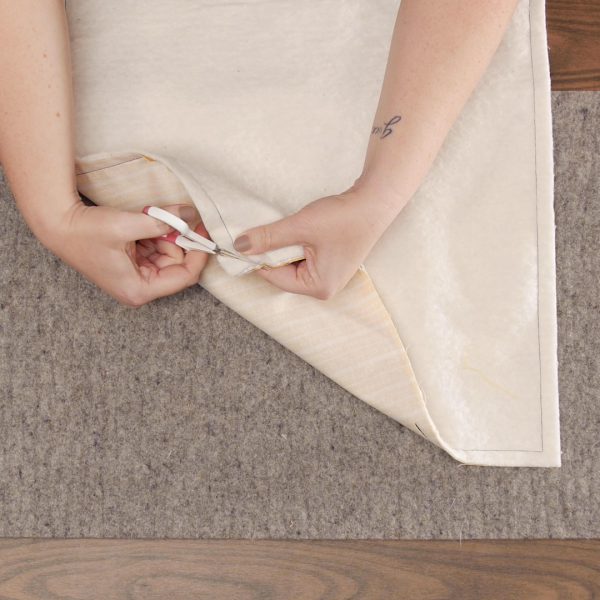
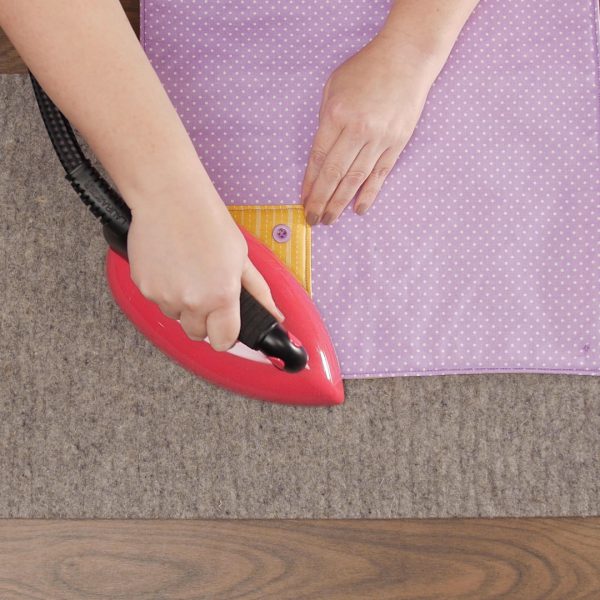
Turn right sides out, using the OESD Point and Press tool to push out the corners.
Press well, tucking the seam allowance in carefully at the opening.

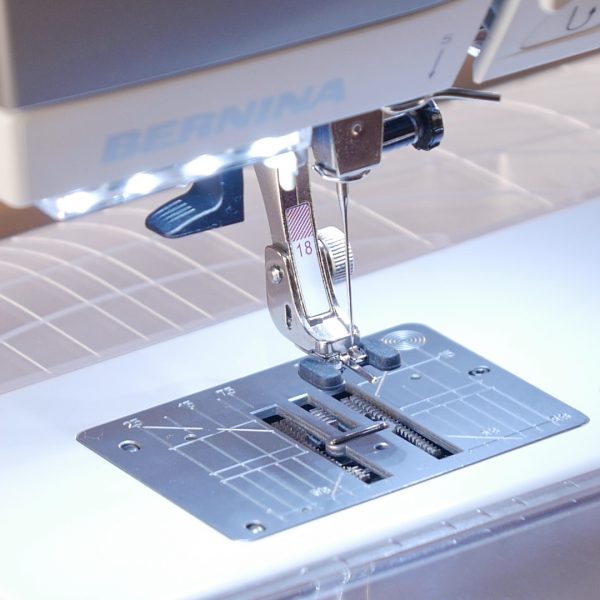
Attach the Edgestitch Foot #10C.
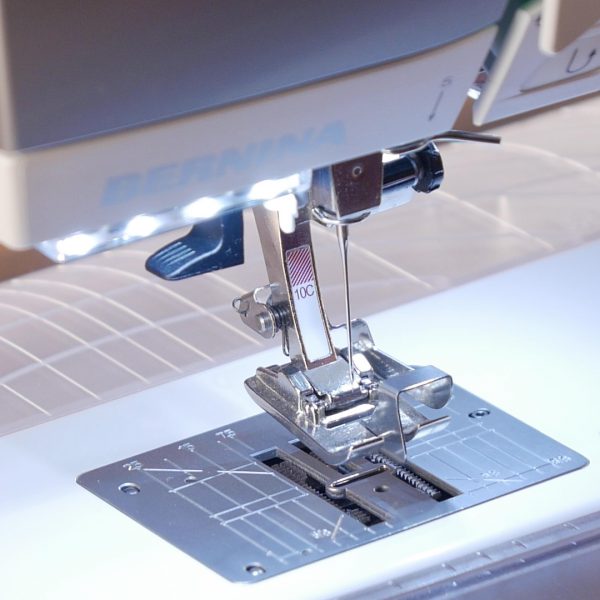
Set needle position to -3.

Align the fabric edge to the left side of the foot blade. Select the triple stitch, and edgestitch all the way around the square. Use the automatic thread cutter when complete!
Attach Button Sew-on Foot #18.
Using the Button Sew-on Program, sew a button on each corner of the square. (This button is purely decorative.) For more information on how to use the Button Sew-on Foot, take a look at Megann Freese’s blog post on buttons and buttonholes from her Garment Sew Along Part 9 blog.
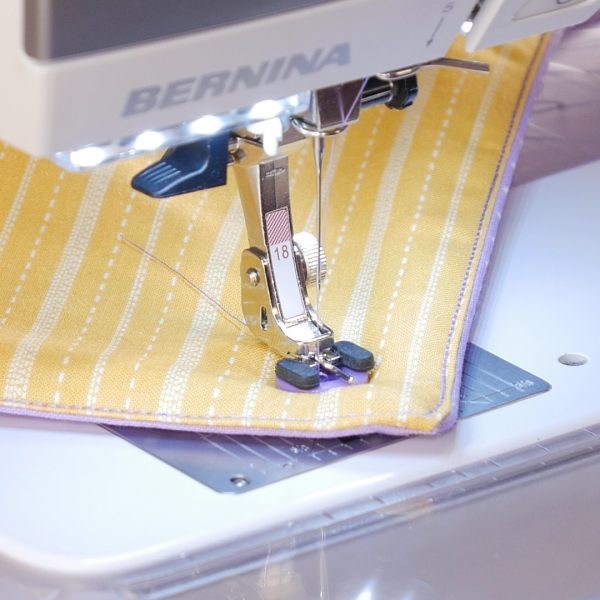
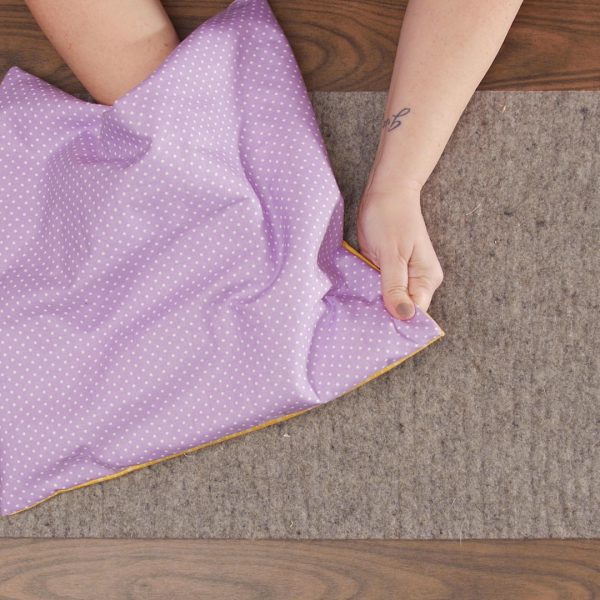
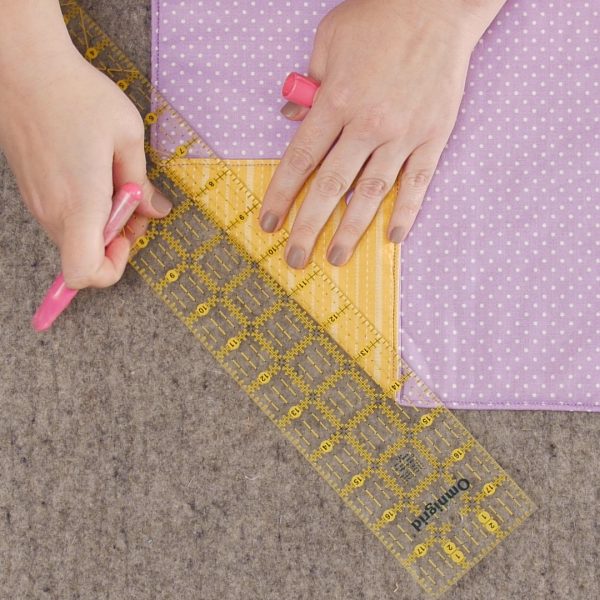
Measure 5” from each point and mark.
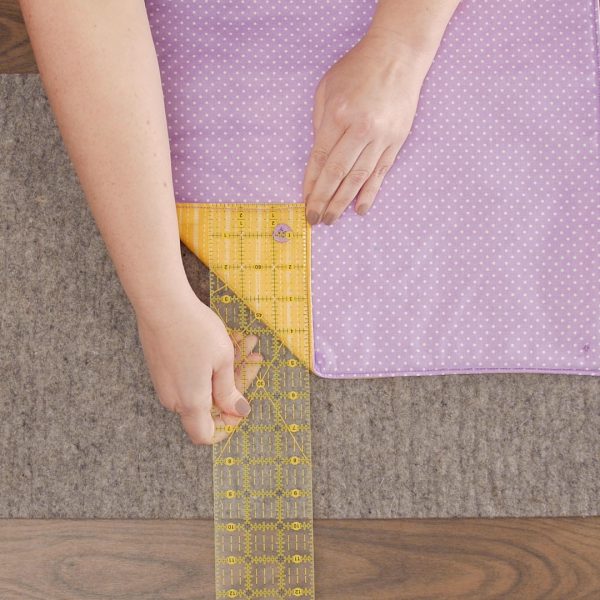
Fold at marks and press well.
Measure ¾” from each folded edge and mark a line.
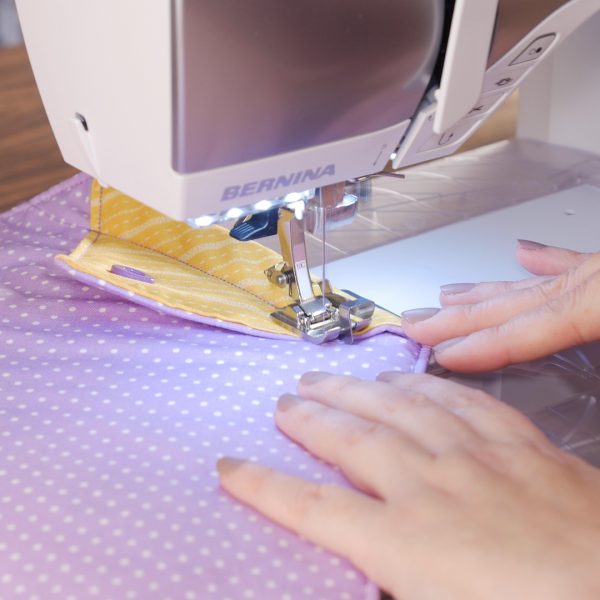
Attach Edgestitch Foot #10C. Select the triple stitch and set the needle position back to center.
Stitch along the marked lines, forming a casing.
Attach a pin or bodkin to your ribbon. Thread the ribbon through the casing and cinch up the bowl.
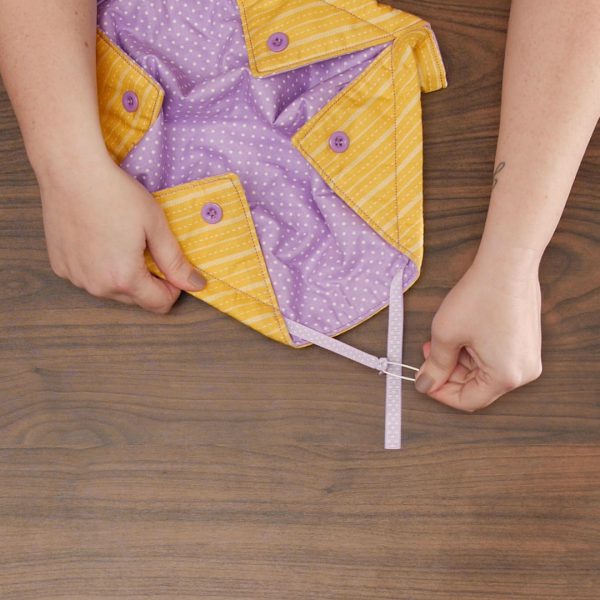
Tie a bow and trim the ribbon ends as desired.


What you might also like


1,013 comments on “How to Sew a Fabric Candy Bowl”
-
I not working on any handmade Valentine’s gifts this year. I don’t usually make things for Valentine’s Day; I just give cards and maybe a sweet treat or toy.
-
I want to make this fabric candy bowl after seeing it! It’s adorable and a great little something to give someone special!!
-
I am making small lampshades to put on wine glasses.
-
Those sound interesting and cute, would you share a photo when done?
-
-
I think I am going to make some also
-
I do too, it’s looks perfect for giving treats to my coworkers!
-
I would like to make fabric Valentines with my Bernina.
-
I agree! Pretty ingenious! Now to find the right fabric…..
-
-
I challenged my sew group to make a Valentine’s Day card, so I’m working on mine!
-
Hopefully I can make several of these bowls for neighbors and relatives if I start now.
-
I have a mug rug pattern I want to try.
-
I love mug rugs! I am working on one now.
-
-
I am making personalized wine bottle carriers for friends and relatives.
-
I made an x and o and hearts for my daughter
-
I am making the Christmas tea light covers currently.I will make one of these cute candy bowls for Va!entine’s Day and Easter.
-
I want to make a mini quilt for my valentine:)
-
I am new to Bernina, and never made Valentine gifts before, but will make these for my daughters! They are adorable! Thank you so much!
-
This is a cute project. I usually don’t do Valentine projects specifically but this could be done for any time of the year.
-
I was going to make some zippered pouches in valentine fabric, but now I think I’ll make some of these fabric candy bowls!! So cute!
-
I’m going to try a few a these bags and 3 table runners. I have copied to fabric some old valentine postcards and plan on using those!
-
I will be making some valentine mug rugs for gifts for family and friends.
-
Making cute Gnome Mug Rug – embroidered design, and I like this candy bowl so maybe make a couple of these!!!!
-
Going out today to get fabric and ribbons for candy bowls plus I will be making heart fabric masks for people.
-
I’d like to make this candy bowl. I can see uses other for other things.
-
I want to make a heart throw for my precious Mom.
And maybe some dish towels for neighbour. -
I love making Valentine’s gifts for the grandchildren, especially those who are far away.
-
I didn’t plan on making anything until I saw this adorable candy bowl. It is perfect! How easy and fast this looks.
-
I’m making beaded postcards this year. Friends and family love getting these postcards in the mail!
-
none. But plenty of other projects to work on.
-
I’m making English paper pieced hearts to appliqué on Valentine’s Day cards. Using Kaffe Fassett fabric.
-
-
I’m going to make the faux bowls for my grandbabies. I think they’ll love them.
-
I just might make the candy bowl, real cute. However I am making small table runners with a valentine motif.
-
I have so many fat quarts. This looks like a great and simple gift for anyone! I can use up my stash a little bit for Valentine’s Day and a few extra for Easter maybe.
-
I usually make pillow cases for every holiday – no exception to the day meant for hearts!!!
-
I’m going to try a paper pieced heart- never did paper piecing before. I taught the above “bowls” in a smaller size as reusable gift bag pouches for Christmas. Used two drawstrings though for easy open and close.
-
I am making myself complete all projects currently on my work table, which include a quilt, a dress for my granddaughter, a shirt for my grandson and about a new quilt book with a stack of fabric I got for Christmas!!! It’s “UFO” year for me!!
-
I am making a Valentines Tea Towel.
-
I am making lamp shades for wine glasses and add a votive light.
-
Would love to finish my red/white heart quilt!
-
I’d like to make a 12×12 heart wall hanging.
-
I’m making felt gift card holders and Valentine bafs
-
I like to make homemade coasters, mug rugs or small wallhangings for holidays. For Valentines Day I can add hearts and cute candy heart fabrics. Sew Fun…
-
-
I want to make this fun candy bowl. It looks like a fun project!
-
I would love to make one of these candy bowls. But I think I should finish my quilted advent calendar
-
I’m a new sewist and just made my first zippered pouches so I plan on making a few zippers bags for Valentine’s Day gift and I’m going to try this candy bowl next to learn a new skill with buttons.
-
I’m working on a quilt for a friend but not sure it will be done for a Valentine.
-
I am not seeing a Valentine’s item this year. I have a grandchild on the way and projects are lined up to welcome him or her !
-
I don’t think I’ll have time to make many Valentine gifts this year but this pattern is soo cute! I’ll have to try to make time to make it!
-
I am working on machine embroidered greeting cards.
-
I think I will try to make this cute candy bowl with left over valentine fabric & heart shaped buttons. I think you could also use this as wrap for a small gift. So cute! ?
-
What a great little project!
-
I’m making a table runner in red and white with hearts squares as the design.
-
Thanks for the inspiration to make these cute fabric candy bowls! For Valentines Day I’m making valentine themed dog scarfs for my sweet pups! ??
-
A Valentines Day table runner
-
I have many projects in the works , although I’ll probably make some valentine’s masks. The fabric bowl is very cute and appears easy as well. Maybe next year or I’ll change it up to suit other holidays.
-
I am making monogrammed soft linen draw string soap mitts/bags which hold my homemade soap!
-
I hope this comment gets me in the giveaway chance. I am not working on Valentine’s because I have a great nephew on the way and I have got to get his gifts made!! Plus Easter sewing. Thankful my Bernina 530 is such a workhorse!!!!!
-
Some mug rugs for the grands
-
Not sure yet what I’m making but that candy bowl looks adorable! I may make that plus a mug rug for my granddaughter for her favorite candies and a mug
of hot chocolate. ? -
Exploding heart quilt using Kaffe Fassett
-
I’d love to make some of these candy bowls for friends!
-
I’ll be making two of these candy bowls for my teachers and fill them with candy and valentine’s trinkets. I’ll also be making home made cards to go with them. If I have time, I’d like to make a pillow too, which I also found on this blog.
-
I usually don’t sew things for Valentine’s Day. I may have to try these candy bowls though.
-
I’m working on some simple Valentine’s mug rugs. I love little seasonal decorative touches for my house.
-
I am making ❤️ Shaped potholders for my sister and my daughters!
-
I’m working on embroidered triangle pouches for my grandkids.
-
I just finished a Valentine’s table topper.
-
This candy bowl looks like it would be fun to make for Valentine’s Day
-
I am making a baby girl quilt with appliqué hearts on it then will quilt flowers all over it
-
Would make a cute travel jewelry case.
-
Im working on a special quilt
-
I plan to sew some Scandinavian hearts for Valentine’s Day.
-
I think I’ll make these cute bowls for my grandkids!
-
I will make valentine cards again this year. I use paper piecing patterns for this.
-
I want to make a valentines quilt for myself. Have the fabric, just need to start.
-
A memory bear. Two actually.
-
I’m making reading pillows with embroidery and appliqués for my grand babies!
-
I am making some small wallets to give away to friends.
-
This is cute! My granddaughter would probably like this filled with some candy for Valentines Day.
-
I’m making fabric postcards for my grandkids. So many great ideas in the comments!
-
Embroidered valentine cards would be special for friends and family!
-
I want to make this cute candy bag for my 6 grands and 3 friends. Thanks!
-
I like making valentines as fabric postcards.
-
-
I am making some fabric bowls to fill with goodies for Valentine gifts, as well as fabric envelopes. Great tutorial for a cute fabric candy bowl, also perfect for a Valentines gift.
-
I’m setting up my sewing room and waiting on sewing tables to come in so maybe next year for Valentine’s Day.
-
-
I haven’t started anything for Valentine’s Day yet but I should as fast as time goes by.
-
My group of friends usually have a Galentine’s Day dinner out the week before Valentine’s Day to celebrate friendship. This year, because of Covid, we’ve decided to skip the gathering. Instead, I am making each friend a small zipped pouch in their favorite color. My plan is to deliver it to their doorsteps, filled with sweet treats!
-
I’m making fabric Valentines quilted with my walking foot.
-
I’m not making anything for Valentine’s Day at present. This bag, however, I will b making. ???
-
I am making cross studied cards for Valentine’s Day gifts?
-
I’m making seasonal pillow covers and seasonal mug rugs.
-
Embroidered valentine door hanger.
-
The Valentines Day candy bowl is on my “list” for this weekend❤️
-
I am always looking for fabric container ideas. This one is great.
The light would be so useful as my eyes are not what they used to be! Wonderful. -
Pink satin and tulle scrunchies for my granddaughters.
-
I don’t do anything for Valentines day. I do make things for other holidays.
-
I wasn’t sure what I was making until I saw your post. I’ll be making the little cute little fabric candy bowl for all my favorite valentines (grandchildren) this year. Thank you for sharing with us.
-
I really hadn’t thought of making anything for Valentine’s Day but after seeing this project, I will be making a few fabric candy bowls! How cute!
-
No projects yet, but I think I’ll make the fabric candy bowls for sisters retreat – which takes place the week of Valentine’s!
-
Just planning a place mat or 2 But now I am making some candy bowls. Sooooo cute
-
I love your Valentine suggestions and will be trying the candy bowl. I am making a quilt for my quilt rack that I use to display holiday decor. I love to decorate and appreciate your crafty suggestions.
-
Mini croissants body bags
-
This project is just tooo sweet to pass up making and sharing as an expression of LUV and appreciation. Have some ‘purrfect’ fabric in my stash in mind. Cats and Hearts — will be sooo cute.
-
I’m going to make that sweet fabric candy bowl for my Goddaughter in Seattle. Now I have to find some candy that won’t melt in transit.
-
I’m not making gifts, however, I am looking at either some pillow covers or a table runner this year.
-
Love the project, but would love to win that package even more! Thanks for the opportunity!!
-
I’m working on a tote bag to fill with goodies for my adorable little grandson for Valentine’s Day.
-
Not working on Valentines Day gifts but the candy bowl will definitely be on my Easter gifts list!!
-
I am making embroidered towels with embroidered towel holders for myself and amcouplemofmfriends for Valentine’s Day !
-
Designing gnomes and hearts for tea towel hangers ~ can’t wait to get started!
-
What a cute idea. I love that these projects help you learn different techniques . . .
-
I’m working on a wedding-quilt. I hope to have it finished by Valentine’s Day.
-
I am going to try the fabric bowl because I just purchased the button sewing presser foot, and this will be a great chance to give it a try. Love that the pattern can be used for all different fabrics and different seasons!
-
I am making a mobile which is actually 2dimensional of red/white hearts attached by a ribbon which so it can
-
I just had shoulder surgery, so any handmade Valentines will have to wait for next year. I think these will be on my Easter sewing plan!
-
I’m making heart coasters.I have heart plates and placemats for Valentine’s Day dinner with my sweetheart. (Of 57 years)
I’ve seen this pouch, smaller, as a jewelry pouch. You can use any size square. Cute. -
Was just planning homemade heart cookies where a portion is dipped in chocolate. Now, after seeing the video, think I will go smaller with the cookies and share inside this adorable bag. Thank you and Happy Valentine’s Day!
-
I am making a mobile which is actually 2-dimensional of red/white hearts attached by a ribbon which so it can hang on the door.
-
I am making a mobile which is actually 2-dimensional of red/white fabric hearts attached by a ribbon which so it can hang on the door.
-
This year I am making fabric Valentine’s Day cards for our women’s golf group. We love to golf in winter so doing little fun things each week brightens up our golf game during cold and drizzly or snowy days. BTW, just love, love, love this fabric bowl…. Going to try out the pattern right now. And thanks for the tips on what Bernina feet to use, this is very helpful. Keep up the great work and instruction.
-
Thanks for the reminder that Valentines Day is coming. Hadn’t thought about what projects…
-
I’m planning a new table runner to give for Valentine’s Day.
-
At the moment I’m quilting a log cabin quilt for a young lady going to college next year in her favorite colors of blue. Now that I have this adorable candy dish, that will be made this weekend for myself and two daughter in laws. Thank you for all the great projects that you send us. It it truly a lot of fun and I love learning things from the projects.
-
I am working on the same small wall-hanging, that I have been pecking away at for four years!
-
Just starting to think about this—maybe a few cards and fabric goody bags??? Probably something scrappy.
-
I am making love themed quilted bookmarks. ?
-
These bowls are SO cute! I have scraps left from my finished Valentine wall hanging and matching bench pillow and a coordinated bowl on the coffee table would be delightful! The ideas on weallsew.com are always inspirational and I come back to them time and time again! Happy Valentine’s Day!
-
I don’t know what I’ll be making….depends on how much time I have to get to my sewing room. If my wheelchair bound child is home from school I can’t go to my sewing room as it is in the basement!
-
I don’t usually make or do much for Valetunes Day. I like to show my love on a nonspecific day. These are cute ideas for a surprise gift.
-
I love this idea. This year I am working on some knitted items but I can see this project for many other holidays, changing up the fabrics.
-
I think I need a mug rug for my morning coffee, afternoon tea or any other time I need to wet my whistle.
-
I am making my annual heart-shaped cookies but now that I see this…I am going to dig into my stash and try this out! Thanks for this great video and directions!
-
I really like the candy bowls and the heart mug mats. I plan on trying both of those!
-
This is a cute pattern.
-
I’m making Valentine earrings for myself
-
I plan to make some heart shaped, coffee mug rugs for my grown children.
-
This is fun bowl to make. Used to make these for teacher gifts yrs ago. This yr mug rugs for my 4 sewing buddies.
-
I’m going to make a small heart quilt/wall hanging for my mom.
-
I’m making a wall hanging with my brand new Bernina 480. I wanted to start by making my first quilt but then I decided to be a little more realistic and start with a wall hanging. The top is done. Now on to the free motion quilting!!!
-
-
I was thinking about making bookmarks for my grandchildren.
-
I’ll be making microwaveable bowls using cotton heart fabrics for my Bible Study friends.
-
I love this candy bowl.
I am working on fabric inspired valentine cards – just glue my favorite heart onto card stock and good to go!Good luck to the chosen winner!
-
I haven’t started anything yet, but I intend to assist my 7yo granddaughter in making this as a surprise for her mom! So cute! Thanks for the opportunity to win!
-
I’m planning to work on a heart quilt or place mats for Valentines Day. I suppose I could do a heart quilt for my Great-Grandson too.
-
Snap purses.
-
-
I’m making a valentine heart pillow in red and white for the love of my life. I hope he likes it.
-
Oh I shall have to make candy bowls now! They are so cute!
-
I am making bowl cozies for friends and grandchildren. The college kids love them. I’m using all sorts of fun prints. FUN!
-
I’m going to make one of these candy bowls for my Granddaughter! But I think I may do a small embroidered heart outline in place of the buttons — not sure yet.
-
I am definitely going to make a few of these valentines candy bowls! So easy and elegant looking! Thanks for the pattern and clear instructions.
Happy Valentine’s Day! -
I will make cards and valentines goody bags.
-
I don’t normally sew Valentine’s Day gifts but I love that little pouch and could see it being used to store jewelry or small items when traveling. Great project!
-
Love the little fabric bowl. This will be great to see with my granddaughter❤️
-
Love the little fabric bowl. This will be great to sew with my granddaughter❤️
-
My sister and I are making pincushions ( you can NEVER have enough pincushions) but now that I saw this I might some of these, and fill them with Hersey’s kisses!
-
I am making towels for friends this year. I love my Bernina machines and accessories.
-
I’m making felt conversation hearts to string along a ribbon as holiday decor in our dialysis center.
-
These fabric bowls looks easy to sew, different fabrics for every season. I think I will sew coasters with heart applique for St. Valentine’s day.
-
I’m going to make at least one of these candy bags! I have some Valentine fabric that will be super cute!
-
I think I’ll try the candy bowl, but not as a gift. I want one for myself. If I have time, I may make another one for my mom. They are so cute.
-
I’m working on mug rugs, but now I’ll add a candy pouch full of candies!! this will be fun for my loved ones. Thank you so much for the idea and tutorial
-
I’m working on cards for my grand kiddies… now after seeing this adorable fabric bowl, I’ll be making a few of these to fill for Valentine’s Day as well!!!
-
-
This looks like a fun little bag to make! I will definitely be trying to make a couple of these for friends for Valentine’s day!
-
Didn’t have anything planned for Valentines crafts but thinking I may have to make a candy bowl!
-
I want to make a heart pillow for my grandaughter.
-
Going to try and make this fabric candy bowl dish for my mom and fill it with chocolate
-
I am making a cute apron for Valentine’s day.
-
These are really cute. I think I will do these for my Grandkids, not sure what for the boys, but I am sure the girls would love them!!! Need ideas for the boys!!! Thanks
-
I don’t have anything specific planned. Yet. But I’m sure anything I decide to make will be for my favorite Valentine…my grandson!
-
I am doing Valentine cards
-
-
This candy dish will be perfect for Valentine gifts! Thanks for the complete and easy to follow directions! If it wasn’t in the middle of a snow storm, I’d be tempted to go my dealer today and purchase the #18 foot, glad I have a couple weeks to still get in on the foot discount. Just discovered weallsew – plan to visit this site often!
-
Oh I love the one above. I’m going to start whipping them up today. Thanks for the chance at the giveaway.
-
The fabric bowls are so cute and I have just the fabric. I will be making them for my grandchildren.
-
I don’t usually make things for Valentine’s Day but I love the Fabric Candy Bowl. I’m planning to make one for both my granddaughters at college and my grown daughter. I think they are so cute and can be used later on a dressing table or bedside table.
-
For Valentine’s Day this year I’m working on a table runner and simple appliqué hearts on t-shirts for three grandgirls.
-
I will be making the “fabric candy bowl” for valentines day. I have new neighbors that may enjoy receiving a couple of these. The bigger plan is to make a few and fill them with sewing notions as door prizes forour upcoming Guild quilt show. Thanks for the pattern and ideas!
-
I think I will make a Fabric Candy Bowl for my grandson.
-
I may not make the candy bowl even though it is a cute idea. It will make a good center piece for Easter and Christmas just by changing up the fabrics.
-
Happy Valentine’s Day Everyone! I was thinking about what to make my grandchildren for Valentine’s Day and this fabric candy bowl sounds like a perfect gift for each child. My grandchildren live far away and with COVID I have not been able to visit as often, so I have been sending boxes of little things on holidays. Thanks for the wonderful idea. Have a glorious day.
-
Working on rope bowls for my daughters.
-
I’m making beaded heart earrings for my daughters. Sorry sewers!
-
I am making bow ties from the pattern you recently shared. My great nephews are into dress-up and share the one bow tie I found at a tag sale. So, bow ties and top hats are on the schedule for sewing.
-
I am making valentine over the collar scarfs for my pets.
-
I am embroidering t shirts for my grandchildren.
-
I usually send cards to grandchildren. I might try this candy bowl if I have time.
-
I am making Valentine pillow cases for my nieces
-
I am thinking of making pocket tissue holders. I made some late last year to give away. But, honestly, I change my mind at the drop of hat.
-
I’m not planning a valentine project now but the cross stitch cards and your candy bowl look tempting!!!
Thank you very much. -
I don’t usually do anything for Valentine’s day but might just make this candy bowl for my Granddaughter
-
Homemade cards
-
This cute bag!! Thanks for sharing this project
-
i’m making an embroided wallhanging
-
I wanted to try ruffling with my L890 serger and it was so much fun that I cut strips of blue gingham batiste, edged them with red thread, and created skirts for my granddaughters that spiraled about six rows of ruffles up from the hem. They turned out so cute I bought t-shirts and embroidered them with an appliqué cherries in heart shapes. Then I spied the image of a quilt on another blog. It was a heart made from quarter triangles of a red 5″ stack. With only that image to go by I figured out dimensions and put it together. With many more blocks than needed I ended up making 3 little quilts to hang up for decoration.
BTW I won the last giveaway: the presser foot mountain. You can see it on my Facebook page Carol Winkler -
I’m making Valentines mug rugs for friends.
-
I want to make some stacked felt hearts or a mug rug or two. I may need to make several of these bowls. So easy and fast.
-
I am working on table runners for valentines gifts this year!
-
I just received my news sewing machine for Christmas. I will be trying to make the Valentine bowls. They look very cute.
-
I am making a heart table runner for my cousin who was born on Valentine’s Day.
-
This candy bowl is so cute. I think this is what I am going to make for my three great grands for Valentines and fill it full of Hershey Kisses! You can’t beat Kisses!
-
I wasn’t making a thing until I saw the adorable Valentine’s Day Goodie Bag on We All Sew. Now, I realize I have several kids that it would be perfect for! 🙂
-
I love making cards with my embroidery attachment… I have a 730 Bernina that does a great job! Started some for Valentine’s Day… Recipients sometimes frame my cards as artwork.. Quite a compliment that make me happy!
-
I am working on a table runner for my mom and sister
-
Plan on making these cute bags for my annual Valentine brunch with school chums.
-
I just made the fabric candy bowl. I will fill it and take it to a friend who just had surgery. I also just finished making a wine bag. Maybe she needs a bottle of wine too!
-
I’ll be making a valentine pillow for our sofa.
-
I’m making Valentine heart-shaped pot holders!
-
It’s still cold outside up north so I’m making bowl cozies.
-
I am working on the fabric candy bowl for friends in quilt guild. What a fun project.
-
Valentine’s Day is MY birthday, so I love crocheting a bunch of red hearts and give out to people I encounter that day. It’s so fulfilling to share my birthday that way.
-
I will be teaching 25 students to hand sew a felt envelope with a heart closure during the Creative Crafts club I run at the elementary school where I am a counselor. The students will be taught how to use a template to mark and cut felt, make a quilter’s knot, sew on a button, and sew using a running stitch. All great life skills taught to me by my mom when I was in elementary school!
-
I don’t usually do Valentine’s Day sewing. Made several items to give for Christmas and one may work for the next couple of months – an in the hoop pocket tissue cover. With colds and other things spreading having a handy tissue might be helpful. Stay safe.
-
For Valentine’s this year, I plan to make some soup bowl holders, using heart fabric, for my adult children, and I’d like to make a couple of these candy bowls for my two sisters.
-
Wow! You have turned something into a very versatile gift. Thank you! For Valentines Day I am making personalized, reusable gift bags for my grandchildren. Each year they can be filled with treats Grandma sends their way and remind them although I live many miles away they are always in my heart. Saving the planet one step at a time.
-
I’m making the embroidered heart box from OESD. I’m gong to make one side satin. Wish me luck
-
I’m making placemats for myself. Using up some old fabrics from my stash.
-
I haven’t planned on any Valentine’s sewing projects, but I do love seeing them! I will be doing a bit of baking for my sweet heart though!
-
Will try this fabric candy bowl. Would be nice for next Christmas as well.
-
I made a velvet heart shaped pincushion with crushed walnuts for a filling.
-
I am in the process of finishing a mug rug and then look for fabric for these candy bowls. It is such a neat idea and looks relatively easy to do for the grandchildren. Could also fill it with a small Lego toy.
-
I’m making a table center, mug rugs, and heart ornaments. The candy bag is a nice idea!
-
i bought a Tula Pink 770 QE last year. I live too far away to take classes so I have been watching the videos online. I am planning to make heart shaped mug rugs as gifts for my friends. This machine is way above me but I am determined to learn it!
-
I’m working on making table runners for each season. So far I only have patriotic and autumn ones, so I’ll be making a Valentine table runner.
-
Lovely ideas! We celebrate Valentine’s Day AND Galentines Day with some college friends, so I am sewing up some fun banners so we can hang them for our FaceTime chat. There are so many beautiful fabrics for this project its hard to decide!
-
I’m working on a small quilted throw pillow with an embroidered quote on it.
-
I have made several soup bowl holders. I can’t wait to try making the bag. It’s so cute
-
I’m working on a valentine themed quilt block to go into a seasons quilt. May have to take time to make one of these cute bowls
-
I’m making the candy dish, pillow and a table runner
-
-
Made a table runner last year. Still working on Christmas winter pillows & placemats. Thought the heart coasters looked interesting to make. Maybe an embroidery design.
-
I don’t do anything for holidays but gift giving is another thing. I love this easy to make idea. I’ve had the symptoms from a brush with COVID (thank goodness I was vaccinated and boosted) for the last two weeks and haven’t sewn anything but I think I will attempt to do this little project. Maybe it will make me feel better.
-
A 4 heart table topper.
-
For some reason, I am still recovering from Christmas sewing! So no Valentine’s Day sewing for me this year. I am looking forward to St. Patrick’s Day, though. Keep the great blog posts coming!
-
I am making valentine table toppers and mini runners!
-
I will be making some homemade chocolates to go along with the Fabric Candy Bowls. They are so cute and such a good idea!
-
I made Valentine mug rugs for my family.
-
No valentine project at the moment. Have started on Christmas projects for next year
-
My Valentine’s Day projects wiil probably more include fun food for my husband with lots of food sensitivities. 🙂
-
Making mug rugs.
I love sewing for the Holidays -
I am making fox minky bags for my little nephews and niece. Will also make valentine dresses for her 2 American Girl Dolls.
-
I’m making heart garland and table runners.
-
I am making valentine pillow cases for my 7 grandkids.
-
If I’m not quilting, I’m baking bread or fusing glass. For this Valentine’s Day I want to make a fused heart dish.
-
I just completed making a throw quilt top in a tumbler pattern using various fabrics, many of which had hearts. I need to add a border and then quilt and bind it.
-
I am making a quilted table runner for Valentine’s Day. I have also added these lovely candy bowls to my project list.
-
Every year I embroider a card for my husband. He has quite a collection!
-
I’m thinking about making some Valentine ornaments using the decorative stitches on my machine.
-
It’s not valentine’s eve yet, so I haven’t started any projects yet! Love this bag though!
So I might need to make 3 of them for the grandkids! -
I am making some scrappy hearts to hang on our gate grapevine wreath. We try to do a theme each month. Livens up a chain link gate.
-
I will be making candy bowls and heart shaped mug rugs!
-
Love this candy bowl. Need to put on my to do list. Getting ready to sew some Hello Pouches. Bought some beautiful batik fabric to make them with at the Raleigh Bernina store.
Happy sewing! -
I’m going to make the cute little gift bags for all the grandkids. with lots of candy inside’
-
I am making some small bench pillows with a Valentine theme.
-
I’m just making cards but the candy bag might be on my to do list.
-
coasters
-
I would like to make some luggage tags!
-
Hadn’t decided yet, but now that I’ve seen these cute bags will be making these and fill with goodies. Sew cute?
-
For Valentines Day, I plan to make the fabric candy bowl with red and white pika dot fabric and red heart buttons !
-
i’m sewing this fabric candy bowl. it looks like so much fun!
-
No plans for making Valentine’s Day, but I’m saving the pattern for this cute candy bowl for a gift in the future.
-
I am going to try and get some table runners done to use in the office.
-
The candy bowl is so cute. I will be making some of them this weekend. And I’m going to start a Valentine quilt. I like making something Valentine every year.
-
I made door hangings and Mug rugs! Can’t wait to make the goody bags for my grandkids! <3
-
Thanks so much for this. I was wanting to make these for Christmas presents, but didn’t have the measurements. Now I will be on a roll.
-
I’d like to make this bowl in fun valentine fabrics! So cute!
-
I am making table runners!
-
What a nice giveaway! I haven’t started anything yet but usually make something for my 3 granddaughters! This little bag sure is cute! My grandson at 16 is not really interested in Valentines from Nana unless it’s sweets and money!
-
I am making Valentine cards.
-
I am making a 3-D Patchwork wallhanging entitled “Be Mine.” It’s a challenge!
I’m sure I’ll be making one of these cute candy bags as well. -
I am sewing valentine coasters and candy bowl.
-
I think it is wonderful that you could make it for different seasons.
-
i’m ecitied to try to
Sew an XOXO Bunting for Valentine’s Day, I have every hoildday but valentine for my sewing room window.*smiles* -
I am working on making seasonal table runners, so I have lots of red fabrics floating around my sewing room right now.
-
A paper pieced heart.
-
I hadn’t thought of anything this year to make yet. After seeing this fabric bowl, I think I will try to make this. It is so cute.
-
I really like the bowls. Great idea. I am making pillowcases for my 4 grandchildren.
-
Nothing this year, which is common for me.
-
I have been working on some Valentines Day post cards to mail out to my friends and guild members.
-
I plan on making a few of these bowls as well as some mug rugs for Valentines Day and other holidays! Thank you for the pattern and instructions for the bowl!
-
I’m making a table runner and now some of these cute little candy bowls!
-
I’m still busy sewing 4 flannel shirts for my husband,a small quilt for my grand daughter and now 6 receiving blankets for my daughter’s friend. I can’t wait to sew for me!
-
Well…seeing these darling bowls and how easy they look, makes me want to make a few! So sweet, thanks for sharing and inviting us to participate in the drawing! 🙂
-
I am just looking for Valentine ideas at this point.
-
Will be making this candy bowl and using my edgefoot I have and never tried . Happy valentines.
-
I will be making linen kitchen towels with embroidered hearts using my new Bernette embroidery machine!
-
I have made ITH “lips” in the past & plan on making more this year. Very cute filled w conversation hearts! Love you tutorials!
-
I’m thinking about making fabric post cards for my grand kids. They love getting mail, and I can practice some small embroidery images!
-
I’m going to try to make a necktie with canvas.
-
I’m working on a table runner. I love using my Tula Pink 570 Special Edition sewing machine. I want to try the fabric bowls.
-
I’ve never had much interest in valentine decor, BUT these bowls are tooo cute to say no to. I will be making several bowls AND I will also make these using leftover Christmas fabric. How fun!!!
-
None this year but you might have inspired me to make a few.
-
I’ve pieced 2 tablerunners with large hearts for 2 daughters. I only need to machine quilt and bind them. I’ve been thinking for myself I’m going to appliqués small 4 or 5 inch hearts after I’ve machine embroidered cute valentine saying like candy hearts. It will be a find remembrance of childhood.
-
I going to make the heart pincushion for my embroidery friends.
-
I will be making placemats and table runners for Valentine’s Day.
-
I’m working on personalized wine bottle carriers using the embroidery with my B790 Plus.
-
Normally don’t make gifts for Valentine’s Day but after looking at the “candy bowl” pattern, hmmmmm but really should finish my UFO’s
-
I am planning a heart table runner, just have to decide which one.
But this fabric candy bowl is adorable, so I’ll be making it too! -
I can’t wait to try this candy bowl for Valentine’s Day so I can learn all the features of my new Bernina machine.
-
I will be making a table runner for Valentine’s Day and probable one of these cute bags in the tutorial all in the same fabrics.
-
This year I will be sewing the candy bowl x3 for my granddaughters. Although they love candy 24/7, I will fill it with some small gifts like heart stickers, etc. I love this idea and can see this in some of the fabrics from my stash. Thanks for a really great idea.
-
New monogrammed towels for my granddaughter who is in college, as she had her others taken.
-
After seeing these I think I’ll try and make these little pouches for vale time treats. They look simple enough to quickly get them together. I shared these with my sister-in-law who plans to make them for her grands for Easter.
Fun project, thanks!!!!
-
-
I’m going to make this for my granddaughter for Valentine’s Day. After she can keep her earrings or whatever in it.
-
Can’t wait to get foot 18 for some items for some cute valentines and many other things I have to add buttons too. I have my Grandmother’s old buttons that she saved for years. She died 3 month’s before her 100th birthday. Loved her so!
-
I hadn’t planned to make any Valentine’s Day projects this year, but these fabric candy bowls are so cute that I may have to rethink my plans!
-
Valentine tabletoppers
-
I am making linen bath towels for Valentine’s Day.
These candy bags are so quick and adorable that I may make some too! -
I think one of these bowls would be awesome, also have some cross stitch to finish up. ❤
-
I’m also making sets bowl cozies for friends. I also now plan to make mug rugs and the pin cushion as I need one for my sewing class take a long bag. I really enjoy your project posts. Thanks
-
I’ll bake a heart shaped cake to take to my sewing day gals.
-
I’m going to make some valentine’s pillows for my couch this year.
-
I’m going to make a fabric bowl!
-
I am hoping to make some skate bags for my Grandchildren for Valentines day.
-
I am making candy holders for the grandchildren. This is so cute, I think I will make one!
-
Valentine’s Table Topper
-
Love this bag just made one for my nephew❣️
-
Years ago I made Valentine’s for my nieces and nephews. Now it’s for the great-nieces and nephews. Each holiday I look for something to make that can be mailed. Previously I’ve done origami with dollar bills and heart coasters – however they used them as frisbees! I’m just starting to look for this year’s project.
-
I am making disappearing 9 patch table runners for my sisters for valentines gifts.
I love using my Bernina 590QE -
I took a few different mini paper foundation heart design patterns, enlarged them to make 10″ blocks, evened out the block sizes with sashing, and used batik fabrics from my scraps pile to make a heart lap quilt. It’s almost done and is turning out lovely.
-
I don’t make anything for Valentine’s Day. I haven’t finished my Christmas sewing. Got COVID and it put me out of commission for 3 weeks.
-
I am sewing my 4-Hers how to make infinity scarves with a hidden zipper & pocket! Should be a fun project they can give as a gift.
Love these baskets! The 4-Hers would enjoy them also!
Thanks for the great idea! -
Working on zipper bags with see thru vinyl tops!
-
I am making hotpads, besides working on a quilt. I hope to try one of these bags too!
-
I am making heart shaped mug rugs with embroidery. I hope to do more than just that, but I need some a little more inspiration.
-
I think I’ll make this candy holder too! Woo hoo! I found my inspiration!
-
I’m planning on making this fabric candy bowl for Valentine’s Day.
-
I don’t usually make Valentine’s Day gifts. I mostly take my grandchildren to Lolli & Pop’s for bulk bags of candy. That’s their idea of a great Valentine.
-
I’m still cleaning up from Christmas sewing, but have started looking at mug rugs with hearts as well as a small wall hanging with hearts.
-
Valentine mug rugs!
-
I made cup cozies for Christmas and my mom said hers is not big enough for her mugs. I told her she uses to bug of mugs (haha) so I’ll be trying to make bigger cozies for her. The bag is the post is adorable! I may try that too.
-
These little bowls are cute and easy. I might also make a heart garland.
-
Four square pieced blocks that I will then sew into heart shape and stuff with lavender I grow in my garden
-
For Valentine’s Day this year, I am going to make some embroidered cards and some fabric candy bowls filled with Hershey’s Kisses. YUM!!
-
I plan to make some of these bowls as rewards for my high school students.
-
I’m making zipper pouches that I’ll put candy in for my grandkids.
-
I wasn’t really going to do anything other than just cards, but this candy dish is too cute – I think I may need to make several for family members!
-
I am sewing a Valentine’s garden flag and heart decorations for my mantle using my Bernina 830 LE and Bernina 880. After seeing this post, I want to sew a candy bag as well! Thanks for the project idea!!
-
Kitchen boas
-
I am making Valentine project bags and needlebooks for my quilty friends since I didn’t make them in time for Christmas.
-
Working on coasters and trying to finish a quilt!
-
I think I’ll be making these cute candy bags for Valentines Day now that I’ve seen them.
Thanks for the great idea -
I’ll try this super cute fabric bowl!
-
definitely want to try these little candy dishes!
-
I have made a quilt wall hanging with pockets shaped like hearts.
-
Currently not making anything but thinking about it!
-
I enjoy making things for Valentines day and St Patricks day after Christmas. It helps me mentally put things back in order and reset after the Holiday rush. I will be making some Valentine Gift Card holders.
-
Making new valentine’s cloth dinner napkins and a new outfit for my senior dog. I love the bag idea, something to be used for many years – reducing waste ?
-
Well, I was going to make several Valentines mini quilts for friends. Then I saw your adorable candy bowl pattern and changed my mind. I checked my stash of fabric and have a good supply of red and pink fabric – some even have Valentine prints. Therefore, the only thing I need to purchase will be some ribbon. Ready, set, sew!!! Candy bowls should be ready before you know it!!!
-
I am making this bag now! Love all the patterns on We All Sew. I am going to stay with Christmas material for next Christmas.
-
I made the Fabric Candy Bowl, in valentine colors was a fast and easy project i loved doing it will see myself making more for gifts. thanks for showing this,
Janice Tubbs -
I am going to make the Valentine’s banner.
-
I’m so excited. I’m making several of these fabric bowls. I was looking for something to make for a few friends for Valentine’s Day when this project found its way to my email. Great timing. So fun.
-
I have a heart mini wall hanging that I have put up. I have made several wall-hangings in the past so at, this point I do not have any place to put them!! I will make a nice dinner for my husband and I on Valentine’s Day!!
-
I have so many UFO’s I really need to work on, that a mug rug is about all I will add to my plate at this time.
-
I will be making this cute Valentine’s Day project! Thanks just what I was looking for!
-
I wasn’t going to make any valentine project but this project would be easy to do for a beginner.
Thanks,
-
I hope to try a small llama out of a fluffy sock for my granddaughter for valentine’s day. Thank you for the easy to follow directions for making the fabric candy bowl!
-
I’ll be sewing some stuffed felt hearts for my grandkid.
-
I don’t make Valentine gifts. When the grandkids were little I would send them a card.
-
I would love to give this project a try!
-
I made a scherenschnidt valentine to use as a pattern to make a (Panamanian) mola-style heart, where you stack fabrics and quilt or handstitch each layer to the backing fabric.
-
Working on a rag quilt for my husband. Hope to try this cute little bag tutorial.
-
Not making Valentine stuff…..the one time my husband and I celebrated it, my youngest daughter got sick and I spent the night in the hospital with her. We took that as “do not do again”. But I love this candy dish so much I am going to the sewing room and make one right now. If I can find buttons and fabric to coordinate!!!!! I just love this project.
-
Hi, Hope everyone is having fun sewing! I’m deep into making Free standing lace hearts for Valentine’s cards as well as some gnome table runners with valentine fabric! Yes, I have 2 machines and one is making the lace hearts while I sew! 🙂
-
I like to make little stuffed hearts with scraps.
-
These candy bowls are cute! I am making embroidery v-day cards.
-
I am going to make some rope baskets for my kids (and myself) and experiment with finishing with a heart!
-
I want to make some mug rugs and I would like to try this candy bag.
-
That is really sweet and thar=t may be my project for a special girl. Thanks.
-
I am making fabric baskets out of a red fabric with hearts to hold goodies such as candy for the grandchildren and homemade candles and soap for the adults.
-
Cute project! I am making fudge w little hand sewn heart gift tags❤️
-
I’m making mug rugs and coasters
-
I am making snap bags for the grands for Valentine’s Day. Then they can use them for their upcoming cruise (if it doesnt get cancelled) in March.
-
I’m sewing sweet bibs for grandkids. ❤️❤️❤️
-
It is a snow day today, so I am going to cut out my Valentine’s project today. My daughter is getting a purse that she has been drooling over.
-
I’m teaching my daughter-in-law to sew on a machine. This is the perfect project for us both. I’m going out this afternoon to buy fabric, ribbon, and little heart buttons.
Thanks for the inspiration. -
I am making a blanket for my granddaughter. I also want to make a card to go with it.
-
I will be making some valentine kitchen towels for my daughters. I do them for each holiday.
I think the baskets would be great for kids to hold their little treasures, I need to check my stash for some appropriate fabrics. Easter baskets for sure. -
Happy Valentine’s Day, this year I’m making embroidered bookmarks from the OESD #32124 Signature Library Volume 1 and pencil cases from the 2021 Kimberbell Fall Box.
-
I’m making a heart-filled wall hanging for my hubby’s home office!
-
I’m making the lovely candy bags you showed on your blog today for Valentines day
-
I am planning to make a Valentines table runner. And now seeing this cute candy bag, I will be making one of those too.
-
Love that cute candy bowl….looks like it’s fairly simple. Using the button sew-on foot (now that I know how to use it (-: ). Making quilts!
-
I am working a a panel quilt using the G’nomie Love fabric.
-
My sisters would love a heart-shaped mug rug.
-
Very cute candy bowl.
-
Mug Rugs for the grandkids, it gives me a chance to practice free motion quilting.
-
My plan is to make at least three of the bowls for my grandchildren. Also plan on making arrows to fit on pencils on my embroidery machine. Best get busy….
-
I am working on a Valentine themed wall quilt.
-
Not sure I will have time to sew anything, but might Cricut something. Just cards.
-
I wasn’t planning to make anything but this is so cute might just have to make it and it is so easy
Can make 2 for my granddaughters.
Thank you! -
What a darling candy bowl! I’m thinking I will make small “I Spy” floor quilts for my 2 great grandchildren.
-
I always love making holiday patterns and who doesn’t like candy.
-
This pattern is a keeper!! Can’t wait to try it.
-
My goal is to begin work on a valentine wall-hanging to go in our new home.
-
I am making a quilt that has a large heart shaped block in the center. I am giving it to my granddaughter who is waiting for a new heart.
-
I don’t usually make Valentine gifts.
-
I am making myself. Valentines Project Bag
-
Handmade Valentines Gift? Oh my, I’m still working on 2021 Christmas gifts that didn’t get finished! Probably won’t make any Valentines gifts… oh, maybe an EPP heart!
-
I will be making heart-shaped placemats for my toddler grandsons. I have some fun donut printed fabric to use!
-
I don’t usually make Valentine’s gifts, but I am sewing a jacket and pants.
-
I just finished the 2nd valentine table runner. Gave one to my son when he came by yesterday and will be stopping by DIL’s today to gift the last one. Nice to get out of the Christmas colors, Next is shamrocks.
-
I am sewing valentine postcards/mug rugs.
-
A friend gave me one and told me to figure out to make.
Your instructions are easy to follow. I’ll have to make one and return the favor. -
I’ll make a embroidered postcard for a friend.
-
I love making Valentine fabric post cards for friends. Last year I participated in a fabric Valentine postcard swap through our local quilt guild. Such fun and received several creative postcards!
-
No Valentine’s Day project plans. I probably should finish Christmas things from last year!
-
I am creating Valentine cards with sewing/embroidery embellishments to give to a local hospital for their long-term patients. My sewing group is joining me in this ‘challenge.’ It will be interesting to see each person’s creativity, too.
-
I’m going to try the Valentine’s dish for my granddaughter.
-
This year I am making mug rugs.
-
I will be making this sweet bag for valentine treat gifts. Thank you for posting this project.
-
I am making Mug Rugs to give as gifts.
-
I have a couple of mini quilts planned, just to play with some new techniques.
-
I’m starting a darling quilt top for my new grandson.
-
Bernina, thank you for such a fun project. Looking through my stash for valentine’s fabric.
-
I am making a small wall quilt with a heart block, flange edging and border fabric.
-
I am not making anything for valentines day, but am working on a red quilt.
-
I am making Valentine postcards which are large enough to be used as mug rugs.
-
I’m making stuffed animals
-
I’m working on a heart quilt (small wall size) for Valentine’s Day.
-
No Valentine sewing but working on making a new design wall for my sewing room using grid flannel and insulation board. Also major reorganization of my space needed after bringing home a new L860!
-
We recently moved to a new home in a new state and have wonderful new neighbors in our cul-de-sac. To show them how much we love their company, I am sewing them each a candy bowl with special treats to share. Thank you so much for the tutorial!
-
I’d love to say I’m making the fabric candy bowl because it’s so stinking cute. It’s more realistic to say that I might get one made in time for Easter.
-
I’m putting appliqués heart on red and white dish towels
-
Making some valentine mug rugs. Love my embroidery module!
-
I’m going to make a pillow.
-
I am working on the woven hearts that were highlighted in an email months ago. I think they were intended to be Christmas ornaments; but they are cute for Valentines Day.
-
I’m making small, lavender filled, bowl pillows.
-
I don’t usually make things for Valentine’s Day, but I am definitely going to make that adorable Valentine’s Day card this year.
-
I will make valentine’s table runners for my 2 children. These candy bags also look fun.
-
Love these little bowls. I was going to make zipper bags for the grand kids, but these will be cuter and hold more treats!
-
I’m making monogrammed baby drool bibs for my daughters daycare class.
-
I am making cards and now I’m going to make this cute fabric candy bowl.
-
I am working on mini pillows that have different sayings for my children’s families for Valentines Day.
-
I’m excited about embroidering tea towels for Valentine’s Day and making crinkle paper hearts for babies.
-
I didn’t have any plans to make anything for Valentine’s Day. My most recent project that I’m hoping to finish soon are some black-out panels curtains for a bedroom.
-
I love making table runners for gifts and Valentine’s Day is a fun day for gift giving!
-
Thinking of making one of these candy bowls for each of my grandchildren.
-
I just give the grandkids candy for Valentines Day. But I am doing lots of FSL!!
-
I’m working on an anniversary quilt .
-
I am making valentines couch through
-
I am working on an in -the-hoop ‘pig purse’ for my granddaughter.
Thanks for your great inspiration videos and projects! -
I have a Lambie I need to make for my new grandson and this candy bowl looks like fun sew might do that as well!
-
I’m making Valentines baskets for my three precious grand babies!
-
I’m going to make some of the cross-stitch valentines cards.
-
These candy bowls are cute. This might be my next quick project.
-
I am definitely going to make some of these bags!! I have the perfect Valentines fabric to use as well. I think I’ll put little trinkets or goodies in them as gifts. I sell Color Street and I think this would be a cute holder for some samples and small goodies for my extra special VIPs!
-
I’m making pieced heart coasters for my friends and family.
-
I am not making anything for Valentine’s day; I generally don’t. I am working on a quilted table runner that I will be sending to my uncle and aunt for their upcoming 75th birthdays, in March and August respectively.
-
I am making cute little Valentine’s Day purses for my granddaughters!
-
I’m still trying to catch up from Christmas!??
-
I’m making Valentines Day-themed placemats! ❤️
-
For my granddaughter, who is three, I am making a small gift bag with a quilted heart on each side.
-
I am making a Valentine’s Day banner to cheer up my living room as I look out at the lake and the blowing snow. Thank you for so much inspiration. I love my Berninas!
-
I usually give a homemade card and candy.
This year, I will make these fabric candy bowls and fill them up.
Thanks for the tutorial and chance to win some goodies! -
For Valentines I might make some gingers with roses from Memories in Thread. Cute candy bag.
-
I made a Valentines Heart Quilt for our granddaughter’s birthday in February. She’s our oldest granddaughter and so special.
-
I am making some Valentine bowl cozies and heart-shaped mug-rugs.
-
Will be making some mug rugs for friends and family. And adding a sweet treat or two to gift them.
-
I would like to sew the Patchwork Heart Pillow! Thanks!
-
I am making a Betty Boop quilt with all different Betty Boop fabric! I found some awesome heart fabric for the back. It is on my longarm as we speak!! Excited!!
-
I’m making embroidered candy heart dish towels. My grandchildren enjoy seasonal dish towels. They make dish duty a little more fun.
-
I will be trying this project with several different seasonal fabrics
-
I hope to make the candy bag…looks fast and simple…I have some heart fabric to use.
-
I’m still working on wrapping up the finishing touches on some of my Christmas projects ?
They’re red, so they’ll totally count for Valentine’s, right? Right? -
I’ll be making some cute heart mug rugs with matching mug wraps
-
I plan on making some mug rugs for my Galentines❣️
-
I’m working on the candy bags in valentine fabric for my 3 grandchildren!
-
I am learning how to use my new Bernina B480 SE and new to this We All Sew Blog! I hope to applique hearts on to towels.
-
I have never made a pouch or candy dish so this is the first and I really think I can do this. Instructions look easy enough. Looking forward to trying this
-
The fabric candy bowls are so cute. I may have to make a few of these for my grandkids for Easter.
-
I’m going to make some mug rugs. Then I’m going to make more seasonal mug rugs. Thank you for being a terrific product!!
-
I was planning on valentine bridal shower prizes – this is so cute. May be making these.
-
No valentine sewing for me! I usually just give sweets.
-
I’m making mug rugs this year. I’d like to try the candy bowl and have one for each season. Just as an aside, I learn so much from this column.
-
This is an “Extra Special Valentine’s Day” coming this year. My granddaughter is scheduled to arrive on Feb. 14. She will be born the same day as her big sister, Mya, who will be 3 on Valentine’s Day.
I am making her a quilt called Puddles that is in the Fons & Porter Modern Baby Quilts. It is an easy quilt. I am machine appliqueing the circles with the Applique Foot #23. I will quilt it on my 570QE. Something I am still learning.
-
I am making memory bears for great nieces who lost their mother and brother recently.
-
These bowl/bags are perfect for every holiday, or anytime you need a container for a small gift or gift card!
-
I love the light and bags. I have a huge project in the works for my niece’s new house as a surprise. A queen size log cabin quilt. Lots of sewing ahead.
-
Such an easy project. I like the idea and already have the feet I’m making a twin quilt for my granddaughter. It’s called pieces of my heart by Flying Fish Quilts from Australia.
-
the candy bowl – it’s so cute
-
I usually make cards for my grandchildren and close friends – but I’m really liking the “candy bowl”, I’m thinking I can make them for my littlest grandchildren and put toys in them!
-
Hummm….,good question. I’m thinking of making some embroidered cards for my grand kids. I think they would like those. Maybe a zipper pouch too to keep little treasures in.
-
I am working on two different heart quilts.
-
Making mug rugs with hearts
-
looks like a fun project
-
looks like a fun project – cant wait to try it
-
Just pulled out a wallhanging and now that I have a Q16 thinking I should add some more quilting!
-
I plan on making a set of valentine mugrugs for several friends. Also a craft project(to be determined) with my grandchild.
-
I’m hoping to make heart shaped mug rugs.
-
My sewing friend and I are decorating 5 inch , fused backs, fabric hearts with ribbon hangers. We have well over 100 and will be dropping them off at elderly residential centers.
-
The bags are adorable! I love the idea for my grandson. I will make some for friends as well. Thanks!
-
I make wrapped rope fabric bowls — small ones and fill with Hersheys kisses.
I love to wrap cotton clothesline with fabric strips when I watch programs — I recycle the plastic bins that lettuce and spinach one in from the grocery. I have a bin for each hue /tone/ tint on the color wheel and I create amazing color combinations while watching the Telly.
It also has deepened my understanding of colors and color theory effortlessly and made me a better quilter as a result.
Everyone loves to receive my baskets! -
I will be making an embroidered shirt for my granddaughter. Valentine’s Day is also her birthday!
-
I am going to make this candy bowl and a mug rug.
-
Im creating a small quilt to fit a 10 x 13 picture frame. There will be 9 hearts. On each heart I will attach something from one of my family members/ancesters including pins from the military, jewelry, coins, jobs, or other small representations of those members. I will not put glass on top of it so that I can add items and/or move them around as needed,
-
I’m making a table runner with hearts on it for me and baking heart sugar cookies for all the kids and grandkids.
-
I’m working on some embroidered cards and FSL heart gift boxes. ?
-
Making fabric cards
-
I’m making a wool heart to give to my husband.
-
Need to find appropriate fabric but thought I would do a table topper inspired by your blog last week with the OESD collection. I will probably digitize the embroidery quilting designs in Bernina V9. It makes it so easy to do.
-
I’ll be making valentines day dish towels with hearts embroidered on them. Love the look of the embroidery!
-
I’m making a large Valentine lap quilt using the “Exploding Heart” pattern with an assortment of Valentine printed fabrics❤️?❤️
-
I like to make placemats to celebrate the holidays. My grandchildren love them!
-
I am going to embroider a onesie for my new granddaughter for her first Valentine’s Day.
-
I love this giveaway idea. The bag tutorial has motivated me to make a Valentine’s bag or two for my sweet family members.
-
I want to make a few mug rugs for family and friends…with hearts of course.
-
I want to make this simple and cute project! They look like they would make great Easter baskets as well! 🙂
-
This bag has fun corners to embroider a child’s nickname or fun small embroidery designs. Great little surprise for the grandkids that can be used later to hold small toys.
-
I dont make valentine gifts – usually just give cards. these look great to make for any occasion.
-
I have made candy bowls for my kids and then refill them each year. I like this bowl so maybe I need to make them new bowls this year.
-
I plan to make heart-shaped coasters for my sister and her family.
-
Looking through my fabric stash tomorrow to find appropriate fabric to make a pillow for my mom for Valentine’s Day, unless I decide to take a try at the fabric candy bowl.
-
I made bowl cozies for Christmas gifts and they were such a hit, I am making some with hearts prints for Valentine’s! They are fun to make also!
-
What a darling candy bowl! Love it that beginners can do it as well – sharing with my daughters & granddaughters. How fun!
-
I’m making Valentine’s Day placemats this year.
-
I’m making stuffed animals ❤️
-
My project for valentines is to make some quilts for Quilts for Kids. Our sewing group is working together to complete about 16 quilts for older youths.
-
I’m working on two quilts that I hope to have ready for Valentine’s Day.
-
I will definitely make one of these bowls they are sew cute!
-
I will be making mug rugs with embroidered hearts on them. They are flat so easily sent to my out of town daughters
-
I’m going to try to make some homemade cards with fabric hearts with words like the candies for all my grands. I did a table topper like that last year.
Those are cute cloth candy holders. -
Haven’t decided yet. I really like the cross-stitched card and will use that in the future.
-
I moved recently and haven’t gotten my sewing room set up so I probably won’t be sewing anything, but I might crosstitch some little cards for my grandkids.
-
My quilt guild is making mug rugs for a local senior care facility.
-
Gift card holders for the college girls.
-
I want to make some Valentine gifts to send to my married kids who live out of state and some snuggle blankets for a new grandbaby!
-
I am working on a table runner. Fun way to decorate easily and doesn’t take a lot of storage space. Bonus: it is a scrap buster.
-
I’m sewing on pretty bowl cozies for family and friends.
-
This year I am making a sweet “Be MIne” pillow for my granddaughter. Applique for flowers and the bee body and some hand sewing for the bee’s path through the garden of brightly colored flowers makes this a delightful project even for me as I make it. It’s sure to delight her heart!
-
I’m thinking homemade pink marshmallows in a fabric bowl!
-
I’m just finished 15 simple drawstring bags that I’m going to donate to a local senior community for Valentine’s Day.
-
I have made this pouch before and will make them again for my granddaughters! They are cute and easy to make!
-
Of course, I am making the fabric candy bags. They are so cute and a quick sew!
-
I’ve made a wall hanging and will gift coordinating mug rugs.
-
I’m making quilted valentine wall hangings.
-
I will make the candy bowls for Valentines. It’s a cute present.
-
Valentines cards for the grandkids, that’s what I will be making.
-
Mug rug/coasters ?
-
I always make hearts for Valentine’s Day in all shapes sizes and colors!
-
I think I will finish a couple of aprons I started for two friends. We will need them for canning season.
-
Just the other day I started teaching my 8 year old granddaughter how to use my Bernina. It is perfect since the speed can set to very slow. I also purchased the guard just to be on the safe side. She is putting together a pre-printed apron for her mother. She did a beautiful job on the ties using #97 and the guide. She also did a gathering stitch on the pocket curves, learning how to lengthen the stitch to do this. She is already talking about what she would like to do next — embroider a sweatshirt for her sister’s birthday.
-
I’m making heart shaped potholders. I think the candy bag will be a nice added touch.
-
I will be finishing 2 UFO’s – placemats and a heart wall hanging.
I had a tabletop Santa chalk ware figurine that had a ‘cloth bag’ to hold candy as a child. Your candy bag reminded me of that one that disappeared long ago. I will make a replacement besides making other seasonal themed bags.
Thank you for this cute, quick candy bag idea!
-
I am making appliqué Valentine sweat shirts for myself and some friends.
-
I’m making a valentine doll quilt for my granddaughter. It will match her heart quilt!
-
I am completing quilting and binding a Valentines table runner that I pieced.
-
Love the candy bowls. I have lots of heart fabrics. The bowls will be so cute and a delight to give away filled or empty.
-
No special Valentine projects, pet crate pads for local cat rescue.
-
I would love to make some bowls for my grands, but my machine is in the spa.
-
Adorable candy bag! must make for my twin granddaughters.
-
Making pillowcases in red & white for my grandsons with embroidered edge to edge variated red thread color valentines hearts on the pillowcase edge.
-
I am making my two great grandbabies that we care for each a mini fleece-lined nap quilt and pillow for their afternoon naps. They are 2 and 3 1/2 and I know they will feel all warm and snuggly with their own little nap quilt and pillows.
-
I am not making any Valentine specific projects, but I have some quilts I want to finish.
-
I am hoping to make the cute basket demonstrated above. Have to unpack my machine first (we just moved) but this gives me a great incentive to get the sewing space set up. Thanks.
-
Not sure about Valentine gifts, I’m still finishing Christmas gifts ?, but this candy dish bag looks cute! May have to make one or two!
-
I am working on Heart Valentine cards
-
I’d like to make the candy bowl for Valentines Day!
-
The fabric bowl with the drawstring will be perfect for my granddaughters Valentines Day gift
-
I love the drawstring candy bag! I received a similar one for Christmas last year and now I can make my own.
I will be embroidering t-shirts for the kids, and would love to win this give-a-way. -
Valentine themed hot pads for my two daughters
-
I am making Valentine mini quilts for my grandchildren. This one is a doggie saying “I Wove you” ❤️❤️❤️
-
I am hoping to complete the candy basket for a friend.
-
Cute bowl pattern. I think I need a LQS trip for Valentine and Easter fabrics!
-
I am making masks again this year. 🙁
-
Wine ? bottle covers embroidered with hearts. ♥️
-
I just finished 2 red velvet pillow covers with embroidery corner motifs and large monogram in the center for a friend. She wanted it done for Valentine’s Day to use in her living area.
-
I’m obsessed with making my own cards. I will be sending out embroidered and appliqued (machine embroidered) cards.
-
I’m working on 4 Valentine’s Heart Table Runners. One for my mom, my 3 sisters and myself. It’s awesome to be able to chain piece a lot of the blocks. I plan to hand bind them all.
-
I might make some mug rugs, and there’s some nice flannel in my stash that may become some new pajama pants for my partner.
-
I’m planning to make the above fabric candy bowl along with some handmade fabric Valentine greeting cards. And maybe a few Valentine fabric face masks as Swangirl mentioned above, also a great suggestion for the occasion! All sound like a good places to start on my very first “We All Sew” projects. Thanks for your great ideas and clear project instructions! ♥️
-
Haven’t started on any Valentine’s Day gifts yet, but this project would make a nice gift for someone in a nursing home or that is home-bound.
-
Some sweet little paper-pieced blocks to turn into appliques for bags!
-
My mother’s birthday was Valentine’s Day. Sadly, both she and my husband passed away in 2020. I’m not working on any Valentine projects this year. I am doing fabric pulls for 2 quilts though! That is uplifting and something to look forward to.
-
For Valentine’s Day this year I am working on a few projects — two pillows for a friend’s grandchildren from their “Poppa’s” work shirts and his carpenter’ belt. Also making bibs for a four year old learning table manners and having co-ordination problems and special pink napkins for all the ladies under five that I know with their name or monogram and maybe a favorite animal embroidered so they can find their special napkin!
-
I have a wall hanging I am making for Valentine’s Day/Month. Taking a look at my fabrics to try some of the fabric candy bowls–so cute.
-
I was thinking of making heart mug rugs. And now I’m thinking a matching candy bowl would be perfect.
-
I will probably make a valentine bench pillow to celebrated the day.
-
My plan is to make cosmetic pouch bags for all of my girls. This candy basket has really piqued my interest and I’m thinking it might be my next project. Thank you for sharing such easy-to-follow instructions.
-
For the last few weeks, I’ve been making in-the-hoop zipper tissue holders. Some have been done in red fabric with tiny white hearts and some in white fabric with tiny pink hearts. I’ve added matching tassels to the zipper pulls. Love the drawstring candy bowl pattern. My local chapter of the American Sewing Guild is looking for an easy “Make-and-Take” idea for one of our meetings and I am going to suggest this. Thanks for all the neat projects you send out !!
-
I am working on a bench pillow cover for my daughter, then mug rugs and lace bookmarks. They are all such fun to put together.
-
I will probably make pillowcases for my grandchildren, out of fabric with their favorite foods on it. I’ll also maybe make a heart garland just for fun
-
I’m finishing my heart quilt. I didn’t know about the button foot. Pretty cool!
-
I am working on Valentine coasters. So excited to get it finished!
-
I’m making keepsake Valentine cards with my 790 embroidery machine.
-
Tea cosies are my go-to for every occasion.
-
I am making mug mats for Valentine’s Day gifts. I have made the little candy bowls as bags to hold a handmade beaded bracelet or earrings.
-
Great for a candy bowl, but also provides a solution for making bowl cozies for the microwave that might could be used for different bowl sizes…..I’ll have to work on that!
-
I’m making a “soft” Valentine basket for my 15-month-old granddaughter who wants to carry her toys around her house.
-
Making Valentine Mug Rugs for friends and family. Almost done…ahead of schedule!!!
-
I’m going to make a table runner for my friend. She has a small condo and table runners add so much color to her area.
-
I don’t have a Valentine. However, this fabric candy bowl is adorable! I’m going to give it a try, then fill it with treats and gift it to an elderly friend who lives in a retirement apartment. I could really use these prize items. I’ve been in search of a good crafting light.
-
It takes a family member to be rushed to the hospital to not take people for granted !
When things settle down plan to make gift bags, Found on Bernina Archive post, for my daughter and my friends. So much fun finding the right candy or prizes.
Thanks Bernina for letting me Create! -
I am working on a Celtic Knot quilt using the True Lover’s Knot.
-
I’ve been making heart shaped mug rugs.
-
Cute project that I will try in the future, however, I have a cast on my arm so not able to make Valentine’s gifts this year.
-
I gave my grandgirls a sewing machine for Christmas. I am making pincushions, scissors holders and fabric bags to hold all the little things they will need.
-
I am making fabric boxes to fill with candy for my two precious grandkids. I will also make several mug rugs to give to friends. They are quick to make and easy to mail.
-
First, I’d like to know what brand that red iron is, cause, how adorable!
“What handmade Valentine’s Day gifts are you working on this year?” I recently took a Kimberbell Valentine’s class and we made gift card holders – which everyone likes. So, I’ll be making gift card holders for my Valentine’s – and I’m going to give a shot at making a couple of the candy bags…and a mug rug or two! -
I am making a couple of table toppers…but may need to make these candy bags too!
-
I am hoping to make a heart quilt.
-
I always make my husband a mixed media card and small treat bags for the little ones –
I love this bag pattern and will be making one for sure. reminds me of a Japanese bag I’ve seen made with kimono remnants- -
I plan to make the February kimberbell cuties table topper.
-
I am going to try the candy bowls, and making a card. I have the perfect fabric in my stash for the candy bowl?. In the past I have made heart shaped pillows.
-
I am finishing a little quilt with hearts for a doll bed for my 2nd cousin.
-
Maybe a card for my sweetheart ?
-
I will be making valentine mug rugs.
-
I’m going to embroider valentine greeting cards and a pillow with roses and a ❤ heart!
-
I want to make one of OESD Freestanding Heart Gift Boxes.
-
Rather than send Christmas presents to my 7 great nieces & nephews, I send them presents for Valentine’s Day. Last year I made each of them a personalized pillow case, choosing fun fabric that fit their interests & ages, plus embroidered their name on the pillow.
This year, I plan to make them personalized book markers, again with fun fabric & their names. Smaller gifts this year because I am making an infant quilt for #8 who will be born in early March!
-
I am making fabric heart-shaped ornaments to attach to cards for friends!
-
I am making a Valentine throw pillow, and now I want to made candy bowls for my 5 grandchildren!
-
I am making fortune cookie love notes
-
Was not planning on making “treats” for VD Day….looks so easy, I may just change my mind!
-
This year I’ve made reusable sandwich bags in pretty fabrics, book marks and tiny duffles.
-
I would love to make the fabric candy bowls for friends for Valentines Day!!
-
Have a Valentine wall hanging planned-just got all the supplies BUT I love this sweet candy dish . Thinking I will have to make 1 or 2 of them!!!
-
I am making some of the drawstring bags for my ‘sweet’ friends!?
-
Working on valentine’s day cards with fabric cover.
-
I make fabric postcards for friends and relatives.
-
I have made a special swirled cold process soap for Valentines. I plan to make the cute bags to wrap them up and give to friends and family.
-
I make a handmade book that reviews our big adventures from the previous year. Usually simple hand sewn but might opt to try my machine this year as I’ve been sewing more book art items on my beautiful 770!
-
I plan to make a Valentine table topper.
-
No projects this year. Dealing with a few issues. Celebrating at home too
-
I am working on some embroidered towels but I really love this sweet bag! I think this bag would be awesome for many holidays for gifts!❤️
-
I’m working on a machine Embroidery project by Kimberbelle for a friend’s Valentine❤
-
I’m making some heart bandanas for my three puppies ??
-
I’m making some heart bandanas for my three puppies ???
-
Thinking about working on a paper pieced heart mini quilt but these would be a wonderful addition to my mini quilt!
-
I think I will have to make a few of these candy bags for my granddaughters.
-
I am going to make Valentine Day cards.
-
What a precious little Valentines Day rememberance. I think I will make them for a luncheon.
Thanks WAS -
Love the drawstring candy bag. I was looking for a cute and quick valentine gift and this is perfect. Can’t wait to start making a few!
-
I’m going to make a nice card with some fabric.
-
I am planning on embroidering t-shirts for my granddaughters. I just learned how to use my embroidery module 🙂 If I have time the candy dish may happen!
-
no plans at the moment to make a Valentine’s project. I have waaaaay too many other projects to focus on.
-
I am making bowls for the grandkids this year.
-
Those fabric candy bowls are so cute. Want to make them for Valentine’s Day!
-
What handmade Valentine’s Day gifts are you working on this year? I just attended an embroidery class where I made a small table topper with valentine greetings.
-
I will be working on some embroidered gift card envelopes and a quilted wall hanging for valentines.
-
I am going to make a heart pot holders.
-
Thinking about doing some of these cute candy bowls for my girls 🙂
-
Love the cute fabric candy bowl! I am making heart table runners for a couple of friends! Shhh! It’s a surprise! ☺️
-
I almost gave up, couldn’t find the comment button :(.
Well, my hope is to finish a quilt I’m making for my niece. I wanted to make a table runner for my sister, but time is getting away from me with so many other projects.
I enjoy getting a box or so of the little kids valentines and handing those out just like I would as a kid.
-
I’m working on quilts for my grandsons.
-
This a perfect small gift and best of all, it is reusable. I have made a lot of pillowcases for gifts, so this is the new project to replace them.
-
To be honest, my pile of UFOs from other holidays is what I’ll be working on for the next few months. But the drawstring candy bag would be so cute for Valentine’s Day.
-
I’m piecing Infinite Hearts for a throw.
-
I usually just make up bags of candy for my daughter’s. This year I will probably do the same.
-
I will be making chocolate covered cherries!
-
I’m making a mug rug for my husband.❤️
-
I’m making a fabric basket for my granddaughter and putting a Tilda doll and some hair scrunchies and candy in it. Thanks for the tutorial for this lovely pouch. I’m sure that I will make one of these someday too!
-
I will be embroidering an apron for a friend with a Valentine’s theme. Tomorrow I’ll be trying this project in the blog post, looks like fun.. Will be using Tula Pink prints.
-
I am working on pieced heart, quilt block pillows.❤️
-
I am not planning any valentine gifts this year. Working on birthday gifts for family
-
These sweet bowls look so pretty, I may make some for my great grandkids!
-
I will be making a Valentine table runner for my niece.
-
I will be making a table runner for my niece.
-
I am working on a table runner with some candy hearts!
-
I love to make gifts for my 7-year-old granddaughter who lives 350 miles away. I am sure she would love one of these cute little bags filled with her favorite candies. I love to send her packages in the mail and she loves getting them! Thank you for the cute little bag pattern!
-
I will be making homemade cards this year.
-
I’ll be pulling out a previous We All Sew blog project that’s a cute heart shaped zippered pouch for my kid’s lunch – it fits a small handful of Kisses.
-
I always think I’m going to make homemade valentines gifts and never seem to get around to it. I am honestly going to try this year.
-
Honestly, I wasn’t going to make anything for Valentine’s Day, but I just found the perfect fabric for two of my nieces, so now I’m hunting for the “just right” fabric for her sister as it turns out that three of my grown nieces are getting pillow cases for Valentine’s Day.
-
I am making a hand-stitched valentine card for my daughter and I want to make one of these candy bowls too.
-
I’m making valentines pillow cases for my grandchildren. ❤️
-
I have yet to start my Valentine sewing since I figure I have a little time. I want to make a few embroidered rope coasters with hearts on them with my B790+; I would like to make a few mug rugs for gifts also. My B790+ makes easy work of those rope coasters & rope baskets.
-
Have a table topper project for Valentines Day, this is a really cute bag project, just might have to make this sometime soon.
-
I plan to make a fabric bowl for Valentine’s
-
I am working on a Valentine Bunting on my sewing machine for my granddaughter and some in the hoop Valentine’s cards for my family.
-
I am working on a Valentine’s Day quilt I started for a family member a few years back. Cross my fingers this year will be the one! The candy bowl is something I plan to use for Christmas
-
All of my adult children will be receiving different home decor projects that I have constructed and machine embroidered to match their kitchens so they can display them for Valentines Day.
-
I just covered some pillows for my porch rockers to brighten up our northwest winter! I think I might make my girlies a cute hot pad as well.
-
Made some paper pieces Valentine post cards. A few years ago I made a bag like this to hold my knitting. Red on the outside, pale yellow lining and green leaves. I added bar tacks done with the button sew-on stitch in a random pattern on the red. The bag looks like a strawberry.
-
I’m going to do the candy bowl. My first ever buttons with my new 770qe+, the 3A foot, and the 18 foot.
-
I started a heart shaped pin cushion this year. It has some needle felting on it.
-
This year for Valentine’s Day I’m going to make treat bags for my kiddos and a custom sticker for my husband for his favorite hockey team.
-
Oh I do hope I have time to make some of these cute candy bowls!!!
-
I’m definitely making one of the candy bowls for my great-granddaughter and will fill it with valentine candies. I”m also making a mug mat with an outline of an anchor and a glass of wine. Yes, Sounds strange but I have a friend who hopes to cruise again . . . . sometime.
-
I’m working on a red/white/blue quilt to donate to a veterans group
-
I a planning to make FSL hearts thta can be hung up in a window or anywhere else.
-
Making a new quilt for my granddaughter.
-
I like to make valentine coasters and placemats for gifts during this holiday. The candy satchel is a clever idea.
-
I’m working on finishing a UFO heart wall quilt, a gift to myself.
-
I am working on some sewing bags for my two stitching sisters! Can’t wait to get them finished and see their reactions!!
-
Whatever tickles my fancy…cards, fabric bags.
-
I am finishing scrappy valentines cards from last year! I love the simplicity of the drawstring candy bag and want to make one for my great niece.
-
Making a couple of fabric envelopes and have plans for a new table runner.
-
I am not planning any Valentine gifts because that day is the deadline to mail my mini quilt swap. But I do plan to make this candy bowl sometime
Thank you fir offering the contest -
I am going to make valentine trivits and hopefully a heart table runner.
-
I am hoping to embroider cards for my friends this year. The candy bowl looks like it will be fun and easy to make.
-
I love “weallsew”…I’ve learned so much. Mug rugs is my next thing to make. So many cute MR designs, but it’s basically making sure that I set my sewing time for myself better this year. Would love to win!
-
I think I need to make one of these cute bags!
-
I hope to make a cute heart pillow❤️. Love your website/blog!
-
Once I kick this covid and get some energy back, i will be making something to send to my college kids. I am thinking about a mini quilt they can put on their bedside table.
-
I’ve made quilted table toppers, in valentine fabric and personalized them with my kids and their partners name in matching embroidery. So darn cute!
-
This pattern would be great for any time of year. I’m not working on anything Valentines Day specific but am making more masks. Also working on projects that I already have planned. Have a goal of giving everyone in the family a handmade Christmas gift. Wish me luck!!
-
I’m working on sewing small felt hearts and stringing them together to hang in my front window.❤️
-
Though I’m usually not drawn to such projects, I like the Fabric Candy Bowl as I see many other uses for it. Thanks for publishing it. It’s the next project on my list so it will be done for Valentine’s Day. BTW, I LOVE my new Bernina 770QE and have already made 3 quilts on it as a newbie beginner!
-
I am making mug rugs for friends and a table runner with hearts and flowers for my mother.
-
For Valentines I’m going to make 2 candy dishes for my fraternal twin grandsons using different fabrics. They get identical gifts that look different – just like they are.
-
Love these projects that are shared.
-
I will have to try this candy dish for my kiddos!
-
I’m sewing Valentine’s Day Doggie Bandannas. ❤️?❤️
-
I am going to make some valentine masks for nurse’s at Philadelphia Veteran Hospital and putting them into fabric bags almost like your candy dish idea which looks super easy, thanks for chance to be super lucky!
-
I’m working on a lavender quilt!
-
I’d like to make the fabric candy bowl for my friend who hosts our bi-weekly stitching group.
-
I am not making any gifts for others but I did make a cross stich heart pillow for myself. It was a Moda pattern.
-
I’m going to be making a Valentine’s wreath for the front door.
-
I usually make homemade chocolates, but with expenses so high, I will sew something instead. Maybe next year I will use this pattern for gifting my chocolates!
-
I haven’t started any Valentine projects yet, but have some darling vintage looking Valentine card fabric. Looking for ideas!
-
I am making a paper pieced braided heart table topper. ♥️
-
I will be making embroidered hearts as a Valentine’s Day project (and I would LOVE to use some of those goodies in the giveaway to make that happen).
-
There are so many great ideas listed here. I’ll probably be making some embroidered greeting cards
-
I’m planning a couple of pillow covers, but I love be this idea, too!
-
I make embroidered seasonal mini quilts for my guest baths. Need a valentines theme, so it’s next.
-
I haven’t started, but I love this proejct and would be perfect for gifting some candy!
-
I am planning on making little faux leather heart shaped coin purses for my grandchildren with maybe $5 in it. They don’t need the candy but the little pouch will work well for lunch money. I think I’ll make this cute candy bowl for their parents.
-Laura -
I’m working on heart pillows.
-
I’m going to make the fabric bowl, that you just featured…I also, make thread-art hand stitched cards and that’s what I will send to the grandkids..
-
I normally just make cards but I do see this bag in my future. Sew cute!
-
I’m currently working on some Valentine’s Day mug rugs
-
I’m finishing a Valentine’s Day wall hanging which will be enjoyed by all who come to the house.
-
I am actually not working on specific Valentines projects. I am working on teaching my 6 yr old granddaughter to sew straight seams as she lives with us and they are home for the next 10 days due to COVID. So after school she is ready and willing! Fun times!
-
I’m working on flannel pjs for my girls and will embroider on them a bit too. Love this pkg giveaway! I was introduced to Kaffe through yarn years ago.
-
Working on fabric bowls for microwave in Valentine fabric for my kids.
-
I plan to make a couple of mugrugs and small zippy bags for Valentines. Cute candy bowl/bag on this blog post.
-
I am making a valentine bunting for our middle school library to hang in the front window.
-
I’m working on a Valentine’s wall hanging this year.
-
At this point I am not starting any new projects but am working on binding a quilt that I finished up to this point about 6 years ago. I finished a crib quilt yesterday. This is a great giveaway.
-
I always enjoy sewing heart shaped baby bibs for those celebrating their first valentine’s day.
-
I am making wine bags and mug rugs! I may have to try the candy bowl too!
-
I wish I could work on something but my machine is in for repairs. Being a new first time owner, I can’t wait to make all sorts of exciting new things!
-
This Valentine’s Day I’m making myself a purse. I’ve decided to show myself the same love I freely share with others. I’m also going to make one of the candy bowls, lol again for myself.
-
I love making kitchen towels for holidays !! I would love the giveaway for my new room !
-
I like to embroider little drawstring candy bags for my grandkids.
-
I’ve been working in soup bowl cozies for gifts – easy and useful!!
-
I’m going to make the candy bowl using valentine fabric for my grandkids.
-
Valentine’s Day is the due date of our first grandchild! I have finished basting the baby quilt, waiting for my Q16 to finish the FMQ. In the meantime, going to hand dew up some fun Valentine’s Day pillows for the house.
-
I am going to make ITH tabletop banners using the V9 update.
-
I plan on making mug cozies
-
I will be making these for gifts for my grandchildren and for friends. These are great ways to package small gifts and they are adorable to boot!
-
I’m too far behind to make anything this year but I have made fabric fortune cookies!
-
Always love new gift ideas! This is great for all occasions.
-
I am embroidering some free standing lace roses.
-
Hadn’t thought about sewing Valentine’s gifts, but what a great idea! Plenty of good options in these comments!
-
I’m working on some hand towels for the half-bath–embellished and decorated for Valentine’s Day. Next, I’ll be working on St.Patrick’s day-themed hand towels.
-
I am making dresses for my nephew’s daughters for valentines day.
-
Love the hand towel seasonal idea. Is there a particular pattern that you using?
-
-
I am making cute Valentine mug rugs and quilting them on my B740. I love my B740 for the 9mm wide decorative stitches and how it quilts! It makes sewing fun!
-
I hope to make a heart garland for my granddaughters.
-
This bowl is so cute! I am working on a knome for my daughter.
-
Working on a crocheted brown for my niece
-
I’m making a small Valentine lap quilt for my granddaughter. With kittens on it, her request!
-
The fabric bowls are so cute! I think I’m going to make the microwave popcorn bag that you showcased a month or so ago and make a movie night goodie bag for my college kids for Valentine”s day!
-
I’ll be making a new version of over-the-handle kitchen towels. Such a practical item that can be made plain or fancy as creativity and/or time permits…
-
I would like to make aprons with valentine fabric
-
My usual handmade Valentine’s Day gifts aren’t sewn but baked – I make heart-shaped sugar cookies and load them up with red, pink, and white sparkling sugars. If I win this giveaway though, I may switch gears and kick my Bernina into action!
-
I don’t have any Valentine projects planned this year, but something might turn up at the last minute.
-
I’m not making much for Valentine’s day – but I did finish my Valentine’s day quilt!!
-
I bought a cute fat quarter packet of Valentine fabric a few years ago. This year, I’m FINALLY using them to make heart coasters and a snack mat…or two! ❤️
-
Open wide bags for my sisters
-
This looks like fun!
-
What a cute project. Will definitely be making this as gifts for loved ones. Great project!
-
Hope to make a stitching gift for a friend and some treat bags. Thanks for the chance to win!
-
Thank you for this sweet project! I’m working on a little Valentine mystery quilt with an online group that has members from all over the world. It’s so much fun to see the beautiful fabrics and ideas from people from other countries!
-
Making stuffed animals holding hearts for my kiddos!
-
I’m not working on any Valentine’s projects. I’m trying to catch up on other sewing projects, but the candy bowl looks like it would be fun to make.
-
I am finishing my valentine love note table runner
-
I was going to do two post cards. But I think that candy pouch is necessary also . Thanks ?
-
I am making In The Hoop Valentine gift card holders. Some will be embroidered with the receiver’s name.
So cute, so easy. -
I have always made brown paper bags decorated with stickers and hand writing for each child. Then we all get together and hand make cards for each family member. Then I get candies of their favorites and they put those in every bag as well. This year as my sewing machine is out, I’m going to sew draw string bags for each child with their favorite fabrics to use. It’s going to be so fun
????❤? -
I am making small quilted hearts for my grandchildren.
-
I’m making pillows for my daughter’s new house.
-
I plan on making a dog bandana for a handsome furbaby who is my daughter’s valentine!
-
I’m making some quilted hearts to leave in my city for people to find! I recently stumbled across one on a particularly hard day and it instantly made me smile & warmed my heart.♥️
-
It is a cute candy dish. I would like to make valentine pillow cases for the grandsons and make valentines together
-
Valentines and pillowcase for grandsons
-
Valentine centerpieces for tables at church.
-
This bag is really cute and reminds me of one of my first projects in 4H years ago. ?
I’m working on some hand drawn (maybe a touch of origami) personal cards for Valentine’s day.
-
The cute little draw string bag with felt hearts for the grand kids. Filled with treats of course!
-
Love this fabric bowl idea. I have everything I need since my husband bought me the number 18 button foot for Christmas. Looking forward to doing this with my grandchildren. I am working on a heart wall quilt for valentines.
-
I’m planning on doing a revamp of my cluttered sewing room but I especially would love to make a few soup bowl cozies and give away some to my grands. So much sewing, sew little time!
Would love to win this giveaways -
I am making monogrammed drawstring soap mitts/bags which hold my homemade soaps!!!
-
Valentine post cards with thread sketching for my sweeties.
-
Making some tiny hearts to put in pockets of family and friends to let them know I love them. When they pull it out, it has a message of love on one side and a positive inspiration on the other.
-
I am making Valentines Day dog collars and bandanas for the local shelter!! ?
-
I LOVE the fabric Candy Bowl idea for this Valentines Day! I think that’s what I’ll be making this year. I think the fun will be picking which candy so I can match it up with the fabrics. Thanks for the Big Idea!
-
I’m making little heart ‘cards’.
-
I haven’t even thought about Valentine’s Day yet… but I’d love to win the giveaway!!
-
This year I will be seeing heart-shaped mug rugs for co-workers.
-
Table runners and coasters. With lots of hearts in pink,red and white and for me I am finishing my wall hanging heart quilt I cut out last January.
-
These little bags are so useful and easy! I would make seasonal versions to share all year.
-
I am going to make a heart-filled bandana for my rescue dog, Zoe ❤️?
-
I’ll probably make some valentine cards in the hoop on my 880 plus or my 570 QEE. Love both machines!!
-
I hope to make a valentine cover for my bench pillow.
-
I’m making zipper pouches for my children’s teachers.
-
I’m planning to make a mini quilt. February is around the corner, I need to get busy! ❤️
-
I’m making cute dresses for my granddaughters for Valentines Day!
-
Make Red felt hearts and ribbons with my grandsons
-
I love valentine fabric!
-
I plan to make one for my granddaughter
-
Valentine candy bowls for my granddaughters.
-
I am making mug rugs for Valentine’s Day.
-
I’m going to complete the quilting on a red, pink, and green geranium quilt!
Thank you!
Aelese -
I plan to make mug rugs to give to my special people to go with tea and my shortbread Valentine cookies.
-
I am working on some Valentine’s pillowcases.
-
I’m making my 4 kids Valentine’s Day outfits.
-
I am making some valentine Mug Rugs. So cute and quick!
-
Will do a valentine table runner this year.
-
I am hoping to make a couple baby quilts to donate to my local pregnancy center so those new babies have a special valentine’s gift.
-
On extended vacation in Belize, so no sewing machine, so I’m working on some cross stitch projects.
-
Shirts for my grandkids
-
Saw some cute little Valentine drawstring bags on here a week or so ago. So I’m planning to make 4 of those and put treats in them for my grandkids.
-
We don’t really do Valentine’s Day, so I’m not working on anything for it. We generally just show love year round and do as we are able. I just finished a bucket hat for my son this past weekend.
-
Love to win the giveaway and making some heart coasters.
-
I am making a quick scissors cover for all my sewing scissors.
-
I am making a bouquet of hearts for our daughter and fiancé to celebrate their first Valentine’s Day together!
-
Making freestanding lace bowl for Valentine’s Day.
-
I’m making a Valentine heart table topper. But I’m also going to make your cute candy holders.
-
I made a table runner and making a rag wreath.
-
This bowl is sew cute! I may add it to my Valentine’s sewing plans. I’m working on a Valentine’s Day flag using an in-the-hoop design on my upgraded 770 qe. Thanks for the opportunity to win cool stuff!
-
What a fun project! I am sewing composition book covers for errand lists, journals, etc. ~ Crystal
-
I am working on a Valentine quilt that has been sitting in my stash for what feels like forever. I probably won’t get it finished in time for this year but it will be ready for next year!!
-
I don’t normally make Valentine’s gifts, but this little project is awfully cute. My Neice has two little girls that would love something like this for stashing little treasures, so I think I’ll make a couple for the girls.
-
I just found an embroidery pattern for a cute flower that I am planning on making into a barrette for my granddaughter, or possibly another idea is a heart shaped coin purse. So many ideas and so little time!!
-
Thought about some mug rugs. I also love the card ideas. My SIL has a birthday on Valentine’s Day.
-
I plan to make the candy bowl for my valentines and fill with chocolates!!!!
-
I do not observe most holidays and gift giving is something I do with Joy when the opportunity arises. Quilts ., chocolate, cheeses…all sorts of things fall into the gift giving category. I love to give surprises.
-
I love to make postcards! Will make some for Valentine’s Day
-
Not sure, may be this project, the candy bowl.
-
I’d love to win this (as everyone else would)! Mug rugs – hopefully!
-
Thanks for including me in the drawing! Having fun making some embroidery zipper bags.
-
I’m making little 14″ Valentine quilts to be hung on a wire stand or from a dowel.
-
I will not make gifts for Valentines. However there is a group of my friends from other states that we meet sort of in the middle and I make sewing gifts for them each time we meet. This time for February I have made wine totes and plan on at least one more homemade gift. Not sure yet as I have couple weeks to plan and see.
-
I’m trying to finish quilting a quilt so no Valentine’s projects.
-
Thanks for the opportunity! I’m working on a small valentine mystery from Kathleen Tracy!
-
I have a valentine wall hanging that I’m working on. I want to free-motion quilt it with hearts. I have to practice before I do the final quilting.
-
Pulling fabrics together for a small table topper for a friend?❤️?
-
I am making a book cover.
-
Iam working on a cute valentines outfit for my 3 yr old grand daughter
-
I’m going to make personalize candy bags for my little Valentine’s (grandchildren).
-
Just made 7 of the fabric bowls. Love them. Will be giving as gifts to family and friends for valentine day. Thank you for the pattern
-
Cute Candy bag, would be used for many things!
-
I’m making cute little round table toppers and I’m thinking I should make a cute fabric candy bowl to go with it.
-
Looks like the candy bowl would be fun to try and gives me an excuse to buy foot # 18!
-
Would love this set for my Valentine! Sewing when I can…❤️❤️
-
This Valentine’s Day I’m making super cute quilted zipper bags that have a heart incorporated on both sides and embroidered Valentine’s Day cards!!
-
I am making machine embroidered cards for the granddaughters. Homemade candy for the grandsons.
-
I am embroidering hearts on clothing for granddaughters ?
-
I am working on bowl çozies for Valentine’s gifts
-
I’m sewing a cute heart print dress for my young 18 month granddaughter.
-
I am going to try these cute fabric bowls to send to my out of state grandkids.
Also making a table runner. -
Making embroidered valentine cards. Sew many cute ideas on #weallsew.
-
I’m painting watercolor cards and making an I love coffee table topper ❤️
-
I don’t normally make Valentine gifts, as there is just not enough time. This year I am leaving on Valentine’s Day to visit my sister in law – her birthday is Feb 15. I may have to make this for her new home, and birthday gift.
Thanks for such great patterns and wonderful give a way opportunities. -
I made one of these years ago and then lost the instructions. Thank you for the instructions. I need to make some more.
-
I’m working on a quilt as a gift right now. Would love to find a Valentine’s craft to give as a gift but haven’t found the right one; maybe I’ll attempt to make one of those little pyramid shaped zippered bags out of some Valentine’s fabric I have in my stash!
-
I am not working on any valentine projects this year.
-
I’m not sure what I’ll be making, but I’ve become inspired by reading the blog and comments!
-
I plan to complete the quilt, “Pieces of My Heart,” designed by Australian quilter Wendy Williams of Flying Fish Quilts. It is an art quilt, free-form, embellished with wool and embroidery. I bought the pattern and have been collecting red fabrics and some red wool. It looks like so much fun. I am really excited about it. If it turns out well, I would like to gift it to my doctor’s office, and title it, “Guard Your Heart.”
-
Sadly, I have never made Valentine gifts so the answer is none. I do love my Bernina’s & using them to piece quilt tops. I may try the candy bowls, but for Christmas gifts.
-
I’m making some felted wool sheep “I love Ewe!”
Making them for my precious grandchildren ❤️ -
Hand quilting a quilt top made by my great great grandmother.
-
I’m making a valentines table runner for my daughter.
-
I’ll be making sewn postcards to mail to all my friends!
-
Such a cute candy bowl. Looking forward to making one.
-
I am making a Valentine sweatshirt with rainbow hearts for my two granddaughters.
-
I’m working on a Valentines Mystery quilt.
-
I plan to make placemats and mug rugs for valentine’s day.
-
I am not planning any Valentine’s projects, still working on Christmas projects!
-
I will be adding this candy bowl to my project list along with the mug rugs and table toppers already in the works!
-
I’m making a valentine pencil pouch for my granddaughter .
-
I am going to make some Valentine pillows and some sucker holders that look like “ conversation” hearts ??
-
I think I will try these candy baskets for my granddaughters for Valentine’s. They would love them.
-
My grands get candy and a card. I am making port pillows & hand warmers for some breast cancer ladies though.
-
I’m making a Valentine’s Day quilt by Eleanor Burns
-
I think Im going to embroider some valentine pj’s for the grandchildren.
-
I’m making ❤ coasters. They are so cute and I will use them long after February.
-
I just finished a heart table runner, now to quilt it on my 790 plus, anxious to make the candy bag, as I have a bag of Linder chocolates ready to place in it and give to my hubby of 47 years?
-
I don’t make Valentine gifts, but I am currently working on Christmas gifts.
-
I am making embroidered heart sachets filled with lavender.
-
What a great little bag! Can’t wait to try it!
Thank you! -
I am finishing a snowman table runner and then plan to start on a Valentine throw pillow for my couch.
-
Making a hearts themed pillow for my sweetheart for Valentines Day.
-
This year the gift is for me! I find taking down the Christmas decorations a real let-down every year. I thought if I had some Valentine decorations I loved it would make the transition easier. A new mantle cover, tablecloth and pillow covers made from a fabric I love are all on my Valentine sewing list.
-
I’m going to make this candy bowl pattern for many of my family and friends. It is so cute.
-
I have a heart wall hanging kit in my stash that needs to happen this year!! Just so happens I’m going on a quilt retreat this weekend!! Perfect project to take!!
-
I haven’t decided on any Valentines projects yet, but this Candy Bowl is now at the top of my list! It is so cute!
-
I am making heart pinnies for my quilty friends this year!
-
I don’t usually make Valentine’s Day gifts, but I may try to make a couple of these candy bowls.
-
Normally I don’t make valentine presents. But now I’m going to start on these for my grandsons class for valentine. So cute. Hope they come out as nice as these pictures.
-
I’m making Valentine mug rugs and pin cushions for my quilting friends, but after seeing this candy bowl, I’m looking for fabrics to make one of these for each of them, and for my grandkids, too! ???
-
Not sure I’d use this for candy. I think it would be a nice holder for jewelry. Also will do valentine table runner.
-
I made a valentine’s table runner. I’ll add this candy bowl to my list for next year. I have some UFOs to complete first.
-
Working on a valentines baby quilt for the newest member of the family.
-
I have a friend who loves to decorate for every holiday so I would like to make her a Valentine table runner. She will love it!
-
Not working on anything for Valentines Day but I sure love my Bernina
-
Not working on anything for Valentine’s Day.
-
I am not working on Valentines Day gifts….everyday in Valentines at my house 🙂
-
I’m making little gift bags for my grandkids.
-
I was not planning on making anything for valentines day, but the candy bowl is cute, may have to try that!
-
My handmade Valentine’s Day gifts this year were working on what items we have to use which is cross stitch hearts in a hoop so cute since my son has a heart transplant we always incorporate hearts in everything we make.
-
I’m making quilted Valentine postcards for my grandchildren. They love getting my postcards in the mail.
-
I’m sewing heart table runner’s.
-
I’m planning to a couple small quilted goodies for my sweetie.
-
I’ve just started thinking about a project. I love that fabric candy bowl and will probably make a couple of those.
-
I am making napkins with fabric that is covered in hearts for Valentines Day!
-
I will be trying some mug rugs for Valentine’s Day.
-
I plan to make little heart pouches for the grands.
-
I am going to make some popcorn bags for valentine gifts.
-
Just bought my first Bernina…still learning it, so probably nothing this year!
-
I’m making some Valentines placemats for some again friends who can’t get out. I think I should add this candy bowl also!
-
Just a tip of the hat to the Bernina blog for giving not only great ideas, but giving clear and details for making the items. Love this bowl. It can be easily adapted for ANY season. A+ for versatility.
-
I usually make chocolate pretzels but this candy bowl looks like it needs chocolate hearts…yum!
-
My goal for Valentine’s Day – making 3 more quilts for donating to kids that need extra loving. I have 3 made already.
I made something similar to your candy bag a few years ago for Christmas present to a friend. I didn’t have a pattern, just worked on it until I was happy. I had my husband cut a thin piece of wood for inserting in the bottom of the bag.
-
I am making a organiser caddy for my mother’s walker and will decorate it by embroidery her name and adding hearts and flowers❤️?
-
I made mug rugs.
-
I’m making a heart Garland and would love to win this giveaway ?
-
Pot holders and a quilt
-
Working on a Valentine’s lap quilt
-
I have made a foundation heart pieced table topper.
-
I’ll be making a little heart garland for my daughter to drape across the room.
-
I love making Mug Rugs for my friends that enjoy coffee or tea. A mug rug lets me experiment with quilting designs.
-
Working on a table topper and learning how to do Edge to Edge quilting on my new 790 Crystal Edition. Love, love this machine!
-
Working on a heart quilt!
-
Planning on making some heart shaped pin cushions.
-
I will be working on a valentine quilt.
-
I’m still working on my Christmas projects!!
-
Nothing on the agenda for Valentine’s this year. I am working on a 3D quilt right now. The candy bowl is cute though. Love Bernina.
-
I’m working on a double ring wedding quilt. It definitely have the rough edges of life into it.
-
I’m working on a #showlove quilted throw.
-
I’m going to attempt to make matching outfits for my girls
-
I am sewing patchwork zipper pouches and prayer heart pouches.
-
I’m planning on making a garland to decorate.
-
I’m going to do a little valentine wall hanging that I have been wanting to make for several years.
-
I am making heart coaster. thanks!
-
Working on a small “LOVE” wall hanging, should be no problem finishing before Valentine’s Day!
-
I’m making ITH mats with my 790+ & tuck a greeting or treat in the back.
-
I will be making Swedish heart baskets to hold sweet treats❤️
-
For my collage age granddaughter, cute I Love Paris pillowcases and for my 3 year old granddaughter a heart shaped mini pillow
-
A valentine table runner for my daughter-in-law
-
I’m making embroidered cards for Valentine’s Day.
-
I’m not really making anything for Valentine’s day, but my youngest turns 6 on Feb 6 and I’m making her an embroidered owl dress!
-
I like making little quilted heart coasters
-
I’m making a valentine wall hanging to cheer up the house and a fabric bowl for my daughter’s scrunchies. Happy Valentine’s Day! ❤️
-
My project is already finished!?. I made a mini heart wall hanging using hst. I quilted it on my B770QEE!
-
I am making a heart quilt for my friend who has breast cancer.
-
Making personalized embroidery cards and a sweet treat❤️
-
I want to make a dressy blouse for Valentine’s Day.
-
I am making cowls out of Cuddle fabric
-
Each year ur quilt guild celebrates Galentine’s Day and we exchange a hand made gift to with our Gal friends. I’ve made some wool and cotton sachet hearts filled with lavender and I’m working on a needle case. I also plan to make a cross-stitched biscornu.
-
I don’t do anything for Valentine’s Day but these bowls would make a great gift for anytime.
-
My Bee is doing a Secret Cupid gift exchange for Valentine’s Day. This will be perfect. Filled with candy and sewing notions.
-
I am making pot holders and bowl cozies. They make wonderful gifts.
-
The candy bowl is cute but working on a tablerunner.
-
I’m working on a Valentine wall hanger. But love the candy bag,
-
For Valentines Day❤️❤️ I am working on 2 lap quilts on for my mom and the other for my grandson. I am also working on a seatbelt cushion for a very special friend going through breast cancer treatments. I also want to make the Candy bowls for my daughters
-
I plan to sew a couple of valentines cards using an OESD heart design.
-
i will make these for grandchildren.
-
Working on a masculine quilt fit my son.
-
This is a neat idea to make for my grand daughter for Valentines. Think I shall try it.
-
I have made mug rugs in the past. This candy bowl is so cute and will go together fast for this year.
-
I’m making a few bright, cheerful quilt block sweatshirts for some women around me who need a boost and some zipper pouches for my kids and husband.
-
I’m making a Big Love quilt by Modern Handcraft.
-
Embroidering Valentine’s T-shirts for 3 grandchildren and then enjoying the pictures that result!
-
Nothing specific for Valentine’s Day…but I am preparing fabric to sew a quilt for my youngest granddaughter! Cute idea though….
-
Nothing specific for Valentine’s Day…but I am preparing fabric to sew a quilt for my youngest granddaughter!
-
This candy gift bag looks like a fast easy sew for my grandchildren.
-
Planning on making some Valentines towels for my sister who just moved into her first home after taking care of our mom in her last years. My sister is the best!
-
Love the pattern, thanks for the tutorial.
Making some heart mug rugs. -
I’ve been trying to design my own heart shaped quilt block for a quilt for Valentine’s Day – it is cold in February and I thought a heart shaped quilt would be very cheerful during the month.
-
I will make small sweet treats for Valentines gifts—these little gift bags will be perfect!!♥️
-
I am making book bags for my mom, sisters, grandkids. Using only scraps so each one is different. Very fun! Love these bowls, too.
-
I made 6 machine embroidered Valentine themed votive candle holders.
-
I made a heart topper towel for my mother.
-
I am working on some kitchen towels and hot pads for my daughters!
-
I’m making some fabric Valentine cards.
-
I would love to make the fabric candy bowl. I looks super cute and easy to make.
-
I have not made Valentine gifts before. This Valentine bowl is teasing me–I think my granddaughters would like this. I have never used the button attachment foot before.
-
Making heart mugrugs
-
I love the candy bags and will make those. I also like to make heart pillows and jewelry bags. Thank you for the great ideas!
-
Now I’m torn between these cute bags and the Danish woven hearts I was thinking about doing. These will hold more candy so…
-
I’m making embroidered mug rugs for my family. I am so addicted to them!
-
I am working on completing a heart table runner which I started 3 years ago. It’s all assembled just quilting. Next project is the fabric candy bowl.
-
I am working on a Kimberbell Bench pillow for Valentine’s for my granddaughters this year! Hope it will be done in time!
-
Darling bowl, mug rugs and some chocolate dipped homemade caramels!
Time to get busy. -
I’m inspired to try one of these candy bowls in the future. I’m making my homemade fudge recipe for family and neighbors.
-
A wool appliqué pillow with heart shaped sentiments
-
I may make a couple of these bags. I have some new fabric with hearts on them that would be really cute.
-
I love the candy fabric bowl with pattern and directions. I will be making Valentine mug rugs with my Bernina!
-
I will be making a heart-shaped rope basket and several small pillows.
-
I am making a couple wallhangings and may make a few of these bowls
-
This a really versatile project. I really like how the fabric choices can make the gift bag match any holiday.
-
I am making several of these for valentine gifts. So cute and love the idea.
-
For Valentine’s Day I am finishing my antique rose quilt that I started four years ago. It was put away for a trip and then a puppy who was afraid of the noise from my sewing machine. When I restarted working on the quilt doing the machine quilting, my old machine couldn’t handle the king sized quilt. So it was put away once again. I now have a new B570QE and love being able to work on completing the quilt. Happy Valentine’s Day all!
-
As soon as I finish the “tumbler” style baby quilt, machine embroidered with a few cranes (birds) and the baby’s name, I will sew some of those bowl cozies as gifts and try machine embroidered Valentine cards to match!
-
I have a Valentine UFO I’d like to finish. It is a small square wall-hanging of a heart with pink, red, and white fabric scrap squares. It is mostly done except for wanting to quilt on my Bernette in the borders and put the binding on.
-
I made one of these & not happy with the results. I followed the instructions. I found it difficult to shape into anything that would hold anything. I’d add a picture, but don’t know how. I’m going to try & rework it, since I hate wasting fabric & time.
Leave a Reply
You must be logged in to post a comment.

2022 WeAllSew Valentine's Giveaway
This giveaway is now closed. Thank you to all of our WeAllSew fans who entered!
Congratulations to our winner(s):
Keep an eye out for the next WeAllSew giveaway!