Managing Embroidery Designs in BERNINA Toolbox
When using any kind of software, we accumulate files over time. It’s important that we can find them again in the future, and in this respect Toolbox is no different than any other software. What makes Toolbox unique is the simplicity and versatility of its file management tools. You may wish to print this article as a handy quick reference for future use.
In this article, we will review the following:
- What files and file types are used in Toolbox
- How to sort Toolbox files
- How to import / export files in and out of Toolbox
- Taking advantage of the BERNINA Cloud service
- How to use your own cloud storage service
- Transferring files to your machine from Toolbox
Designs inside Toolbox
There are two types of files used in Toolbox: Project files and Machine files. You work and build a design in a project file, and you export the machine file suited to your machine. For example, you will develop a project file (ARTX), which is automatically saved along the way by Toolbox. When ready to send it to your machine, a BERNINA machine owner will export a BERNINA EXP file and save that on a USB stick that you take to your machine. More on that process later.
Here’s a few details on the file types:
- Project Files: ARTX—these are the files native to Toolbox.
- Even when you import a design from another format, it will be converted and repackaged inside an ARTX file.
- ARTX files are located on your computer in the following folder: Documents>Toolbox>Toolbox Designs.
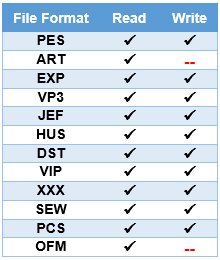
- Machine files: EXP, pes, etc. These are the files that are exported to a location outside Toolbox (e.g. a folder on your hard disk, a USB stick, etc.). Here’s a list of the various embroidery file formats that Toolbox can read (import) and write (export):
Working with Files in Toolbox
When you first open Toolbox, you are looking at the main (shell) screen. All ARTX files currently stored in the Toolbox Designs folder are listed automatically. As you can expect, this list will grow longer over time so being able to sort the list will come in handy.
There are two ways to sort the list:
- By Date: most recent file first.
TIP: This is great! Sorting by Date puts the last files you’ve worked with right on top of the list. No need to go looking for them!
- By Name: alphabetically in ascending order
TIP: If a file name starts with a number, it will be listed before files starting with the letter
- There is also a Search Tool that works based on file names.
![]()
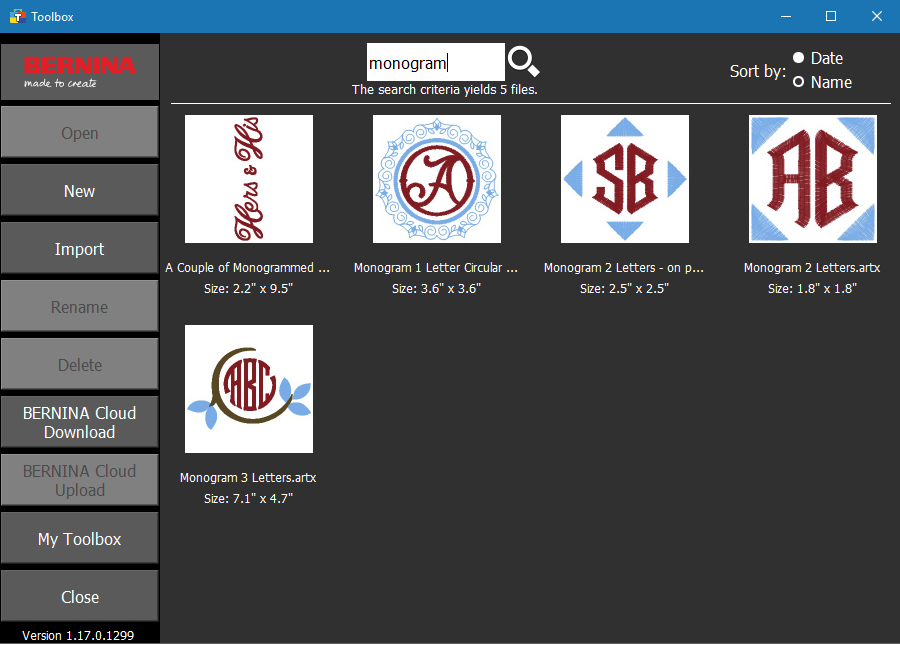
TIP: This is very useful when you have several files with similar names. For example, if you have multiple monogram files, they may all have the word “monogram” in their file name, but their names may not all start with the word “monogram”. The search tool will find all such files. See below how it found all my files containing the word “monogram”.
TIP: You can combine the Search Tool and Sort (either by Name or Date).
Actions you can take with files listed inside Toolbox
Once you’ve selected a design on the main screen, you can perform the actions below using the buttons on the left. Note: The buttons only become available for use after you’ve selected a design.
- Open the currently selected file. You have 2 options:
- Edit the current file directly.
- Create Copy and edit the copy of the file.
- Rename the currently selected file.
- Delete the currently selected file.
You can watch a video of these steps by clicking here.
Bringing External designs into your Toolbox
There are two basic scenarios (and tools) in which you can bring external designs into your Toolbox.
- Import Tool: Brings in a copy of a design file that will reside in your Toolbox designs library.

- Import is selected at the main (shell)
- It imports a design file of any supported format right on the main shell screen.
- It opens a dialog box that will navigate to the last location you imported a design from.
- Upon selecting the file to import and clicking on the Open button, a copy of that design will now be imported and will reside inside Toolbox.
- The original copy of the file will remain intact in its original location.
- Add Design Tool: Lets you insert an existing design into your current design file.

- It is used at the Edit Screen where you manipulate your embroidery).
- It imports designs on the fly (as needed) while editing a file using one of two options:
- Add a Design from the current Toolbox files:
- The files are listed on the right hand side of the screen and are ready to import.
- Double-click on the desired file and it is instantly added to your current design.
- You can insert multiple files in a row, one at a time.
- Add a Design from the current Toolbox files:
- Import Design from:
- Your computer (hard disk, USB stick, CD-Rom)

- This Opens a dialog box that will navigate to the last location you imported a design from.
- Upon selecting the file to import and clicking on the Open button, a copy of that design will now be imported and will reside inside Toolbox.
- The original copy of the file will remain intact in the location you imported the copy from.
- Import from the BERNINA Cloud

- NOTE: Your computer must be connected to the Internet in order to use the Cloud option.
- When you click on this option, the Toolbox screen will change over to show the online Cloud library.
- Click on any design to display its detailed info (see below).
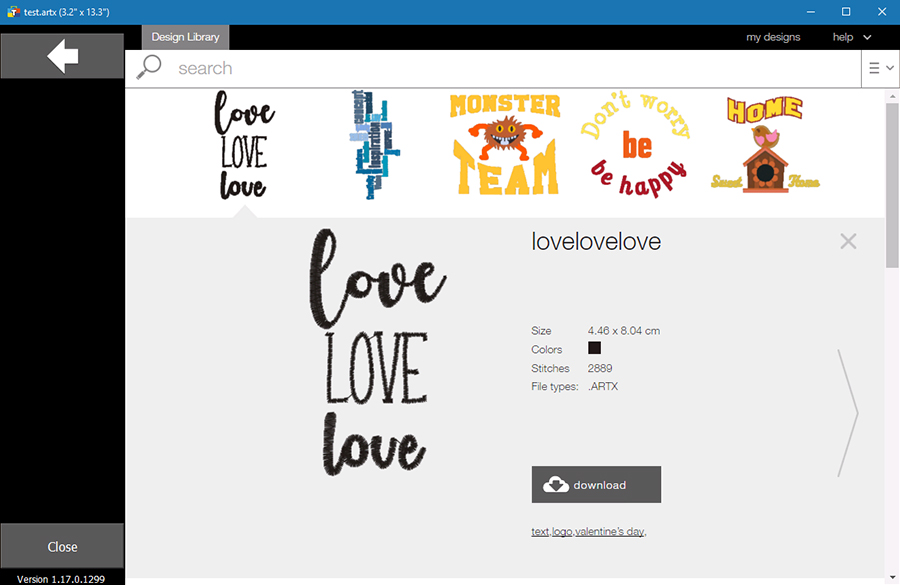
- Click on the Download button and the design is automatically inserted into the current design file.
To watch a video of these steps, click here:
Talking of the BERNINA Cloud…
When you installed and registered your copy of BERNINA Toolbox, a BERNINA Cloud account was automatically created for you. Your BERNINA Cloud makes anytime/anywhere design storage possible.
Using and managing Designs on the BERNINA Cloud:
- NOTE: your computer must be connected to the Internet in order to use the Cloud options
From the main Toolbox Screen (shell), you can:
- Download a design from the BERNINA Cloud.
- Click on the BERNINA Cloud Download
- When you click on this option, the Toolbox screen will change over to show the online Cloud library.
- Click on any design to display its detailed info.
- Click on the Download button.
- A dialog box will open suggesting the existing file name.
- You can edit the file name to suit your needs.
- Click on OK and a copy of that design will now be imported and will reside inside your Toolbox.
- Click on OK in the next dialog box (indicating that the download was successful).
- Click on the Return (arrow) button to exit the BERNINA Cloud and return to the main screen.

- You should see the newly downloaded design now listed.
- TIP: If you are using sort by Date, this newly imported design will be first in the list.
- The original copy of the file will remain in the BERNINA Cloud library.
- Upload a Design to the BERNINA Cloud.
- This is done from the main (shell) screen.
- NOTE: You must first select the design to be uploaded before the Upload button becomes active and available for use.
- Select the design to upload.
- Click on the BERNINA Cloud Upload
- The design will be uploaded automatically to your BERNINA Cloud library, provided your computer is connected to the Internet.
- Click on the OK button in the resulting confirmation message.
- Your design will be listed in the My Designs section of the Cloud, and will be available via any internet connection.
- TIP: You can verify that your design was indeed uploaded by logging into your BERNINA Cloud account at com and clicking on the my designs tab.
![]()
- You can now access that design from any computer you have Toolbox installed on, as well as with the Cloud based version of Toolbox via a web browser on a smart phone, table or computer.
What about designs from collections I have purchased?
As you can see above, you can bring designs from external sources (e.g. collections you have purchased) into Toolbox as you need them.
Designs from your purchased collections stored on your computer include:
- Collections purchased on USB Sticks
- Design files downloaded or copied to your hard disk
- Collections purchased on CD’s
My recommendation is to keep the original collections on their original media, and only import the individual designs as needed. This will keep your Toolbox library more manageable.
Remember that you can import designs into toolbox before you begin working with them, or you can add them into a file on the fly while you work. I love that flexibility!
General TIPS in managing your embroidery designs:
- I personally use a cloud drive service (Dropbox, Google Drive, iCloud, OneDrive) where I backup all my design collections. If my computer crashes I have a copy securely stored online.
- Typically, your cloud drive will be represented by a single folder on your computer.
- This makes for a convenient single location to store all your embroidery collections.
- I use a dedicated USB stick to transfer designs (machine files) from Toolbox to my embroidery machines. Dedicated meaning I don’t use it for other purposes, so it’s always available.
- TIP: Use a hook-and-loop tape ‘dot’ and stick one side to the machine, the other to the USB stick so you can easily park your stick right on the machine. It will always be there when you need it.
- I use an inexpensive USB stick (1 or 2 GB will do). Remember that the larger the stick’s capacity the more clutter you can build on it.
- I only store designs in the machine if I plan to stitch them out repeatedly or regularly. They are easily deleted from the machine once I’m done with them.
I hope this helps you take advantage of the simplicity and flexibility BERNINA Toolbox makes possible in managing your designs and making use of them as you compose your own embroidery motifs and scenes.
Enjoy the Toolbox video tutorials playlist to build your Toolbox Software skills.
Used Products
What you might also like


8 comments on “Managing Embroidery Designs in BERNINA Toolbox”
-
-
The BERNINA EXP export format in Toolbox should be readable to ArtDesign. If for some reason that doesn’t work there is a newer option with Artlink 8, which is free and will add free designs to your library. You can download Artling 8 at:
https://www.bernina.com/en-US/Products-US/BERNINA-products/Software-Designs/Free-Embroidery-Design-Viewer/Free-embroidery-design-viewerArtlink reads most home formats and can send to your machine.
Sylvain
-
Love Love Love my toolbox software. I am trying to take a purchased design, and ungroup it. It’s a door hanger. I want to take the motif’s off and create my own, Trying to get the blank door hanger shape.
Is that possible on Toolbox?
Thanks so much
Roni Gerhardt
Danbury CT-
Hello Roni, you can connect directly with your BERNINA store for personal help with the editing question you have about a specific design in the Toolbox software.
-
-
Right now I have Editor v. 7 (PC version). I am trying to decide whether to go to Designer v. 8 (using the PC) or Toolbox instead. I would also much prefer to work on my MAC, put designs on a USB, and then go to my 880, bypassing my PC altogether. I do not have any sort of windows program on my MAC. I am not sure I have much interest in digitizing, at least for now — just editing at the moment. Which seems to best meet my needs?
-
hi, question on Toolbox, my machine is not satin stitching completely over the baste foundation of the letter leaving three to five stray stitches. This especially happens on “O ” “D” and has just happened again on K.
Using OESD medium weight stabilizer, using Aurifil cotton in bobbin, using Cotton and Steel cotton on top, using Organ Needles ballpoint 90/14 special gold needles. Is there an issue with the software? Also, this same problem of “stray” stitches happening on OESD canned design, small strawberry design in the leaf area. Please help.Also, is Bernina coming out with smaller fonts for labels? thanks
-
Hi – can anyone tell me why my print preview doesn’t work on toolbox. I get the dialog that says it’s print but nothing prints or appears.
-
I want cutwork on my Artista 200 embroidery sm. What do I need to purchase? My EditorPlus 6 does not work on my PC windows 10 sm. Thank you.
Leave a Reply
You must be logged in to post a comment.

I have a Bernina 430 with embroidery attachment. I have to connect my computer to the sewing machine (rather than use a memory stick) to stitch a design. I can’t figure out if you can stitch out directly from the toolbox application? I use Bernina ArtDesign 1 to stitch out my designs, but I can’t seem to make the .artx files created in toolbox export to a format I can read with my software. Any advice?