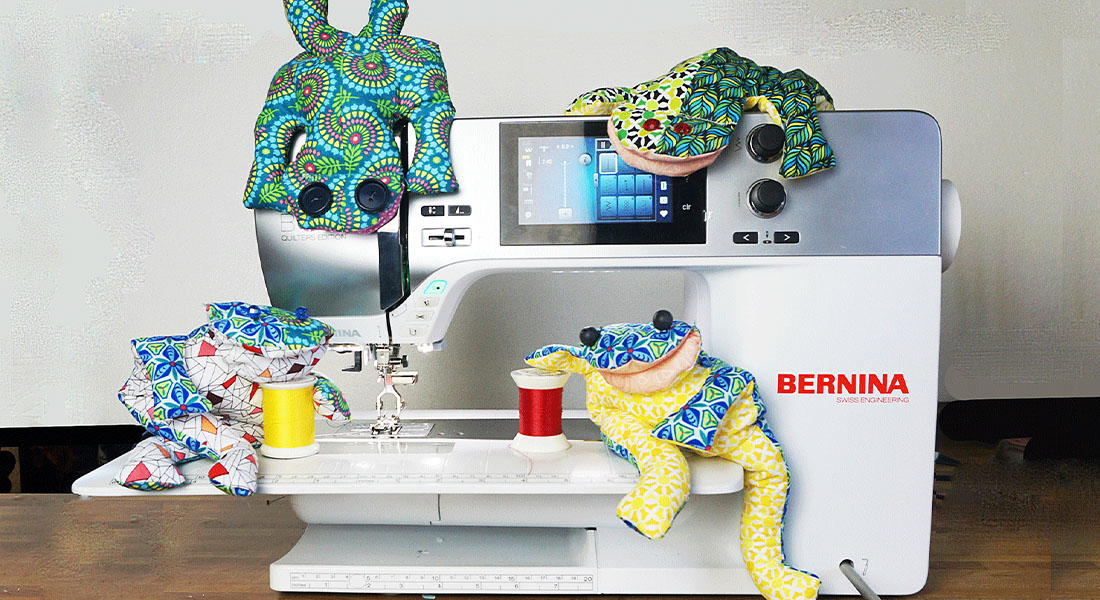
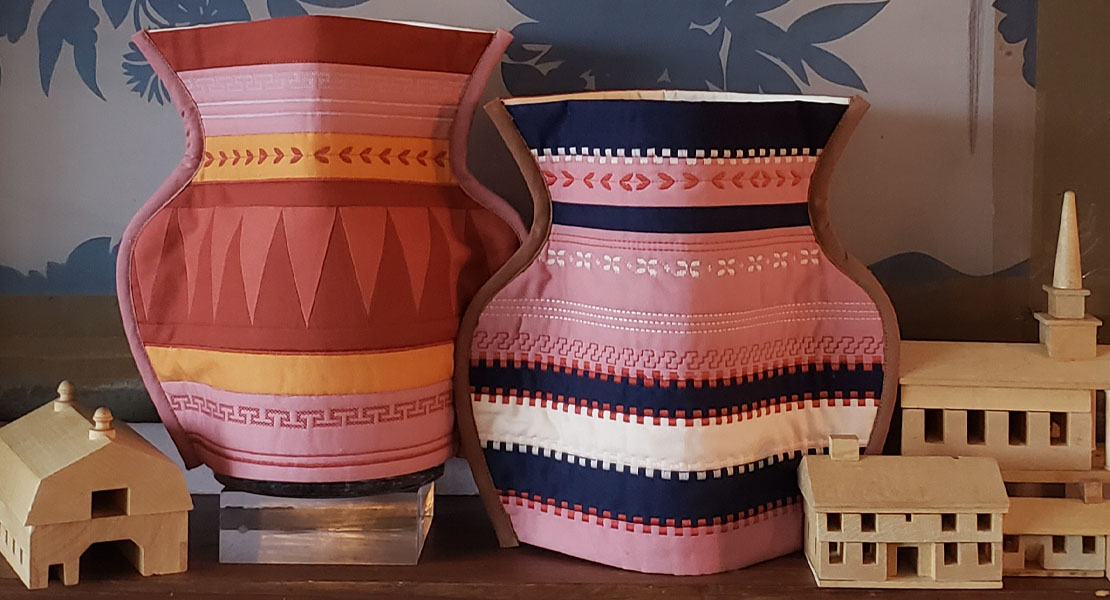
How to Sew Wall Organizers

These adorable wall organizers are quick and easy to make! These are a perfect afternoon project and great for beginners. They can be used in any room that needs a little organization! Use in the sewing room by your sewing machine or cutting area to free up table space. Use in the bathroom or bedroom for some added storage. They are so quick to make and pretty to look at that they would also make a great gift for someone special. Just change the fabrics and sizes to meet your needs.
This blog will cover three different sizes, different pocket styles, and different ways to sew the finished binding edge in place. Each method uses a different pressing foot. So let’s get started!
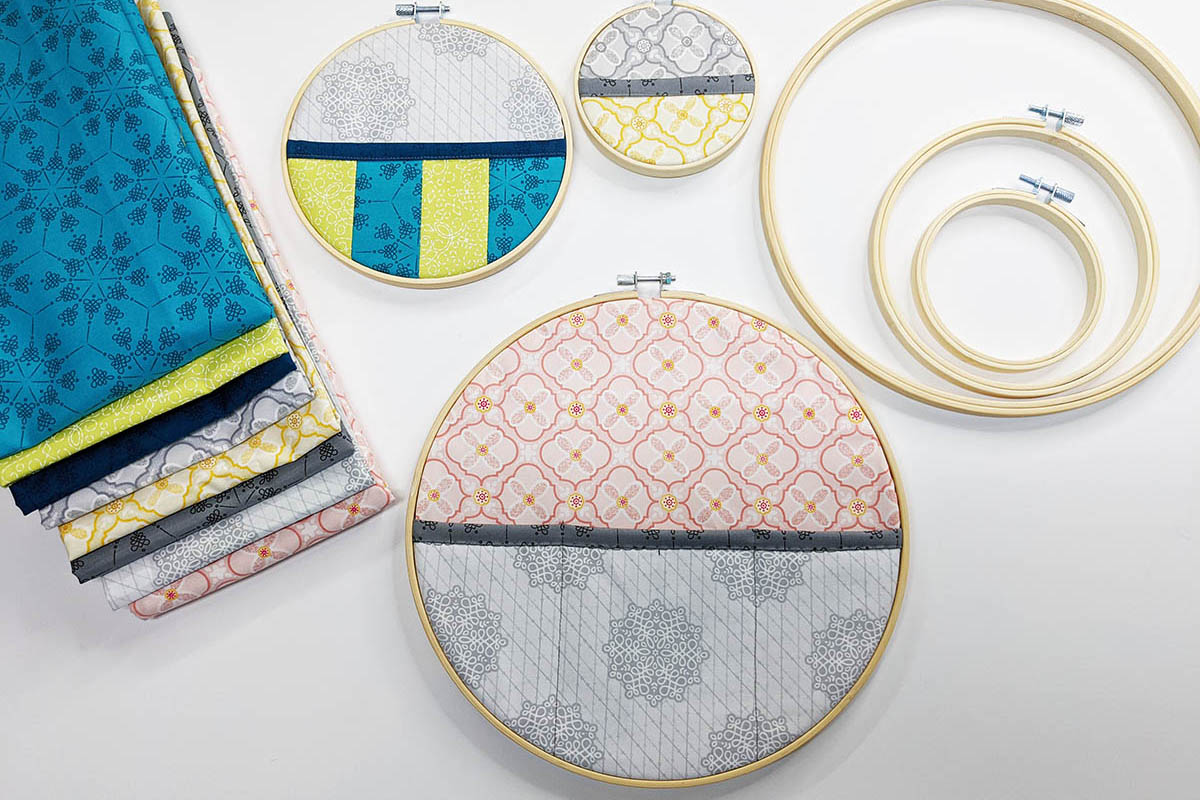
You can use scrap fabrics or fat quarters for this project. The wall organizer finished size is based on the embroidery hoop size that is used. For this pattern, we used 4”, 6”, and 10” wood embroidery hoops. You can also get different size embroidery hoops or use bright plastic versions to change the Wall Organizers’ style.
Materials to Sew Wall Organizers
- Two fat quarters and 1/8 yard of fabric for each organizer
- Three embroidery hoops, one of each size, 4” diameter, 6” diameter and 10” diameter
- Circle templates from download
- Cutting mat and rotary cutter
- 15” square clear acrylic ruler
- Hot glue gun and glue sticks
- Iron and pressing surface
- Scissors
- Wonder clips
- Fabric marking pencil
- Matching cotton thread like Aurifil-50 weight
- Sewing machine (I use BERNINA 570 QE)
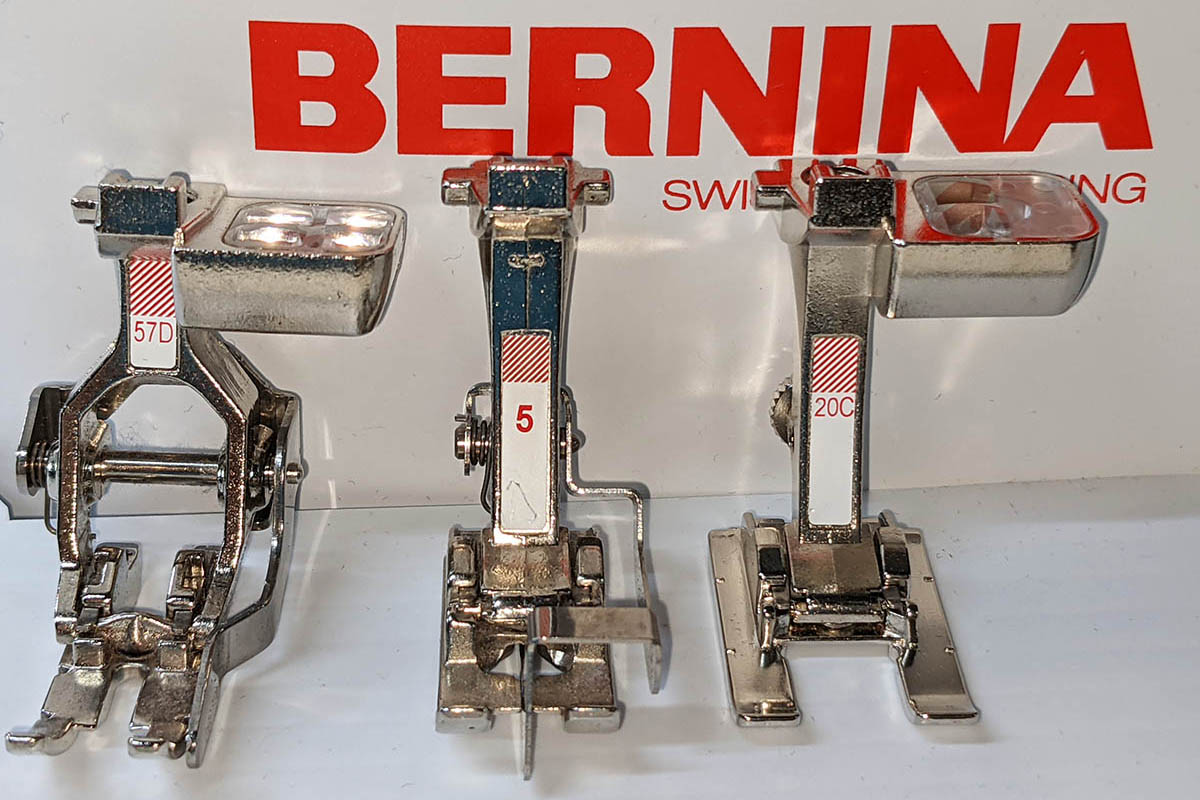
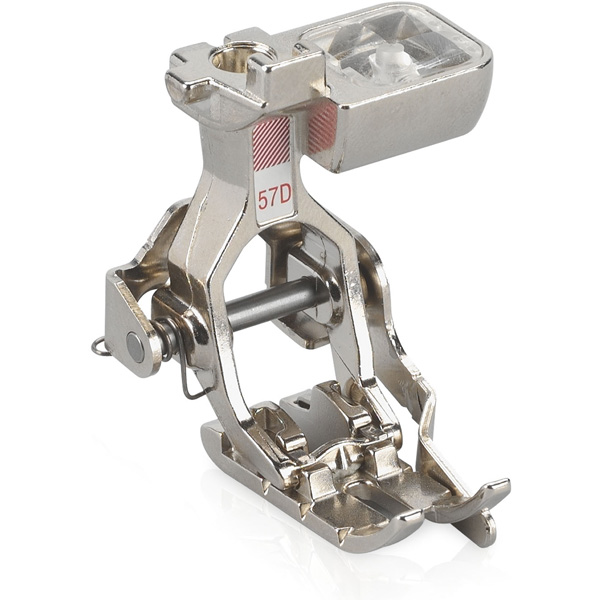
- Straight stitch or patchwork foot (I use Patchwork Foot with Guide #57D)
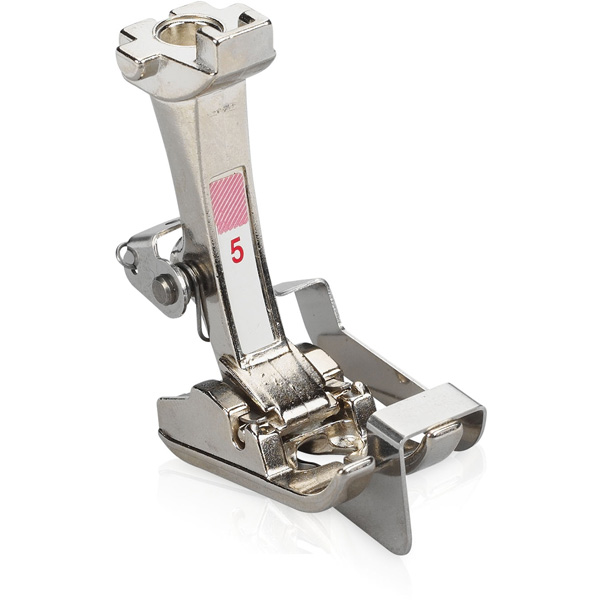
- OPTIONAL: Blindstitch Foot #5 and Open Embroidery Foot #20
- OPTIONAL: Aurifil invisible thread
- Wall Organizers Pattern
Purchase Your Fabric and Hoop Kit Today!
Click here to purchase the DIY Wall Organizer kit including all of the fabrics and embroidery hoops needed to create these wall organizers. Available while supplies last!
Steps to Sew Wall Organizers
Step 1: Cutting the Templates and Fabric
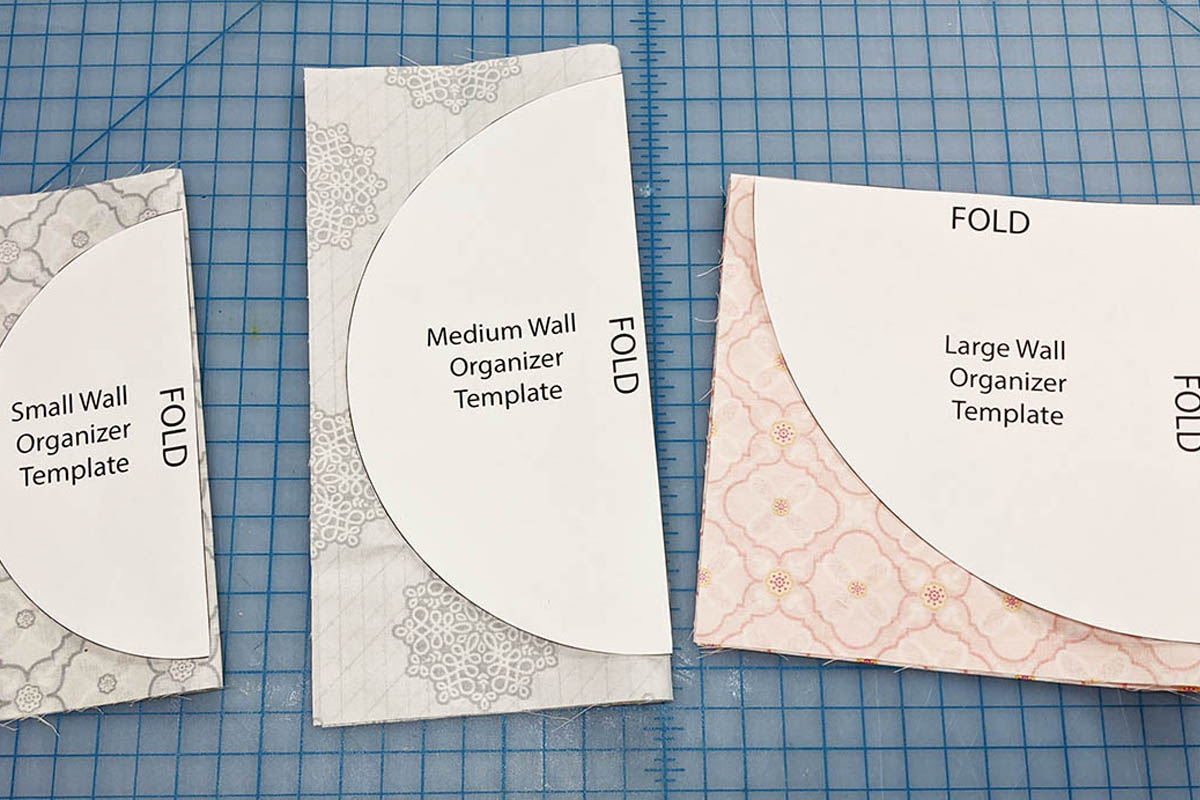
Download the paper templates. Cut out the three circle templates on the printed line.
Cut the following fabric pieces for each wall organizer.

Small Organizer
- One 7” square for the back piece from one fat quarter
- One 7” square for the pocket from one fat quarter
- One 2” x 8” strip for the pocket binding
Medium Organizer
- One 9” square for the back piece from one fat quarter
- One 3” x 6” strip and one 2” x 6” from one fat quarter
- One 4 ½” x 9” strip, 3” x 6” strip and one 2” x 6” from one fat quarter
- One 2” x 10” strip for the pocket binding
Large Organizer
- One 13” square for the back piece from one fat quarter
- One 13” square for the pocket from one fat quarter
- One 2” x 14” strip for the pocket binding
Step 2: Cutting the Circles
Small Organizer
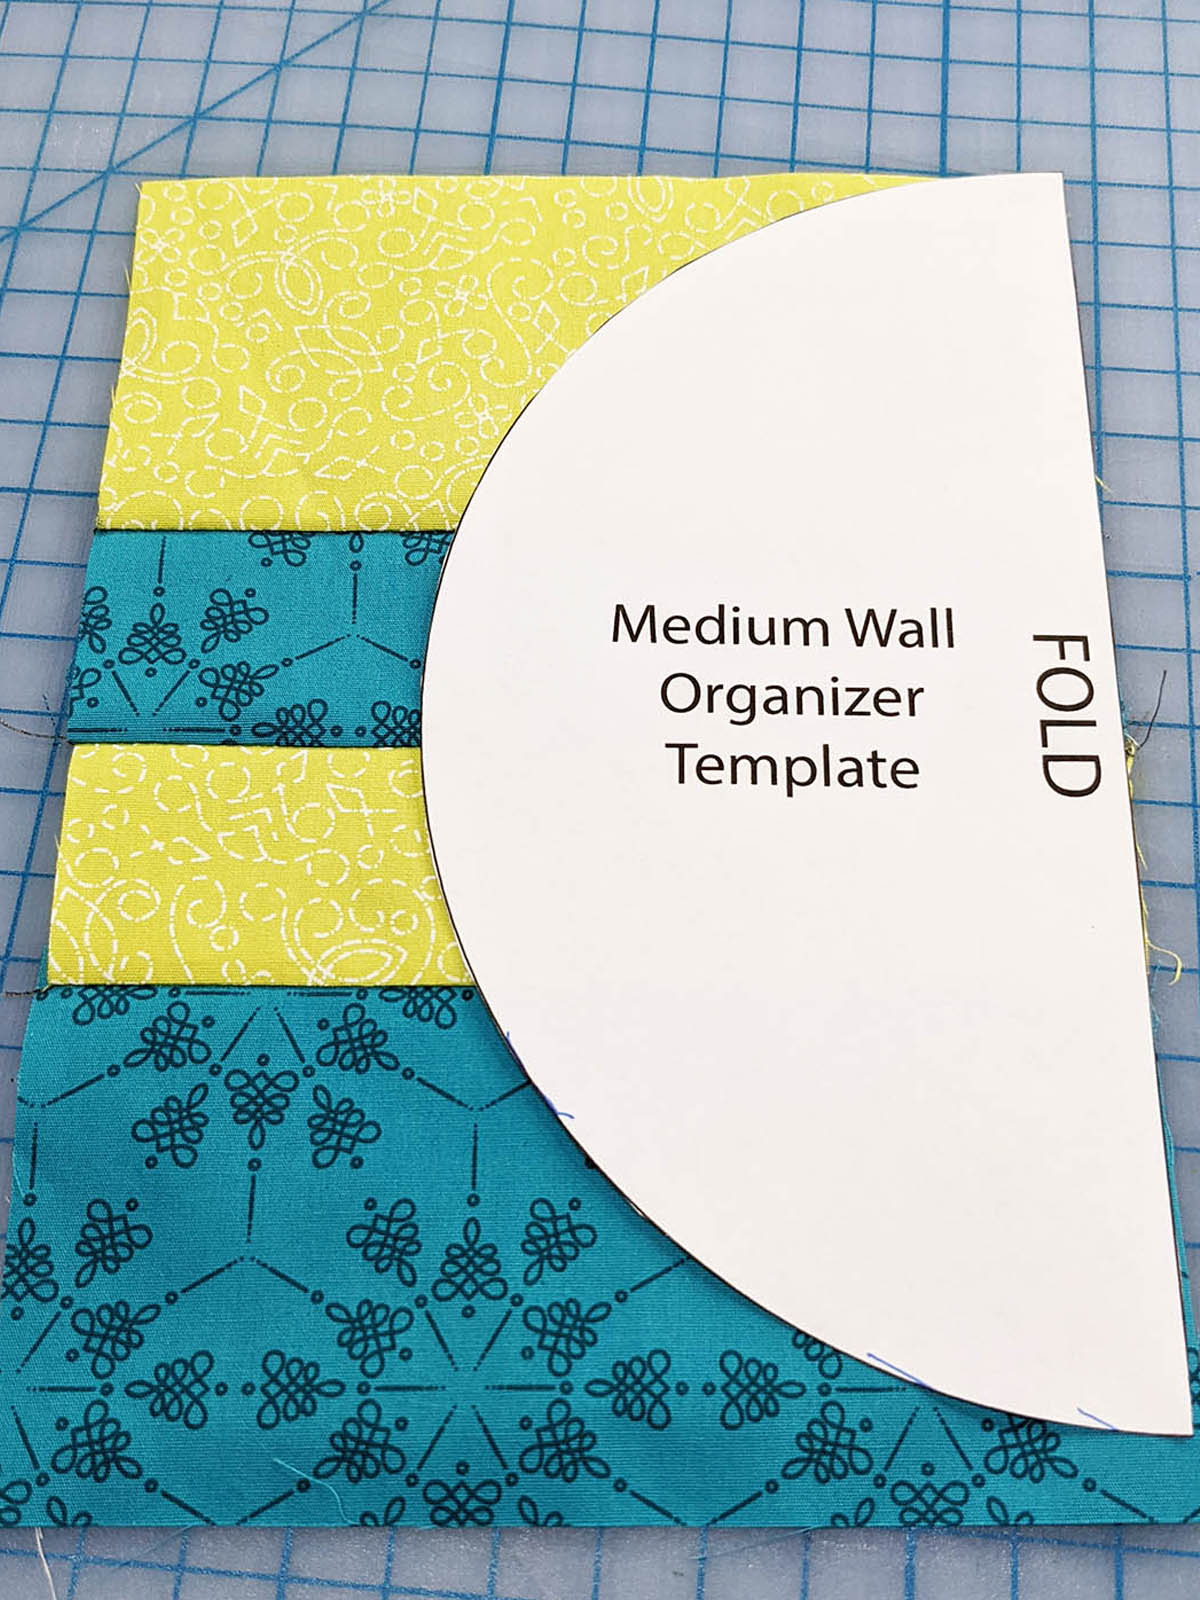
Fold one 7” square in half, right sides together, and place the small wall organizer template on top of the folded fabric. Align the template edge marked “FOLD” with the folded edge of the square. Trace the template onto the fabric using a fabric pencil. Cut on the drawn line through both layers of fabric to cut one small circle. Repeat with the second 7” square to cut another small circle.
Medium Organizer
Fold the 9” square in half, right sides together, and place the medium wall organizer template on top of the folded fabric. Align the template edge marked “FOLD” with the folded edge of the square. Trace the template onto the fabric using a fabric pencil. Cut on the drawn line through both layers to cut the medium circle.
Place the medium wall organizer template on top of the 4 ½” x 9” strip, aligning the straight edge of the template with the long edge of the rectangle. Trace the template and cut the fabric on the drawn line to make the pocket lining piece.
Large Organizer
Fold one 13” square in half from side to side, right sides together. Now fold the fabric again from top to bottom to fold the square into quarters. Place the large wall organizer template on top of the folded fabric. Align the template edges marked “FOLD” with the folded edges of the square. Trace the template onto the fabric using a fabric pencil. Cut on the drawn line through all the layers to cut the large circle. Repeat with the second 13” square to cut a second large circle.
Step 3: Get Ready to Sew
This project is stitched with straight stitches and 1/4″ seams. I recommend using a Patchwork Foot for the project (I use Patchwork Foot with Guide #57D). I will also cover how to sew the binding edge in place using the Blindstitch Foot #5 and Open Embroidery foot #20. These two feet are not required to make this project.
Small Wall Organizer
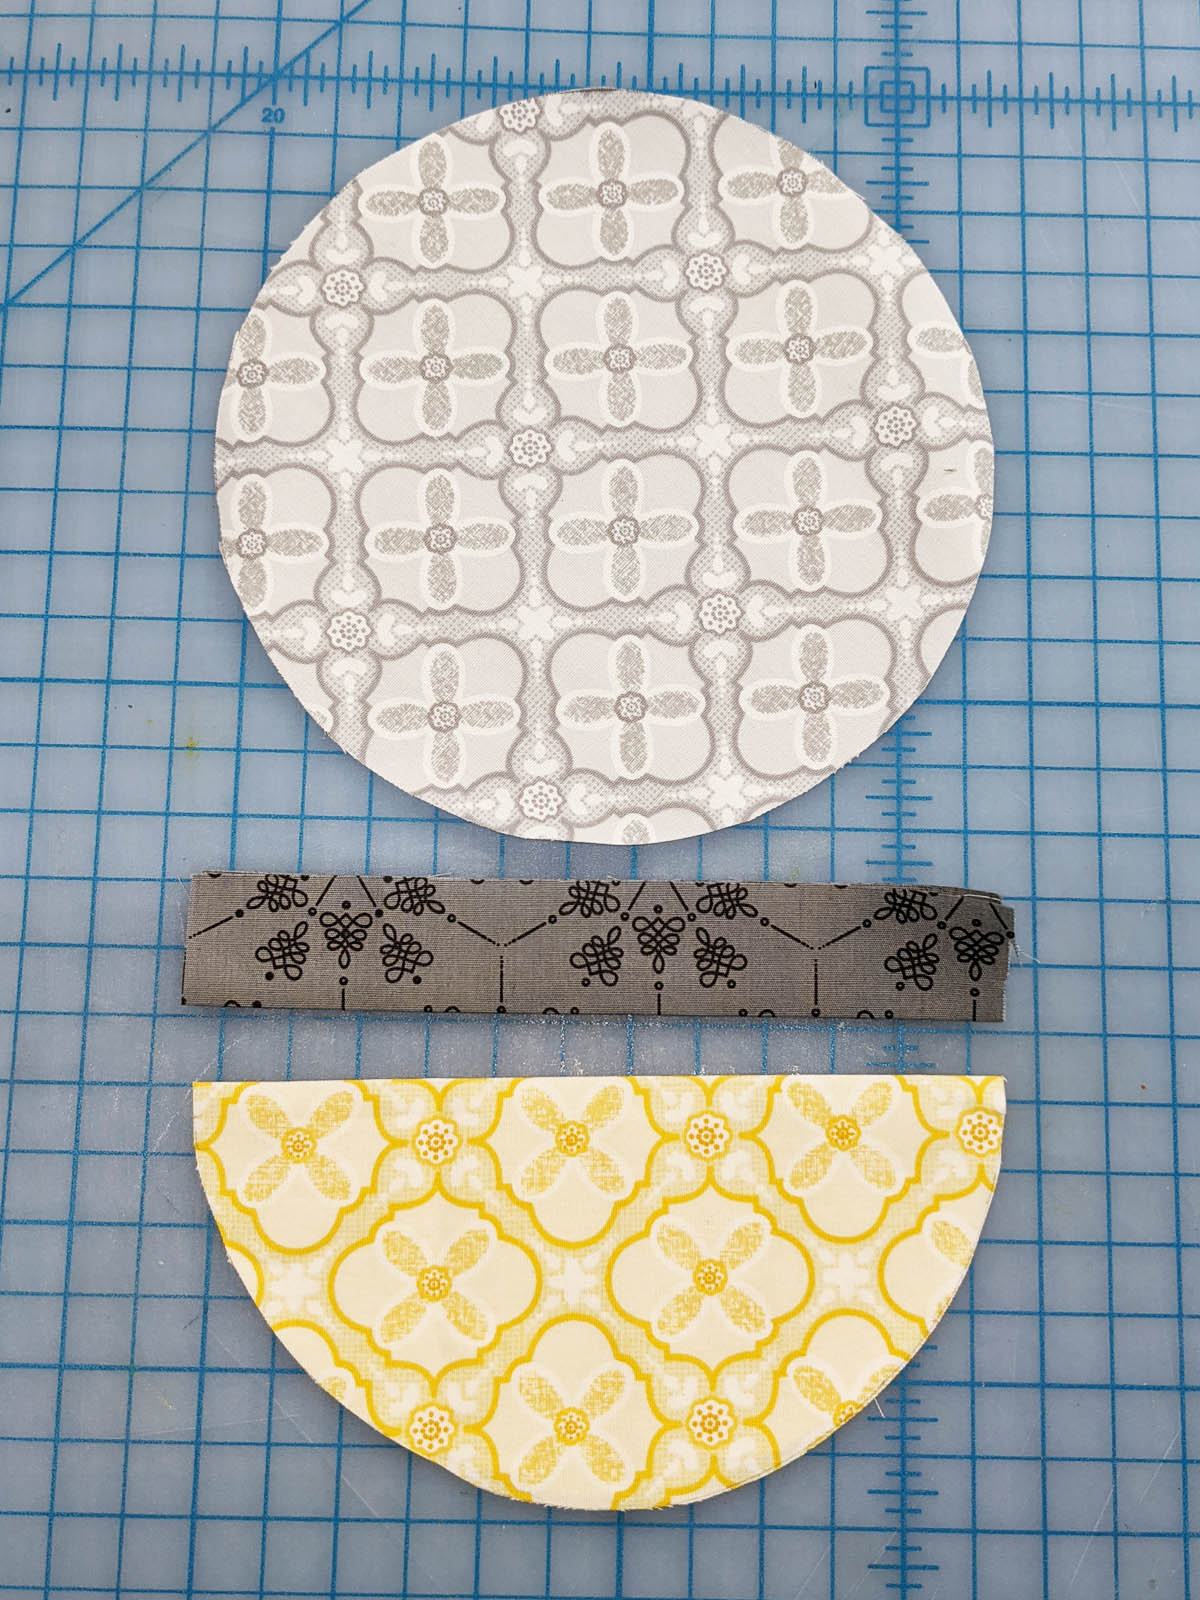
Fold the small pocket circle in half, wrong sides together, and press to make the pocket. Fold the 2” x 8” strip in half lengthwise, wrong sides together, and press to make the binding strip.
Align the raw edges of the binding with the straight edge of the pocket on the backside of the pocket and use wonder clips to clip the two pieces together. Sew the binding strip to the pocket back, using a 1/4″ seam.

Press the binding strip up and over the pocket edge. Turn the binding over to the top of the pocket edge to the front of the pocket and clip in place using wonder clips.
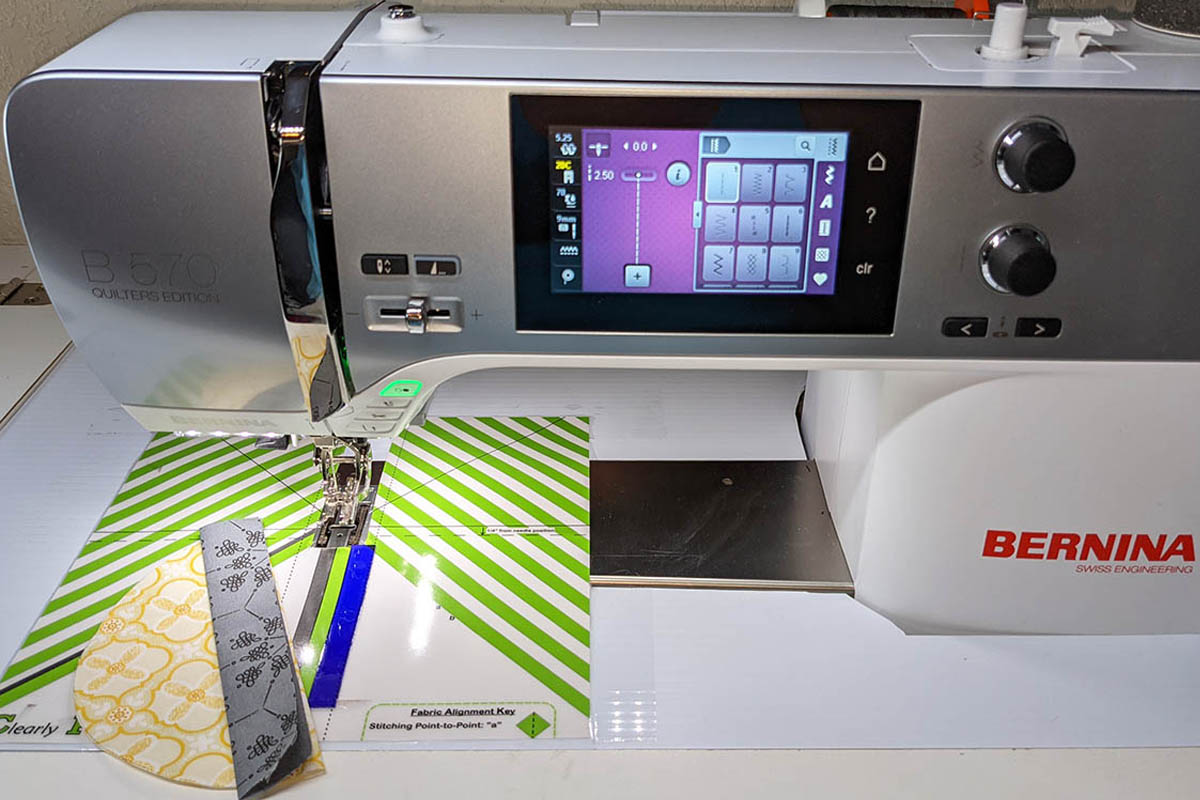
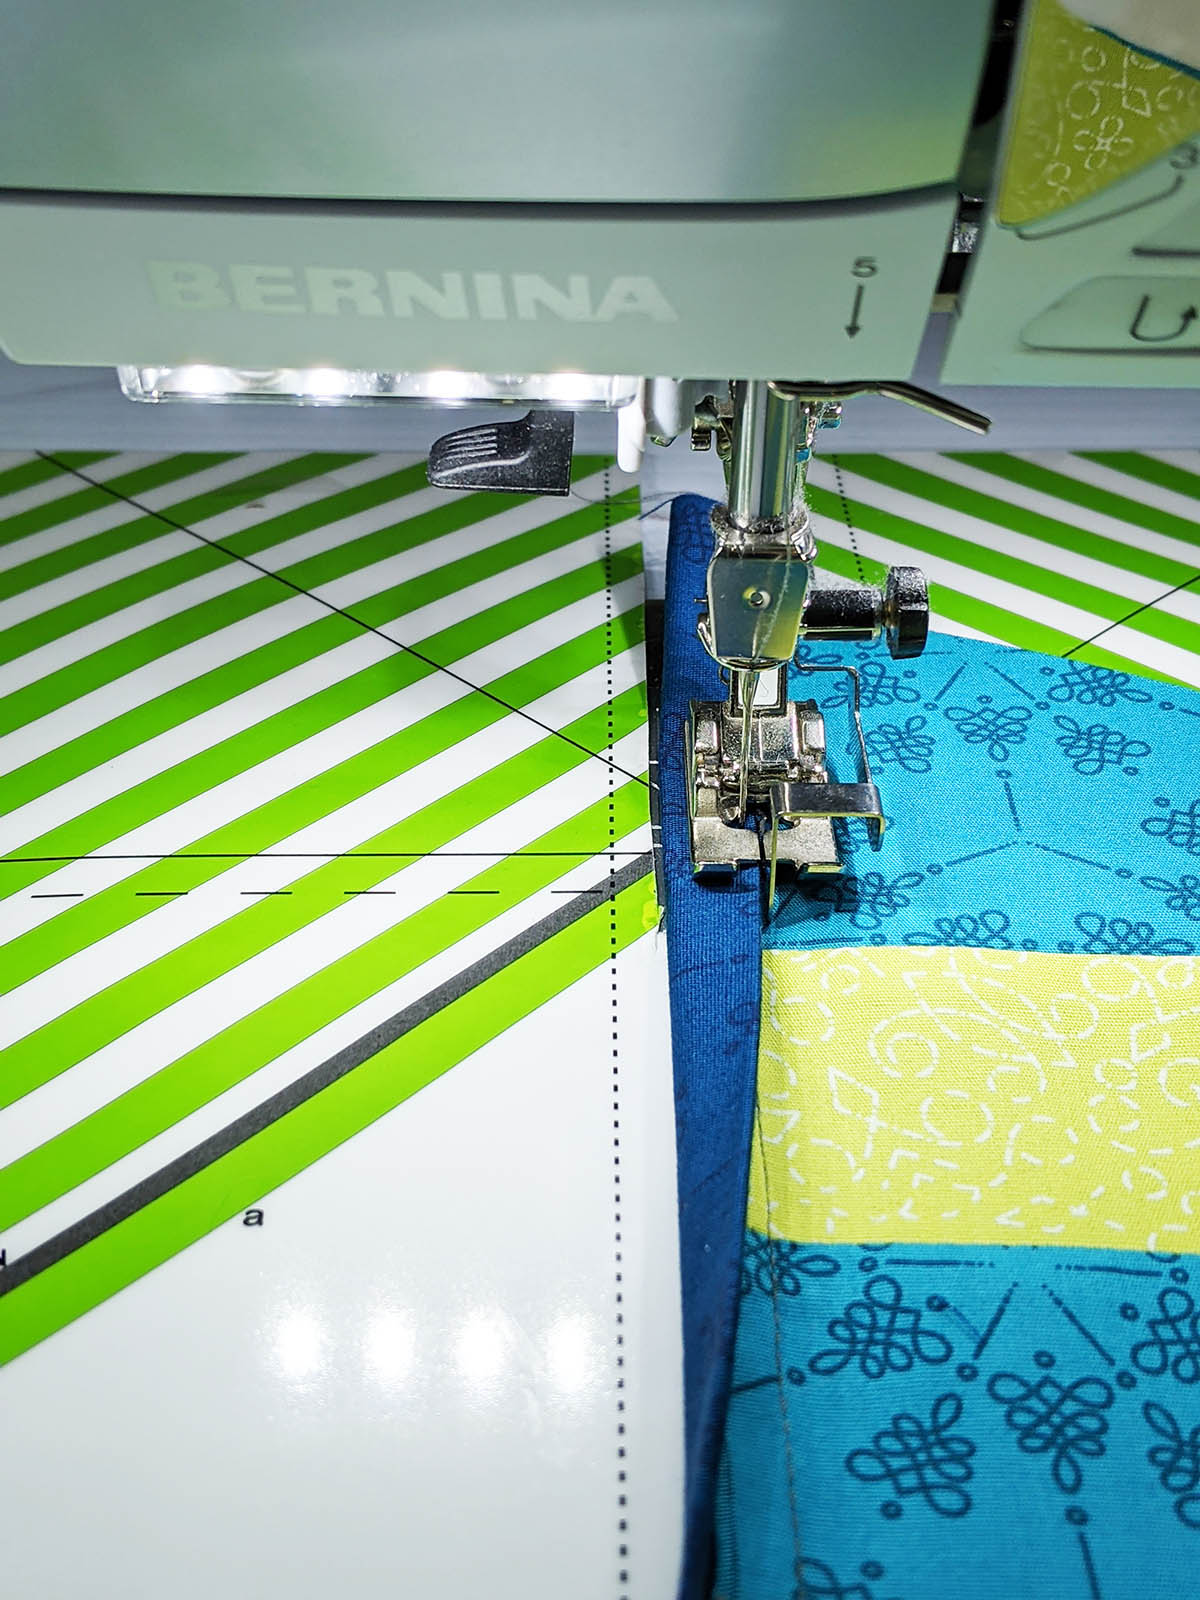
To do the first topstitch method, use the small inset of the Patchwork Foot with Guide #57D presser foot. Align the edge of the binding with the inset on the foot as shown above. Sew through all the layers using the inset as a guide to sew 1/8” top stitch along the binding edge to complete the pocket. Trim the binding even with the circle to complete the pocket.
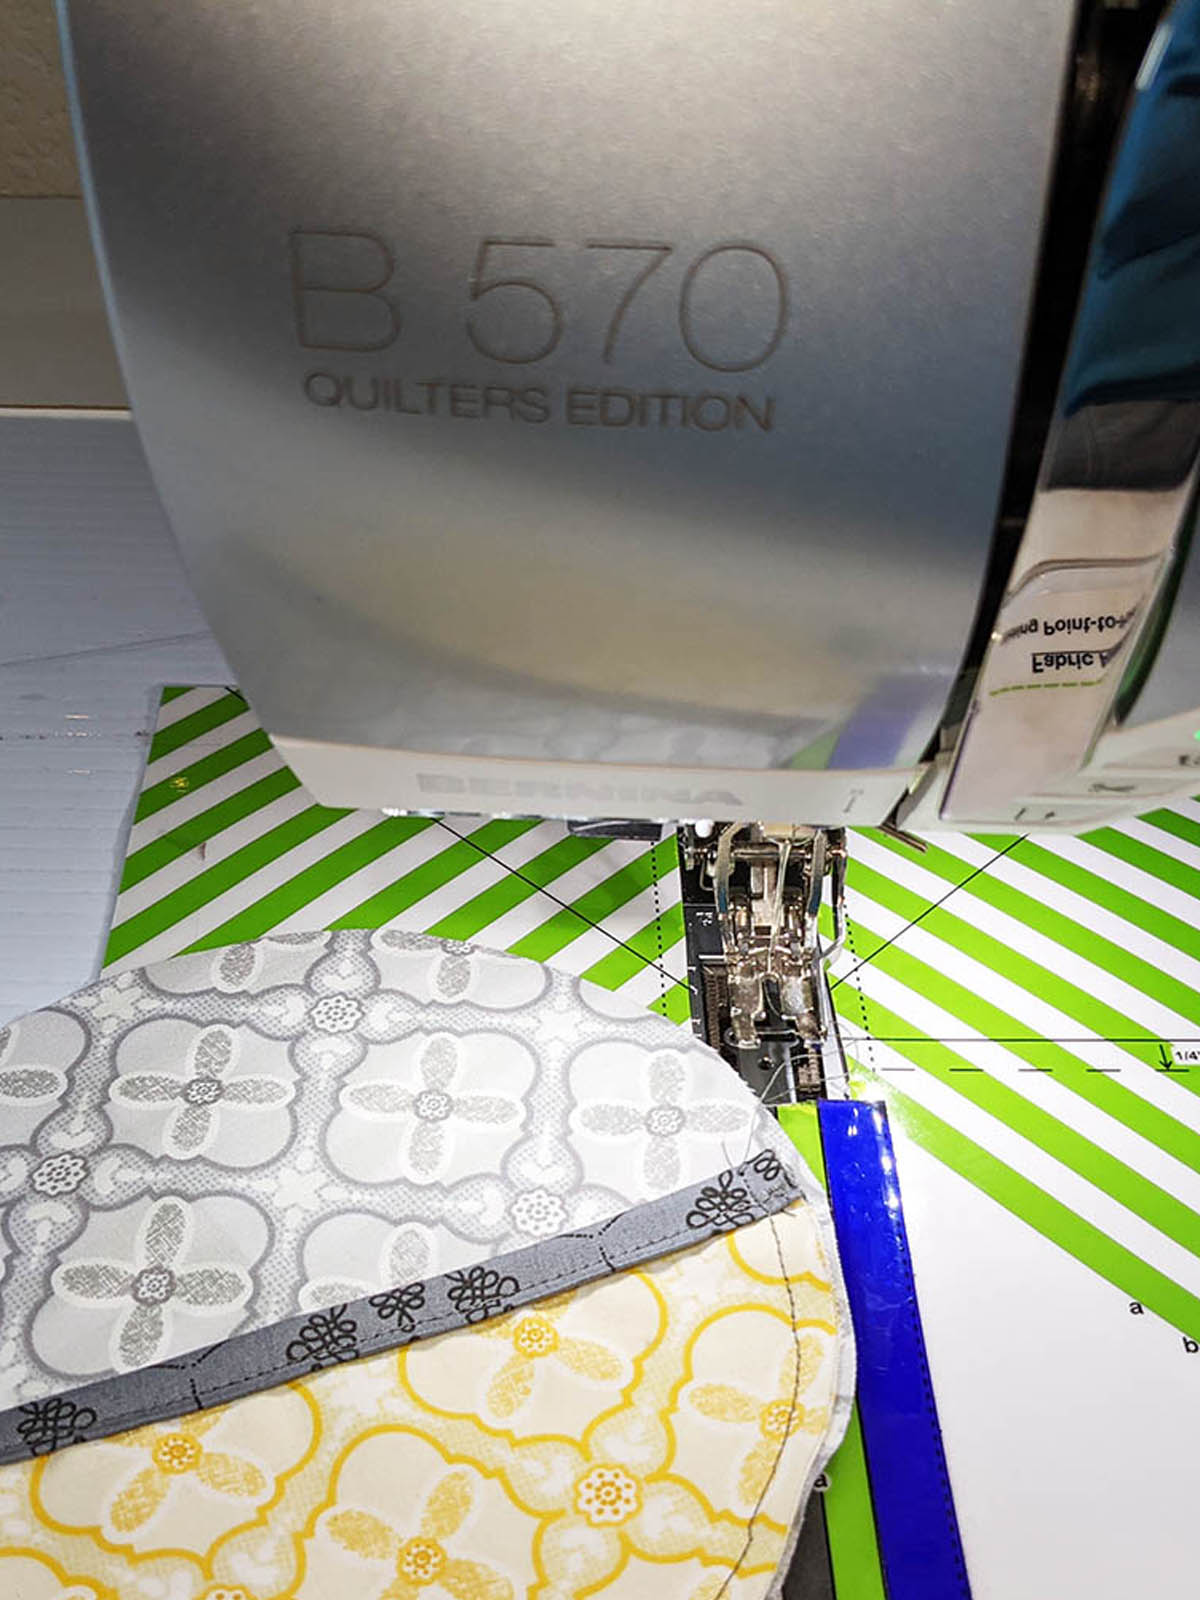
Place the finished pocket on top of the 7” background circle, aligning the edges, and clip the two pieces together. Sew the pocket to the background using a ¼” seam allowance to make the small organizer insert.
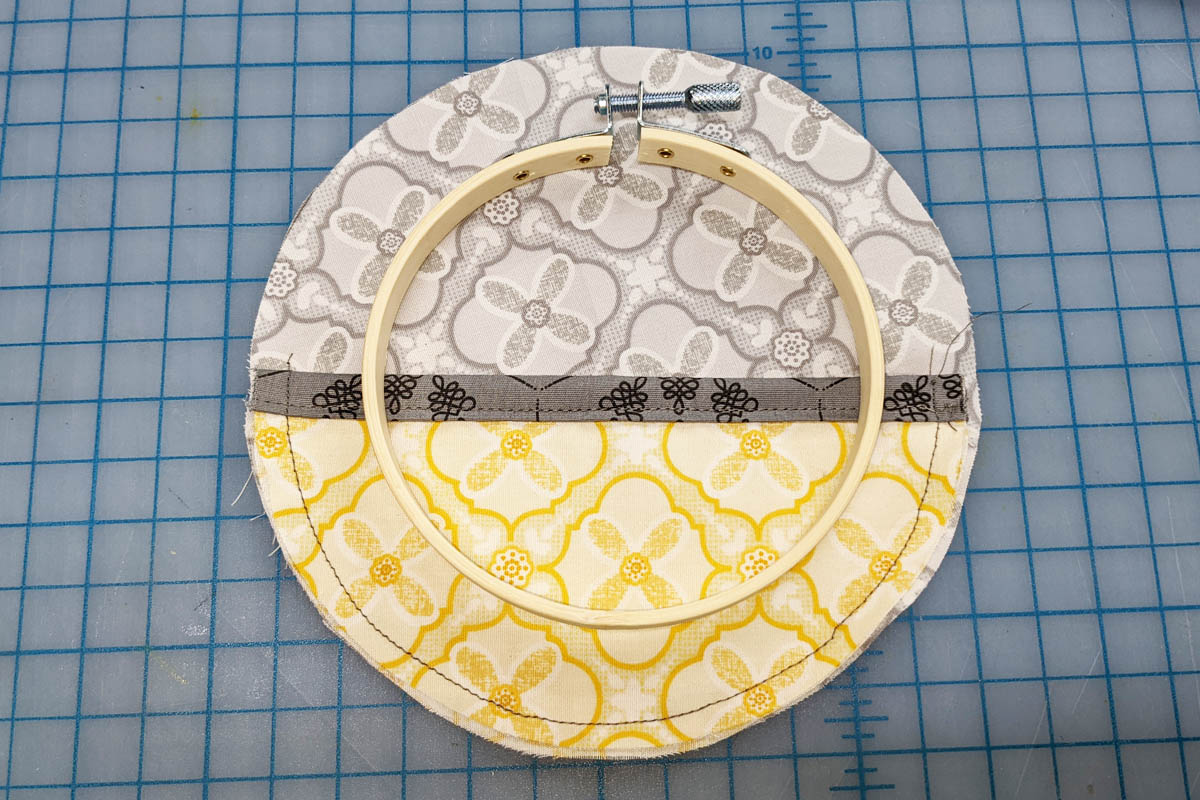
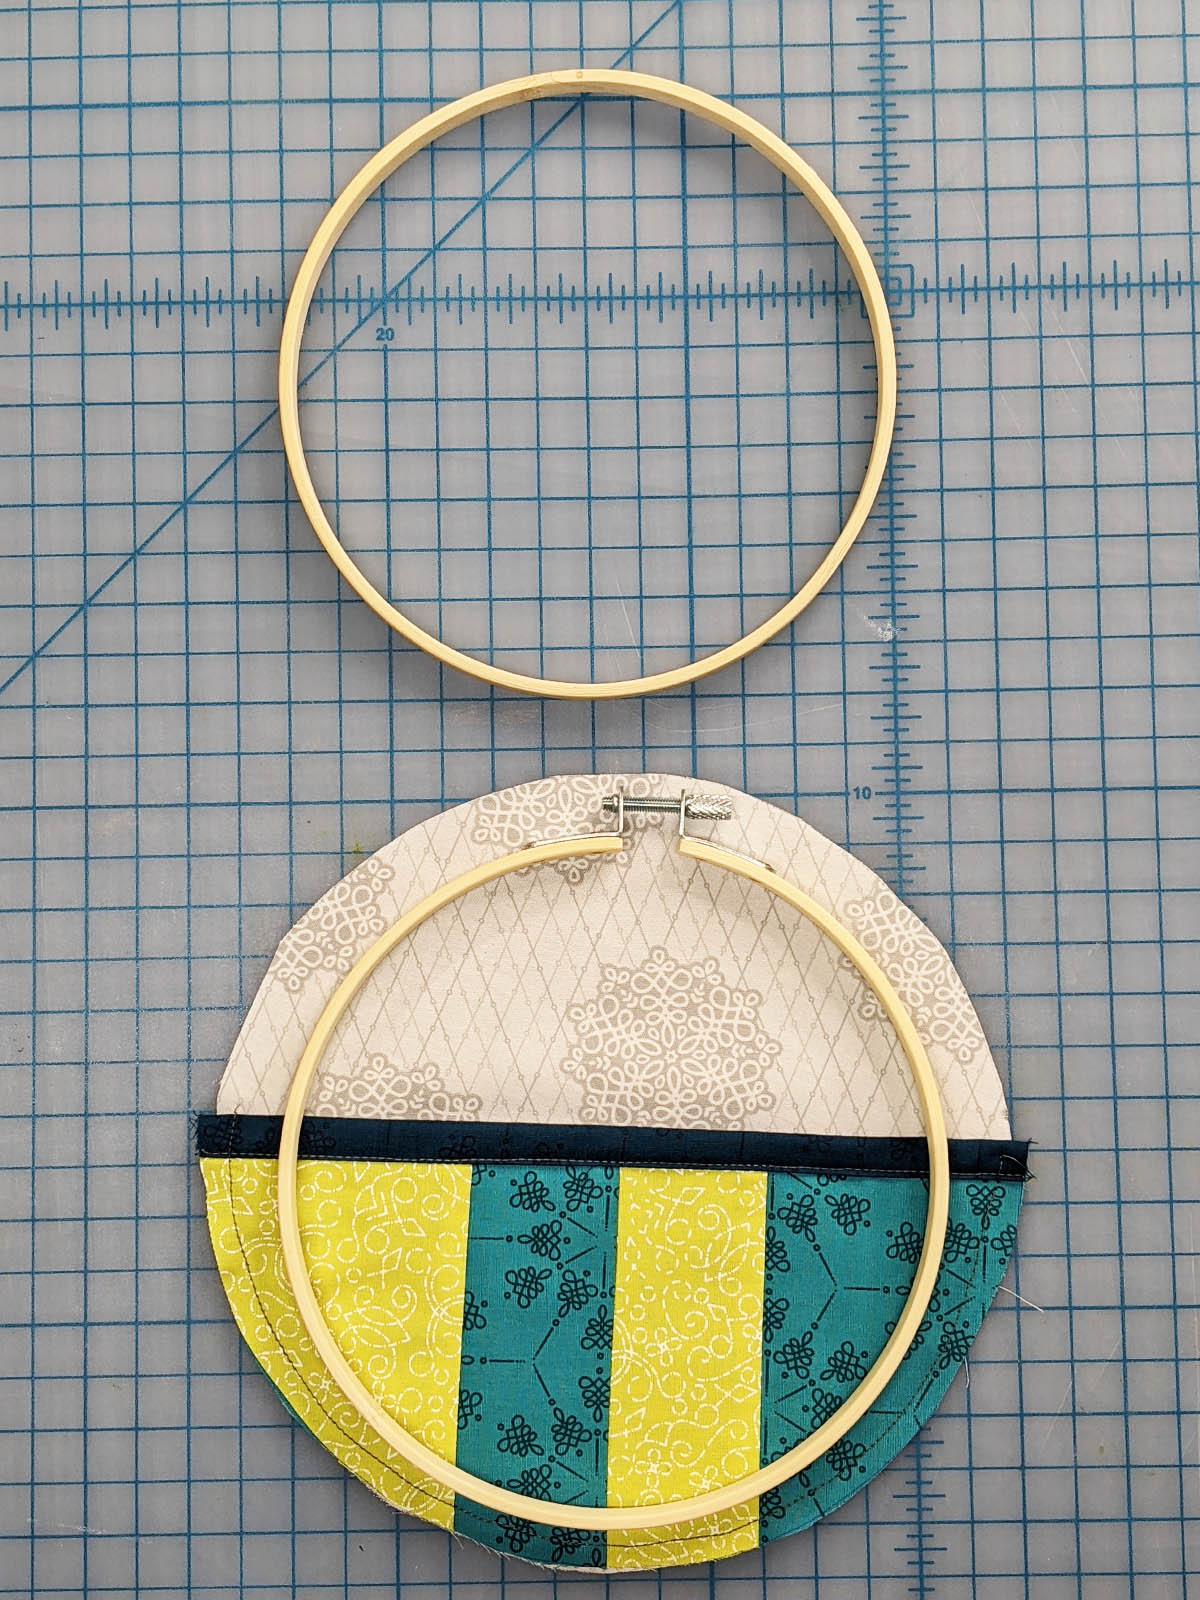
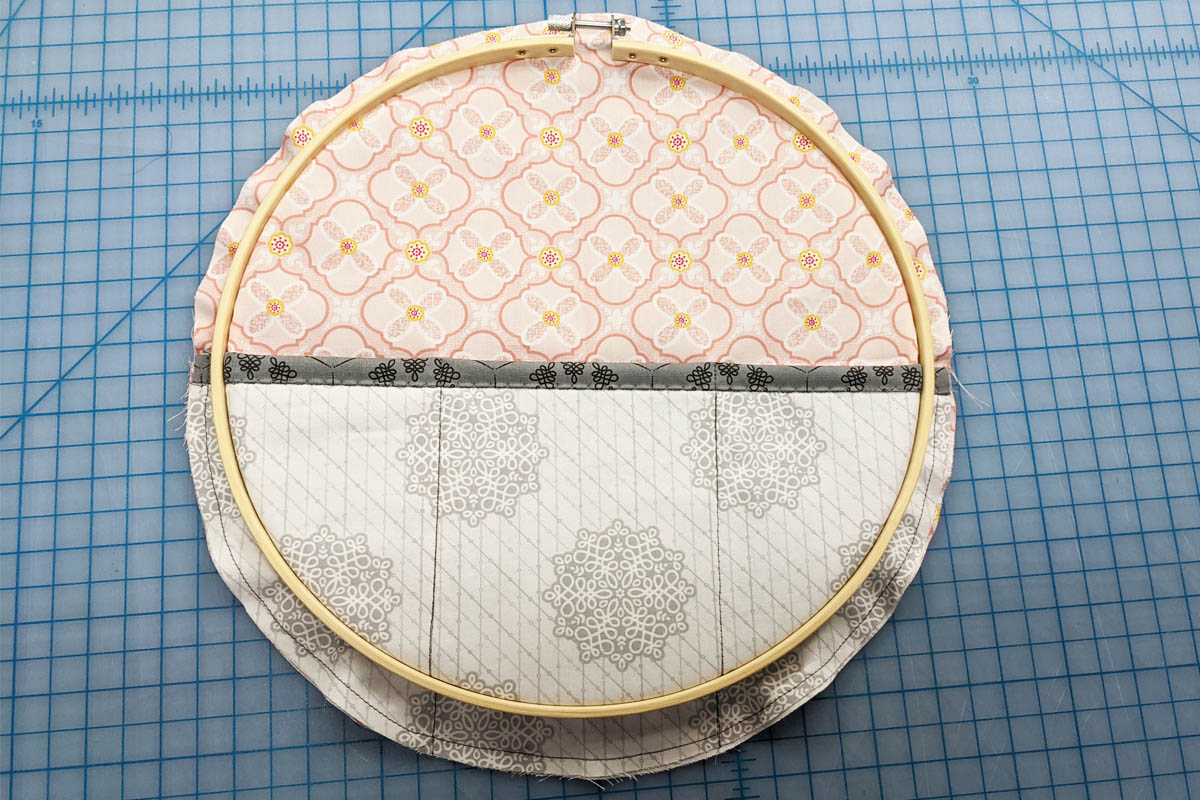
Separate the two halves of the 4” embroidery hoop. Place the outer hoop on top of the small organizer insert, centering it from the edges. Make sure the screw on the embroidery hoop is at the top of the insert and parallel to the pocket edge.
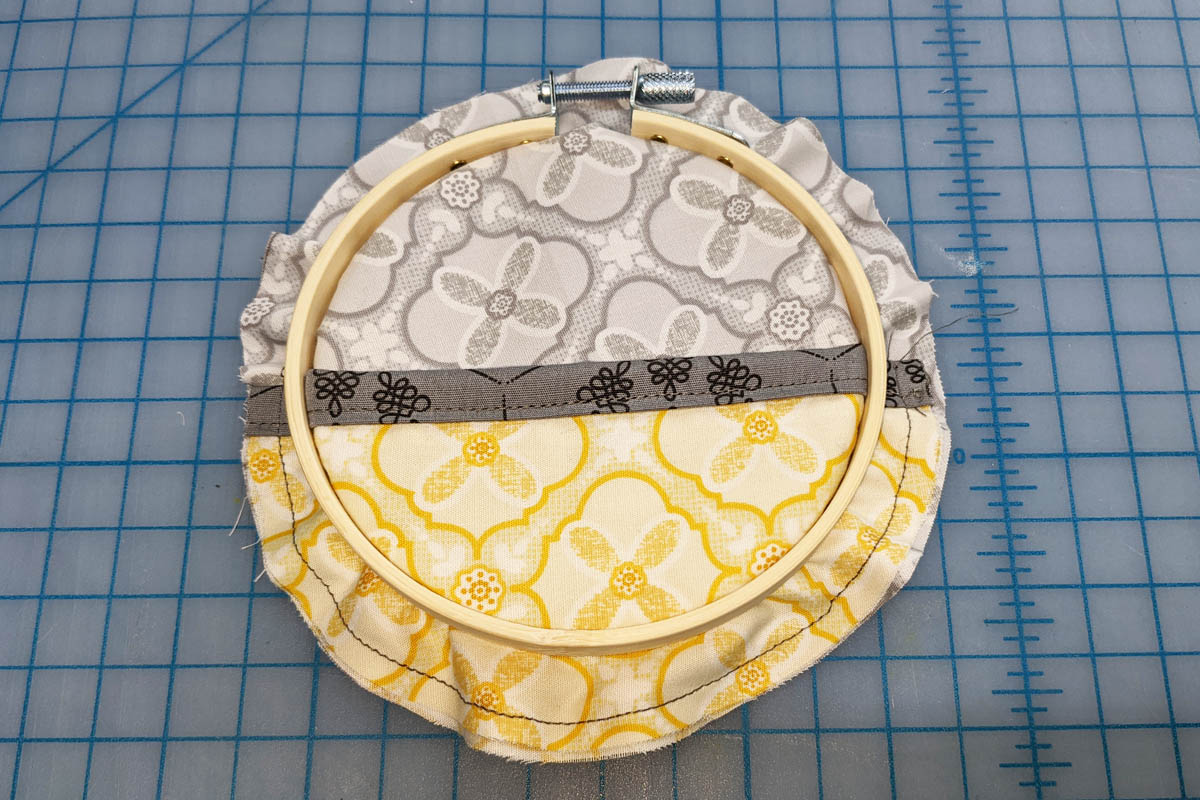
Carefully pick up both the outer hoop and fabric insert together and place them over the inner hoop. Press the three pieces together, keeping the insert in the center of the hoop. Adjust as needed and tighten the screw at the top of the embroidery hoop.
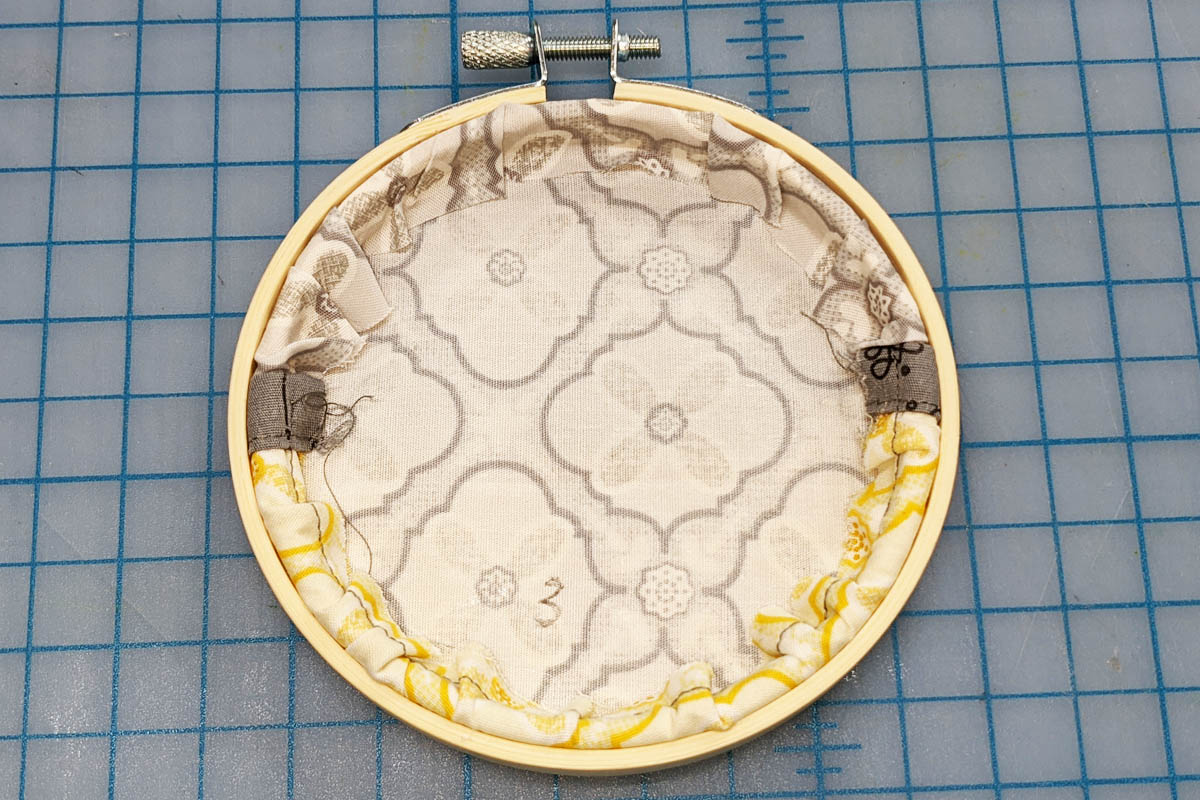
Flip the small wall organizer to the back. Using a glue gun, glue the raw edges of the fabric insert to the inside of the embroidery hoop interior to complete the Small Wall Organizer.
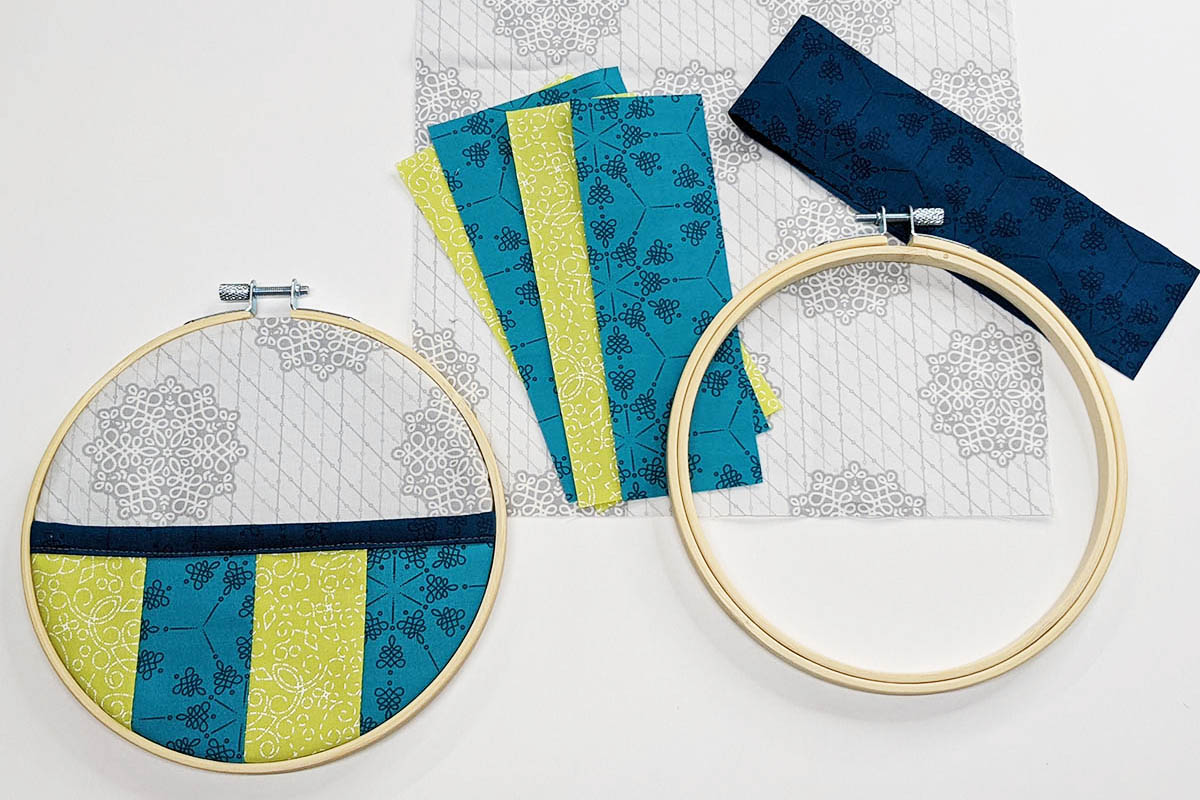
Medium Wall Organizer Pieced Pocket Option
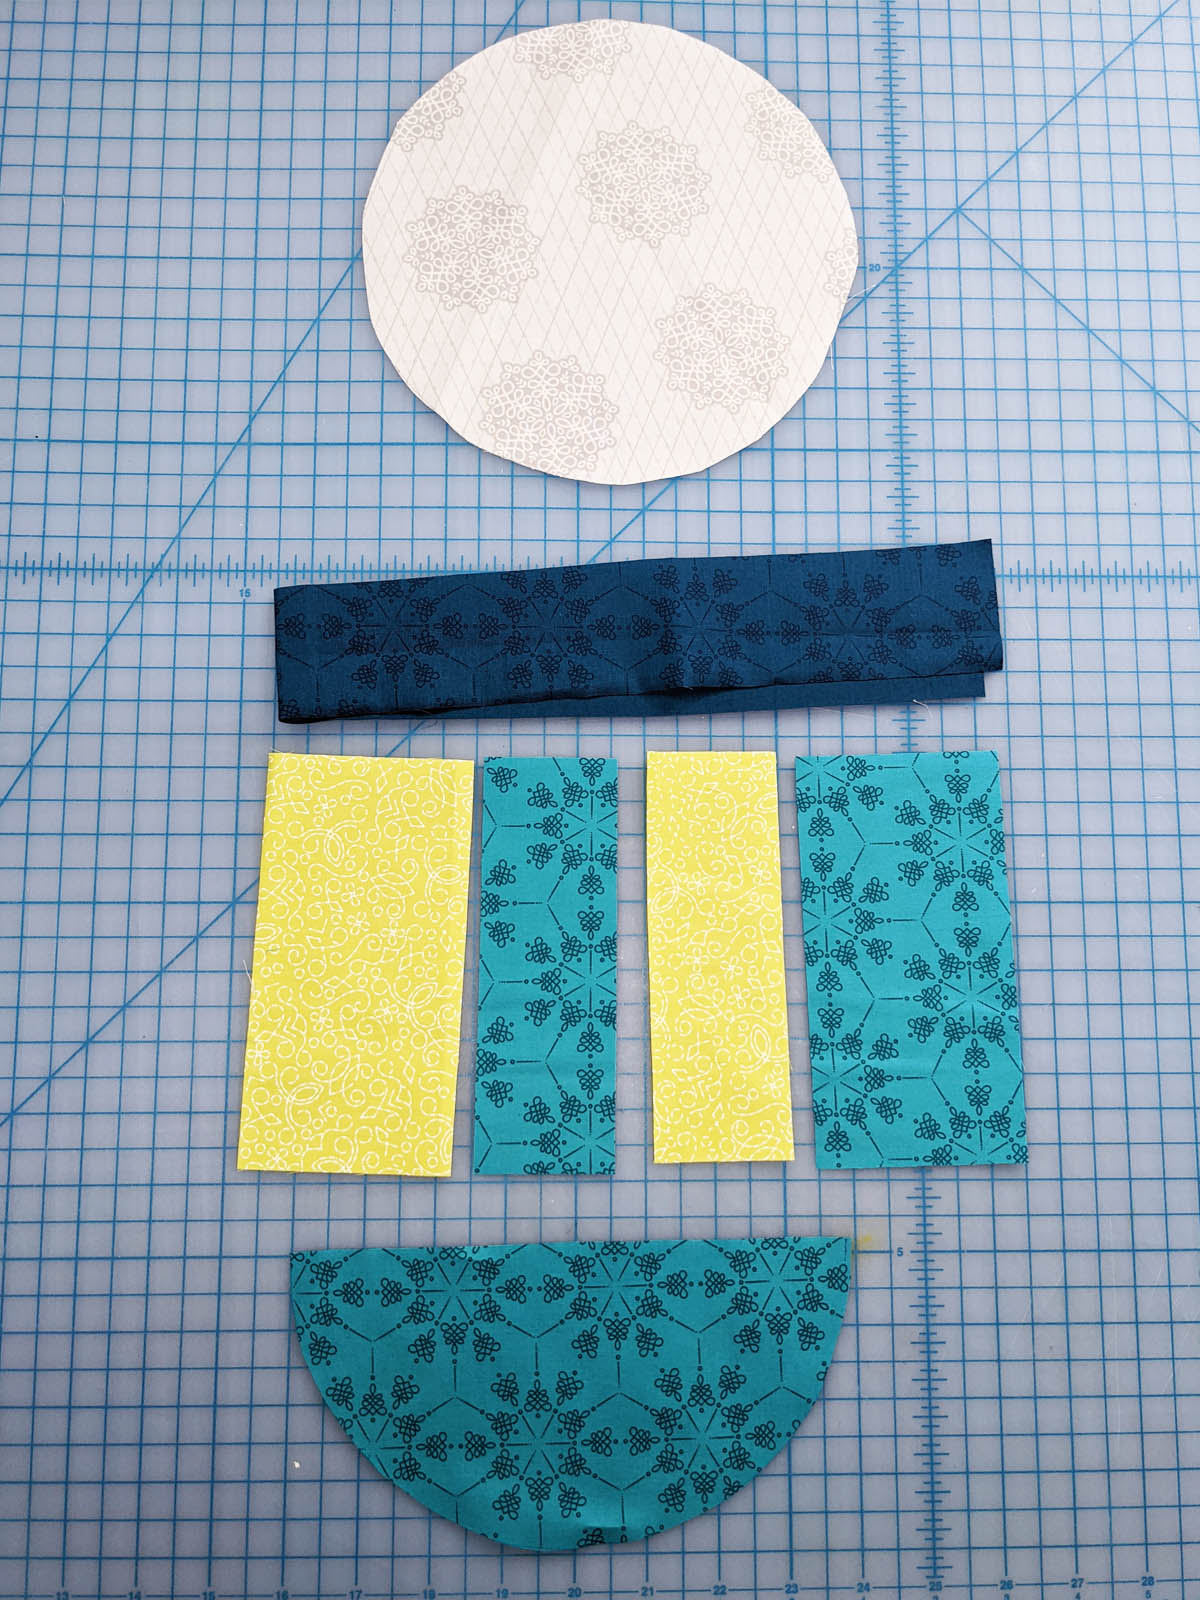
For the Medium Wall Organizer, we are going to make a pieced pocket front rather than use just one piece of fabric. Sew the cut strips for the Medium Wall Organizer together to make the pocket front in the following order, 3” x 6” color #1 strip, 2” x 6” color #2 strip, 2” x 6” color #1 strip, and 3” x 6” color #2 strip, along the long edges to make the pocket front.
Use the Medium Wall Organizer template to trace the pocket shape onto the sewn strip set.
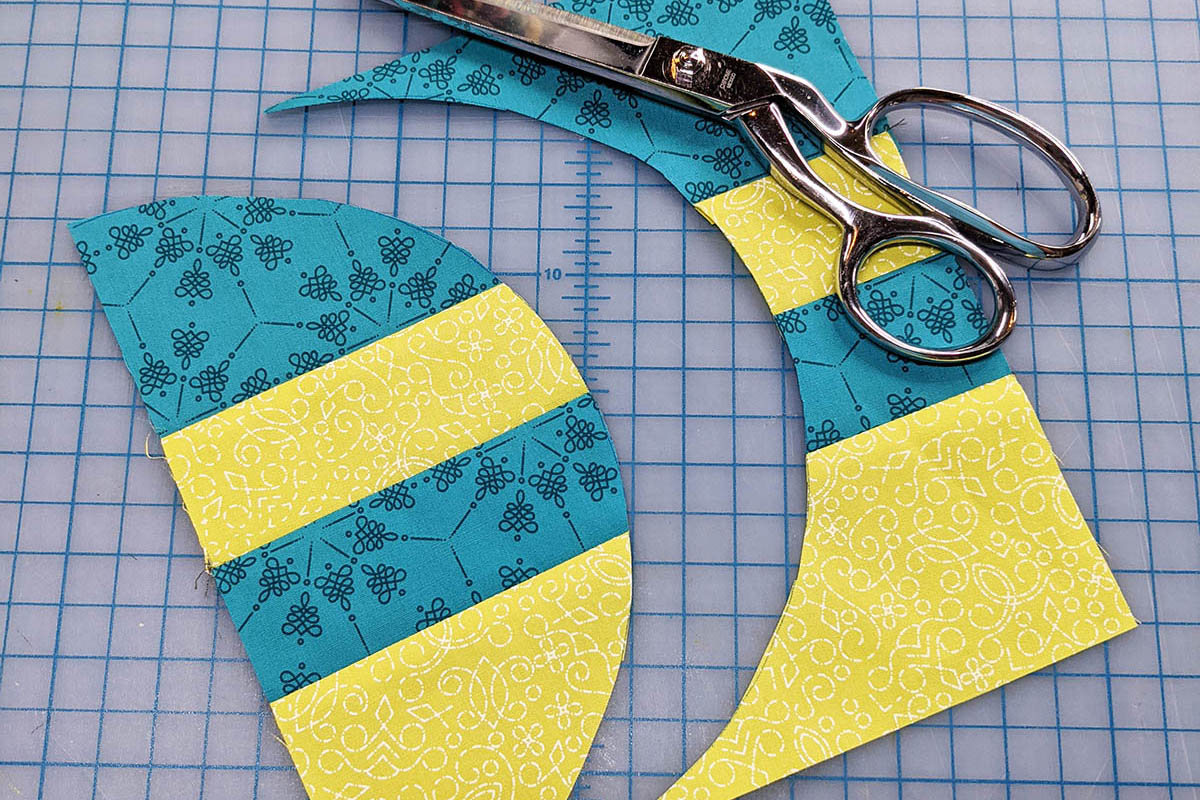
Cut on the drawn line to cut out the pocket front.
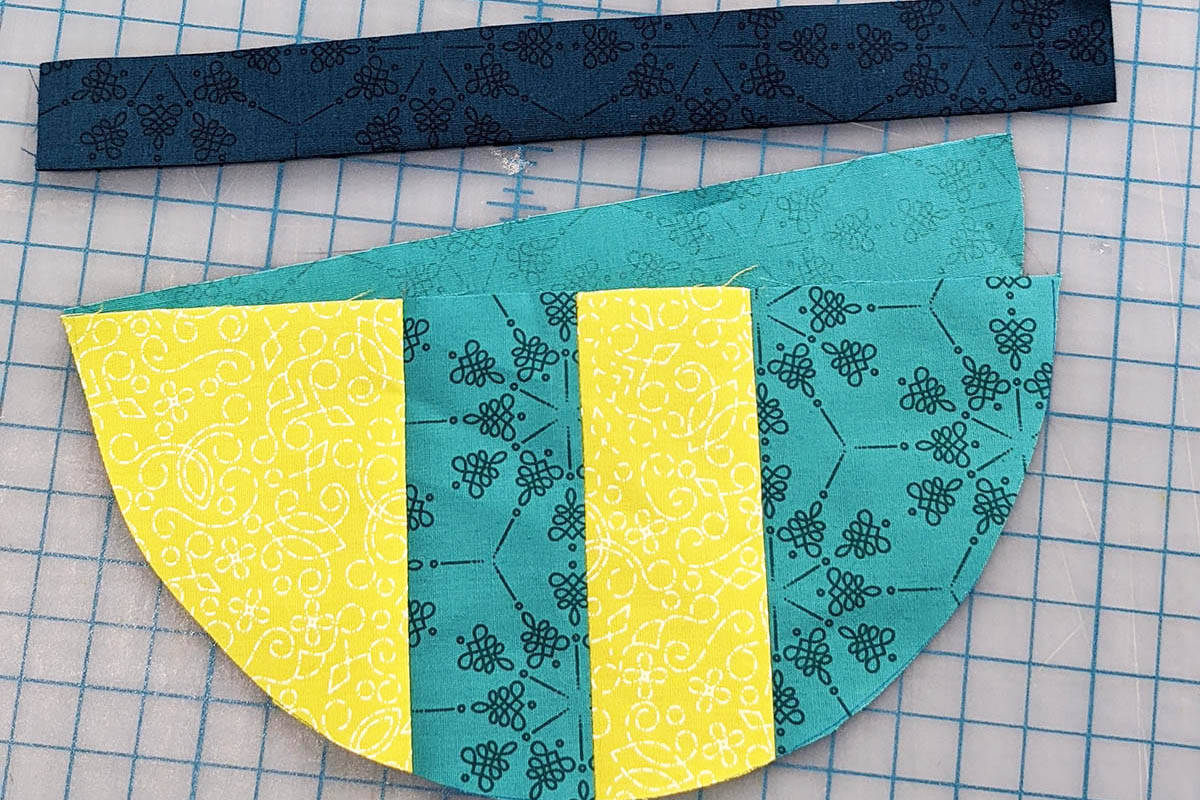
Place the pocket front and pocket lining, wrong sides together, aligning the raw edges.
Fold the 2” x 10” binding strip in half, wrong sides together, and press.
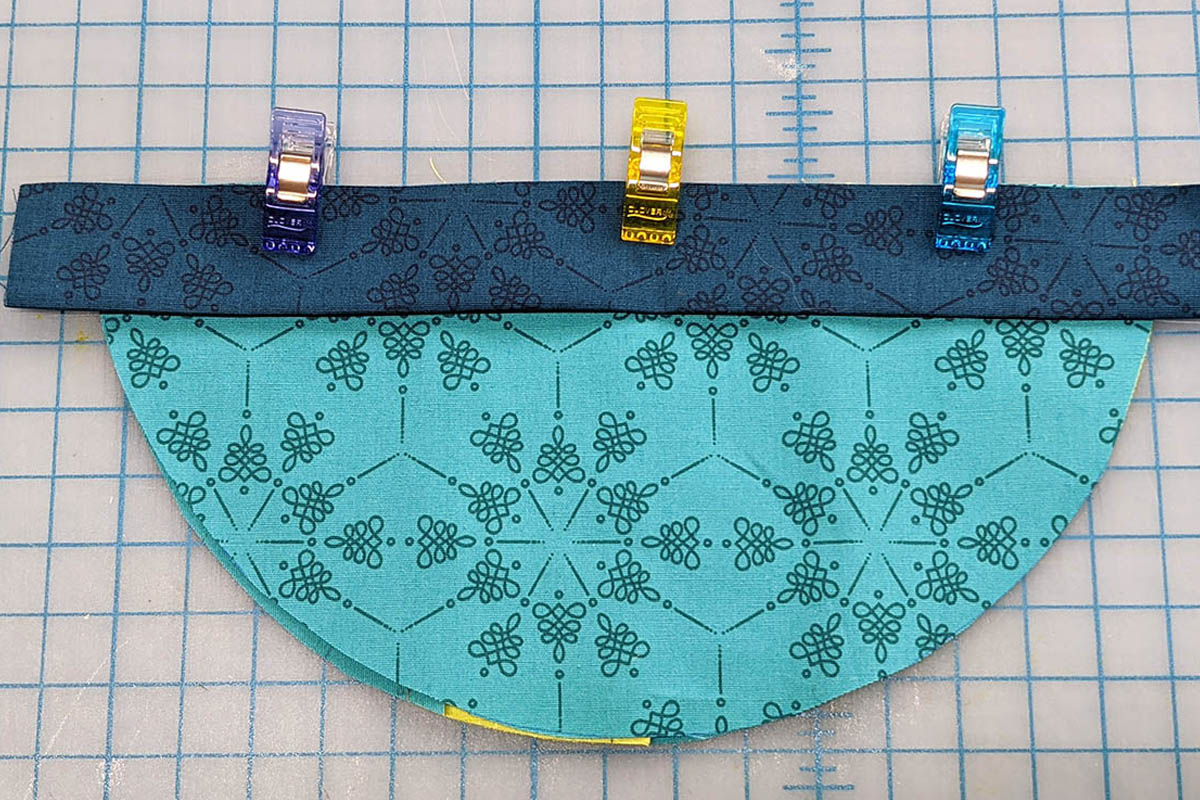
Align the raw edges of the binding strip with the straight edges of the pocket and pocket lining. The binding strip should be on top of the pocket lining piece. Clip the three pieces together.
Using a ¼” seam, sew the three layers together. Press the binding up and wrap it to the front of the pocket.
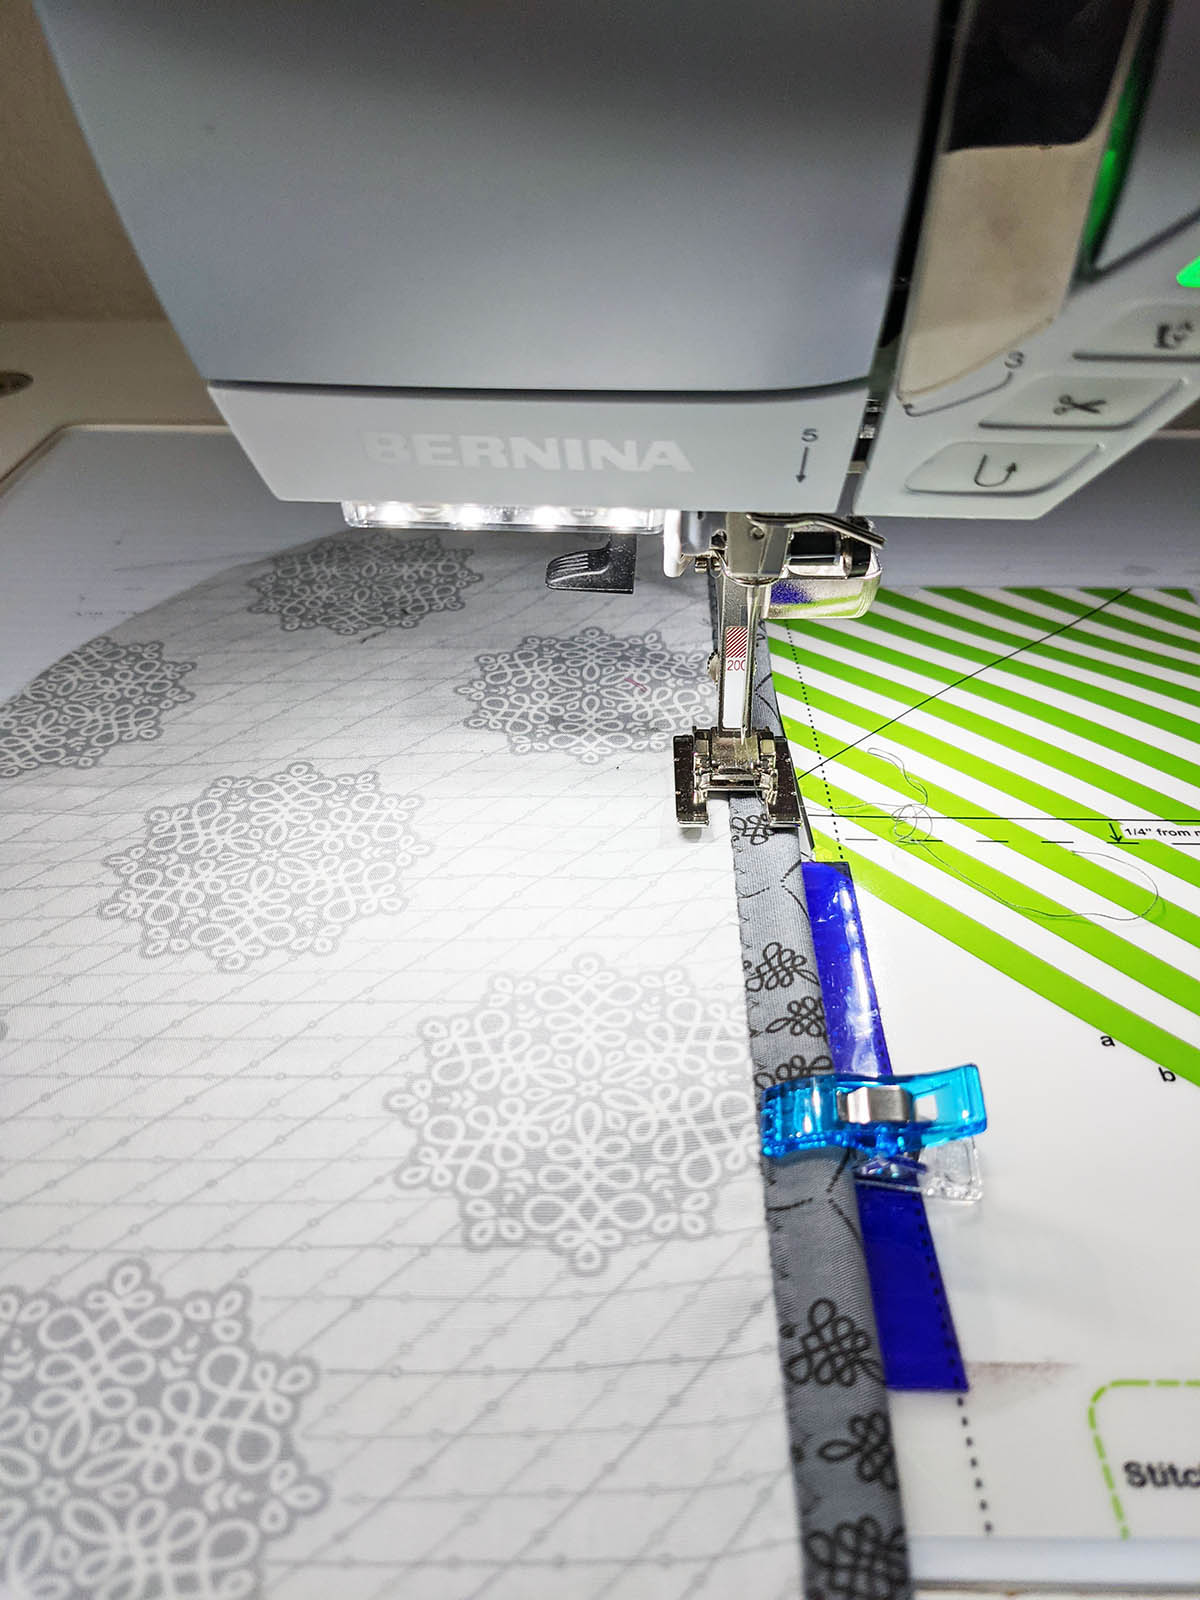
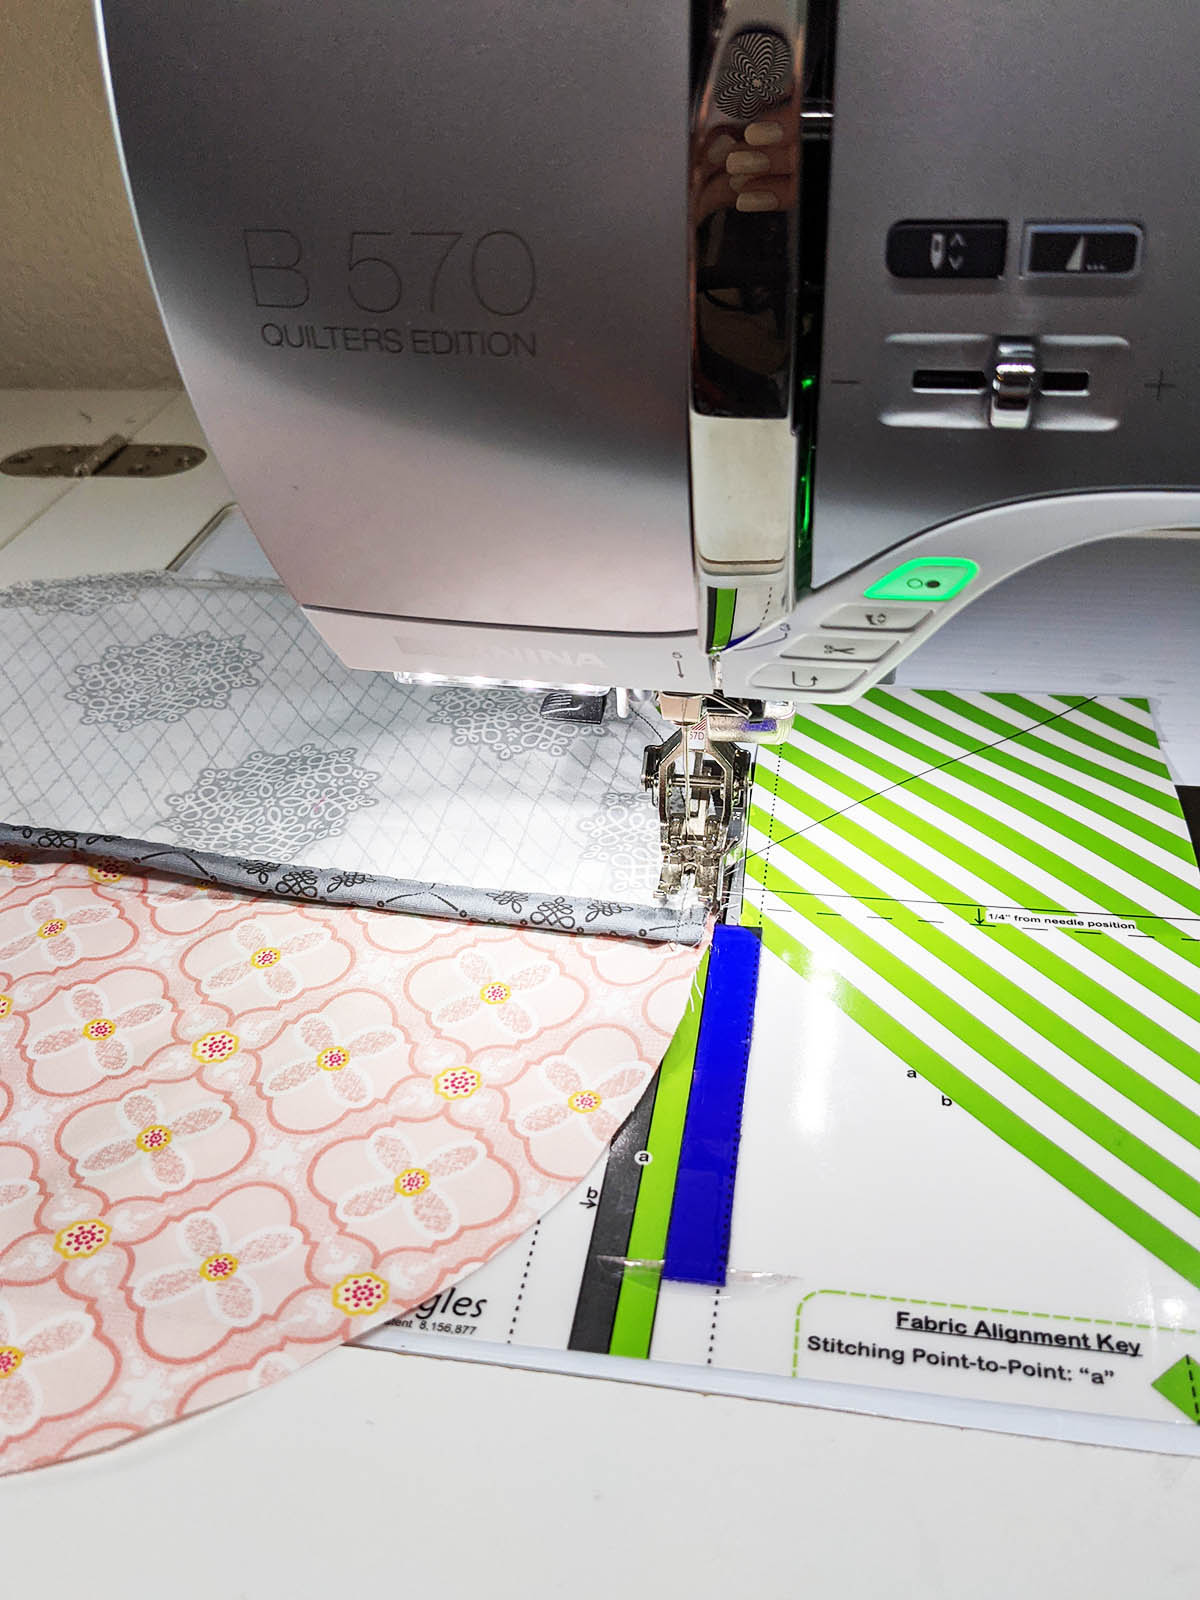
For the second style of binding finishing stitch, I used Blindstitch Foot #5. This foot has a metal guide at the base of the foot. This guide will ride along the binding strip edge and the stitch will fall on either side of the guide based on where you position your needle. You will need to move the needle position to the left to the desired width of the topstitch. I recommend trying the topstitch on a practice piece to decide how far you would like the topstitch from the binding edge. Sew the binding edge down using the guide on the foot to keep the stitches parallel to the binding edge. Trim the binding strip even with the circle to complete the pocket.
Repeat the assembly instructions from the Small Wall Organizer above to sew the medium pocket to the medium background circle, to position the medium organizer unit into the 6″ embroidery hoop, and to glue the raw edges to the back to complete the medium organizer.
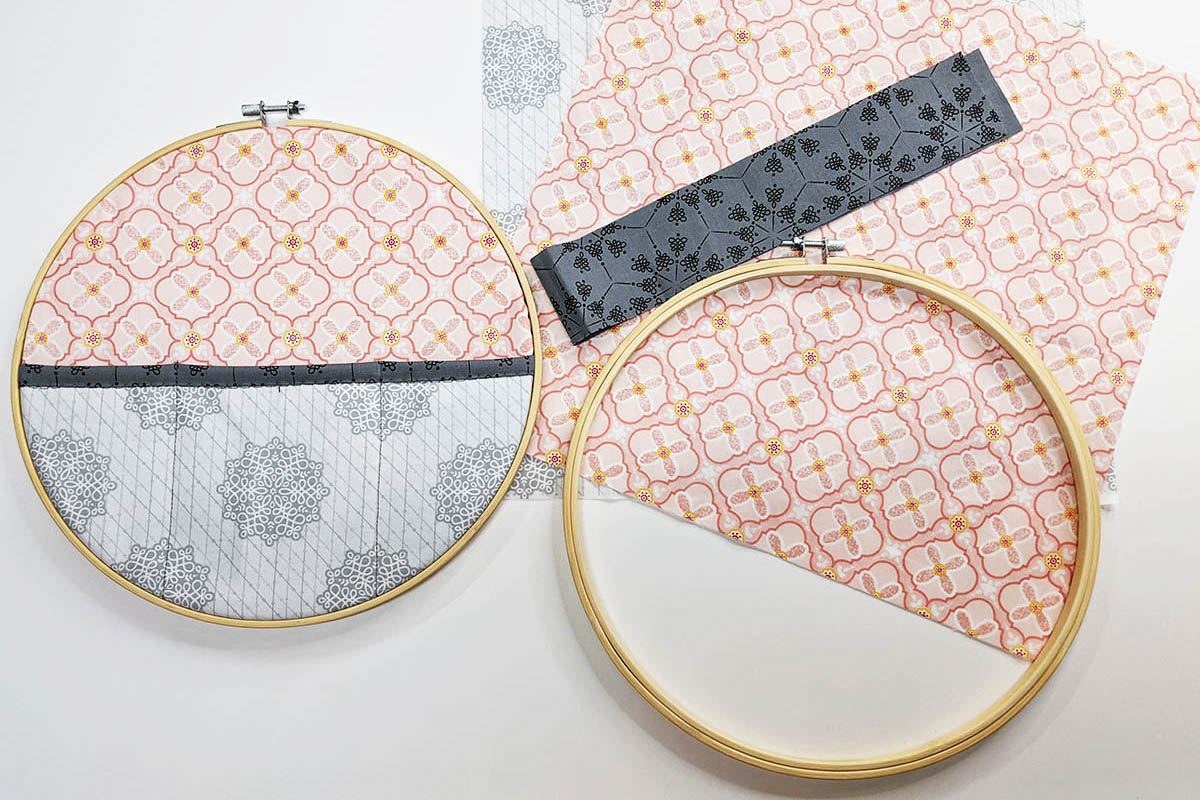
Large Wall Organizer Divided Pocket Option

For the Large Wall Organizer, we are going to make a divided pocket. Fold the large pocket circle in half, wrong sides together, and press to make the pocket. Fold the 2” x 14” strip in half lengthwise, wrong sides together, and press to make the binding strip.
Align the raw edges of the binding with the straight edge of the pocket on the backside of the pocket and use the wonder clips to clip the two pieces together. Using a 1/4″ seam, sew the binding strip to the pocket back. Press the binding up and wrap to the front of the pocket. Clip the binding in place with wonder clips.
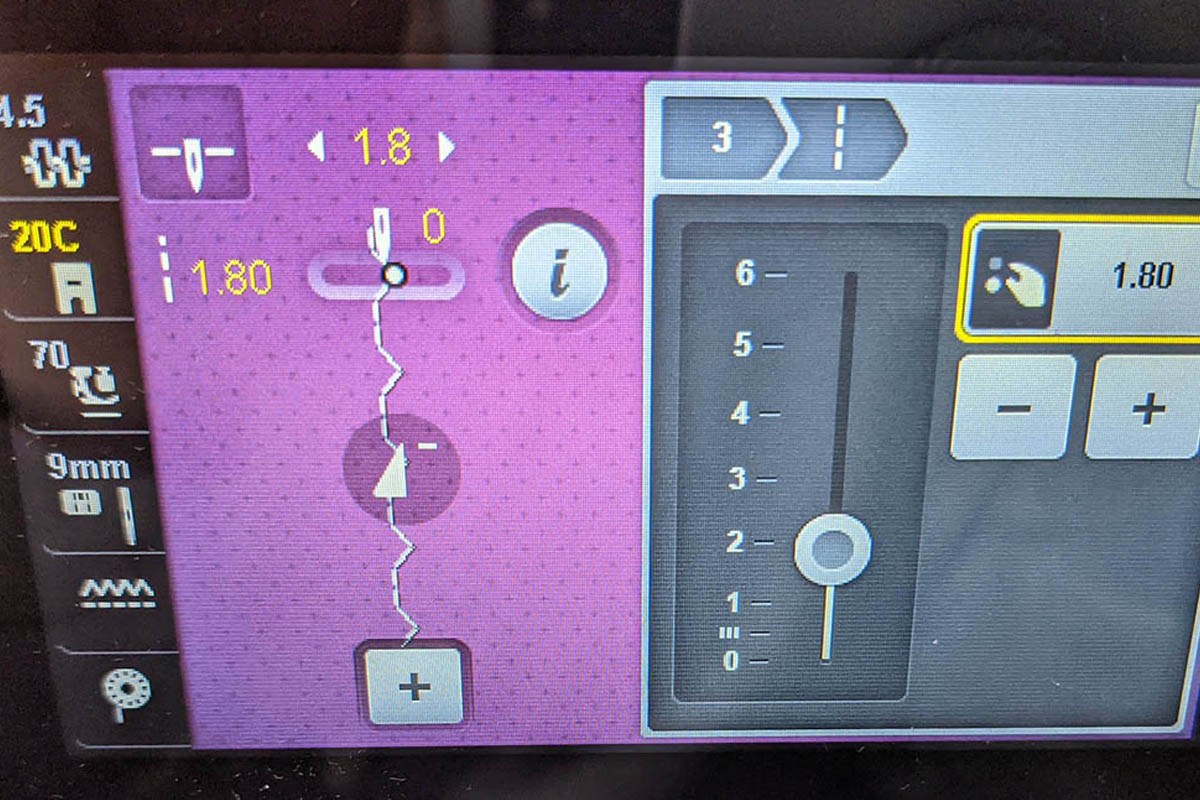
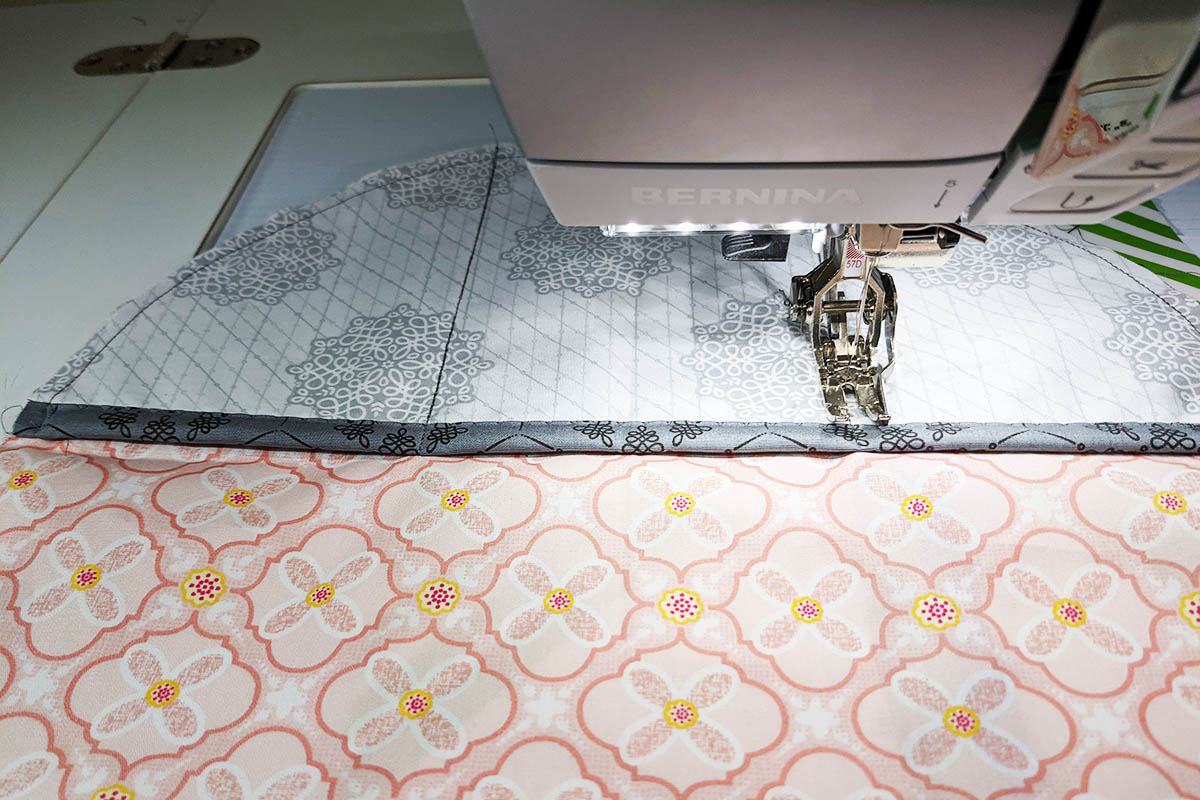
The final method for sewing the finished edge of the binding to the pocket is using a blind hem stitch and the Open Embroidery Foot #20. On the BERNINA 570 QE, it is stitch #3. Adjust the stitch width and stitch length to 1.8. Move the needle position to the center position. I recommend using thread that matches the binding fabric or Aurifil Invisible thread for this stitch.
Place the pocket under the presser foot with the binding on the right side. Center the binding edge with the center of the foot. My foot has a subtle line going down the center and I use this as my reference point. The blind hem stitch has a straight part of the stitch that should go in the pocket piece and the bite of the stitch should extend into the binding edge. This is one of my favorite stitches to use and it is the stitch I like to use to bind all of my quilts and projects.
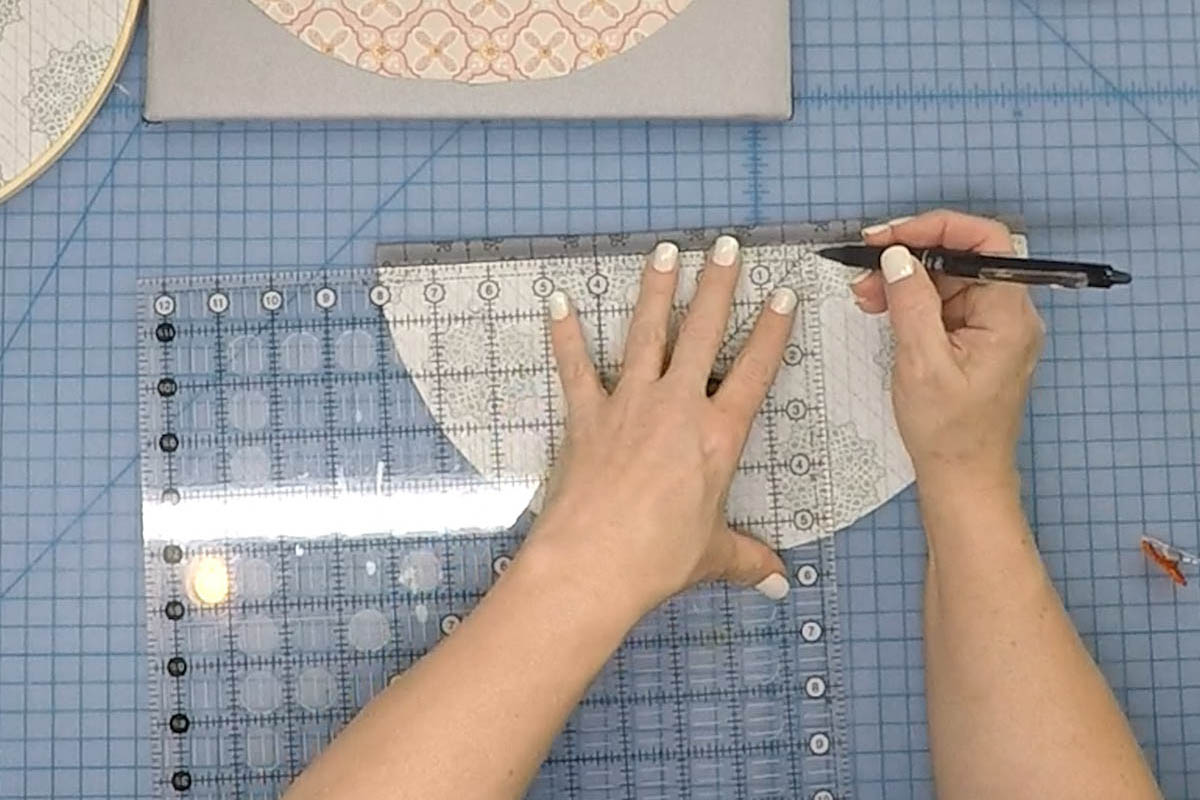
For the Large Wall Organizer, we are going to divide the pocket into three smaller pockets. To mark the large pocket, fold the pocket in half to find the vertical centerline. Using a ruler and a fabric pencil, measure over from the centerline 2” to the right and draw a vertical line on the pocket front. Measure over from the centerline 2” to the left and draw a second vertical line on the pocket front.
Place the pocket onto the large background circle, aligning the raw edges, and sew the two pieces together using a ¼” seam.
Sew through the pocket and back circle on the drawn lines to divide the large pocket into three smaller pockets.
Repeat the instructions for assembly instructions from the Small Wall Organizer above to position the large organizer insert into the embroidery hoop and to glue the raw edges to the back of the organizer.
I hope you have enjoyed this tutorial on making this simple and fun project. The options for these are endless. You can piece the background instead of the pocket, add some fun applique or embroidery, or jazz them up with some fun embellishments like beads, buttons, or ribbon.
Used Products


What you might also like


242 comments on “How to Sew Wall Organizers”
-
The one sewing notion I can’t live without is my magnetic wand. I use it to pick up all the pins I drop on my carpeted craft room floor.
-
The notion I can’t live without is my 6″ x 24″ ruler.
-
I can’t live without my stiletto! It’s such a helpful tool!
-
The one notion I must have is my measuring tape
-
Can’t live without my needle threaders and magnifying glass.
-
Got to have my thread snipers!!
-
I’d say it’s my rotary cutter. I use it constantly for quick, clean results.
-
Among others – my small sewing snips. They have truly become an extension of my hand! I use them multiple times when sewing any project. They just don’t snip threads. Among other use: cutting corners off projects to turn r/s out; push out corners on squares or rectangles; grade seam allowances; snip my convex and concave seams; grade s/a on collars and other facings; act as a quick dual feed when sewing short quick seams; and the list goes on!
-
The notion I cannot sew without is my rotary cutter.
-
I would say my Bernina Sewing machine! I have a B560 and the Embroidery attachment.
I can live without the embroidery attachment/module, but I like that very much!
The only thing better than my B560 would be another Bernina, i.e. the B570 QE! -
My ruler that has a lip to catch the edge of the cutting mat. Maybe not a notion, but would not want to be without my new Bernina 590!
-
Can’t imagine quilting and sewing without my rotary cutter.
-
-
My Karen Kay Buckley scissors! They are so precise for cutting.
-
My 60mm rotary cutter.
-
-
My one sewing notion I wouldn’t want to live without is my rotary cutter. 2nd choice would be my 2.5 x 8 inch ruler. I use both of these daily.
-
I couldn’t live without my rotary cutter!
-
The one notion I can’t live without is my tape measure!
-
I use my seam ripper more than I wish I needed to!
-
My rotary cutter and mat are my tools I cannot live without!
-
Definitely my seam ripper, sadly! 😉 Thank you for this awesome giveaway!!
-
I love my snips and use them all the time. I would be lost without them.
-
How do I pick just one?! Rotary cutter/mat/ruler. A good sewing machine is essential too.
-
my six 1/2 inch Creative Grid ruler for flying geese and much more
-
Cutting mat and rotary cutter. tljeo at yahoo dot com
-
Unfortunately, my “can’t live without” sewing notion is a seam ripper ?
-
I’m old enough to have lived before rotary cutters but I need a seam ripper.
-
I can’t live without my cutting tools…having a good rotary cutter, snips, and mat are a must!
-
I can’t live without my good shears.
-
I can’t live without my combo seam ripper/stilleto
-
The one sewing item I could not live without is my Bernina 1008, so precise.
-
Definitely my seam ripper that makes an ugly job easier.
-
-
Lately, the best sewing notion in my studio is a pair of scissor snips that cut by spring action. Easy to grab, snip & keep sewing!!
-
The notion that I can’t live without would be my snips!
-
This would be adorable in my sewing room!
-
I couldn’t live without my seam ripper!
-
I can’t imagine quilting without a rotary cutter. I bought my first one in the 80’s when I was primarily sewing garments and now as a quilter, it is the tool I depend on for accuracy from first cut of my fabrics to the final trim of the quilt as it comes off the longarm.
-
I couldn’t live without my left-handed sewing shears. Even the universal handed scissors aren’t as comfortable, & I have injured my thumb nerve using the right-handed ones!
-
-
There are several things at every machine/station: seam ripper (where do those seam rippers go?…to the lost land of socks?), Bamboo sticks/points/purple thang and small clip scissors. After that, it’s all subjective to project demands.
-
Needle
-
My one sewing notion that I can’t live without is my stilleto. It really makes in getting seam straight to the very end.
-
My stiletto is a must-have notion for me when I piece or sew.
-
I definitely could not live without my rotary cutter. ?
-
My Stripology ruler. Makes cutting strips fast and easy.
-
I can’t live without my thread snips. AND, though it may not technically be a notion, how do people sew without a knee lift on a Bernina??
-
Choose just one? That’s difficult to do when I love using my rotary cutter, mat & ruler.
-
Sorry, I have to pick 2 – a good rotary cutter and my Stripology XL Ruler!!
-
My seam ripper Ha!
-
Unfortunately today my seam ripper has been my favorite tool. I hope tomorrow it’s just my rotary cutter!
-
The tool I would never sew without has to be my Purple Thang. It’s got the perfect pointy end for holding pieces straight as they go under the needle as well as poking corners out. PLUS the other end is 1/4″ for keeping me right on with my seams. Love it!
-
I agree with several previous post. I couldn’t live without my Bernina seam ripper they are my favorite, my curved handle rotary cutter. I can’t imagine sewing with cutting everything with scissor.
-
The one sewing notion I wouldn’t live without is my 3” x 18” ruler that has an all over 1/8” grid. It’s the perfect size, and the 1/8” grid gives me the precision I need and love.
-
Definitely my rotary cutter although my seam ripper is a close second.
-
Rotary cutter and cutting rulers. I would go crazy trimming and cutting out quilt pieces with scissors!
-
It is so hard to choose, but I have to say a small, sharp seam ripper. It’s bad enough that you make a mistake, it does’t have to be so hard to fix it. The Bernina seam ripper is perfect for the tight stitches.
-
My scissors…
-
The sewing notion that I can’t live without is my rotary cutter! It definitely makes our wonderful hobby easier. ❤️
-
For sure my scissors/ seam ripper! But rotary cutters are so helpful! I learned about them in high school sewing class, my mom and I had been using scissors for everything prior.
-
I could not life without my seam ripper.
-
What a clever wall storage idea!
What I Cannot Live Without as a sewer/quilter: I could not live without my rotary cutter as I use it for all my projects! With having RA, it is much easier than a scissors with swollen joints and painful fingers and hands.
-
Can’t live without my snips!!
-
Not sure this counts as a sewing notion but my mini iron for pressing seams as I am piecing is a must have for me.
-
My first thought was my Bernina! My thread nipper, seam ripper, and stiletto would be my top ones.
-
The Bernina seem ripper is the best. I have more than one. I think it’s so much better because of its size — the ripper itself see so thinner and better able to slide under stitches, and the handle seems easier to hold for close work.
-
I couldn’t live without my sharp pins, but my rotary cutter is a close second choice. It’s hard to pick only one! Thanks for this tutorial.
-
I use safety pins (for hold quilt sandwiches together) and mini clips (instead of straight pins).
-
Rotary cutter for sure is my favorite notion…started using one about five years ago and love it…it helps to have a cutting table at the ready…I’m so lucky now that I have a dedicated craft room! Cheers to empty nesting!
-
My most used tool for sewing is my rotary cutter! Runners up are my magnetic pin bowl, sewing snips and add-a-quarter ruler.
-
Wish that I *could* live without my seam ripper!
-
I cannot live without my Quilters Select non-slide rulers.
-
The one notion I can not do without is..why does it have to be only one! For this comment it would have to be my Seam ripper (4 in one tool) by Alex Anderson.
-
I can’t live without the always taken for granted most versatile size 80/12 sewing machine needles.
-
Much as I love my quilting tools, my seam ripper is used for more than ripping. I use an older, dull one as a stiletto at the machine, to hold small seams and folds at the iron, as a hera-type marker to mark small lines, and to help in removing foundation papers or the paper on stabilizers or bonding web.
-
I have to have my rotary cutter and good thread. There is more for sure. Apparently I am very needy!
-
My seam ripper is my best friend.
-
The one quilting notion I cannot do without is my seam ripper.
-
I can’t live without my cutting mat! Without it I wouldn’t get anything done!
-
The one quilting tool I can not live without. my Bernina sewing machines they make my sewing look great and are amazing with all the neat feet to make it easier to get great results.
-
I’m afraid it has to be the seam ripper 🙂
-
My cutting mat with rotary cutters! But a seam ripper follows closely behind, unfortunately!
-
I can live without my friend, Jack, the seam ripper.
-
My favorite notion is seam ripper. What a time saver!
-
To many to choose from! Guess my rotary cutter and mat is the ones I have to pick.
-
I couldn’t do without my Bernina Walking Foot, it makes my sewing a breeze.
-
I can’t live without seam ripper and trusty thread snips.
-
I can’t live without my Bernina seam ripper. I keep it to the right of my sewing machine and use it whenever I need to unstitch a seam.
-
i would not want to be without my pins and Karen Buckley little red scissors.
-
It’s a toss up between my rotary cutter and my seam ripper. Both are in use all the time!?
-
The sewing notion that I can’t live without is my rotary cutter. My favorite rotary cutter is the gold one that came with my 125th Anniversary Bernina 790+. Clearly, nothing cuts like a Bernina, too! ?
-
I love using all my feet for my Bernina notions I can’t live without would be my reverse sewing tool AKA my seam ripper;)
-
I can’t live without my sharp seam ripper. We all have to take out stitches now and then. It is okay to throw away an old seam ripper. They do get dull.
-
The sewing notion I could not live without is my rotary cutter. I use it every single day without fail now that I am retired.
-
I love this cute idea holding tools I use all the time with this hoop. What a great happy addition to my wall.
-
I never spend time in my studio without using my seam ripper. Actually I have three I use all the time handy at the machine, on my drafting table and in my hand sewing kit I take to the living room.
-
I can’t sew without my left handed scissors. Everything is easier with the righ
-
My rotary cutter! My quilter Select ruler I have just found. Rulers do not move so more accurate cuts!
-
I can’t sew without my left handed scissors. Everything works better with the right tool.
-
I absolutely need my rotary cutter and mat.
-
I recently started using the little mini cloths pins. They hold things securely and my fingers say “Thank you”…
-
My rotary cutter and mats but most important my Bernina 1130 that has served me faithfully since I bought it many years ago.
-
Many times I can’t live without my seam ripper. I also love rotary cutters and snip it scissors.
-
The one tool I can’t live without is my rotary cutter. Makes cutting so much quicker & easy!
Cute wall hangings! -
I can’t live without so many of them, scissors, rotary cutter, stylus, seam ripper. I need them all and depend on them to help me make creative works.
-
I can not live without my Tula Pink tweezers. They have very sharp ends and can catch any size threads
-
I can’t live without my Bernina seam ripper.
-
As others have said, the rotary cutter(s) is the notion I could but wouldn’t want to live without. I do have several scissors of different sizes and purposes but the rotary cutter is so much faster. Of course I would need a seam ripper as a second notion that needs to be handy so that would be my second choice. Thanks for doing a give-away.
-
I love my clear quilting ruler!
-
The one thing I couldnt live without is my rotary cutter..makes cutting so much more exact for quilting and projects.
-
I could not do without my sewing lamp. I have had eye problems and need good lighting.
-
I use a June Taylor “Shape Cut Plus” all the time when cutting out a new quilting project. So much easier and faster than rulers.
-
I am lost without my wrist pincushion,
-
My seam ripper of course. I even have an electronic one for big rip outs.
-
My Bernina 880 is my most important tool. As to notions, it is my seam ripper as I am a perfectionist.
-
I love my Bernina sewing machine. I can’t imagine having a day without the ability to fix, or make something for my family. I have made my family of 11’s entire wardrobe with my Bernina. Now I am able to embroidery on things for the grandkids and friends. Long before embroidery machines were available I would copy simple pictures from the kid’s school work and embroidery them on my old 830 by moving the hoop by hand. Life is much simplier now. Love Bernina–all 5 of my machines.
-
My seam ripper named Jack ???!
-
As others have said, the one notion I couldn’t live without is my rotary cutter, followed closely by my seam ripper (I make way too many mistakes!). Those are the two tools that are always nearby when I quilt.
-
The rotary cutter/cutting mat are things I wouldn’t want to do without. I have made quilts without them but they make cutting so much quicker and more accurate when making geometric pieces.
-
I just love my cordless iron. It makes it so much easier to quickly press fabric.
-
The combo notions on which I am dependent is my cutting mat & rotary cutter. Everything begins and ends with them in some way.
-
One sewing item I could not live without is my thimble. I do a lot of hand sewing and I find a good thimble is a must have!
-
The one sewing notion I can not live without is my curved scissors. They are prefect for appliqué and I use them when ever I need to trim threads close to my project.
-
The one thing i can’t do without us my rotary cutter and mat. Of course fabric is a must also.
-
Being a new sewist, I can’t live without my seam ripper.. lol.
-
I love my tweezers for holding fabric and pulling out bottom bobbin thread.
-
A rotary cutter and mat are a must.
-
I can’t live without sewing clips. It saves a lot of needle sticks while putting bindings on quilts.
-
I can’t do without all my thread collections. Thank You for the Contests and Wonderful Prizes.
-
I can’t live without my rotary cutter.
-
The one notion I am always reaching for is my ‘purple thang’. I use it to hold, push, poke, or pull threads or fabric one way or another, on or around my 570QE or my Q16. There’s one near each machine, the iron and the cutting station. Who would think something so little and simple would become so important!
-
My favorite notion is my rotary cutter,as I have arthritis, makes it so much easier. ❤️
-
The Bernina Seam ripper is the best!
-
The notion I couldn’t live without is my Seam ripoer
-
Must have is my rotary cutter!!
-
The one notion I can’t live without would be my iron. I couldn’t get anything done without it.
-
The sewing notion I can’t live without is my seam ripper, which I need more often than I want to admit.
-
I hate to admit it but my seam ripper!
-
My Rotary Cutter is number one followed by a seam ripper. Thanks for a great tutorial.
-
My seam ripper!!
-
I can’t live without my rotary cutter!
-
I love my Bernina seam ripper, it is small enough to take out the smallest of stitches in embroidery! xoxo
-
The notion I cannot live without is my SEAM RIPPER. :-)). I’m a Master Ripper.
-
I love my curved awl. I use it for piecing all the time.
-
It would have to be my rotary cutter!
-
My rotary cutter! I learned to quilt before these were invented. I’ll never go back.
-
I can’t sew without my seam ripper, unfortunately.
-
I have to say it’s my marking pen. I use it for anything I’m making, garment sewing, quilting, embroidering, etc.
-
My rotary cutter and seam ripper
-
My must have sewing notion is a needle threader. Whether it’s the accessory for my Bernina machine needle or one of the many I have for my quilting and hand sewing needles, it’s become more and more important. The eyes of those needles seem to get smaller and smaller the older I get!
-
My Olaf rotary cutter and Olaf mat. Both are over thirty years old. It is hard to pick one thing. My Bernina sewing machine has been with
Me for over thirty years and my Rowenta iron about as long! -
The rulers for a specific project really aid in my accuracy!
-
I think my thing I can’t quilt without is a rotary cutter with a sharp blade along with the rulers and mat I need for the project.
-
I cannot live without my shears. I use them for seam ripping and cutting . My most valuable tool.
-
I could not be without my rotary cutters–and have been quilting and sewing for a long time and can appreciate the “wonderfulness” of this cutter! Then I guess second thing would be my seam rippers!
-
I can’t live without my seam ripper
-
My custom made 16 in square ruler and my snips
-
Rotary Cutter.
-
Bernina products are always the BEST!!!
-
I’d like to say my rotary cutter… but unfortunately the tool I can’t live without is my seam ripper!
-
The notions I can’t be without are my seam ripper and scissors.
-
I must have several styles of scissors. All sizes. Snips, appliqué, dress maker, you name it, I need it!
-
I can not live without my rotary cutter.
-
I can’t live without my stripology rulers. One of the best purchases for quilting.
-
I couldn’t live without my Bernina Jubilae Model 801 and my Bernina 1300DC Serger!
-
There are 2 notions I have to have close…’That Purple Thang’ to push out corners is my favorite, and a light that fits on my glasses is a necessity.
-
I love my little snips with the spring action-lightweight and sew easy to use!
-
The sewing notion that I could not do without is the seam ripper…my favorite is comfortable to hold and has a sharp blade. Flower head pins would be second.
-
Hard choice – would have to choose small sharp scissors
-
A thimble. Such a simple, old fashioned tool but I’d be lost without one. I have several different kinds for different uses. I always check them out when I’m in a quilt shop.
-
That’s hard to decide, there are so many notions that I use every day. I would have to say my seam ripper would be my choice. I use it as a stileto as well as for “unsewing”.
-
iOS my walking foot considered a notion. Because I use it almost all the time! As far as a gadget or tool. I use my little purple thang during every project
-
I can’t live without my sewer’s awl. It is like having an extra hand at the sewing machine to tuck in edges, hold things steady, and keep fingers safe. It will be great to have it handy in my wall organizer.
-
I would not want to do without my wooden iron than a friends husband made for me. It is wonderful to press a small seam or edge, I have no room for an iron in my sewing room. The other tool I cannot do without is my seam ripper.
-
Is my walking foot considered a notion? . Because I use it almost all the time! As far as a gadget or tool. I use my little purple thang during every project
-
My most important tool is my seam ripper. It is so important that I have 6 or more.
-
I can not sew without my seam ripper.
As Mom said, “As Yee Sew, So shall Yee Rip”
I love my snips, my dressmakers shears, and my rotary cutters,
But I can not sew without at least one of my Seam Rippers within reach. -
My sewing machine.
-
Aside from my Bernina , I can’t imagine completing any sewing project without my cutting mats!
-
Can’t live without rotary cutter.
-
Probably my seam ripper (aka Jack).
-
Got to have my thread snippers!
-
I cannot live without my seam ripper…for those inevitable errors!
-
SCISSORS – without them you couldn’t cut thread, fabric, trim, grade, etc
-
I was going to say my ruler, but alas, it’s my seam ripper. I use it more than I would like to admit!
-
At the sewing machine, it’s foot 37. At my work table, I couldn’t be without my seam gauge–I use it for every project.
-
Not sure anyone would consider a sewing machine a notion, so I’ll have to go with my rotary cutter. I’d be hard pressed to go back to cutting fabric with scissors again.
-
I can’t live without my seam ripper!
-
I cannot live without my seam ripper. I use it as an improv stillettol
-
i (unfortunately) can’t live without my seam ripper!
-
Cutting tools–rotary cutter and good scissors
-
The one sewing tool I cannot live without is my seam ripper. I have several stashed in different sewing kits. I believe that I have used my seam rippers nearly as much as I’ve used scissors over my 50+ years of sewing!!!
Your Wall Organizers are so cute. I plan to make several sets as gifts for my crafty friends.
Thank you for sharing your design. Terry -
Seam ripper!!! I think I use it daily!
-
I agree with all of the choices but I think I like a sharp pair of scissors best.
-
Where would I be without my needles.
-
Those organizers are so cute! Can’t wait to make them
-
I could not go back to having only 1 sewing machine, now that I have two, I could not live without two machines.
-
My favorite notion is a Clover awl with a curved tip. I use it instead of a seam ripper to pull stitches. Hard to find, have 2 right now one in my sewing room, one by my chair for tv stitch removal.
-
Thank you! can’t wait to try making the organizer. One of my favorite sewing notions is my magnetic pin holder.
-
I can’t live without my seam ripper ?
-
I ‘m always looking for ways to make my sewing room tidierr
-
I cannot live without so many things pins,needles, thread, or material.
-
My Martello 16” circular cutting mat is the notion I could not live without.
-
Unfortunately, the one sewing notion that I can’t live without is my seam ripper!
-
I would be lost without my thread snips.
-
i need my rotary cutter and mat, but also my seam ripper unfortunately.
-
Hi……I love my open toe foot. I use it not only for applique but, at times, regular sewing.
I’m really enjoying your Bernina site with all the fun patterns you have given us sewers.
Thank You, Janet -
The #1 sewing notion I cannot live without is my BERNINA seam ripper…so sharp, tiny point, fits in my hand, never wears out after many years of use.
-
I can not live without my rotary cutter.
-
As much as I wish I could, I cannot live without my seam ripper! Lol
-
I can’t live without my small Karen Buckley scissors
-
I love to find fun notions to make my life easier. One I have found and wouldn’t go without is my PurpleThang! (I mean, besides a sewing machine and good cutting system!). This is an amazing tool and has so many uses. I try to tell everyone I know about it because it’s just that good!
-
The one thing I couldn’t do without — My purse-sized sketchbook/note pad. Everything starts from there.
-
My most frequently used notion is my rotary cutter with grid ruler. My Bernina stitch regulator is equally as important, but not every project is a quilt so it doesn’t get used quite as often.
-
I primarily sew garments. My daughter and I are both tall so I lengthen every pattern. I couldn’t live without my 2″x18″ clear gridded ruler. It is also great for getting pattern pieces laid out on grain.
-
Oh gosh…it’s really hard to pick just one! Besides my Berninas, I would say either my bottle of Best Press or my Sewline gluestick!
-
I can’t sew without my sewing scissors
-
There are so many…hard to just pick one…but I do love the convenience of my spring loaded snips. I have several…at my machine, at my Q20, on my cutting table and on my ironing station. Always have those long threads to keep under control.
-
I can’t live without my glue sticks, especially for putting binding onto quilts❤️
-
I can’t choose because it’s a tie between my rotary cutters, my Bernina Seam Ripper, and my curved scissors!
-
The sewing notion I cannot live without – my Gingher Scissors. My Mother-in-Law gave me a pair of Gingher Scissors over 30 years ago when I started quilting. They are still my “go to” scissors.
-
My favorite sewing notion is my scissors. I have a small super sharp scissors I put beside my machine. It trims threads, seam allowances, but never paper, ?.
-
A seam ripper is vital followed by a rotary cutter and cutting mat. The latter have been revolutionary in my lifetime!!
-
My seam ripper is number one! So often do I need to ‘rip it out’ and start over. Next in line…rotary cutter.
-
I can’t live without my Elmer’s glue stick. I use it to take care of frays, keeping pieces in place and all around helper in my quilting.
-
I would be lost without my rotary cutter, but the seam ripper has saved me too many times to count!
-
I can’t live without my oversized dental mirror. It definitely helps with threading my 880 +!
-
Can I have two? Small scissors for cutting thread as I sew and to trim small quilting pieces AND my seam ripper.
-
I can’t live without my rulers and templates. I even use old cereal boxes to cut my templates out. It makes repetitive cutting a breeze.
-
I can’t live without my seam ripper!
-
Can’t live without my walking foot.
-
There are too many to list. I need them all!!
-
Can’t live without my fabric! Love love love fabric!
-
Can’t imagine quilting and sewing without my rotary cutter.
-
I absolutely could not live without my rotary cutter. I still remember the years before I had one; it took so much time to cut out fabric!
-
My cutting mat that turns 360 degrees!
-
Gotta have my seam ripper!
-
I can’t live without my Clover seam ripper with the grip on the handle. It’s my favorite and I always have 2 in my sewing room.
Leave a Reply
You must be logged in to post a comment.

Spring Song DIY Wall Organization Kit Giveaway
This giveaway is now closed. Thank you to all of our WeAllSew fans who entered! The winner(s) are being informed and will be announced soon.